Software Manual
113
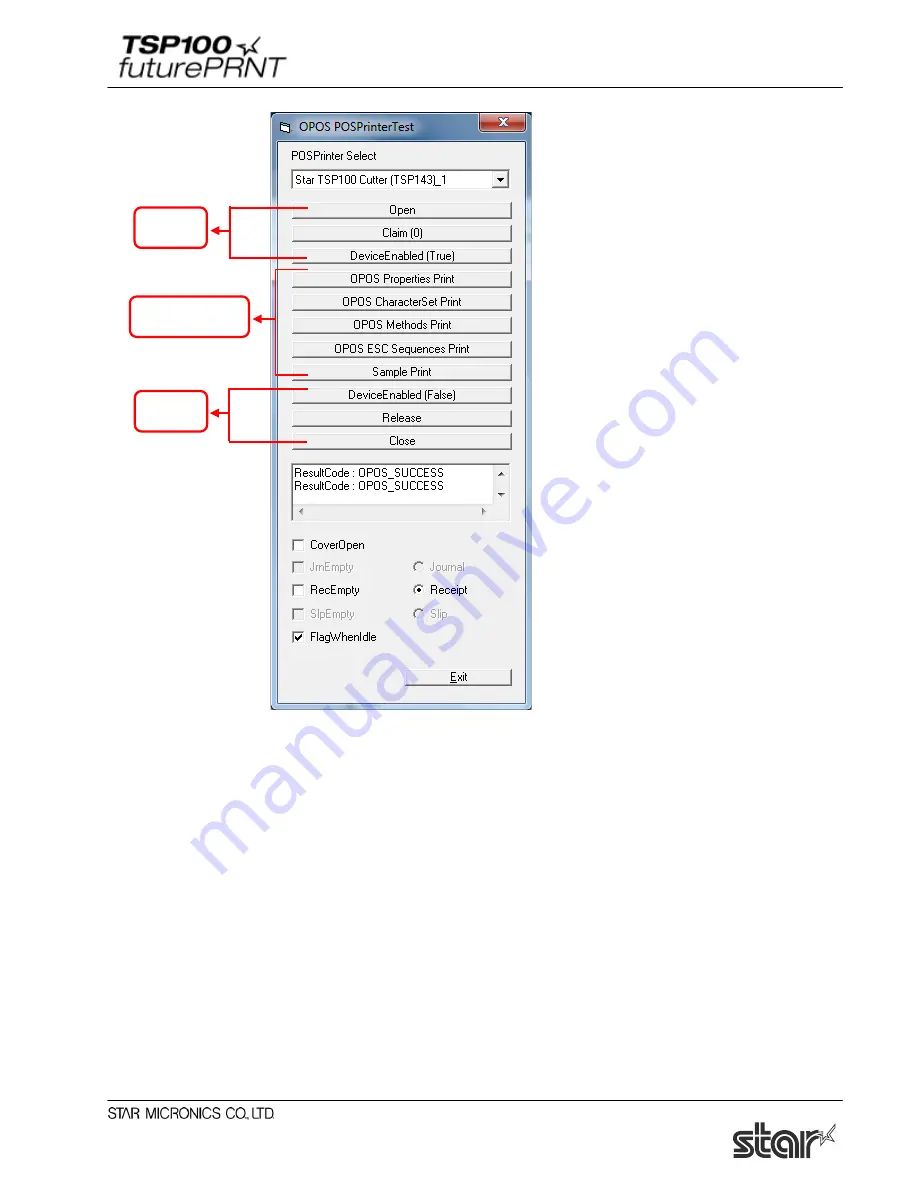
To begin the sample application, first select
the device from the drop-down menu. Next
follow the steps below:
1. Click “Open” to open the OPOS device.
2. Click “Claim” to claim the device for
the sample application’s use.
3. Click “DeviceEnabled (True)” to enable
the device for printing.
Click any or all of the following buttons to
print the respective sample:
OPOS Properties Print – Prints a list of the
available OPOS properties and whether or
not they are supported by the TSP100
futurePRNT.
OPOS CharacterSet Print – Prints tables of
each of the available OPOS character sets.
OPOS Methods Print – Prints a list of the
supported OPOS methods.
OPOS ESC Sequences Print – Prints a list
(with examples) of the supported ESC
sequences.
Sample Print – Prints a sample of the
typical point of sale receipt.
To exit the sample application, follow the
steps below:
1. Click “DeviceEnabled (False)” to
disable the device in the application.
2. Click “Release” to make the device
available to other OPOS applications.
3. Click “Close” to close the connection
between the sample application and
OPOS.
Finally, click “Exit” to close the sample
application.
4.8. JavaPOS™ Installation <Star Line mode only>
The JavaPOS printer driver is included with the Windows driver installation. However, before
it can be used with a JavaPOS application, the printer must be registered. If a cash drawer is
Sample print
Start
End
Содержание Star futurePRNT TSP100GT
Страница 9: ...Software Manual 4 6 Click Next to continue 7 Choose the user and then click Next to continue ...
Страница 132: ...Software Manual 127 Click Add New to browse for an image to add to the list The following Image Import window appears ...
Страница 135: ...Software Manual 130 4 11 1 Logo Printing The following shows the setting required to print an image on a receipt ...
Страница 173: ...http www starmicronics com support ...


