Page 77
HX851E
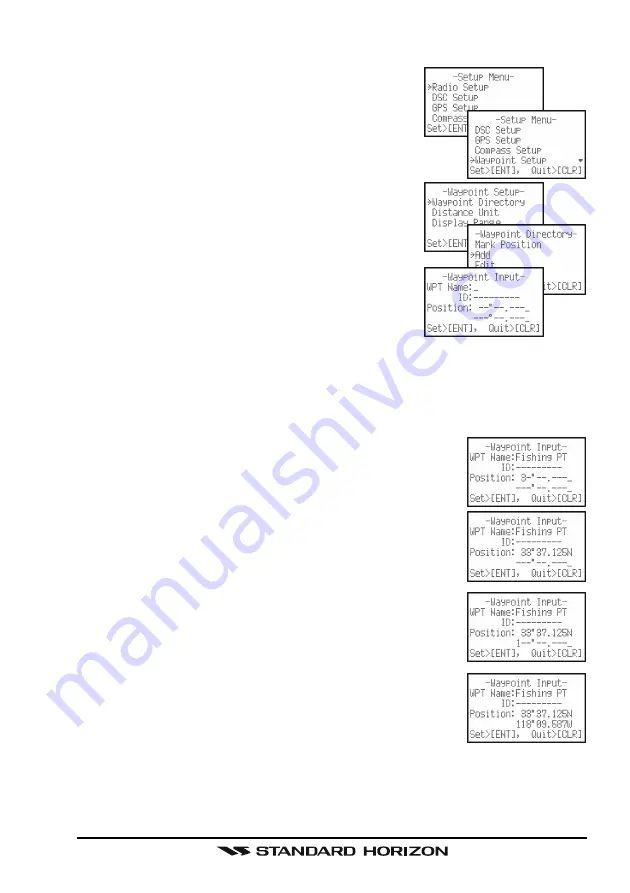
12.2 STORING WAYPOINTS
1. Press and hold down the [
CALL
(
ENT
)
MENU
]
key until “
Setup Menu
” appears.
2. Press the [
] key to select “
Waypoint Setup
”
menu.
3. Press the [
CALL
(
ENT
)
MENU
] key, then select
“
Waypoint Directory
” with the [
] / [
] key.
4. Press the [
CALL
(
ENT
)
MENU
] key.
5. Select “
Add
” with the [
] / [
] key, press the
[
CALL
(
ENT
)
MENU
] key.
6. Press the [
] / [
] key to select the first letter of
the Waypoint Name you want to reference in the
directory.
7. Press the [
CALL
(
ENT
)
MENU
] key to store the
first letter and to move to the second letter in the
name.
8. Repeat step 6 and 7 until the name is shown. Press the [
CALL
(
ENT
)
MENU
]
key to skip a letter if needed.
9. Press the [
] / [
] key to skip the ID: entry and to the first digit of the
latitude.
10. Enter the coordinates of the waypoint POSITION, by
pressing the [
] / [
] key to select the first digit in the
Latitude.
11. Press the [
CALL
(
ENT
)
MENU
] key to store the first
number and to move to the second number in the po-
sition.
12. Repeat step 10 and 11 until the latitude is shown in-
clude N or S in the last digit.
13. Press the [
CALL
(
ENT
)
MENU
] key until the first digit of
the Longitude is blinking.
14. Press the [
] / [
] key to select the first digit in the
Longitude.
15. Press the [
CALL
(
ENT
)
MENU
] key to store the first
number and to move to the second number in the po-
sition.


