1-21
88
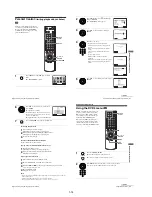
Adjusting the picture (tracking)
Adjusting the picture
(tracking)
Adjusting the tracking
Although the VCR automatically adjusts the
tracking when playing a tape, distortion may
occur if the recording is in poor condition. In
this case, manually adjust the tracking.
During playback, press TR/– to
display the tracking meter. The distortion
should disappear as you press one of the two
buttons. To resume automatic tracking
adjustments, eject the tape and re-insert it.
Adjusting the picture
sharpness (Smart trilogic)
You can automatically adjust the sharpness of
the picture.
1
During playback, press SET UP, then press
V/v/B/b
to select
(USER
SET) and press ENTER.
T R A C K I N G – – – – – –
– – – – – –
Tracking meter
V/v/B/b
ENTER
SET UP
O
RETURN
SET UP
ENTER
89
Adjusting the picture (tracking)
VCR Ad
ditio
nal Ope
ration
s
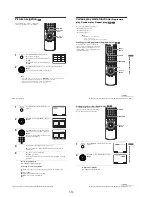
2
Press
V/v
to select “SMART TRILOGIC,”
then press
b
.
3
Press
V/v
to set “SMART TRILOGIC” to
“ON” or “OFF.”
• ON: Picture sharpness is automatically
adjusted.
• OFF: Adjust the picture sharpness
manually.
To soften the picture, press
B
.
To sharpen the picture, press
b
.
4
Press
O
RETURN to return to the original screen.
ENTER
U S E R S E T
C O L O U R S Y S T E M
:
S M A R T T R I L O G I C
:
A U T O P O W E R O F F
: O F F
V I D E O P L U S E X T E N D :
N I C A M
:
O N
A U T O
O N
O F F
T I M E R M E T H O D : V A R I A B L E
RETURN
vV B
b
ENTER
S M A R T T R I L O G I C : O N
O N / O F F
:
P I C T U R E
S O F T E N
S H A R P E N
– – – – – –
– – –
– –
– – –
– – –
RETURN
vV
B
b
RETURN
90
Changing menu options
Changing menu options
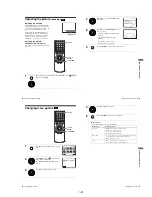
1
Press SET UP when the DVD player is in stop
mode.
2
Press
V
/
v
/
B
/
b
to select
(Video Function
Setup), then press ENTER.
The “VIDEO FUNCTION SETUP” menu
appears.
3
Press
V
/
v
to select the option to change.
V/v/B/b
ENTER
SET UP
O
RETURN
SET UP
DVD SETUP
RETURN
SETUP MENU
Vv b
B
ENTER
ENTER
Tape Select
OSD
Repeat Play
E180
Off
On
RETURN
VIDEO FUNCTION SETUP
v
V
b
B
ENTER
91
Changing menu options
VCR Ad
ditio
nal Ope
ration
s
Menu choices
The default settings are indicated in bold print.
4
Press
B
/
b
to change the setting.
5
Press
O
RETURN repeatedly to exit the menu.
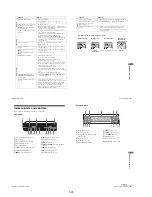
Menu option
Set this option to
Tape Select
•
E180
to use an E-180 or shorter type tape.
• E240 to use an E-240 type tape.
• E260 to use an E-260 type tape.
• E300 to use an E-300 type tape.
Repeat Play
• On to play back a tape repeatedly. The VCR rewinds a tape to
the beginning and restarts playback automatically.
•
Off
to turn off Auto repeat.
OSD
•
On
to display the menu on the TV screen.
• Off to disappear the menu from the TV screen.
ENTER
RETURN
Содержание SLV-D900E
Страница 38: ...2 8E Fig 2 12 Circuit Board Locations 2 3 Circuit Board Locations VCR MAIN PCB DVD MAIN PCB FUNCTION TIMER PCB ...
Страница 39: ...3 Block Diagram 3 2E 3 1 SLV D900E D900G ...
Страница 40: ...4 PCB Diagrams 4 1 VCR Main 4 3 4 2 DVD Main 4 7 4 3 Function Timer 4 9 4 2 4 1 SLV D900E D900G ...
Страница 41: ...4 3 4 4 4 1 VCR Main COMPONENT SIDE ...
Страница 42: ...4 6 4 5 CONDUCTOR SIDE ...
Страница 43: ...4 7 4 8 4 2 DVD Main CONDUCTOR SIDE COMPONENT SIDE ...
Страница 44: ...4 10E 4 9 4 3 FUNCTION Timer COMPONENT SIDE CONDUCTOR SIDE ...
Страница 47: ...5 6 5 5 5 1 S M P S ...
Страница 48: ...5 8 5 7 FROM TO DVD Audio Video CN4 5 2 Power Drive ...
Страница 49: ...5 10 5 9 5 3 OSD VPS PDS ...
Страница 50: ...5 12 5 11 5 4 NICAM ...
Страница 51: ...5 14 5 13 5 5 A V ...
Страница 52: ...5 16 5 15 5 6 Hi Fi ...
Страница 53: ...5 18 5 17 5 7 Input Output ...
Страница 54: ...5 20 5 19 5 8 TM ...
Страница 55: ...5 22 5 21 5 9 SYSCON ...
Страница 56: ...5 24 5 23 5 10 DVD Main Micom AV Decoder ...
Страница 57: ...5 26 5 25 5 11 DVD Servo ...
Страница 58: ...5 28E 5 27 5 12 DVD Audio Video ...
Страница 60: ...6 2 6 1 2 TEST location for adjustment mode setting TEST SW709 BUTTON Fig 6 2 Function Timer PCB Top View ...


