1-11
48
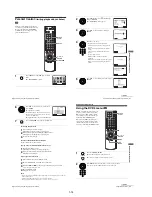
Checking/changing/cancelling timer settings
When the timer settings overlap
The programme that starts first has priority and the second programme starts
recording only after the first programme has finished. If the programmes start at the
same time, the programme listed first in the menu has priority.
2
Press
V/v/B/b
to select
(TIMER PROGRAMMING), then press
ENTER.
• If you want to change a setting, go on to the next step.
• If you do not need to change the settings, press
O
RETURN repeatedly
to exit the menu.
3
Press
V/v
to select setting you want to change
or cancel.
• To change the setting, press
B
/
b
to flash the
item you want to change, and press
V
/
v
to
change it.
• To cancel the setting, press CLEAR.
4
Press
O
RETURN to confirm the setting.
If any settings remain, turn off the VCR to return to recording standby.
ENTER
RETURN
ENTER
CLEAR
PR DAY
START
STOP
– –
–
– – –
: – –
– – –
– –
–
– – –
: – –
– – –
– –
–
– – –
: – –
– – –
– –
–
– – –
: – –
– – –
– –
–
– – –
: – –
– – –
–
–
–
–
–
–
–
–
–
–
RETURN
CLEAR
:
:
:
:
:
–
–
–
–
–
–
–
–
–
–
V/P
–
–
–
–
–
–
–
–
3 5
0 : 0 0
1 : 0 0 SP
2 0
: 0 0
: 3 0 LP
6 0
: 3 0
: 0 0 AUTO
MO30
WE02
TU30
2
2
2
0
2
2
3
2
2
2
–
–
–
–
–
vV
B
b
RETURN
about 20 seconds
will be cut off
Programme 1
Programme 2
about 20 seconds will be cut off
Programme 1
Programme 2
49
A/V Receiver hookup
Ad
v
a
n
ce
d Hoo
kups
Advanced Hookups
A/V Receiver hookup
A
Use this hookup if your A/V receiver has a Dolby* Surround (Pro
Logic) decoder and 3 to 6 speakers
You can enjoy the Dolby Surround effects only when playing Dolby Surround audio
or multi-channel audio (Dolby Digital) discs.
∗
Manufactured under license from Dolby Laboratories. “Dolby,” “Pro Logic,” and the double-
D symbol are trademarks of Dolby Laboratories.
Note
• When connecting 6 speakers, replace the monaural rear speaker with a center speaker, 2 rear
speakers and a subwoofer.
A
VIDEO
AUDIO
R
L
DVD-VCR
Front (R)
Front (L)
Rear (R)
Subwoofer
l
: Signal flow
Rear (L)
Amplifier (receiver) with Dolby
Surround decoder
Center
Rear (mono)
Stereo audio cord
(supplied)
[Speakers]
(red)
(white)
[Speakers]
to audio input
(white)
(red)
to LINE OUT L/R (AUDIO)
continued
50
A/V Receiver hookup
B
Use this hookup if your A/V receiver has a Dolby Digital, MPEG audio
or DTS* decoder, a digital input jack and 6 speakers
This connection will allow you to use the Dolby Digital, MPEG audio or DTS
decoder function of your AV amplifier (receiver). You are not able to enjoy the
surround sound effects of this player. You must make connections using
and
.
∗
“DTS” and “DTS Digital Out” are trademarks of Digital Theater Systems, Inc.
Note
• After you have completed the connection, be sure to set “Dolby Digital” to “Dolby Digital”
and “DTS” to “On” in “Audio Setup” (page 52). If your AV amplifier (receiver) has an
MPEG audio decoder function, set “MPEG” to “MPEG” (page 52). Otherwise, no sound or a
loud noise will come from the speakers.
B-1
B-2
COAXIAL
OPTICAL
DIGITAL AUDIO OUT
B-2
B-1
VIDEO
AUDIO
R
L
Front (R)
Front (L)
Rear (R)
AV amplifier (receiver) having a
decoder
Subwoofer
Center
[Speakers]
DVD-VCR
[Speakers]
Rear (L)
to coaxial or optical
digital input
and
Coaxial digital cord
(not supplied)
l
: Signal flow
Stereo audio cord
(supplied)
(red)
(white)
to audio input
(white)
(red)
to LINE OUT L/R (AUDIO)
or
to DIGITAL OUT
(COAXIAL or OPTICAL)
Optical digital cord
(not supplied)
Remove jack cap
before connecting
51
S-Video hookup
Ad
v
a
n
ce
d Hoo
kups
S-Video hookup
Make audio connections using the LINE OUT AUDIO L/R jacks or DIGITAL AUDIO OUT
(OPTICAL or COAXIAL) jacks on the right side of the DVD-VCR when you use S-VIDEO
hookup.
Use this hookup if your TV has an S VIDEO input jack
• Connect an S VIDEO cord (not supplied). You will enjoy high quality images.
Notes
• Set “DVD Video Out” to “S-Video” in the “SCREEN SETUP” menu (page 55) to view
pictures from the S VIDEO jack.
• The connection using S VIDEO OUT jack is only for the DVD player.
INPUT
S VIDEO
l
: Signal flow
(DVD only)
TV or AV amplifier
TV
S VIDEO cord
(not supplied)
DVD-VCR
Audio cord
(supplied)
Coaxial
digital cord
(not supplied)
Optical digital
cord (not
supplied)
Remove jack
cap before
connecting
or
or
to coaxial or optical
digital input
to audio
input
Содержание SLV-D900E
Страница 38: ...2 8E Fig 2 12 Circuit Board Locations 2 3 Circuit Board Locations VCR MAIN PCB DVD MAIN PCB FUNCTION TIMER PCB ...
Страница 39: ...3 Block Diagram 3 2E 3 1 SLV D900E D900G ...
Страница 40: ...4 PCB Diagrams 4 1 VCR Main 4 3 4 2 DVD Main 4 7 4 3 Function Timer 4 9 4 2 4 1 SLV D900E D900G ...
Страница 41: ...4 3 4 4 4 1 VCR Main COMPONENT SIDE ...
Страница 42: ...4 6 4 5 CONDUCTOR SIDE ...
Страница 43: ...4 7 4 8 4 2 DVD Main CONDUCTOR SIDE COMPONENT SIDE ...
Страница 44: ...4 10E 4 9 4 3 FUNCTION Timer COMPONENT SIDE CONDUCTOR SIDE ...
Страница 47: ...5 6 5 5 5 1 S M P S ...
Страница 48: ...5 8 5 7 FROM TO DVD Audio Video CN4 5 2 Power Drive ...
Страница 49: ...5 10 5 9 5 3 OSD VPS PDS ...
Страница 50: ...5 12 5 11 5 4 NICAM ...
Страница 51: ...5 14 5 13 5 5 A V ...
Страница 52: ...5 16 5 15 5 6 Hi Fi ...
Страница 53: ...5 18 5 17 5 7 Input Output ...
Страница 54: ...5 20 5 19 5 8 TM ...
Страница 55: ...5 22 5 21 5 9 SYSCON ...
Страница 56: ...5 24 5 23 5 10 DVD Main Micom AV Decoder ...
Страница 57: ...5 26 5 25 5 11 DVD Servo ...
Страница 58: ...5 28E 5 27 5 12 DVD Audio Video ...
Страница 60: ...6 2 6 1 2 TEST location for adjustment mode setting TEST SW709 BUTTON Fig 6 2 Function Timer PCB Top View ...


