123
Audio Input System
Chap
te
r
7
Set
ting Up th
e Camc
orde
r
7-5 Audio Input System
7-5-1 Using the Supplied
Microphone
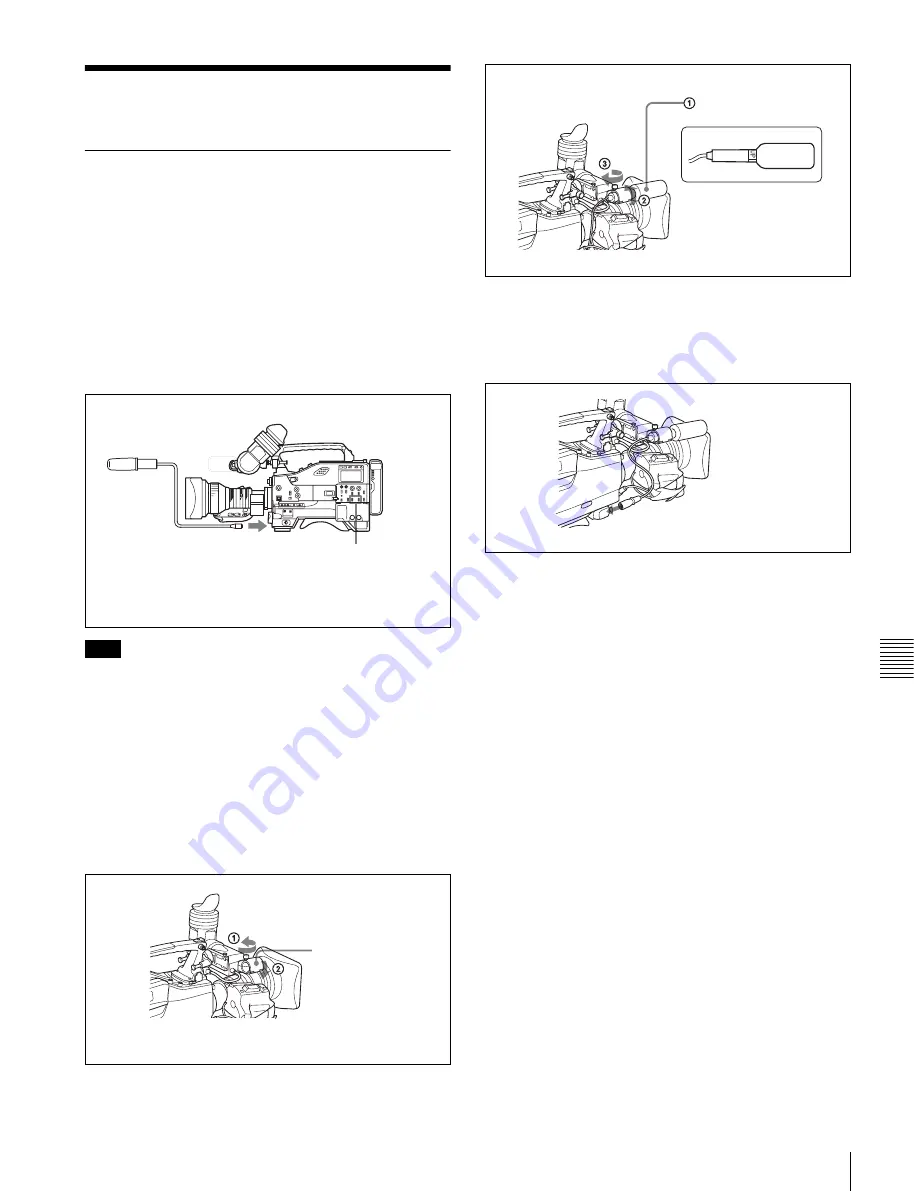
The camcorder’s MIC IN connector is an XLR-5-pin
(female), which you can use to attach the supplied stereo
microphone.
You can use the supplied microphone either detached from
or attached to the camcorder.
Using the microphone detached from the
camcorder
When using the supplied microphone with an extension
cable, always use an external power supply type cable.
Using the microphone attached to the
camcorder
When an optional HDVF-20A HD Electronic Viewfinder
is used, attach the microphone as follows.
1
Loosen the screw and open the microphone holder
clamp.
2
Place the microphone in the microphone holder.
3
Plug the microphone cable into the MIC IN connector,
then set the AUDIO IN CH-1, CH-2, CH-3 and/or CH4
switch(es) for the desired recording channel to
FRONT or F.
Recording stereo sound
You can record either stereo sound or monaural sound
using the supplied stereo microphone.
To record stereo sound:
To record the L and R audio signals of stereo sound in
channels 1 and 2, set both AUDIO IN CH-1 and CH-2
switches to FRONT.
To record the L and R audio signals of stereo sound in
channels 3 and 4, set both AUDIO IN CH-3 and CH-4
switches to F.
Confirm that FRONT MIC SELECT on the FUNCTION 1
page of the USER menu is set to STEREO.
At the factory, the function of FRONT MIC SELECT is
assigned to ASSIGN 2 (slide type). Slide the ASSIGN 2
switch to the front (lens side). If you have removed the
FRONT MIC SELECT function from the ASSIGN 2
switch, set FRONT MIC SELECT to STREO on the
FUNCTION 1 page of the USER menu (STREO is
selected at the factory).
To record monaural sound:
Set the appropriate AUDIO IN CH-1, CH-2, CH-3 and/or
CH-4 switch(es) corresponding to the channel(s) to which
you want to record to FRONT or F.
Set the front microphone selection function to MONO.
Note
Connect to the MIC IN
connector.
Set the AUDIO IN CH-1/
CH-2/CH-3/CH-4 switches
for the desired audio
recording channel to
FRONT or F.
Clamp of the
Microphone holder
Place the microphone in
the holder so that “UP” is
at the top.
Tighten the screw.
Close the microphone holder.
Connect to the MIC IN connector.
Содержание HDW-790
Страница 174: ......
Страница 176: ...Sony Corporation HDW 790 790P SY 3 994 220 02 1 Printed in Japan 2008 02 13 2007 ...


