


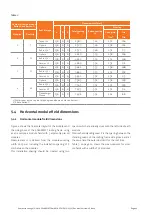


Subject to change | © 2019 SOLARWATT GmbH | AZ-TM-PMS-1339 | Rev 001 | Version: 12/2019
Page 16
6
Step-by-step installation
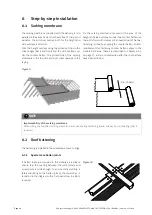
6.1 Sarking membrane
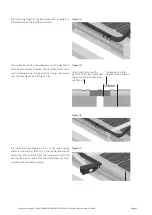
The sarking membrane supplied with the delivery is laid
parallel to the eaves. Fasten the sheets free of crimps and
wrinkles. The minimum overlap both for the height and
side overlaps is 100 mm.
Stick the height overlaps using the adhesive strip on the
sheet edges (back and front) and the side overlaps un-
der the counter batten. The printed side of the sarking
membrane is the top side and must show upwards in the
laying.
Fix the sarking membrane covered in the area of the
height and side overlaps or under the counter batten (on
the roof rafters) with staples or fl at-headed nails. The fi nal
fastening is done by applying the counter batten. Stricter
requirements for fastening counter battens apply in the
module fi eld area. These are described in Chapter 6.2.3
on page 17 and are implemented after the roof battens
have been attached.
Figure 9
min. 100 mm
NOTE
Impermeability of the sarking membrane
When using the supplied sarking membrane and penetrating fastening (nails, screws) no nail sealing strip is
required.
NOTE
NOTE
NOTE
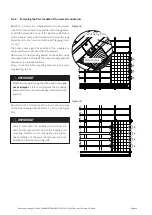
6.2 Roof battening
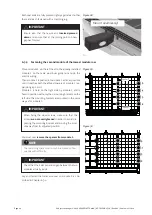
The battening is installed in the orientation of eave to ridge.
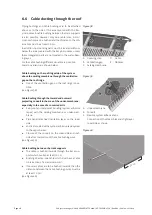
6.2.1 Special case batten joints
If batten joints are required in the module area, please
ensure that the spacing between the joint surface and
screw point is wide enough. To ensure static stability, a
lateral doubling on the batten joint or the solution as il-
lustrated in the diagram with a fl at-head screw 6 x 80 is
required.
Figure 10


