background image

NETYS RT 5 - 7 - 9 - 11 kVA - 551570A - SOCOMEC

52

EN

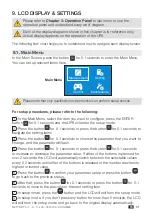
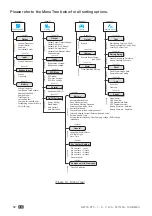
Please refer to the Menu Tree below for all setting options.

Maintenance

Setting

Measurement

Control

(Level 1)

(Level 1)

(Level 1)

(Level 1)

Output

Input

Bypass Input

Battery

Output Phase/ Output Voltage/

Output Frequency/

Output Sync. Freq. Range/ 

Output Freq. Slew Rate/

Output Mode/ Standby Mode/

Overload Alarm

Voltage/ Frequency/

Current/ Watts/

Load/ VA/

Cumulated/ Power

Bypass Max. Voltage/

Bypass Min. Voltage

ECO Mode/ 

ECO Max. Voltage/ 

ECO Min. Voltage

Redundant UPS/ ID

Energy Saving/

Sleep Mode/

Auto Restart/ 

Auto Start on AC

Language/ Audible Alarm

LCD Back Light/

Date/ Time

Dry Contact 1 – Input/

Dry Contact 2 – Output/

Dry Contact 3 – Output/

Dry Contact 4 – Output/

Remote Control

Fan Life Prediction

Voltage/ Frequency

Voltage

Frequency

Voltage/ Capacity/ 

Last Battery Test Runtime/

Charge Mode VRLA/

Charge Stage/

Total Capacity

Last battery test

Charging current (LIB only)

Discharging current (LIB only)

SOH (LIB only)

Output

Input

ECO Mode

Parallel

On/Off Settings

Battery

General

Dry Contact Setting

Component Life Prediction

Test

Battery Aging

Reset

About

Start Battery Test (only VRLA)

Deep Discharge Test (only VRLA)

Local Dry Contact Test

Create Discharging Reference

Battery Discharging History

Reset Power Usage Data

Restore Factory Setting

Model Name/

UPS Serial No./ 

UPS Manufacture Date/

UPS Firmware Version/

Battery Summary - Installed/

Battery Summary - Replaced

Log

Event List 

Clear Log

Output

Charger

Alarm

Bypass

Execute Boost Charge

                      (only VRLA)

Clear Prediction Warning

Automatic Battery Test/

Deep Discharge Test/

Low Battery Warning Capacity/

Warning of Remaining Time/

Runtime Limitation/ 

Charge Mode/ Internal charging current /

Internal Charging Current/ External Battery Source/

External battery Type/

External Battery Capacity/ Float Charging Voltage / EOD Voltage

Install Date

(Level 3)

(Level 3)

(Level 3)

(Level 3)

(Level 3)

(Level 3)

(Level 3)

(Level 3)

(Level 3)

(Level 3)

(Level 3)

(Level 3)

(Level 3)

(Level 3)

(Level 3)

(Level 3)

(Level 3)

(Level 3)

(Level 3)

(Level 3)

(Level 2)

(Level 2)

(Level 2)

(Level 2)

(Level 2)

(Level 2)

(Level 2)

(Level 2)

(Level 2)

(Level 2)

(Level 2)

(Level 2)

(Level 2)

(Level 2)

(Level 2)

(Level 2)

(Level 2)

(Level 2)

(Level 2)

(Level 2)

(Level 2)

(Figure 9-1: Menu Tree)

Содержание NETYS RT 1100 VA

Страница 1: ...5000 7000 9000 11000 VA NETYS RT INSTALLATION AND OPERATING MANUAL EN www socomec com netys manuals ...

Страница 2: ......

Страница 3: ...als This Safety Information is to be retained for future reference Reference security information is in English For other languages please contact Socomec or local distributor The manufacturer will not be held liable for failure to follow the instructions in this manual which is also available at www socomec com ...

Страница 4: ... warranty The product must be accompanied by proof of purchase such as an invoice or receipt indicating the date of purchase and product ID information model serial numer The sender must also attach the reference number issued to authorize the return of the product together with a detailed description of the defect If any of this information is missing the warranty will be invalid The authorisatio...

Страница 5: ...t and the load characteristic are suitable adequate or safe for the installation and the usage of this product The User Manual must be carefully followed The vendor makes no representation or warranty as to the suitability or fitness of this product for any specific application Options A 12 month return to base warranty is provided on options Software products Software products are guaranteed for ...

Страница 6: ...iew 18 2 2 Exterior Dimensions 18 2 3 Package list for UPS 19 3 OPERATION PANEL 21 3 1 LED Indicators 21 3 2 Multi function Buttons 22 3 3 LCD Display 25 4 REAR PANEL 28 5 COMMUNICATION INTERFACES 31 5 1 Communication solutions 31 5 2 Smart Slot 31 5 3 Parallel Ports 31 5 4 Dry Contacts 31 5 5 REPO Port 32 5 6 RS 232 Port and USB 32 5 7 WEB SNMP Card option 33 5 8 RS 485 Port 33 5 9 External Batte...

Страница 7: ...nnection 50 8 OPERATION 51 8 1 Single Unit Start up 51 8 2 Single Unit Turn off 53 8 3 Parallel Units Start up 54 8 4 Parallel Units Turn off 55 8 5 Operating Mode 55 9 LCD DISPLAY SETTINGS 56 9 1 Main Menu 56 10 OPTIONAL ACCESSORIES 69 10 1 Optional External Battery Pack 70 10 2 Manual Bypass Guide 74 10 3 Lithium ion battery module 90 11 TROUBLESHOOTING 100 12 MAINTENANCE 104 12 1 UPS 104 12 2 B...

Страница 8: ... persons or property the products might require compliance with statutory regulations and standards specific local by laws and be adapted accordingly For such uses we would advise you to contact Socomec beforehand to confirm the ability of these products to meet the requested level of safety performance reliability and compliance with applicable laws regulations and specifications Use the UPS in a...

Страница 9: ...f the mains neutral in any way if the neutral needs to be modifed downstream of the UPS an isolation transformer must be used In the event that the equipment has no automatic backfeed protection contactor device make certain that the user installer attaches warning labels to all mains isolating switches located remotely from the area where the UPS is sited in order to inform service personnel that...

Страница 10: ...ly followed the instructions given in this User Manual Battery Warnings Keep the batteries away from heat sources Do not open or damage the batteries Do not dispose of batteries in a fire The batteries may explode The released electrolyte is harmful to the skin and eyes and may be toxic A battery can present a risk of electric shock and high short circuit current Servicing of batteries and battery...

Страница 11: ...ntilation To ensure reliable operation of the battery pack and to protect the battery pack from overheating these slits and openings must not be blocked or covered Do not insert any object into the slits and openings that may hinder ventilation Do not allow liquid or any foreign object to enter the battery pack Do not place beverages or any other liquid containing vessels on or near the battery pa...

Страница 12: ...tween 15 C and 50 C 5 F 122 F Idle batteries must be recharged fully approximately every three months if the UPS needs to be stored for an extended period of time Ensure that every time after charging the battery capacity percentage shown on the LCD on the UPS is 100 1 4 Installation Consult the following check list when installing the UPS NETYS RT units are designed for use in enclosed environmen...

Страница 13: ...led on the UPS input line optional this must be located upstream of the power distribution unit The following table indicates the sizing of input protection devices that will ensure correct installation Use type A two pole selective S RCDs Any leakage currents at the loads will be added to that of the UPS so that current peaks can occur during transients loss and restoration of mains supply althou...

Страница 14: ...t It uses the latest technology and the highest quality components and its efficiency in on line mode can reach up to 95 5 The UPS not only provides safe reliable and uninterruptible power to your sensitive electronic equipment at all times but also produces greater electronic power efficiency at less cost There are four different ratings 5kVA 7kVA 9kVA and 11kVA for your selection 2 2 Exterior Di...

Страница 15: ...g If there is anything missing please contact the vendor immediately Models NRT3 U5000 NRT3 U5000C NRT3 U7000 NRT3 U7000C NRT3 U7000CLA NRT3 U7000CLAC NRT3 U9000 NRT3 U9000C NRT3 U11000 NRT3 U11000C NRT3 U11000CLA NRT3 U11000CLAC x 4 x 9 x 1 x 1 1 2 3 4 5 6 8 9 x 2 x 4 x 4 x 4 12 11 NETYS RT 5000 7000 9000 11000 VA EN www socomec com USER MANUAL https www socomec com netys manuals CN DE FR IT PL P...

Страница 16: ...1 PC 6 Parallel Cable 1 PC 8 Cord End Terminal 9 PCS 9 USB Cable 1 PC 11 Cable Gland 3 PCS 12 Cable Tie 6 PCS If there is any damage or anything missing please immediately contact the vendor from whom you purchased the unit If the UPS needs to be returned carefully repack the UPS and all of the accessories using the original packing material that came with the unit ...

Страница 17: ...tion buttons ESC 100 75 ONLINE Input 232 0V 50 0Hz Output 232 0V 50 0Hz 1 3 1 LED Indicator 3 3 LCD Display 3 2 Multi function Buttons BYPS 231 V PS Figure 3 1 Operation Panel 3 1 LED Indicators No LED Description 1 Green Normal operation Yellow Alarm Red Load not supplied Please check the corresponding warning message s in Chapter 11 Troubleshooting ...

Страница 18: ...will transfer to run in standby or bypass mode The UPS will keep charging the batteries when the UPS is in standby bypass mode To fully turn off the UPS it is advised to disconnect the UPS from the AC power In battery mode 1 press and hold the button for 3 seconds 2 release it after you hear one beep 3 use the Scrolling Up or Down button to select Yes and 4 press the Enter button to confirm your s...

Страница 19: ...s multiple functions Please refer to the following for detailed information 1 Scrolling Up Increasing Number In the Main Screen press the button for 0 1 seconds and the UPS will directly enter the Measurement Menu s level 3 see Figure 9 1 Menu Tree which contains related Output information In setup up mode the button is used to navigate the setting items Press the button for 0 1 seconds to go to t...

Страница 20: ...isplay or to decrease a number If the button is pressed for more than 2 seconds the number will be decreased by a single digit every 0 2 seconds automatically until the button is released or the number reaches its lowest value 2 LCD Reset Press the Scrolling Up and the Scrolling Down buttons together for 3 seconds to reset the LCD display 7 ESC Back Mute Button The button has multiple functions Pl...

Страница 21: ... the battery capacity level Indicates that the battery is abnormal and needs replacement If the battery is abnormal the battery capacity icon will be empty 4 Indicates the load level 5 When the UPS runs normally the display will show the input voltage 6 When the UPS has abnormalities or is in fault condition the display will show an error code and its corresponding fault or warning message 7 Indic...

Страница 22: ...ode Diagram Definition No Diagram Description 1 BYPS 231 V PS INV Indicates ONLINE mode 2 BYPS 231 V PS ECO Indicates ECO mode 3 BYPS 231 V PS BATT 999 min Indicates BATTERY mode 4 BYPS 231 V PS Indicates BYPASS mode 5 BYPS 231 V PS STBY Indicates AC STANDBY mode ...

Страница 23: ...xample SMART SLOT DRY CONTACT P2 P3 P4 RS 485 RS 232 P1 REPO EXTERNAL BATT CONNECTOR 192V DC 29A PARALLEL PARALLEL INPUT BREAKER TMOV T U P N I T U P T U O ON OFF UPS OUTPUT POWER SHARE PARALLEL OUTPUT AC INPUT N L N L N L 1 2 3 4 5 6 7 8 9 10 11 12 15 13 14 NOTE Remove the terminal cover plate and you will see the wiring terminal blocks Figure 4 1 5kVA Rear Panel No Item Functions 1 Smart Slot Fo...

Страница 24: ...s 6 RS 232 Port Connects to a computer so you can moni tor the state of the UPS configure the UPS parameters and upgrade the UPS firmware Please refer to Chapter 5 6 RS 232 Port and USB for more information The USB port and the RS 232 port must not be used simultaneously The USB port has the higher priority 7 USB Port Connects to a computer so you can moni tor the state of the UPS configure the UP...

Страница 25: ...or UPS grounding 14 AC Input Terminal Block Connects to the mains L N 15 UPS Power Share Parallel Output 1 With power share function 2 Connects to the loads L N Please note that for parallel application the output loads can only be connected to this output terminal block When the UPS is running in single unit mode the output terminal block has power share function The power share function will be ...

Страница 26: ...stems Web SNMP manager Web SNMP slot card allowing control via LAN using TCP IP protocol and remote shutdown management BMS JBUS RS232 or RS485 interface allows the UPS to interface with a Building Management System 5 2 Smart Slot The smart slot is for option cards You can install the SNMP or Relay I O card in this slot to let the system have network communication and dry contact functions 5 3 Par...

Страница 27: ... qualified service personnel 5 6 RS 232 Port and USB You can use an RS 232 or USB cable to connect the UPS to a computer and install the LocalView software or Building Managment System BMS software to check and monitor the UPS status These interfaces are required to run the Local View UPS monitoring and shutdown point to point solution for Windows Linux and Mac OS X operating systems The RS 232 po...

Страница 28: ... the functionalities 5 8 RS 485 Port You can use a RS 485 cable user supplied to connect the UPS with a computer and install the LocalView or Building Managment System BMS software to check and monitor the UPS status This interface is required to run the Local View UPS monitoring and shutdown point to point solution for Windows Linux and Mac OS X operating systems The RS 485 port provides the foll...

Страница 29: ...VA 219 2Vdc 1A default 1 168V 3 12V 16 PCS 9kVA 11kVA 274Vdc 2A default 1 210V 3 12V 20 PCS If you need to modify the charge current default setting please contact your local vendor or customer service External Battery Pack To increase the battery back up time you can connect several external battery packs to the UPS Socomec external battery pack is optional When connecting the external battery pa...

Страница 30: ...tion switches are OFF switches upstream of the UPS are OFF Set the switch on the back of the battery extension module to the OFF position Connect the battery extension module to the UPS Set the switch on the back of the battery extension module to the ON position Set the number of EBM connected to the UPS in the Settings menu Turn off the UPS and cut off the AC source before performing battery bat...

Страница 31: ... the alarm beeps once every 2 seconds After reconnecting or replacing the batteries it might take a while for the UPS to switch off the alarm automatically If after a period of time the audible alarm continues please manually initiate a battery test Please follow the route below to execute the manual battery test in order to clear the alarm Route press the button for 0 1 seconds select Maintenance...

Страница 32: ...he UPS If requested the UPS can also be switched off utilizing a remote external shutdown contact The command is acknowledged when the contact is made and held for 3 seconds default whereas the external contact must be made between the common and input pins The external contact MUST be dedicated and voltage free so as not to cause permanent damage to the UPS The shutdown input can be configured al...

Страница 33: ...y and or input contacts Connect Tx to pin 2 Rx to pin 3 and GND C to pin 5 of the computer s RS232 port In Windows start the Hyper Terminal application and proceed to open the specified COM port Set the following properties Baud rate 2400 Data Bits 8 Parity None Stop Bit 1 Flow Control None Configuration Press Enter to display the main menu of the relay card UPS Relay Card Firmware Version Relay C...

Страница 34: ... shut down the UPS or to test the batteries The delay preceding shutdown of the UPS can be set up to 9999 seconds maximum Configure Input Signal 1 Act as Shutdown or Test Shutdown 2 Input Signal Confirm 3 Seconds 3 Delay Before Shutdown 30 Seconds 0 Back to Previous Menu Please Enter Your Choice 3 Press 3 to configure NO or NC operation of each relay Shift SW2 to the ON position to activate the se...

Страница 35: ...y Power share Parallel output Input EMI Output EMI Aux Power External Internal Battery Pack Control Board Communication Board LCD Board To A2D D2D To inverter To charger I P 6 1 Rack Mounting Use the included bracket ears and screws to mount the UPS in a rack by following the procedures below 1 Attach the included bracket ears to the lateral mounting holes of the UPS See Figure 6 1 S ESC Figure 6 ...

Страница 36: ... optional See Figure 6 2 Step 1 Adjust the length of the rail according to the rack Step 2 Tighten the nuts Step 3 Fix the rail on the rack Step 4 Insert the UPS in the rack and tighten the screws 3 If you want to use a non Socomec rail kit please only follow step 4 S ESC 1 2 3 3 4 Figure 6 2 Rack Mounting ...

Страница 37: ... by following the steps below 1 Assemble the tower stands see Figure 6 3 Tower Stand 4 PCS Figure 6 3 Assemble the Tower Stands for 5 7 9 11 kVA UPS 2 Pull out the control panel 1 rotate the panel 90 clockwise 2 and re insert the control panel 3 see Figure 6 4 2 1 3 S ESC Figure 6 4 Rotate the Control Panel and the Socomec Logo Nameplate ...

Страница 38: ...he panels facing up Lift up 90 S ESC S ESC 4 Figure 6 5 Place the Whole Unit Upright 4 Place the whole unit inside the tower stands 5 5 S ESC S ESC Figure 6 6 Place the Whole Unit inside the Tower Stands Leave adequate space at least 50cm around all sides of the unit for good ventilation A minimum of two people are required to execute 3 and 4 ...

Страница 39: ...ries and battery packs Replace the battery battery pack by following the procedures below 1 Remove the screws and remove the battery pack s front bezel 1 2 Disconnect the battery terminals 2 3 Use the insulated screwdriver to remove the screws from the protective cover located in front of the battery 3 4 Pull out the battery from the left battery compartment and insert a new one Follow the same pr...

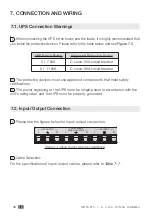
Страница 40: ...ker 9 11 kVA D curve 80A circuit breaker 2 The protective devices must use approved components that meet safety certifications 3 The power supplying to the UPS must be single phase in accordance with the unit s rating label and the UPS must be properly grounded 7 2 Input Output Connection 1 Please see the figures below for input output connection UPS OUTPUT AC INPUT N L N L N L POWER SHARE PARALLE...

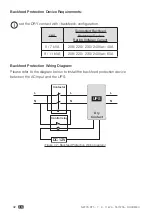
Страница 41: ...ner voltage or energy might be fed back to the input terminals either directly or via a leakage loop To avoid the risk of electric shock resulting from the backfeed installing of a backfeed protection device between the AC input and the UPS is highly recommended The UPS doesn t have any built in backfeed protection device Installation of the backfeed protection device between the AC input and the ...

Страница 42: ...d Protection Device Rating Voltage Current 5 7 kVA 208 220 230 240Vac 40A 9 11 kVA 208 220 230 240Vac 65A Backfeed Protection Wiring Diagram Please refer to the diagram below to install the backfeed protection device between the AC input and the UPS DC 12V L N L N L N UPS Dry Contact Contactor Control relay Figure 7 2 Backfeed Protection Wiring Diagram ...

Страница 43: ...t cables 4 Connect the main AC source output external battery pack cables to the wiring terminal block Please see Figure 7 3 5 Ground the UPS TM OV EXTERNAL BATT CONNECTOR 240V DC 46A L1 AC INP UT L2 L PAR ALL EL OU TPU T N PO WE R SH AR E L1 UP S OU TP UT L2 DR Y CO NT AC T P2 P3 P4 RS 48 5 RS 23 2 P1 RE PO PA RA LL EL PA RA LL EL SMART SLOT For Grounding Output Protective Devices For Grounding F...

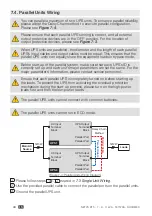
Страница 44: ...nd each unit s major parameters are set the same For the major parameters information please contact service personnel Ensure that each parallel UPS is completely turned on before starting up the loads To prevent the UPS from activating the overload protection mechanism during the start up process please turn on the high power loads first and then the low power loads The parallel UPS units cannot ...

Страница 45: ...ole non fuse DC breaker with characteristics of 1 pole 250Vdc 2 pole 500Vdc and 35kA or above DC breaking capacity 1 Remove the two screws from the external battery connector s panel shown below SMART SLOT DRY CONTACT P2 P3 P4 RS 485 RS 232 P1 REPO EXTERNAL BATT CONNECTOR 192V DC 29A PARALLEL PARALLEL INPUT BREAKER TMOV T U P N I T U P T U O ON OFF Two Screws External Battery Connector s Panel Fig...

Страница 46: ...s to an inductive load the inrush current initial surge current may restart the inverter To avoid this situation please turn on the inductive load in bypass mode before starting up the inverter 8 1 1 Start up with AC Input Single Unit 1 Verify if the UPS s input meets with N L G of the utility AC power works normally 2 Switch on the input protective device see Figure 7 3 installed between the UPS ...

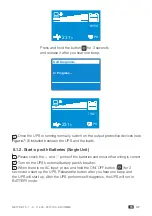
Страница 47: ...e Figure 7 3 installed between the UPS and the loads 8 1 2 Start up with Batteries Single Unit 1 Please check the and poles of the batteries and ensure that wiring is correct 2 Turn on the UPS s external battery pack s breaker 3 When there is no AC input press and hold the ON OFF button for 3 seconds to start up the UPS Release the button after you hear one beep and the UPS will start up After the...

Страница 48: ...e turn on the high power loads first and then the low power loads 8 2 Single Unit Turn off 1 Make sure all of the loads connected to the UPS are off 2 1 Press and hold the ON OFF button for 3 seconds 2 release it after you hear one beep 3 use the Scrolling Up or Down button to select Yes and 4 press the Enter button to confirm your selection 3 Switch off the input breaker input protective device s...

Страница 49: ...ill run in ON LINE mode 5 Turn on each UPS s output protective devices 6 Once the parallel system runs normally please turn on the high power loads first and then the low power loads 8 3 2 Start up with Batteries Parallel Units 1 Please check the and poles of the batteries and ensure that wiring is correct 2 Turn on the circuit breaker on each connected external battery pack 3 Press and hold each ...

Страница 50: ...cted to the utility AC power it will supply power to the UPS and the batteries will be charged Online Mode In on line mode the connected loads are supplied by the inverter which derives its power from the utility AC power and the UPS charges the batteries and provides power protection to its connected loads Bypass Mode In bypass mode the critical loads are directly supplied by the utility AC power...

Страница 51: ... Press the button for 0 1 seconds or press the button for 0 1 seconds to navigate the setting items 3 Press the button for 0 1 seconds to choose the parameter that you want to change and the parameter will flash 4 Press the button for 0 1 seconds or press the button for 0 1 seconds to increase or decrease the parameter value If either of the buttons is pressed for over 2 seconds the LCD will autom...

Страница 52: ...ettings Battery General Dry Contact Setting Component Life Prediction Test Battery Aging Reset About Start Battery Test only VRLA Deep Discharge Test only VRLA Local Dry Contact Test Create Discharging Reference Battery Discharging History Reset Power Usage Data Restore Factory Setting Model Name UPS Serial No UPS Manufacture Date UPS Firmware Version Battery Summary Installed Battery Summary Repl...

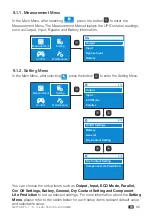
Страница 53: ...enu after selecting Setting press the button to enter the Setting Menu Output Input ECO Mode Parallel 1 3 On Off Settings Battery General Dry Contact Setting 2 3 Dry Contact Setting Component Life Prediction 3 3 Measurement Control Setting Maintenance You can choose the setup items such as Output Input ECO Mode Parallel On Off Settings Battery General Dry Contact Setting and Component Life Predict...

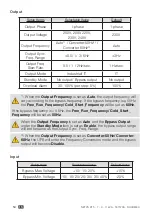
Страница 54: ... vary according to the bypass frequency If the bypass frequency is 55Hz the Free_Run_Frequency Cold_Start_Frequency will be set as 60Hz If the bypass frequency is 55Hz the Free_Run_Frequency Cold_Start_ Frequency will be set as 50Hz When the Output Frequency is set as Auto and the Bypass Output under the Standby Mode item is set as Enable the bypass output range will be the same as the Output Sync...

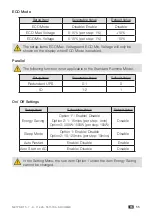
Страница 55: ...tion is not applicable to the Standard Runtime Model Setup Item Selectable Value Default Value Redundant UPS 0 1 0 ID 1 2 1 On Off Settings Setup Item Selectable Value Default Value Energy Saving Option 1 Enable Disable Option 2 1 15mins per step 1min Option 3 300W 1500W per step 100W Disable Sleep Mode Option 1 Enable Disable Option 2 10 120mins per step 10mins Disable Auto Restart Enable Disable...

Страница 56: ...tery Rated Voltage Total Capacity Standard battery pack Model Name Quantity Customer own batt pack Voltage Qty Total capaciy 1 2 3 999 Ah one step 1Ah Standard battery pack Model Name B7000 5 7K B11000 9 11K Quantity 1 Float Charging Voltage For Lead Acid Battery Option1 Auto Customize Option2 2 20 2 35 V cell one step 0 01V For Li ion Battery or Others 150 310 Vdc one step 1V Auto EOD Voltage For...

Страница 57: ...c Option 3 Normal open Normal close Disable Dry Contact 2 Output Disable On bat Low bat Bat fault Bypass UPS OK Load protected Load powered General alarm Overload alarm Backfeed On batt Dry Contact 3 Output Disable On bat Low bat Bat fault Bypass UPS OK Load protected Load powered General alarm Overload alarm Backfeed Low batt Dry Contact 4 Output Disable On bat Low bat Bat fault Bypass UPS OK Loa...

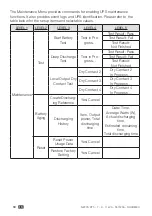
Страница 58: ...the table below for the setup items and selectable values LEVEL 1 LEVEL 2 LEVEL 3 LEVEL 4 LEVEL 5 Control Output Bypass 1 Go into Bypass Yes No Go out of Bypass Yes No Charger Execute Boost Charge Yes No Alarm Clear Prediction Warning 2 Yes No 1 The item Bypass will be hidden if you set the Standby Mode as Bypass Output To set up Bypass Output please go to Setting Output Standby Mode Bypass Output...

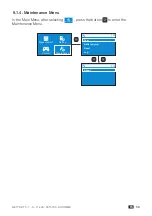
Страница 59: ...A 551570A SOCOMEC 59 EN 9 1 4 Maintenance Menu In the Main Menu after selecting Maintenance press the button to enter the Maintenance Menu Test Battery Aging Reset Log 1 2 About 2 2 Measurement Control Setting Maintenance ...

Страница 60: ...lt Fail Test Result Not Finished Deep Discharge Test Test in Pro gress Test Result Pass Test Result Fail Test Result Not Finished Local Output Dry Contact Test Dry Contact 2 Dry Contact 2 In Progress Dry Contact 3 Dry Contact 3 In Progress Dry Contact 4 Dry Contact 4 In Progress Battery Aging Create Discharg ing Reference Yes Cancel Discharging History Item Output power Total discharging time Date...

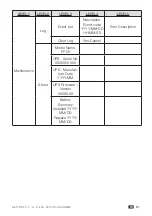
Страница 61: ...EVEL 5 Maintenance Log Event List Description Event code YYYY MM DD HH MM SS Error Description Clear Log Yes Cancel About Model Name RT 5K UPS Serial No XXXXXXXXXX UPS Manufac ture Date YYYY MM UPS Firmware Version XXXXXXX Battery Summary Installed YYYY MM DD Replace YYYY MM DD ...

Страница 62: ...s or Fail Start Battery Test Deep Discharge Test Local Dry Contact test Test Battery Aging Reset Log 1 2 Test Battery Test Test In Progress Battery 272 0V Press ESC key to abort test 85 Battery Test Test In Progress Battery 272 0V Press ESC key to abort test 85 Battery Test Test In Progress Battery 272 0V Press ESC key to abort test 85 ESC ESC ESC Test Completed ...

Страница 63: ...the bottom left of the LCD display B Tests Result_ Pass No alarm icon occurs and the UPS runs normally Battery Test Test In Progress Battery 72 0V 85 Battery Test Test In Progress Battery 72 0V 85 Battery Test Test Result FAIL Battery 272 0V Press ESC key to Escape 0 Battery Test Test Result Pass Battery 272 0V Press ESC key to Escape 80 A B BYPS 231 V PS INV ...

Страница 64: ...MD NETYS RT environement sensor temperature and humiidity and 2 inputs NRT OP REL NETYS RT relay board for slot 1x input 6x output programmable relays NRT OP RAIL NETYS RT 2 runners for rack mounting support maximum 100 kG NRT3 LIB 1S NETYS RT Li ion battery for UPS 5000VA to 11000VA rail One string NRT3 LIB 2S NETYS RT Li ion battery for UPS 5000VA to 11000VA rail Two strings NRT3 B7000 NETYS RT ...

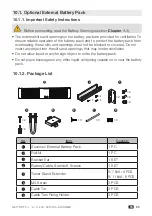
Страница 65: ...ust not be blocked or covered Do not insert any object into the slits and openings that may hinder ventilation Do not allow liquid or any foreign object to enter the battery pack Do not place beverages or any other liquid containing vessels on or near the battery pack 10 1 2 Package List 1 4 4 4 2 4 4 2 3 4 5 6 7 8 8 8 4 S NeTYS RT 3 3 3 No Item Quantity 1 Socomec External Battery Pack 1 PC 2 Rail...

Страница 66: ... to the external battery connector 4 on the UPS and connect the other end to the external battery connector 7 on the Socomec external battery pack Use the provided screws 2 and standoffs 3 to fix the battery cable firmly Make sure that the positive cable connects to the positive pole and the negative cable connects to the negative pole See Figure 10 2 外接 电池 连接 孔 192 V DC 50 A RS 23 2接口 外接电池连接孔 192...

Страница 67: ... positive pole and the negative cable connects to the negative pole Use the screws 2 and standoffs 3 provided in the battery cable s package to fix the battery cable firmly on the parallel Socomec external battery packs Please see Figure 10 3 外接电 池连接 孔 192V DC 50A 外接电 池连接 孔 192V DC 50A 断路器 250V DC 63A 外接电 池连接 孔 192V DC 50A 断路器 250V DC 63A 外接电池连 接孔 92 V DC 50 A 外接电池 连接孔 19 2V DC 50 A 断路器 25 0V DC 6...

Страница 68: ...al to turn on the UPS 10 1 5 Technical Specifications Socomec External Battery Pack NRT3 B7000 NRT3 B11000 Applicable to NETYS RT Series UPS 7 kVA 11 kVA Battery Type VRLA Quantity 16 12V 7Ah 20 12V 9Ah Dimensions W D H 440 565 89 mm 17 3 22 2 3 5 440 650 131 mm 17 3 25 6 5 1 Weight 39 kg 86 Ib 67 kg 147 7 Ib Environment Operating Temperature 0 40 C 32 104 F Relative Humidity 5 95 non condensing R...

Страница 69: ... UPS and cut off the input power and battery power if applicable Failure to properly install the Manual Bypass may result in severe damage to your UPS or load equipment Please install the Manual Bypass in an indoor temperature controlled environment that is free of conductive contaminants Do not operate the unit in an extremely dusty unclean area or a location near heating devices water or excessi...

Страница 70: ... for Single UPS Application 1 2 3 4 5 10 6 7 x 2 x 4 x 4 x 4 8 9 No Item Quantity 1 M3 Screw 4 PCS 2 CU Terminal Type A 2 PCS 3 M4 Screw 10 PCS 4 Standoff 4 PCS 5 CU Terminal Type B 6 PCS 6 Manual Bypass Ear 1 PC 7 Manual Bypass Ear 1 PC 8 Manual Bypass Ear 1 SET 9 Wire 2 PCS 10 Cable gland 2 PCS ...

Страница 71: ... 6 7 11 12 8 9 10 x 2 x 4 x 4 x 4 No Item Quantity 1 M3 Screw 8 PCS 2 CU Terminal Type A 4 PCS 3 M4 Screw 9 PCS 4 Standoff 8 PCS 5 CU Terminal Type C 4 PCS 6 Manual Bypass Ear 1 PC 7 Manual Bypass Ear 1 PC 8 Manual Bypass Ear 1 SET 9 Wire 4 PCS 10 CU Terminal Type D 2 PCS 11 Parallel Cable 1 PC 12 Cable gland 2 PCS ...

Страница 72: ... the UPS s output terminals 3 To UPS Input Connects to the UPS s AC input terminals 4 Manual Bypass Switch No connection is needed The function is to switch the UPS into manual bypass mode for maintenance without power supply interrup tion 5 Warning This is a Manual Bypass Switch Cover Plate No connection is needed After you remove the screw shown in Figure 11 to remove the cover plate the MBP s d...

Страница 73: ...Output Connects to the critical loads 3 Bypass Breaker No connection is needed After you remove the two screws shown in Figure 15 to remove the cover plate the PMB s detector will automatically activate and send a message to the UPS to ask it to transfer into bypass mode 4 UPS 1 Output Breaker No connection is needed The function is to prevent the output terminals from damage caused by overload 5 ...

Страница 74: ...PERSONNEL CAN OPEN AND OPERATE IT TO UPS PAR ALL EL TO UPS PAR ALL EL L N UPS INP UT OUTPUT BREAKER 1 250V AC 20A OUTPUT BREAKER 2 250V AC 25A OUTPUT SOCKET 2 20A MAX PER OUTLET OUTPUT SOCKET 1 10A MAX PER OUTLET INP UT OU TPU T UPS OU TPU T L N P1 DR Y CO NTA CT P4 P3 P2 REP O RS 485 RS 232 SMART SLOT PAR ALL EL PAR ALL EL EXTERNAL BATT CONNECTOR 192V DC 35A INPUT BREAKER TM OV INP UT OU TPU T MB...

Страница 75: ...T OUTPUT BREAKER 1 OUTPUT BREAKER 2 OUTPUT SOCKET 2 20A MAX PER OUTLET OUTPUT SOCKET 1 10A MAX PER OUTLET INP UT OU TP UT M5 Cage Nut 4 8 MBP Ear 2 8 M5 Screw 4 8 MBB M4 Screw 4 8 O UT PU T L N L AC IN PU T N Figure 10 7 10 2 6 Wiring Before wiring 1 Follow 10 1 6 Important Safety Instructions 2 When connecting the Manual Bypass to the mains and the loads you must install protective devices The pr...

Страница 76: ... DC 46A PARALLEL PARALLEL INPUT BREAKER TMOV T U P N I T U P T U O MBP UPS Wire 2 9 Parallel Cable 1 provided in UPS package 6 Figure 10 8 NRT3 OP PMB SMART SLOT DRY CONTACT P2 P3 P4 RS 485 RS 232 P1 REPO EXTERNAL BATT CONNECTOR 240V DC 46A PARALLEL PARALLEL INPUT BREAKER TMOV OUTPUT INPUT SMART SLOT DRY CONTACT P2 P3 P4 RS 485 RS 232 P1 REPO EXTERNAL BATT CONNECTOR 240V DC 46A PARALLEL PARALLEL I...

Страница 77: ...REMOVE THIS COVER PLATE REMOVING THIS COVER PLATE WILL CAUSE THE INVERTER TO SHUTDOWN SEE THE USERS MANUAL FOR INSTRUCTIONS Screw x 8 Cable Entry Knockout x 2 TO UPS 1 INPUT TO UPS 2 OUTPUT TO UPS 2 INPUT INPUT OUTPUT N L N L N L N L 3 Follow Figure 10 12 and Figure 10 13 to install the provided accessories on the Manual Bypass and perform wiring The suggested knockout or hole diameter for optiona...

Страница 78: ...ration NRT3 OP MBP All the equipment and the UPS system must be properly connected and there must be an acceptable AC voltage present Please refer to the UPS User Manual for more information Do not remove the cover plate of the Manual Bypass MANUAL BYPASS SWITCH during operation 1 Turn on the input utility breaker at the service panel 2 Turn on the Manual Bypass UPS OUTPUT BREAKER 3 Turn on the ci...

Страница 79: ... on the connected loads 8 Press and hold the UPS1 s ON OFF button for 3 seconds and release it after you hear one beep to turn the UPS1 on 9 Press and hold the UPS2 s ON OFF button for 3 seconds and release it after you hear one beep to turn the UPS2 on 10 Please refer to the UPS User Manual for more information 10 2 8 Maintenance NRT3 OP MBP 1 Press and hold the UPS s ON OFF button for 3 seconds ...

Страница 80: ...AX PER OUTLET OUTPUT SOCKET 1 10A MAX PER OUTLET OUTPUT BREAKER 2 250V AC 25A OUTPUT BREAKER 1 250V AC 20A NORMAL By pass NORMAL By pass BYPASS Position Figure 10 16 If there is a power interruption while the MBP is in the bypass mode the connected loads won t be protected 4 Turn off the UPS s INPUT BREAKER 5 Turn off the circuit breaker on each connected external battery pack 6 Disconnect the bat...

Страница 81: ...Press and hold the UPS1 s ON OFF button for 3 seconds release it after you hear one beep use the Scrolling Up or Down button to select Yes and press the Enter button to confirm your selection The inverter will be off and the UPS1 will transfer to run in bypass mode 2 Press and hold the UPS2 s ON OFF button for 3 seconds release it after you hear one beep use the Scrolling Up or Down button to sele...

Страница 82: ...TPUT BREAKER BYPASS BREAKER OFF ON Bypass Breaker TO UPS 1 INPUT TO UPS 2 OUTPUT TO UPS 2 INPUT INPUT OUTPUT N L N L Figure 10 20 If there is a power interruption while the PMB is in bypass mode the connected loads won t be protected 5 Turn off the UPS1 s INPUT BREAKER 6 Turn off the UPS2 s INPUT BREAKER 7 Turn off the circuit breaker on each connected external battery pack 8 Turn off the Manual B...

Страница 83: ...L2 L L1 BYPASS MODE UPS MODE UPS 2 UPS 1 OUTPUT BREAKER BYPASS BREAKER Bypass Breaker OFF ON TO UPS 1 INPUT TO UPS 2 OUTPUT TO UPS 2 INPUT N L N INPUT OUTPUT Figure 10 21 24 Re install the cover plate of the BYPASS BREAKER on the Manual Bypass This will automatically inactivate the manual bypass detector 25 Press and hold the UPS1 s ON OFF button for 3 seconds and release it after you hear one bee...

Страница 84: ...l block x 1 Environ ment Operating Altitude 0 3000 m 0 10000 ft 0 1000 m 0 3300 ft without derating Operating Temperature 0 C 55 C 1 32 131 F Storage Temperature 15 C 55 C 59 131 F Relative Humidity 5 95 non condensing Physical Dimensions W x D x H 440 x 120 x 89 mm 17 3 4 7 3 5 440 x 120 x 131 mm 17 3 4 7 5 1 Weight 3 kg 6 6 lb 5 6 kg 12 3 lb 1 1 When the operating temperature is at 40 55 C 104 1...

Страница 85: ... to supply stable power to the critical loads connected to the UPS when the main AC source is abnormal It must operate in conjunction with a corresponding Socomec Netys RT series UPS model Please see Figure 10 22 and Figure 10 23 to check its appearance and block diagram Figure 10 22 Front View of the Lithium ion Battery Pack BM1 BM2 Breaker Connector BMS Figure 10 23 Block Diagram ...

Страница 86: ...sume charging when the temperature is below 50 C During this time the UPS can run as usual Standard Compliance CE CAN UL1973 Storage Prior to installation If the lithium ion battery pack needs to be stored prior to installation it should be placed in a dry area The allowable storage temperature and relative humidity non condensing are 15 C 50 C 5 F 122 F and 5 95 respectively After usage Remove al...

Страница 87: ... Battery Pack Model RT 10K LIB 1 pc 2 RS 485 Cable 1 pc 3 Bracket Ear Kit 1 set 4 Tower Stand Extender 4 pcs 5 Battery Cable 1 pc 6 Grounding kit 1 pc 1 If there is any damage or anything missing please immediately contact the vendor from whom you purchased the unit 2 If the battery pack needs to be returned carefully repack the battery pack and all of the accessories using the original packing ma...

Страница 88: ...al Battery Connector Connects with the UPS to supply battery power The Pin assignment of the external battery con nector is shown as follows 2 RS 485 Port The lithium ion battery pack communicates with the UPS via the RS 485 port 3 Breaker Serves as a switch for safety protection 4 Fan Ventilates the air to avoid overheating ...

Страница 89: ...llow the rack mounting procedure in 10 1 3 Battery Installation Procedures Tower Mounting Please follow the tower mounting procedure in 10 1 3 Battery Installation Procedures Please tighten the provided screws to install the grounding kit to connect to UPS for grounding See Figure 10 25 Figure 10 25 ...

Страница 90: ... connect the other end to the external battery connector on the lithium ion battery pack Make sure that the positive cable connects to the positive pole and the negative cable connects to the negative pole See step in Figure 10 26 2 Use the provided RS 485 cable to connect the UPS s RJ45 RS 485 port and the RJ45 RS 485 port of the lithium ion battery pack Please see step in Figure 10 26 Figure 10 ...

Страница 91: ...u need Figure 10 27 Lithium ion Battery Module To install the lithium ion battery module in the lithium ion battery pack please follow the steps to shown in Figure 10 28 Step Remove the screws and remove the battery pack s front bezel Step Use the Phillips screwdriver to remove the screws on the protective cover on front of the battery module Step Remove the protective cover Step Extract the used ...

Страница 92: ...tery pack in reverse order of the above mentioned steps which is Y Y Y shown in Figure 7 2 2 If the Socomec Manual Bypass is installed behind the lithium ion battery pack please keep the Manual Bypass away from the lithium ion battery pack by at least 1cm 0 39 3 If you install two lithium ion battery modules and there is any fault in one of the two modules it is suggested that you replace both of ...

Страница 93: ...usage you can turn off the lithium ion battery pack safely by following the steps below Step Turn off the lithium ion battery pack s breaker Step Disconnect the provided RS 485 cable Step Disconnect the provided battery cable 10 3 9 Maintenance It is recommended that you follow the following maintenance items and intervals to ensure the reliability and efficiency of the lithium ion battery pack 1 ...

Страница 94: ...arging Current 5 7A Communication Interfaces RJ45 RS 485 Port x1 Physical Dimensions W x D x H External battery pack 440 x 646 x 89 mm 17 3 x 25 5 x 3 5 Battery module 212 x 506 x 76 8 mm 8 3 x 19 9 x 3 0 Weight External battery pack with 2 battery modules 37 7 kg 83 lb External battery pack with 1 battery module 12 0 kg 26 5 lb Environ ment Operating Altitude 0 3000 m 0 10000 ft 0 1000 m 0 3300 f...

Страница 95: ...0X61C1 Input Fuse Open The input fuse has blown or the input relay is open Please contact service personnel 0X60C0 PFC Soft Start Fail The UPS has an internal fault Please contact service personnel 0X6221 0X6241 DC Bus Over Shutdown 1 The output has capacitive or inductive loads 2 The UPS has an internal fault 1 Remove the capacitive or induc tive loads 2 Please contact service personnel 0X62A0 0X...

Страница 96: ... Check whether the UPS is properly connected to the ex ternal battery pack s 2 Contact service personnel If all possible causes are eliminated but the alarm still appears please contact your local vendor or customer service 3 Error code on display and event list Error Code Alarm Message 0x0100 Mains Input Volt Out Range 0x0120 Mains Input Freq Out Range 0x0121 Input relay short 0x0122 Input Fuse O...

Страница 97: ...g for PM 0x2503 Parallel Unit Config Incompatible 0x2504 EXT Parallel Comm Loss 0x2505 Redundancy Loss 0x2508 Inter System Sync Signal Loss 0x250C Main Input Backfeed Fault 0x2514 System Ambient Over Temperature Shutdown 0x2600 Manual OFF 0x2601 Manual ON 0x2608 AUTO START UPS 0x3100 Remote INV ON 0x3101 Remote INV OFF 0x3102 Remote Schedule Shutdown Regular form command 0x3103 Remote Schedule Reb...

Страница 98: ...0x62A1 PFC DC Bus Under Shutdown 0x62C0 Recover from PFC DC Bus Under Warning 0x62C1 PFC DC Bus Under Shutdown 0x80C0 INV Soft Start Fail 0x8106 INV IGBT Over Heat Shutdown 0x857F INV Over Current Shutdown 0x8580 INV Over Current Shutdown Hardware Over Current 0x8673 Output relay fault 0xA000 Charger Fault 0xA00B Charge Abnormal 0xA082 Charger Output Switch Abnormal 0xA101 Charger Over Heat Shutdo...

Страница 99: ...cy will quickly shorten the battery life The batteries do not require user maintenance however they should be checked periodically Please follow the suggestions below to ensure a normal battery lifetime Keep the usage temperature at 20 C 25 C Idle batteries must be fully recharged every three months if the UPS needs to be stored for an extended period of time Please fully charge the batteries unti...

Страница 100: ...em TT TN Output Voltage 200 208 220 230 240 Vac Voltage Regulation 1 linear load Frequency 50 60 Hz 0 05 Hz vTHD 2 linear load Overload Capacity 105 continuous 105 125 2 minutes 125 150 30 seconds 150 500 ms Crest Factor 3 1 Connection Terminal Block 2 Electrical output supply system TT TN Battery Charger Battery Voltage 144 2 192 264 Vdc adjustable Default 192 Vdc 144 2 192 264 Vdc adjustable Def...

Страница 101: ...e 0 3000 m 0 10000 ft 0 1000 m 0 3300 ft without derating Operating Temperature 0 C 55 C 4 32 131 F Storage Temperature 15 C 55 C 59 131 F Relative Humidity 5 95 non condensing Standard Compliance CE TUV GS EN IEC 62040 1 EN IEC 62040 2 Category C2 1 In free running mode the UPS needs to be de rated to 70 of its capacity 2 The UPS needs to be de rated to 70 of its capacity 3 The latter value of UP...

Страница 102: ...X O O O O O 插座 O O O O O O 电缆及配线 X O O O O O 连接器及断路器 X O O O O O 密封铅酸电池 O O O O O O 变压器 O O O O O O 其它 X O O O O O O 表示该有毒物质在该部件所有均质材料中的含量均在 SJ T11363 2006 标准规 定的限量要求 以下 X 表示该有毒物质至少在该部件的某一均质材料中的含量超出 SJ T11363 2006 标准规定的限量 要求 注 印刷电路板 包含空的印刷电路板及其上面所有零部件 有害物质 MCV Pb Hg Cr6 PBB PBDE 1000 PPM Cd 100 PPM 依照中国 电子信息产品污染控制管理办法 第 39 号 现标明此产品中可能 含有的有毒 有害物 质或元素的名称与含量 环保使用期限 本产品环保使用期限请参照贴在机器上的规格标签上的标识 产品报废后处置提...

Страница 103: ......
Страница 104: ...ment of electrical parameters Energy management A worldwide presence 80countries where our brand is distributed 12production sites France x3 Italy x2 Tunisia India China x2 USA x3 ENERGY STORAGE POWER CONVERSION POWER MONITORING POWER SWITCHING EXPERT SERVICES EXPERT SERVICES 28subsidiaries and commercial locations Algeria Australia Belgium China Canada Dubai United Arab Emirates France Germany In...

Отзывы: