background image


PD900 Series


Page 52 


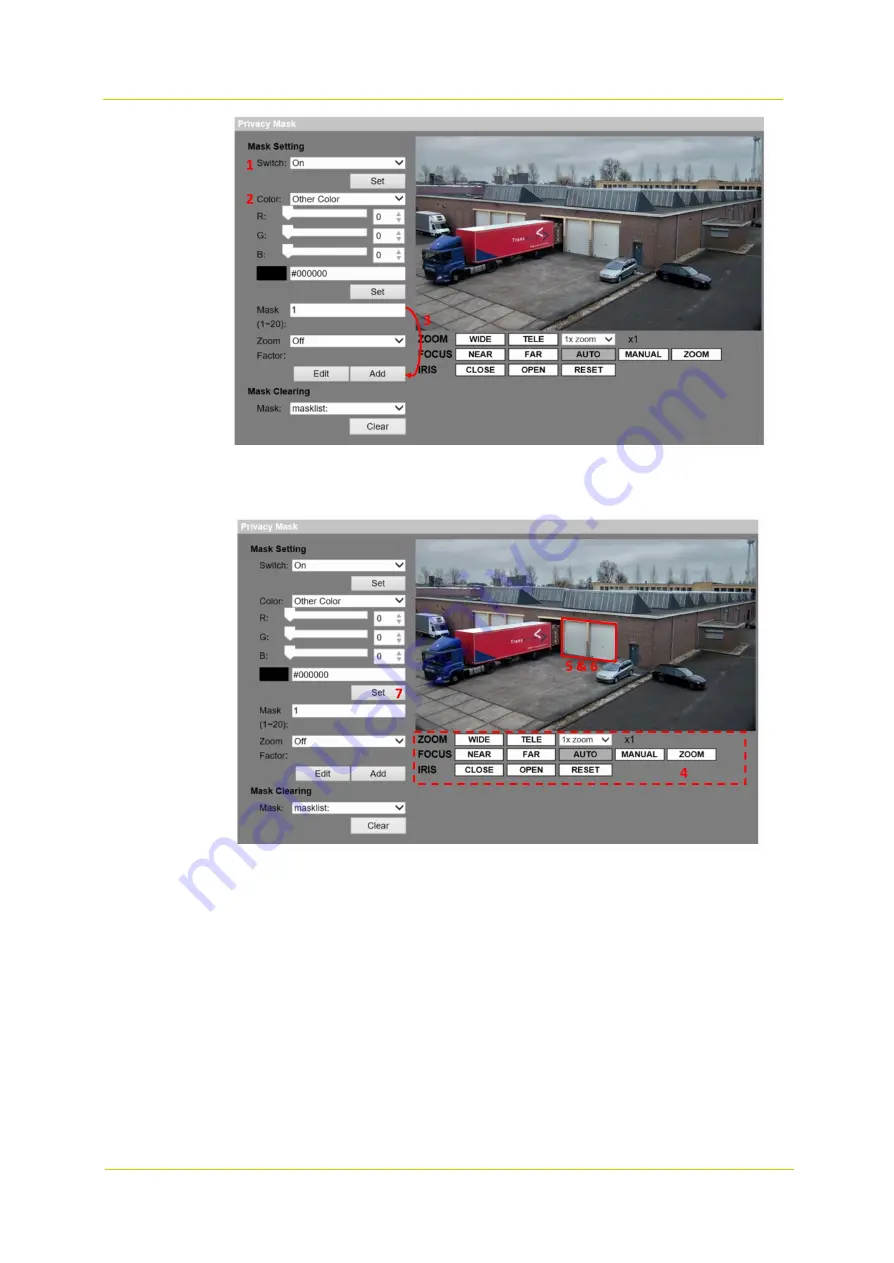
Set Switch to 

On

 and click the 

Set

 button to activate the Privacy Mask function.   

Select a color for the mask from the Color drop-down list and click the 

Set

 button to apply the color setting.   

Enter the mask number, e.g. 1. If a Zoom Factor is needed, select 

On

 to enable it. Then, click the 

Add

 button 

and a privacy mask will be displayed on the live video pane on the right.   


To shift the mask to the desired location, move the mouse cursor to the center of the mask and click and drag.   

To change the shape and the size of the mask, click any edge of the mask and draw it outward/inward.   

If needed, set Zoom, Focus and Iris.   

Click the 

Set

 button to confirm the setting. The Privacy Mask will be displayed in the color set above.   

If you wish to edit the previously set mask, enter the Mask number in the Mask (1~20) entry field and click the 

Edit


button. The camera will go to the set location and display the mask. Then, follow steps 4 to 6 to edit the mask. To 
cancel mask editing, just click the 

Return

 button. 

Mask Clearing   

In this section, you can delete an existing Privacy Mask.   

Select the Privacy Mask to be removed from the drop-down list, and click the 

Clear

 button. The selected Privacy Mask 

will be removed without warning. 

Содержание PD900 Series

Страница 1: ...User Manual PD900 Series PTZ Dome Camera...

Страница 2: ...ability for claims from third parties arising from improper use other than that stated in this manual Although considerable care has been taken to ensure a correct and suitably comprehensive descripti...

Страница 3: ...etection 24 3 2 8 3 Network failure detection 27 3 2 8 4 Periodical event 28 3 2 8 5 Manual Trigger 29 3 2 8 6 Audio Detection 31 3 2 9 Storage Management 33 3 2 9 1 SD Card 33 3 2 9 2 Network Share N...

Страница 4: ...4 11 TV System 48 3 5 PTZ 48 3 5 1 Preset 49 3 5 2 Cruise 49 3 5 3 Auto Pan 50 3 5 4 Sequence 50 3 5 5 Home Function 51 3 5 6 Tilt Range 51 3 5 7 Privacy Mask 51 3 5 8 PTZ Setting 53 3 5 9 RS485 53 3...

Страница 5: ...ons Video compression methods Before you continue Before you continue read and obey all instructions and notes in this manual Keep this manual with the original bill of sale for future reference and i...

Страница 6: ...PD900 Series Page 6...

Страница 7: ...r it is at night or in any low or zero lux environments the camera provides effective illumination to objects 200 meters away The camera features Servo Feedback technology which enables the camera to...

Страница 8: ...PD900 Series Page 8...

Страница 9: ...monitor the live video of the targeted area in the live view pane System The administrator can set the host name system time root password network related settings etc in the System page Streaming Th...

Страница 10: ...Stream Selection Depending on the streaming setting you can choose a stream to display from the drop down list in the top left corner of the Home page Camera Info Double click the live view in the liv...

Страница 11: ...On Off Manual trigger On Off Pointer Function buttons Control Panel Click the Control Panel button to open arrow down and close arrow up the control panel Pan Tilt Direction and Speed Control The Pan...

Страница 12: ...the default storage location refer to section 3 2 12 Note With operating system Windows 7 or higher you must run Internet Explorer as an administrator to implement the snapshot function To do so right...

Страница 13: ...page is only available for the administrator 3 2 1 System Select the System category on the left to set the System parameters Host Name The Host name is used for camera identification If the alarm fun...

Страница 14: ...ing items User HTTPS IP Filter IEEE 802 1X 3 2 2 1 User Admin Password The administrator can reset passwords Enter the new password in the Admin password fieldand select Confirm password The maximum l...

Страница 15: ...users will be requested to enter a user name and password before viewing the live streams The following security modes are available Disable If the disable mode is selected there will be no security p...

Страница 16: ...Enter the name of the organization to which the entity identified in Common Name belongs Organization Unit Enter the name of the organizational unit to which the entity identified in Common Name belon...

Страница 17: ...the binary numbers of IP address 192 168 2 84 is different and will not be filtered As a result the IP addresses 192 168 2 80 to 192 168 2 83 will be filtered when entering 192 168 2 81 30 The followi...

Страница 18: ...ound on the label or on the package container of the camera for later use and identification in the future 1 Run the SDM2 program 2 After the SDM2 window has appeared clickthe Edit and Manual Scan for...

Страница 19: ...r HTTP port and HTTPS port Web Server port The default web server port is 80 With the default web server port 80 you can simply enter the IP address of the camera in the URL bar of a web browser to co...

Страница 20: ...e VMS SNMP v3 SNMP v3 supports an enhanced security system that provides protection against unauthorized users and ensures the privacy of the messages You will be requested to enter a security name au...

Страница 21: ...ort on the router Note To enable this function make sure that the router supports UPnP and that it is activated Friendly name Enter a name for the camera for identity Click the Save button to confirm...

Страница 22: ...site when an alarm is triggered Alarm messages can be assigned to up to two FTP sites Enter the FTP details including server server port username password and remote folder in the relevant fields Cli...

Страница 23: ...ages of the duration will be uploaded to FTP when the alarm input is triggered Select Upload while the trigger is active to continue uploading images to FTP during the trigger active until the alarm i...

Страница 24: ...o to the selected Preset Point and stay there for a user defined period of time As for other function modes the camera will keep executing the specified function to stop it simply change the camera s...

Страница 25: ...ion Motion Detection Setting You can adjust various Motion Detection parameters in this section Sampling pixel interval 1 10 This item is used to examine the differences between two frames You can con...

Страница 26: ...aming page Video Configuration is set to 6 or smaller the range will change accordingly Check the Continue image upload box to upload the triggered images during a certain period of time or keep uploa...

Страница 27: ...2 10 for more details File Name Enter a file name in the File name field e g image jpg and select the desired file name format of the uploaded image Add date time suffix File name imageYYMMDD_HHNNSS_X...

Страница 28: ...site or the E mail address every 60 seconds The images to be uploaded are the images before and after the triggered moment You can define the number of images to be uploaded in the Triggered Action se...

Страница 29: ...able options Manual Trigger The default setting for the Manual Trigger function is Off Select On to enable the function After the Manual Trigger function has been enabled click the Manual Trigger butt...

Страница 30: ...ence Autopan or Cruise and specify a Preset Point Sequence Line Autopan Path Cruise Line for the camera to perform when an alarm occurs Note See sections 3 5 1 to 3 5 4 for more details on Preset Poin...

Страница 31: ...the more sensitive it is The default level is 10 Time interval sec 0 7200 Denotes the interval between each detected audio The default interval is 10 Triggered Action Multi option The administrator c...

Страница 32: ...n 1 and 15 frames per second Note Make sure SMTP configuration has been completed See section 3 2 5 for more details Send HTTP Notification Check this option select the destination HTTP address and sp...

Страница 33: ...card for information about the card s reliability and life expectancy Device Information When you insert the SD card the card information such as the memory capacity and status will be shown in the D...

Страница 34: ...he memory capacity and status will be shown in this section Storage setting You can set the camera to send the alarm messages to a specific NAS site when an alarm is triggered Enter the network device...

Страница 35: ...ad it to a specific location 3 2 10 Recording The Recording category on the left gives access to the Recording parameters In the Recording pane you can specify the recording schedule that fits the sur...

Страница 36: ...frames in the time frame list Schedule pane Setting Schedules 1 Select a time frame from the time frame list 2 Check the weekday boxes of the desired weekdays 3 Select a time mode Day Night or Time Fo...

Страница 37: ...le User Information Parameter 3 2 13 1 Log File The camera keeps a record of the system s behavior authentication attempts and service status Camera as the network devices can continuously send the sy...

Страница 38: ...upgrade 1 Click the Browse button and locate the upgrade file for example ulmage_userland Note Do not change the name of the upgrade file or the system will fail to find the file 2 Select a file type...

Страница 39: ...onfiguration file to the camera clickthe Browse button to select the configuration fileand then click the Upload button 3 3 Streaming The Streaming page includes the following categories on the left V...

Страница 40: ...sent out video bitrate will be fixed and consistent to maintain the bandwidth VBR The video bitrate varies depending onthe activity of the monitoring environmentto achieve better image quality LBR LBR...

Страница 41: ...value of MJPEG Q factor is 35 Enter a value between 1 and 70 Click the Save button to confirm the entry or clickthe Reset button to return to the previous values 3 3 2 Video Rotation Rotate Function...

Страница 42: ...s 3 3 4 Video OCX Protocol The Video OCX Protocol category on the left gives access to the following video OCX protocol parameters RTP over UDP RTP over RTSP TCP RTSP over http orMJPEG over http for s...

Страница 43: ...ection Recording to Storage Select Enable from the drop down menu toenable storage of audio recording with videosto the SD card or the NAS Note If the chosen bit rate is not compatible with the player...

Страница 44: ...configurable from 1 30 to 1 sec NTSC or 1 25 to 1 1 5 sec PAL Auto Shutter Mode In this mode the camera will automatically adjust the shutter speed and the iris size depending on the light intensity...

Страница 45: ...et the white balance 1 Point the camera to the monitoring area 2 Select One Push in the White Balance setting menu 3 Click the Trigger buttonto adjust the white balance Note In this mode the value of...

Страница 46: ...ght On Mode In this mode IR LED lights will always be on Light Off Mode In this mode IR LED lights will always be off Smart Mode In Smart mode the camera will determine the occasion to remove the IR c...

Страница 47: ...ing light issues to allow for enhanced video display Level options for the WDR function include Low Mid and Hi The higher the level the wider the dynamic range In this way the camera can catch a great...

Страница 48: ...e Save button 8 Repeat the above steps for the rest of the profiles Now the camera will automatically switch profiles depending on the schedule Alternatively you can manually select a number from the...

Страница 49: ...s Preset Go To have the camera move to a specific preset position select the Preset Point from the drop down Preset list click the PrePage or NextPage button to go to preset number 1 to 256 The camera...

Страница 50: ...Set button of End Point to save the setting Note The zoom ratio of an Auto Pan s Start Point remains the same throughout the path Auto Pan Run Select the configured Auto Pan Path from the drop down li...

Страница 51: ...Cruise Line Auto Pan Path Sequence Line from the drop down Type and Line lists Click the Set button to save the Home settings 3 5 6 Tilt Range The camera s tilt angle is adjustable from a minimum of 2...

Страница 52: ...e shape and the size of the mask click any edge of the mask and draw it outward inward 6 If needed set Zoom Focus and Iris 7 Click the Set button to confirm the setting The Privacy Mask will be displa...

Страница 53: ...eedback Integrating Servo Feedback technology the camera will calibrate and precisely return to the previous position without stalling when deviation of the dome pivot is detected Select On and click...

Страница 54: ...PD900 Series Page 54...

Страница 55: ...Add or Remove Programs 2 Click Add Remove Windows Components in the Add or Remove Programs window 3 Select Networking Services from the Components list in the Windows Components Wizard window and then...

Страница 56: ...PD900 Series Page 56...

Страница 57: ...st decimal number of the IP address 192 Select Bin and the number will be converted to a binary number Repeat the same procedure for the rest of the decimal numbers Remember to select Dec before enter...

Страница 58: ...PD900 Series Page 58...

Страница 59: ...e pull authentication API Command to Enable Required Authentication http username password ip_address cgi bin admin param cgi action update Network Authentication Sna pshot enable Sample API command t...

Страница 60: ...PD900 Series Page 60...

Страница 61: ...ilable video transmissions in the PD900 Series camera rtsp ip_address port_number streamx where x corresponds to each stream channel 1 to 4 Example Video stream 1 rtsp 10 1 55 180 554 stream1 Example...

Страница 62: ...PD900 Series Page 62...

Страница 63: ...parts and some of the optional parts see table below of the NTCIP CCTV specification as laid down in the NTCIP 1205 2001 v01 08 document This means that in terms of section 4 of this document the foll...

Страница 64: ...lStartColumn labelStatus labelLocationLabel labelEnableTextDisplay Motion control The Motion Control group defines the variables that provide PTZ control For details refer to NTCIP 1205 Conformance re...

Отзывы: