Sim2 NERO 1 Скачать руководство пользователя страница 38


NERO1 

User Guide 


38


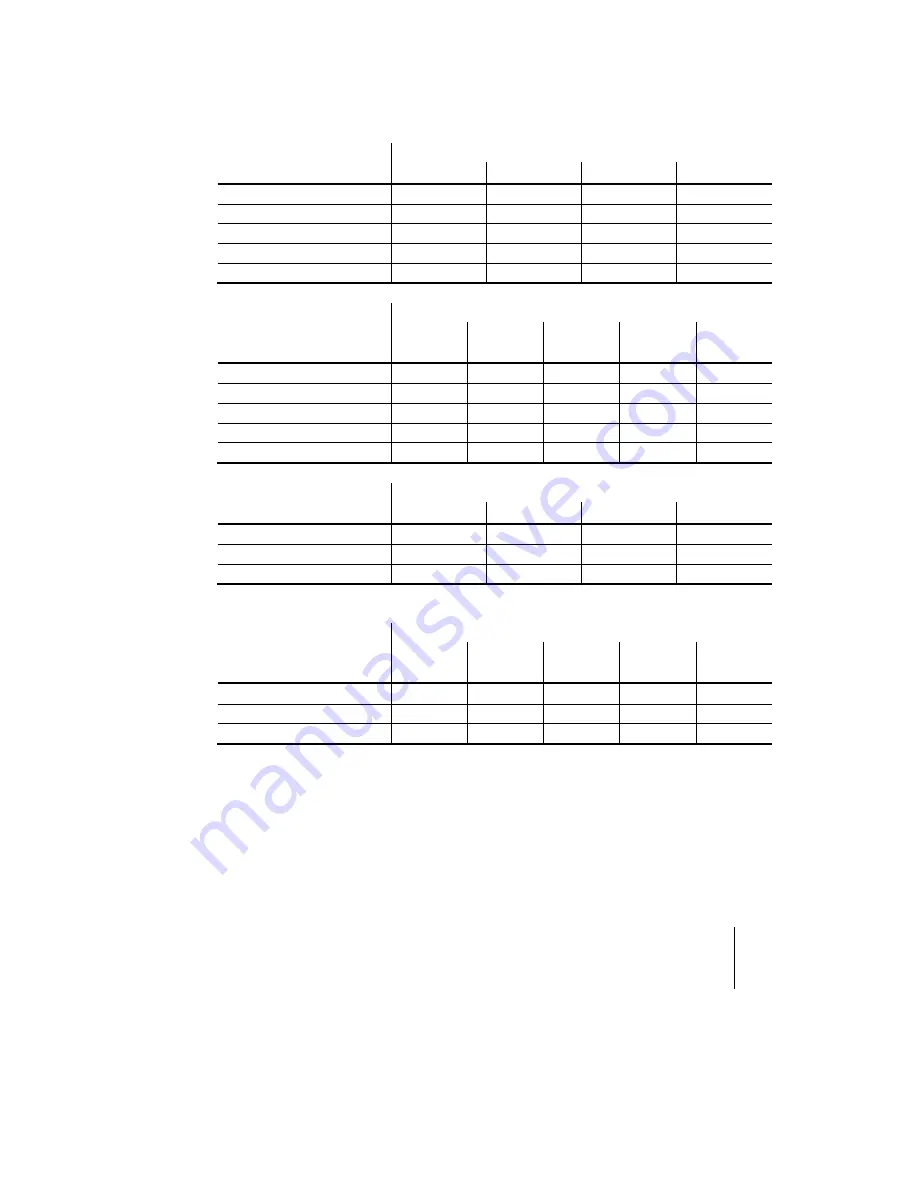
Movable. When Auto235 feature is selected the 12V Trigger 2 will send power to the 
anamorphic lens if the source format is 2.35:1 It will not send the power when the 
source format is 4:3 or 16:9. Pressing Native button on the remote will be “Auto235” 
when anamorphic lens is fixed or movable. 


HDMI 

Auto235 OFF 

4:3 

16:9 

LBX 

Native 

2D/HQFS/2D->3D 

!


!


!


!


SBS 


!


Top and Bottom 


!


!


1080p24FP 

!


!


!


!


720pFP 

!


!


!


HDMI 

Auto235 ON 

4:3 

16:9 

LBX 

Auto235 

Auto235 

Subtitle 

2D/HQFS/2D->3D 

!


!


!


!


!


SBS 


!


Top and Bottom 


!


!


!


!


1080p24FP 

!


!


!


!


!


720pFP 

!


!


!


!


!


Component 

Auto235 OFF 

4:3 

16:9 

LBX 

Native 

2D/HQFS/2D->3D 

!


!


!


!


SBS 


!


Top and Bottom 


!


Component 

Auto235 ON 

4:3 

16:9 

LBX 

Auto235 

Auto235 

Subtitle 

2D/HQFS/2D->3D 

!


!


!


!


!


SBS 


!


Top and Bottom 


!


Содержание NERO 1

Страница 1: ...NERO 1 User Guide...

Страница 2: ...es 9 Overview 9 Remote Control 13 Connections 14 Installation 14 Location 15 Mounting 18 Connections 20 Switching On and Off 21 Temperature LED indicator 22 Operation 22 Viewing 3D Content 23 3D Menu...

Страница 3: ...only the power cord supplied by the manufacturer Observe all warnings and precautions Keep the manual for future consultation Do not touch internal parts of the projector Inside the housing there are...

Страница 4: ...t use water or liquid detergent to clean it Place the projector on a stable surface Place the projector on a stable surface or use a suitable ceiling mounting bracket see Installation at page 14 Never...

Страница 5: ...more at risk of experiencing discomfort and less inclined to report symptoms Individuals who may be susceptible to epileptic seizures or strokes on the basis of personal and family history should con...

Страница 6: ...are correctly scrapped Incorrect treatment of the product at the end of its service life and failure to follow the above disposal instructions are punishable under local legislation Notice The applia...

Страница 7: ...setting Pure Action retains the dream like quality of film while maximizing the detail of every frame whereas the highest setting virtually eliminates motion Blur perfect for fast paced sports where...

Страница 8: ...nexplored installation options Lens Shift The combination of the manual adjustment of Lens Shift and a wide 1 9x zoom range enables a wider range of projector placement possibilities This remarkable c...

Страница 9: ...ower Off C Power On D Brightness E Gamma F Contrast G Advanced H CMS I LED Brightness J 16 9 K 4 3 L Letter Box M Native N Pure Engine O 3D Format P Arrows for Menu Q Enter R Menu S Mode T HDMI Link U...

Страница 10: ...35 1 M Native The input source will be displayed without scaling N Pure Engine The PureEngine is a collection of advanced image processing technologies that enhances the quality of the displayed image...

Страница 11: ...discrete codes for Aspects Memories 3D Controls 3D Mode and Input Formats Operation The NERO1 projector has two IR receivers B C one on the front of the unit and one on the top The operative range of...

Страница 12: ...e manufacturer Dispose of used batteries according to local regulations Make sure you do not mix old and new batteries or different types of batteries Remove the battery compartment cover by sliding t...

Страница 13: ...te video signals Also used as composite sync input for SCART RGBS signals L Standby Power button Power LED S Source Source button Control Service G SERVICE USB type B port for firmware upgrade H RS 23...

Страница 14: ...ojector has adequate ventilation Check that room temperature is below 35 C and that the projector is away from heating vents Ensure a minimum 0 20 m 5 in clearance on the left right and rear sides of...

Страница 15: ...cabinet see D E at page 11 To determine where to position the projector consider the size and shape of your screen the location of your power outlets and the distance between the projector and the re...

Страница 16: ...llation instructions and safety guidelines provided with the bracket Do not over tighten the screws Orientation By default the NERO1 is configured for a Front installation projector installed upright...

Страница 17: ...e sides of the image will be inclined If the tilt is not excessive you can use the Keystone function of the projector to correct the image shape See V Keystone on page 41 Note Keystone correction may...

Страница 18: ...ogether with the signal If your source has dual HDMI outputs we would recommend direct connection to the projector from one of the HDMI connections and the second HDMI output to the input of an approp...

Страница 19: ...he cable manufacturer may be required Note RS 232 communications are limited to max 15 m 50 ft VGA communication are limited to max 20 m 65 ft HDMI communication are limited to max 20 m 65 ft CVBS YPb...

Страница 20: ...switch between inputs Switching Off I Press the button on the remote control or button on the back panel of the projector one time The following message will be displayed on the screen Press the butto...

Страница 21: ...again If the warning indicator light up again please contact your nearest service center for assistance MESSAGE POWER LED Red POWER LED Blue TEMP LED Red Standby State Input power cord Steady Light O...

Страница 22: ...equivalent that is capable of playing 3D content and is HDMI 1 4 compliant plus of course a copy of a film that has released on Blu ray in 3D Only films with the 3D logo are compatible Ensure your pl...

Страница 23: ...button on the remote control see 3D Format at page 23 Switch on your 3D glasses Refer to the instructions supplied with the glasses to ensure correct operation Important All 3D technologies currently...

Страница 24: ...ist of a sequence of alternating frames wherein each successive frame carries the image meant for one or the other eye 2D 3D 2D signal transform 3D signal 3D 2D You can choose one of the following opt...

Страница 25: ...80i 50 Hz Side by Side Half 1920 x 1080i 60 Hz Side by Side Half 1920 x 1080p 24 Hz Top and Bottom 1920 x 1080p 24 Hz Frame Packing HDMI 1 3 3D CONTENT 1920 x 1080p 60 Hz Side by Side Half While 3D Fo...

Страница 26: ...the sub menu press or on the remote control to highlight the input and select which sources you require Press to finalize the selection The projector will only search for inputs that are enabled Press...

Страница 27: ...ol Use to change settings on a selected item Note Depending on the selected input source and signal characteristics some adjustments may not be available Image and Display menu sections provide access...

Страница 28: ...not available for a given input are not displayed in the menu See Table 1 for details Table 1 Video RGBS YPrPb RGB Graphics HDMI 1 2 Contrast Brightness Color Tint Sharpness Noise Reduction 1 Fine Det...

Страница 29: ...tings for home theater The default Color Gamut is the Cinema SIM2 available only D65 BRIGHT maximum brightness from PC input The default Color Gamut is the Native Native USER user s settings The defau...

Страница 30: ...le while ensuring that it can still be distinguished from the adjacent band with brightness slightly less than white Alternatively use a scene composed of well lit white objects surrounded by light ob...

Страница 31: ...Decreasing the value increases the red content of the image increasing it increases the green content For this adjustment use skin tones or a test card image with color bars as a reference This adjus...

Страница 32: ...des of brightness blacks dark medium and light grays whites in the projected image Choose the setting that is appropriate to the type of video source the ambient lighting and your subjective preferenc...

Страница 33: ...a new color processing algorithm and enhancements to enable the picture s vividness to be significantly increased The range is from 0 to 5 Pure Action Pure Action uses sophisticated algorithms to ensu...

Страница 34: ...LED brightness between 100 13 DynamicBlack 2 automatically adjusts the LED brightness between 100 5 DynamicBlack 3 automatically adjusts the LED brightness between 100 0 POWER manually adjust the LED...

Страница 35: ...SIM2 the color gamut nearest to the DLP Cinema Note the HDTV and the Cinema SIM2 cannot be changeable from the CMS menu Color Gamut Enabled colors CMS Menu Native W Available only for W Color RGBCMYW...

Страница 36: ...from AUTO RGB 0 255 RGB 16 235 or YUV Auto determines the signal range using the information provided by the AVI infoframe of the HDMI signal If the AVI infoframe is missing or inconsistent the projec...

Страница 37: ...This aspect ratio is also recommended when using Anamorphic Lenses Some letter box format DVDs are not enhanced for 16x9 played in 16 9 mode In this situation please try to use the 4 3 mode to view th...

Страница 38: ...ton on the remote will be Auto235 when anamorphic lens is fixed or movable HDMI Auto235 OFF 4 3 16 9 LBX Native 2D HQFS 2D 3D SBS Top and Bottom 1080p24FP 720pFP HDMI Auto235 ON 4 3 16 9 LBX Auto235 A...

Страница 39: ...76i p 1080i p 720p PC 4 3 1440 x1080 center 16 9 1920 x 1080 center LBX Catch 720x363 Center Catch 720x436 Center Catch 1920x817 Center Catch 1920x545 Center Catch 75 65 of height Center Scale to 1920...

Страница 40: ...m Catch 87 8 of height Bottom When source is 2 35 1 with black bar at top bottom doing above catching rule and scale to 1920x1440 then get the central 1920x1080 image to display When source isn t 2 35...

Страница 41: ...er the menu H press the to shift the projected image position horizontally V press the to shift the projected image position vertically V Keystone Press the or to adjust image distortion vertically an...

Страница 42: ...The image is projected straight on the screen Rear Desktop when selected the image will appear reversed Front Ceiling when selected the image will turn upside down Rear Ceiling when selected the imag...

Страница 43: ...ed screens 12V Trigger 2 press the Off to disable the trigger Press the On to enable the trigger and the programmable sub menu The sub menu is accessed by selecting the On option then pressing the but...

Страница 44: ...e control of a motorized anamorphic lens This feature can select an anamorphic Lens from None Fixed or Movable 12V Trigger 2 Anamorphic Lens Off On Auto 235 Auto 3D None Fixed Movable Information Pres...

Страница 45: ...ge It can display the menus in Multilanguage Press to into the sub menu and then use or or or to select your preferred language Press to finalize the selection Input Source See Input menu at page 26 H...

Страница 46: ...to be turned off at the same time set the setting to No Power On Link CEC power on command Mutual both projector and CEC device will be turned on simultaneously PJ Device the CEC device will be turne...

Страница 47: ...ency to match the frequency of your computer s graphic card Use this function only if the image appears to flicker vertically Phase Synchronize the signal timing of the display with the graphic card I...

Страница 48: ...r in the image Press the to increase the amount of color in the image Hue Adjust the color balance of red and green Press the to increase the amount of green in the image Press the to increase the amo...

Страница 49: ...50 1280 x 720 60 1280 x 720 120 2 WXGA 1280 x 768 60 3 1280 x 768 75 1280 x 768 85 3 1280 x 768 60 SXGA 1280 x 1024 60 1280 x 1024 75 1280 x 1024 85 SXGA 1400 x 1050 60 UXGA 1600 x 1200 60 HDTV 1080p...

Страница 50: ...elevator feet from the bottom of the projector as indicated on the image In the accessories of the projector there are 5 spacers 4 pcs of 25 length A and 1 pcs of 35 length B The spacers have to been...

Страница 51: ...as shown below and secure it using three M6 screws F G SFM150 SFUNI Put between the plate of the bracket and the bottom of the projector the spacers supplied only the 25 mm length spacer Align the bra...

Страница 52: ...r Image Problems No image appears on screen Ensure all the cables and power connections are correctly and securely connected as described in the Installation section Ensure the pins of connectors are...

Страница 53: ...horizontally and vertically of one of the IR receivers on the projector Remove any obstacles between the remote control and the infrared sensor in the front of the projector Make sure the remote contr...

Страница 54: ...n switching inputs on either the projector or the AV Receiver Processor sometimes the picture is either green or pink This usually means the incorrect color standard has been selected This is sent aut...

Страница 55: ...IR remote control Standby and Source button on rear panel RS 232 Serial commands HDMI Link Communication Ports 1 x USB 1 1 type B firmware upgrade for onboard memory 1 x RS232 male D Sub 9 pin for ser...

Страница 56: ...x LBX Native Power Requirement 100 240 V AC 10 50 60 Hz Operating Consumption Bright Normal Typical 190W MAX 240W 110VAC Typical 185W MAX 235W 220VAC Standard Film Typical 135W MAX 170W 110VAC Typical...

Страница 57: ...he following table explain the distance from screen to lens 1 78 1 16 9 Screen Diagonal Size in Width m Height m Min m Max m Min ft Max ft 100 2 21 1 25 3 3 6 4 18 9 20 9 120 2 66 1 49 4 7 7 13 1 25 2...

Страница 58: ...8 Dimensions NERO1 User Guide 58 11 Dimensions NERO1 dimensions in millimeters and inches...

Страница 59: ...8 Dimensions NERO1 User Guide 59...

Страница 60: ...383292 Fax 39 0434 383260 Email info sim2 it www sim2 com SIM2 USA SIM2 USA Inc 10216 NW 47th Street Sunrise FL 33351 Phone 1 954 442 2999 Email sales sim2usa com www sim2usa com SIM2 BRIONVEGA Co Lt...

Отзывы: