5
Siemens Energy & Automation, Inc.
Outgoing Power And Control Wiring
Connect power and control wires for the control unit with the
control unit stabs disengaged from the vertical bus. Use strand-
ed wire and leave enough slack in the wire to permit partial with-
drawal of each unit for test position maintenance checks.
Wiring between control units is pulled through the vertical wire-
way at the right side of the section. These wires can be fas-
tened to the wireform wireties provided. Route wiring to con-
trol units in other sections through the horizontal wireways.
For control units with Size 3 or smaller starters and load termi-
nal blocks, the load connections are made to the terminal
blocks. Load connections for Sizes 3
1
/
2
–5 control units are
always made directly to the starter.
When load cable conduit is in the bottom of a Motor Control
Center, additional room for pulling cable may be obtained by
removing bottom plug-in units.
For rear units of back-to-back Motor Control Centers, connect
motor T1 to terminal unit T3 and motor T3 to terminal unit T1 in
order to obtain the same motor rotation as for motors controlled
by front units.
Pre-Operation Checks
Before energizing and operating the motor control center, per-
form the following checks:
1. Test insulation resistance for all electrical circuits within the
control center for grounds.
2. Operate all magnetic devices by hand to be sure that all
parts operate freely. Some contactors are shipped with
restraining devices to minimize vibration during shipment.
Be sure that all such blocks have been removed. Check
electrical interlocks for proper contact operation.
3. Current transformers for customer remote devices are
shipped with secondaries shorted out. Be sure all such
shunts are removed when the metering circuits are com-
pleted.
4. Be sure that each motor is connected with the proper
starter.
5. Check the overload heater element against the full load cur-
rent shown on the nameplate of each motor.
6. Check all heater elements to insure that they are properly
installed.
7. Check all timers for proper time interval setting and contact
operations.
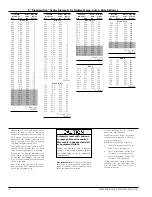
8. If HMCPs are used, adjust as follows:
a. Determine motor full load current from the motor name-
plate data. Refer to the table and determine the appro-
priate setting position. Use screwdriver to set indicator
on adjustment screw to the appropriate position.
b. For maximum protection the trip position should be set
as low as possible. Turn the adjustment screw counter-
clockwise to successively lower positions until the break-
er trips on motor starting. After this position is deter-
mined, turn the adjustment screw clockwise to the next
higher setting for normal operation. The adjustment
screw is infinitely adjustable for customer convenience.
If the breaker does not trip at the lowest setting, leave
the indicator at this setting.
c. If “nuisance” tripping occurs, check voltage and load
with peak reading ammeter to locate problem.
9. If fusible disconnect type starters are used, check for prop-
er fuse size. Fuses are normally sized for short circuit pro-
tection. For high capacity units (100 KA), fuse size should
not exceed 150% FLA for RK5 time delay, 250% FLA for RK5
non time delay, and 300% FLA for Type J.
10. Clean the motor control center and be sure that all extrane-
ous material has been removed.
11. Check all connections for tightness, both mechanical
and electrical. Factory connections may loosen during
shipment and storage. It is of utmost importance to
inspect all connections and bolted joints for tightness
PRIOR TO energizing the equipment.
12. Close all access plates and doors before the motor control
center is energized.
13. Jog motors to determine proper rotation.
600A Bolted Clamp Assembly Instructions
A
- Vertical Bus Bar
G
- Tie Bar
B
- Carriage Bolt
H
- Carriage Bolt
C
- Flat Washer
I
- Flat Washer
D
-
3
/
8
" x 16" Standard Hex Nut
J
-
3
/
8
" x 16" Standard Hex Nut
E
- Clamping Spring
K
- Riser
F
- Bar
Description
The clamp assembly is required for replacement or assembly of
400 and 600A circuit breakers or disconnect switches that are
mounted directly to the vertical bus on Furnas System/89 Motor
Control Centers.
Содержание TIASTAR SFIM-70020
Страница 63: ......
Страница 64: ......
Страница 65: ......
Страница 66: ......
Страница 67: ......
Страница 68: ......
Страница 69: ......
Страница 70: ......
Страница 71: ......
Страница 72: ......
Страница 73: ......
Страница 74: ......
Страница 75: ......
Страница 76: ......
Страница 77: ......
Страница 78: ......
Страница 79: ......
Страница 80: ......
Страница 81: ......
Страница 82: ......
Страница 83: ......
Страница 84: ......
Страница 85: ......
Страница 86: ......
Страница 87: ......
Страница 88: ......
Страница 96: ...4 ...
Страница 100: ...5 Today and tomorrow you ll know you have the very best ...
Страница 115: ...13 Siemens Energy Automation Inc ...
Страница 116: ...14 Siemens Energy Automation Inc ...
Страница 117: ...15 Siemens Energy Automation Inc ...

