background image

9.2.4

Collecting 3D data

Tab: 

3D Image

New 3D profiles are being collected constantly, overwriting what is displayed in the
visualization window. In order to get an entire 3D image of the object, an external
enable signal can be used. A photoelectric switch or similar device can be connected
to the device. For information on electrical connections and pin configuration, see 

see

"Electrical connections", page 34

.

1.

Click the start button to start the collection of 3D image data.

2.

To adjust the number of profiles in each grabbed 3D image, edit the 

Profile per

image

 parameter in the 

3D image format

 section.

3.

To save the 3D image, there are several options:

°

Click the 

Add image

 button to save the image to the 

Evaluation 

window.

°

Click the 

Save image

 button, to save the image to disk.

°

Use the 

Record

 functionality to record all or selected images to disk.

4.

Use the image handling controls to move, rotate, and zoom while you inspect the
image, 

see "General image handling", page 64

.

5.

Use the 

View

 drop-down menu to select view mode, 

see "Image components",

page 74

.

6.

To change the color range, click the Options button and select the 

Aspect ratio

button, 

see "Aspect ratio", page 76

.

7.

To select data presentation, click the Additional settings button and select 

Surface

or 

Points

see "Data rendering mode", page 77

.

8.

To adjust the scene lighting, use the menus and sliders in the GUI, 

see "Light

settings", page 78

.

9.2.5

Image components and visualization

9.2.5.1

Image components

A 3D Image can either be visualized as a heightmap, or rendered in the 3D view.

View as heightmap

The drop-down list contains all image components available in the current setup. It
is possible to select between 

Range

 (3D data), 

Reflectance

 and 

Scatter

, if the data is

available. In 

Reflectance

 mode, color is proportional to the intensity values of the pixels.

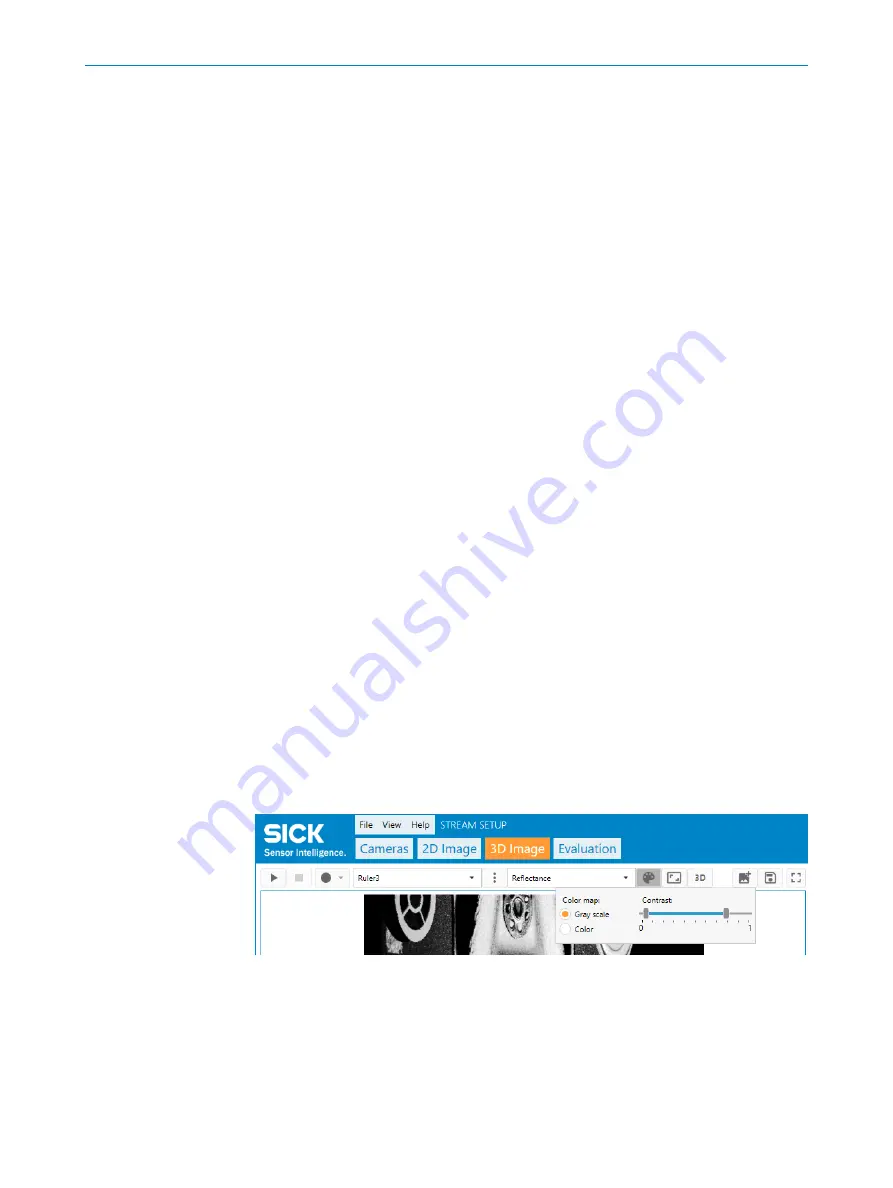
Select the 

Palette

 button for available color maps. The image can be viewed in both

grayscale and color, with the option to adjust contrast. Data outside the contrast range
is dark if too low and bright/red if too high.

Figure 73: 3D image 

Reflectance

 component.

View as rendered 3D image

Click the 

3D

 button to switch to the rendered 3D image. When you view a rendered 3D

image, you can select different ways to color it. Select the 

Palette

 button for available

color maps, and the option to adjust contrast and light. Data outside the contrast range
is visualized with a rotating color palette instead of a fixed color. For more information
about light adjustments, see 

"Light settings", page 78

.

OPERATION

74

O P E R A T I N G   I N S T R U C T I O N S | Ruler3000

8026049//2021-04 | SICK

Subject to change without notice

Содержание 1106166

Страница 1: ...O P E R A T I N G I N S T R U C T I O N S Ruler3000 3D vision...

Страница 2: ...issible within the limits of the legal determination of Copyright Law Any modi fication abridgment or translation of this document is prohibited without the express written permission of SICK AG The t...

Страница 3: ...talling PC software 13 3 4 Capturing the first images 13 3 4 1 Finding and connecting the camera 14 3 4 2 Getting a 2D image 14 3 4 3 Getting a 3D image 14 4 Product description 16 4 1 Introduction 16...

Страница 4: ...3 1 Editing parameters 41 8 4 Extraction region 42 8 4 1 Setting extraction region 45 8 4 2 Measurement mode 46 8 4 3 Maximum buffer size 46 8 5 Laser profile extraction 46 8 5 1 Exposure time 47 8 5...

Страница 5: ...lifetime 83 11 Troubleshooting 85 11 1 Over triggering 85 11 2 Encoder line trigger setup tips 85 11 3 Network card settings 85 11 4 Rescue mode 85 11 5 Repairs 85 11 6 Returns 86 12 Decommissioning 8...

Страница 6: ...I O control 105 16 2 7 Counter and timer control 106 16 2 8 Encoder control 107 16 2 9 Event control 108 16 2 10 User Set control 108 16 2 11 File access control 109 16 2 12 Chunk data control 110 16...

Страница 7: ...ion on operating the machine or system in which the device is integrated For more information refer to the operating instructions of the specific machine or system 1 2 Explanation of symbols Warnings...

Страница 8: ...can result in dangerous situations Therefore observe the following information Product should be used only in accordance with its intended use All information in these operating instructions must be s...

Страница 9: ...t regulations to be able to perform tasks delegated to them and to detect and avoid any potential dangers independently Electricians have the specialist training skills and experience as well as knowl...

Страница 10: ...ing may increase the level of risk Current national regulations regarding laser protection must be observed Caution Use of controls or adjustments or performance of procedures other than those specifi...

Страница 11: ...660 15nm P C6 1mW within 7mm aperture If the device itself is installed in a way that obscures the attached warning labels additional clearly visible labels must be attached 2 9 Note on laser radiatio...

Страница 12: ...Make sure that the camera is properly cooled 1 2 Figure 2 Mounting position stand off from device bottom laser side is 245 5 mm 1 Stand off from device bottom 245 5 mm 2 Measuring range 125 mm For det...

Страница 13: ...on the camera using the power I O cable 4 Connect a 24V DC power supply to the connection module 24V on terminal 1 and GND on terminal 2 5 Switch on the power to the system For further information abo...

Страница 14: ...d as an ordinary camera You can edit parameter values related to the image acquisition and evaluate the result directly in the image viewer until the result is satisfactory Figure 5 Getting the 2D ima...

Страница 15: ...Figure 6 Getting the 3D image GETTING STARTED 3 8026049 2021 04 SICK O P E R A T I N G I N S T R U C T I O N S Ruler3000 15 Subject to change without notice...

Страница 16: ...n retrieve its position x y z in millimeters in a coordinate system relative to the Ruler3000 and the reflectance i e the amount of light that is reflected by the object 3D image data can also be retr...

Страница 17: ...g laser light is distributed beneath the surface of the object This is useful for example for find ing the orientation of fibers in wood Note that the output from the camera is not images of the objec...

Страница 18: ...s the profiles sent from the camera More information about 3D measurements see Range 3D measurement page 95 Range By default the range measurement values from the camera are calibrated and rectified t...

Страница 19: ...d scatter right The knots and the blue stained right edge of the board outlined in blue appear dark in the scatter image 4 3 Hardware description 4 3 1 Sensor The Ruler3000 camera is based on a unique...

Страница 20: ...re upgrade fast flashing O Yellow Idle O Green Continuous or single frame acquisi tion Red flashing Thermal warning risk of overheating O Red The device is in rescue mode due to software problems or o...

Страница 21: ...tive names For the same reason there are only a few parameters available in the GUI It is still possible to reach all of the available GenICam parameters via the API see Features page 97 For informati...

Страница 22: ...Space with a Ruler3000 is to connect the device to either a SIM or an IPC running SICK AppEngine This extra hardware in turn runs an AppSpace app This is due to that Ruler3000 is a streaming device an...

Страница 23: ...No details about the images are coming with the callback You need to find out if it is range reflectance scatter etc Rectified image needs to be scaled and off seted to get wanted mm values Details a...

Страница 24: ...ort inspection Immediately upon receipt in Goods in check the delivery for completeness and for any damage that may have occurred in transit In the case of transit damage that is visible externally pr...

Страница 25: ...torage periods of longer than 3 months check the general condition of all components and packaging on a regular basis TRANSPORT AND STORAGE 5 8026049 2021 04 SICK O P E R A T I N G I N S T R U C T I O...

Страница 26: ...th a network interface card NIC that supports Gigabit Ethernet For informa tion about requirements Recommended network card settings page 113 Power I O cable Ethernet cable for Gigabit Ethernet with M...

Страница 27: ...rapezoid shaped area in the laser plane The maximum height and the maximum width of the object to be inspected define a rectangle that must be entirely inside the trapezoid total FOV For correct measu...

Страница 28: ...s fitted with an optical red band pass filter to reduce ambient light but some shielding might still be needed 6 4 Field of view diagram Each device is uniquely calibrated which means different device...

Страница 29: ...Width at maximum working distance Table 2 Preliminary measurement details Ruler3020 Field of view height 125 mm Field of view width 155 220 mm Stand off from device bot tom laser side 245 5 mm Stand o...

Страница 30: ...to be connected at both ends of the cable Ensure that loose cable ends are isolated Connect unused pins to GND and leave unused output pins floating Wire cross sections of the supply cable from the cu...

Страница 31: ...cal trigger sen sor s system controller via shielded cables The cable shield for the data cable for example rests against the metal housing of the device The device can be grounded through the cable s...

Страница 32: ...llations On widely distributed system installations with correspondingly large potential differen ces the setting up of local islands and connecting them using commercially available electro optical s...

Страница 33: ...n the event of large differences in the ground potential ground loops are effec tively prevented As a result equalizing currents can no longer flow via the cable shields and metal housing NOTICE The v...

Страница 34: ...rnet GigE and Power I O 2 Connect the Ethernet cable to the GigE connector on the camera Connect the other end of the Ethernet cable to the Network Interface Card NIC in the PC 3 Connect the connectin...

Страница 35: ...er type Encoder Input B or Do not connect Configurable RS 422 TTL or HTL Default RS 422 TTL 13 Reserved 14 LASER STROBE OUT22 5 V trigger output for Laser or Strobe 15 I O 2 24 V Line trigger input3 1...

Страница 36: ...ull Max output cur rent 100 mA 5 V outputs 14 Output type Push pull 7 5 2 GigE connector 1 7 2 6 5 4 3 8 Pin assignment Table 5 GigE connector 8 pin Pin Signal 1 GETH L1 2 GETH L1 3 GETH L2 4 GETH L2...

Страница 37: ...n ports for CDB650 204 Terminal in CDB650 Signal in Ruler3000 Voltage 1 50 I O 3 24 V input 2 51 I O 4 24 V output 3 10 I O 1 24 V input 4 13 I O 2 24 V input 5 21 Laser trigger 2 5 V output 6 34 Enco...

Страница 38: ...inal in CDB650 Signal in Ruler3000 Voltage 1 Power supply 24 V input 7 ELECTRICAL INSTALLATION 38 O P E R A T I N G I N S T R U C T I O N S Ruler3000 8026049 2021 04 SICK Subject to change without not...

Страница 39: ...the cameras For best performance connect each camera to a separate NIC For recommended network settings see Recommended network card settings page 113 8 1 3 Installing PC software The latest version o...

Страница 40: ...ded click the three dots to the right and select IP settings to edit the IP settings of the device see Editing IP settings page 65 d Click Connect When the device is connected select 2D Image to conti...

Страница 41: ...he Evaluation tab after each adjustment and compare the images to find the best configuration You cannot edit the parameters while the camera is acquiring data 1 Click the stop button to stop acquirin...

Страница 42: ...utput either the raw data i e a standard 2D image or the 3D profile data The region of interest ROI is the area within the laser plane in which the device will look for a profile to capture The parts...

Страница 43: ...erest height 4 Region of interest width Using a smaller region on the sensor enables measurements at a higher rate The region is specified by the parameters OffsetX OffsetY Width and Height as shown i...

Страница 44: ...res are given in sensor pixel or world mm coordinates 3D extraction processing module Profiles per image Width Height Width 3D extraction Extraction region 1 2 3 Figure 27 A 3D processing module defin...

Страница 45: ...adjust the height and position of the region that is used to generate the 3D image data follow the steps below NOTE For best image quality make sure that the whole width of the laser line is within th...

Страница 46: ...due to the limited GigE Vision retransmission buffer memory in the device The maximum buffer height i e Profiles per image depends on the data format the region width or rectification width if using...

Страница 47: ...by clicking on the Timed profile rate field The maximum profile rate is shown in the information field at the bottom NOTE The maximum exposure time and the maximum profile rate are stored as floating...

Страница 48: ...his will result in bad image quality If Detection threshold is too high not all laser peaks will be registered This will result in an image where some parts are missing Missing data will be registered...

Страница 49: ...nd 1 Raw profile 2 Reflections 3 Intensity along a b 4 First peak 5 Maximum peak 6 Last peak 7 Intensity 8 Threshold 8 5 3 2 WAM size The size of Window Around Maximum WAM is used for high resolution...

Страница 50: ...localization of the laser line when acquiring images containing both dark and bright materials such as bright objects towards a dark background or dark objects with bright prints The HDR function is o...

Страница 51: ...inear mode the sensor readout and a new exposure can be done in parallel For example If the readout time is 33 s and the exposure time is 30 the total cycle time is 33 s for linear mode and 63 s for H...

Страница 52: ...cted in parallel to the 3D data The reflectance values are saved as an 8 bit grayscale image with one value corresponding to each point in the range dataset The Reflectance checkbox enables collection...

Страница 53: ...denoted in blue appear dark in the scatter image Scatter measurements can distinguish material effects which is useful for organic mat ters such as wood wood fibers transmit light along their growth d...

Страница 54: ...own in gray 1 Laser peak position 2 WAM window You can set additional scatter parameters using GenICam or GenIStream see GenI Stream API page 21 8 6 1 3 Profile meta data Profile meta data are tagged...

Страница 55: ...and profiles Triggering is used to control the initiation and rate of data acquisition You can use an external signal to trigger each image or every single profile The camera can also be configured to...

Страница 56: ...ger input of the device Activating this mode is only possible using GenICam or GenIStream see GenIStream API page 21 Use an encoder for profile triggering In that case pulses are received on the encod...

Страница 57: ...r input is always used as trigger source 8 7 2 2 Encoder triggering When you use an encoder for triggering the camera counts the number of pulses received on the encoder inputs using an internal count...

Страница 58: ...l encoder is used the camera cannot differentiate between forward and backward movement The single channel encoder mode is therefore only visible and selectable when the Encoder mode see table 6 is se...

Страница 59: ...he desired mode The Encoder value is an informational field and can be reset to 0 by clicking the Encoder reset button Encoder type Ruler3000 supports the encoder type RS 422 It is only possible to ch...

Страница 60: ...apture is completed To avoid unnecessary CPU load set the Profiles per image parameter to no less than 100 pixels 0 V 24 V Height Height Height Image trigger signal Profile acquisition level sensitive...

Страница 61: ...m u v z x Figure 56 Sensor image and corresponding calibrated x z points The camera can operate both Calibrated and Uncalibrated The default setting is Calibrated Camera Figure 57 Calibration GUI refe...

Страница 62: ...ane and the camera the number of holes in the image depends on the range value with typically no holes in the image at one end of the range scale and maximum number of holes at the other Hence the spr...

Страница 63: ...to change the parameters while the image acquisition is started 1 2 3 4 5 8 6 7 Figure 59 Graphical user interface 1 Image viewer 2 Menu bar 3 Tab section 4 Control bar 5 Parameter settings pane 6 Pa...

Страница 64: ...Description Pan image Click and drag to pan image Zoom Rotate the mouse scroll wheel 3D Image handling controls Action Description Rotate around center point Click and drag to rotate the image around...

Страница 65: ...useful for example when you want to connect to a camera that is not on the same subnet as the NIC see Recommended network card settings page 113 Then you have to reconfigure the camera to the same sub...

Страница 66: ...5 Tab 2D Image This view shows a grayscale 2D image which can be useful when adjusting the expo sure time or deciding the region of interest 9 1 2 4 3D Image Here you view the 3D image that is the res...

Страница 67: ...processing tools that can be applied to the currently selected image In the Select processing tool list box you can choose between three different evaluation methods as described below Image filterin...

Страница 68: ...and the center point in another plane You can define which pixels to include in the plane estimation for both planes 9 1 3 Control bar Depending on the currently active tab different options are avai...

Страница 69: ...field of view in the 2D viewer This feature is only available for Ruler3000 cameras Boost expo sure Brighten up the region of interest by temporarily increase the exposure time for the 2D image Specif...

Страница 70: ...the parameters while the camera is acquiring data The parameter settings pane is located to the right of the image viewer showing different parameter categories It also holds a text box showing a desc...

Страница 71: ...is assumed that the Ruler3000 and Stream Setup are installed and working properly How to install the Ruler3000 and Stream Setup is briefly described in Getting started page 12 When capturing 3D image...

Страница 72: ...selected the Default configuration is used The Default configuration is read only and cannot be modified NOTE A Camera configuration is only valid for the firmware version that was used when the confi...

Страница 73: ...of the guaranteed field of view Show extraction region Select the Show area in 2D image checkbox to visualize the selected extraction region When the checkbox is selected a blue overlay appears in the...

Страница 74: ...tional settings button and select Surface or Points see Data rendering mode page 77 8 To adjust the scene lighting use the menus and sliders in the GUI see Light settings page 78 9 2 5 Image component...

Страница 75: ...lor is proportional to depth z coordinate Suitable to show large variations in depth Hybrid Color hue is proportional to depth z coordinate color brightness is proportional to the laser reflectance Th...

Страница 76: ...when showing the 3D image Subsampling reduces the amount of data and gives a more responsive 3D display especially for large data sets and a slow PC Parameter Description Sub sampling X Defines how m...

Страница 77: ...s displayed as a crosshair which can be disabled The Reset button resets the rendered view to default Figure 76 3D image Settings options Table 8 Rendering modes Rendering mode Description Example Sha...

Страница 78: ...y file that contains the image data dat An XML file that describes the binary file xml In the 2D Image tab the currently displayed 2D image is saved In the 3D Image tab the complete buffer of the curr...

Страница 79: ...en saved to disk either by a recording or saved as a single image Figure 79 Loading and selecting an image GUI reference To load a single 2D or 3D image do as follows 1 Open the Evaluation window The...

Страница 80: ...dots to the right You can also access the Camera action menu from the 2D Image and 3D Image tabs The Camera files window opens and different files and actions are displayed in a list Figure 80 Camera...

Страница 81: ...update is finished the device restarts automatically 3 Click Close 4 Reconnect to the device see Connecting the camera page 40 OPERATION 9 8026049 2021 04 SICK O P E R A T I N G I N S T R U C T I O N...

Страница 82: ...nt conditions and climate Recommended At least every 6 months Specialist 10 2 Cleaning NOTICE Equipment damage due to improper cleaning Improper cleaning may result in equipment damage Only use recomm...

Страница 83: ...ons stated in this document 10 3 1 About laser lifetime The total lifetime of a laser module is dependent on the time the laser is lit By reducing the time the laser is lit the total lifetime will inc...

Страница 84: ...t data page 90 Avoid temperature peaks caused by direct sunlight or electrical heaters that may heat up the housing At higher ambient temperatures the expected lifetime for the laser diode will decrea...

Страница 85: ...s are counted by the camera The Encoder reset button will reset the counter to 0 11 3 Network card settings For problems related to the network card settings see Recommended network card settings page...

Страница 86: ...ack aging NOTE To enable efficient processing and allow us to determine the cause quickly please include the following when making a return Details of the contact person Description of the application...

Страница 87: ...ICE Danger to the environment due to improper disposal of the device Disposing of devices improperly may cause damage to the environment Therefore observe the following information Always observe the...

Страница 88: ...m Width at maximum work ing distance 220 mm Maximum height range 125 mm Factory calibrated Yes Light source Visible red light laser 660 nm Divergence fan angle 40 Output power 22 mW Can be pulsed or c...

Страница 89: ...FPN correction causes a small reduction of the resulting signal range and the expected useful signal range is around 240 AD units When the imager is saturated residual FPN may appear 13 3 2 Light sens...

Страница 90: ...e and Reflectance 13 4 Interfaces Product Ruler3020 Ethernet UDP IP 1 Gbit s data transmission rate Configuration software Stream Setup Communication interfaces Gigabit Ethernet GigE Vision Operating...

Страница 91: ...t M12 8 pin female X coded Connector material Nickel plated brass Supply voltage 24 V DC 10 Ripple 5 Vpp Power consumption 12 W maximum Current consumption 1 5 A maximum Enclosure rating IP65 IP67 Pro...

Страница 92: ...20 117 5 4 63 25 70 2 76 Figure 84 Ruler3020 dimensions 1 Optical receiver 2 Optical sender 3 Fastening threads M5 x 12 mm deep with through hole 4 2 mm 4 Connector Power I O 5 Connector Gigabit Ether...

Страница 93: ...cessories and where applicable mounting information can be found online at www sick com Ruler3000 ACCESSORIES 14 8026049 2021 04 SICK O P E R A T I N G I N S T R U C T I O N S Ruler3000 93 Subject to...

Страница 94: ...e line Contains one value for each measured point along a cross section of the object of each aquired type Same thing as profile line rate The rate at which the profiles in an image are captured Hz MT...

Страница 95: ...rt direction 2 Range Z 3 Negative transport direction Y 4 Width X The following is important to get correct measurement results The laser line is orthogonal to the movement direction of the object 16...

Страница 96: ...ata as rectified Z data with Z pointing towards the device i e inverse to the sensor v axis The camera views the object and the laser line from above with a certain angle between the camera and the la...

Страница 97: ...he device For further information including detailed descriptions of the standard parameters see www emva org standards technology genicam NOTE There are parameter dependencies both within and between...

Страница 98: ...robe1Output This setting selects the laser strobe output for configuration 2 Set the LineSource to Region1Exposure Region1Exposure means that the laser strobe output will automatically follow the expo...

Страница 99: ...ures Naming Convention that was used to create the device s GenICam XML R DeviceTLType enum Transport Layer type of the device Values GigEVision R DeviceTLVersionMajor int Major version of the Transpo...

Страница 100: ...W DeviceRegistersStreamingStart Prepare the device for registers streaming without checking for consistency DeviceRegistersStreaming is used when loading and saving a device s configuration to from f...

Страница 101: ...e RegionSelector int The unique identifier value corresponding to the Region R ComponentIDValue ComponentSelector int The unique identifier value corresponding to the selected Component type R 1 Accor...

Страница 102: ...ratedAC CalibratedAC_Linescan RW Scan3dCoordinateSystem Scan3dExtrac tionSelector enum Value Cartesian R Scan3dDistanceUnit Scan3dExtraction Selector enum Value Pixel Millimeter R Scan3dCoordinateScal...

Страница 103: ...verse RW ReflectanceFilter Scan3dExtractionSelec tor bool Speckle reduction smoothing of reflectance RW Scan3dRectificationWidth Scan3dExtrac tionSelector int Rectification can be made to a higher or...

Страница 104: ...20 Acquisition control standard SFNC selector Selector Type Description TriggerSelector enum Selects the type of trigger to configure Value LineStart FrameStart ExposureStart AreaScanFrameStart Table...

Страница 105: ...rSelector enum Increases the dynamic range Values Off PresetSoft PresetMedium PresetAggressive RW MultiSlopeKneePointCount int The number of knee points as well as the number of addi tional exposure s...

Страница 106: ...ntrols the current electrical format of the selected physical input or output Line For encoder Lines RS422 corresponds to differential 5V TTL logic mode Line24V corresponds to single ended 24V HTL log...

Страница 107: ...arameter Type Description Access EncoderResolution float Defines the resolution of one encoder tick in the used coordi nate system RW EncoderMode enum FourPhase mode is the standard encoder mode where...

Страница 108: ...ble 32 User Set control standard SFNC selector Selector Type Description UserSetSelector enum Selects the feature User Set to load save or configure Default User Set is read only and cannot be modifie...

Страница 109: ...ce Values Open Close Write Read Delete Table 37 File access control standard SFNC parameters Parameter Type Description Access FileAccessOffset FileSelector FileOpera tionSelector int Controls the Off...

Страница 110: ...eTriggerCounter Height ChunkScan3dCoordinateSelector enum Selects which Coordinate to retrieve data from Values CoordinateA CoordinateB CoordinateC ChunkScan3dCoordinateReferenceSelec tor enum Selecto...

Страница 111: ...in the payload 1 GHz clock R ChunkEncoderValue LineSelector int The encoder counter s value when the profile exposure is triggered for each scan line included in the payload R ChunkHeight int The hei...

Страница 112: ...t R GevMCSP int Indicates the source port for the message channel R GevSCPHostPort int Controls the port of the selected channel to which a GVSP transmitter must send data stream or the port fromwhich...

Страница 113: ...the device boots with the Persistent IP configuration scheme RW GevDiscoveryAckDelay int Indicates the maximum randomized delay the device will wait to acknowledge a discovery command R Table 46 GigE...

Страница 114: ...er frame size which implies higher CPU load on the PC Symptoms of too high setting If you use a switch that is unable to support Jumbo Frames connected between the camera and the PC it is impossible t...

Страница 115: ...up to two cameras to the same encoder Use an incremental encoder with two channels A A and B B and connect all four outputs It is not possible to connect an index channel Z to the camera The drawing b...

Страница 116: ...4 Phase2 RS 422 5 Phase1 RS 422 6 Phase1 RS 422 7 Phase2 RS 422 16 ANNEX 116 O P E R A T I N G I N S T R U C T I O N S Ruler3000 8026049 2021 04 SICK Subject to change without notice...

Страница 117: ...cense LGPL MIT license zlib license and licenses derived from the BSD license This program is provided for general use without warranty of any kind This warranty disclaimer also extends to the implici...

Страница 118: ...Mexico Phone 52 472 748 9451 E Mail mario garcia sick com Netherlands Phone 31 0 30 229 25 44 E Mail info sick nl New Zealand Phone 64 9 415 0459 0800 222 278 tollfree E Mail sales sick co nz Norway...

Отзывы: