


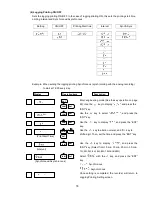


83
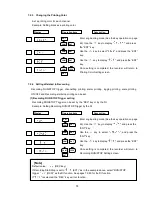
7.2.12 Data Calibration
Calibrates the voltage, RTD(resistance temperature detector), and reference junction compensation.
: Calibration of voltage
: Calibration of RTD (resistance temperature detector)
: Calibration of RJC (reference junction compensation)
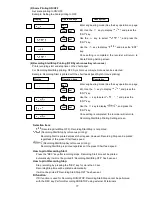
Example: Calibrating the voltage at Channel 1.
Enter engineering mode (See the key operation on page
69). Use the
key to display "
", and press
the “ENT” key.
Use the
key to select "
", and press the
“ENT” key. Select a channel to which equipment for
calibration such as an mV generator is connected, and
then, press the “ENT” key.
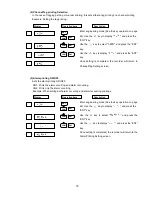
Enter 0 mV. After 30 seconds, make sure that the ALM
indicator is unlit and press the “ENT” key.
Enter 15 mV. After 10 seconds, make sure that the ALM
indicator is unlit and press the “ENT” key.
Enter 25 mV. After 10 seconds, make sure that the ALM
indicator is unlit and press the “ENT” key.
Enter 35 mV. After 10 seconds, make sure that the ALM
indicator is unlit and press the “ENT” key.
Enter 55 mV. After 10 seconds, make sure that the ALM
indicator is unlit and press the “ENT” key.
Enter 200 mV. After 10 seconds, make sure that the
ALM indicator is unlit and press the “ENT” key.
Enter 1 V. After 10 seconds, make sure that the ALM
indicator is unlit and press the “ENT” key.
Enter 5 V. After 10 seconds, make sure that the ALM
indicator is unlit and press the “ENT” key.
Enter 10 V. After 10 seconds, make sure that the ALM
indicator is unlit and press the “ENT” key.
If the calibration is correct, select "
" with the
key, and if incorrect, select "
" with the
key. Then, press the “ENT” key.
[Note]
For calibration of voltage input, calibrate only one channel.
ENT
ENT
ENT
ENT
ENT
ENT
ENT
ENT
ENT
ENT
ENT
ENT
ENT
ENT
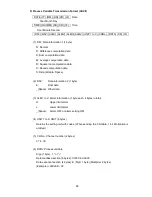
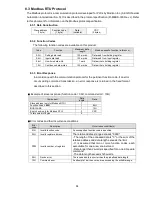
Display
Operation keys
Description
[Note]
This recorder is carefully calibrated, however, if an indicated value is not normal, check the settings
again.


