


80
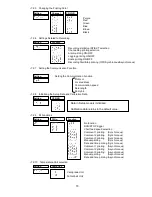
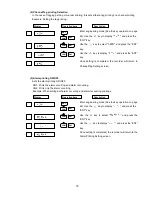
(6) Chart feed speed selection
(SPEED)
Chart feed speed can be operated in 2 stages by DI terminals. Refer to Section “7.1.4 Setting
the Chart feed speed”. The 1st chart feed speed can be selected by closing the DI terminals
and the COM terminal (ON). The 2nd chart feed speed can be selected by opening the DI
terminals and the COM terminal (OFF).
(7) Comment printing 1 to 3 (Sync.)
,
,
(CMNT 1 to 3)
The preset comments (comment 1, 2, 3) are printed on the chart paper.
Refer to Section “7.1.7 Setting other functions: (6) Comments”.
Comments are printed by the preset Chart feed speed.
Depending on the Chart feed speed, some comments may not be printed (e.g. where
Chart feed speed is too slow.). Refer to Section “7.1.4 Setting the Chart feed speed”.
Printing starts upon closing the DI terminals and the COM terminal (ON).
It is possible to print up to 16 characters for Dot printing type, and up to 12 characters for Pen
writing type.
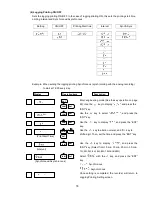
(8) Comment printing 1 to 3 (Async.)
,
,
(ACMT 1 to 3)
The preset comments (comment 1, 2, 3) are printed on the chart paper.
Refer to Section “7.1.7 Setting other functions: (6) Comments”.
Comments are printed regardless of the preset Chart feed speed.
During printing, measured value recording will not be performed.
Printing starts upon closing the DI terminals and the COM terminal (ON).
It is possible to print up to 16 characters for Dot printing type, and up to 12 characters for Pen
writing type.
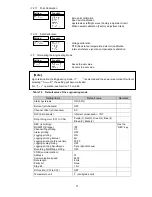
Notes when operating Recording RUN/STOP
When operating Recording RUN/STOP externally using the DI function, select “(3)
RUN/STOP trigger
(RCD)” of the DI function (p.79), and DI setting in engineering
mode has to be set to
(EXT). [Refer to Section “7.2.6 Settings related to Recording (1)
Recording RUN/STOP trigger setting” on page 74.]
For priority order and buffer action of Comment, Manual and Date/Time Printing,
refer to
Sections “6.3.3 Printing sample” and “6.4 Digital printing”.
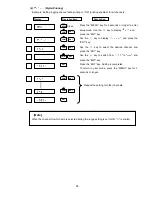
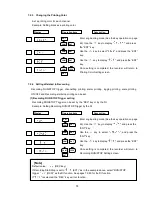
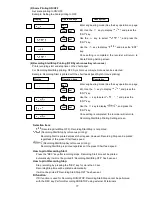
Example: Setting Comment printing 3 for DI3
Enter engineering mode (See the key operation on page
69). Use the
key to display "
", and press the
“ENT” key.
Use the
key to select "
", and press the “ENT”
key.
Use the
key to display "
", and press the
“ENT” key.
Once setting is completed, the recorder will return to the
DI3 Function Setting screen.
[Note]
Although DI synchronous does not print in STOP status, DI asynchronous does print in STOP
status.
Be sure to set to OFF if the DI function (Option: RE6) is not ordered.
Do not set to any other setting except OFF.
ENT
ENT
ENT
ENT
Display
Operation keys
Description


