background image

13

E

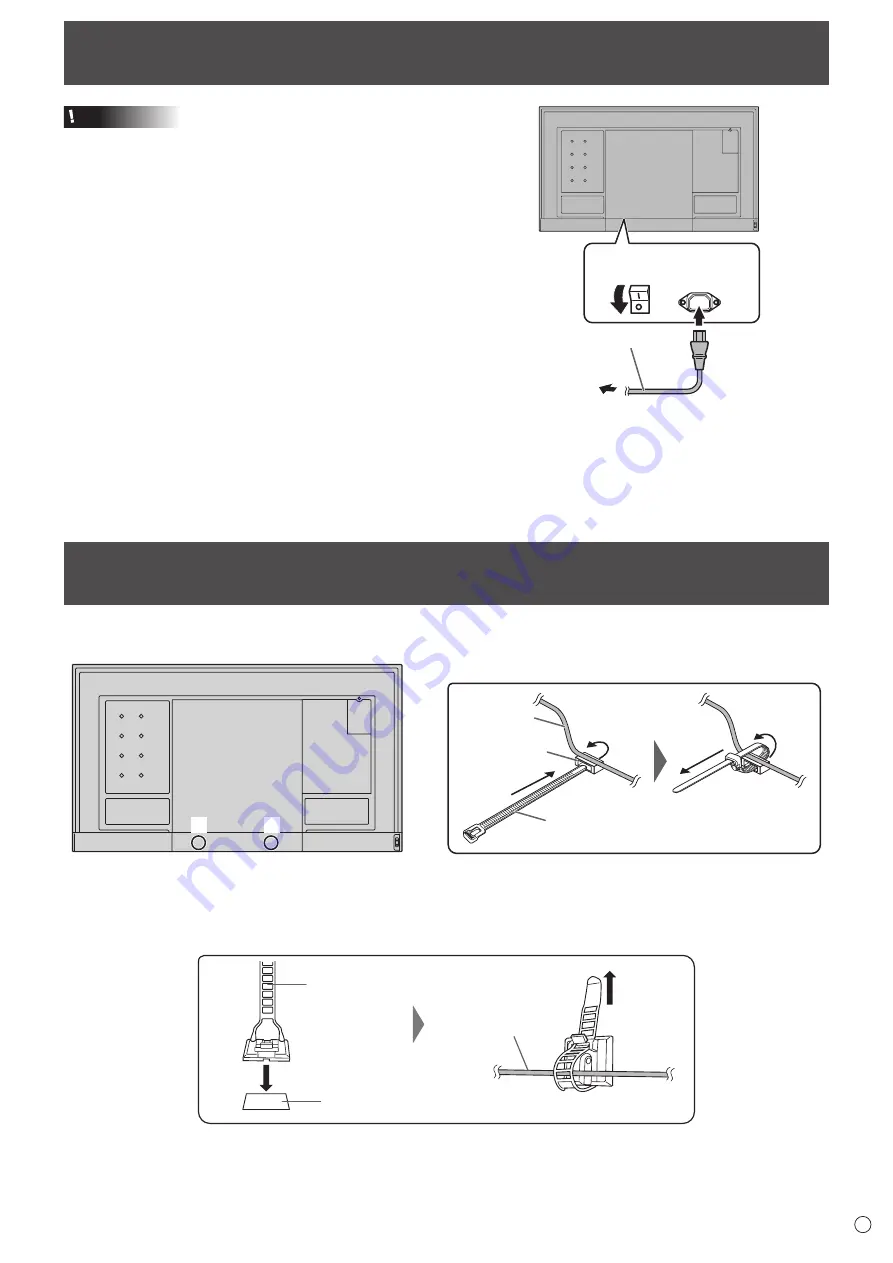
Connecting the Power Cord

Caution

•  Use only the power cord supplied with the monitor.

1.  Turn off the main power switch.

2.   Plug the power cord (supplied) into the AC input 

terminal.

3.  Plug the power cord (supplied) into the power outlet.

Main power 

switch

AC input 

terminal

1

2

For power 

outlet

3

Power cord (Supplied)

Binding Cables

The supplied cable clamps can be used to clamp the power cord and cables connected to the back of the monitor.

*

*

*

Cable clamp

Cable

Cable clamp 

attachment

Attach the supplied cable clamps (affixing type) to a flat surface, removing any dust or dirt before attaching. 

Do not attach over a vent.

Cable clamp

(affixing type)

Affixing point

Cable

Содержание PN-HB651

Страница 1: ...PN HM851 PN HM751 PN HM651 PN HB851 PN HB751 PN HB651 LCD MONITOR OPERATION MANUAL ...

Страница 2: ...ORTANT To aid reporting in case of loss or theft please record the product s model and serial numbers in the space provided The numbers are located in the rear of the product Model No Serial No U S A ONLY ...

Страница 3: ...en tested and found to comply with the limits for a Class A digital device pursuant to Part 15 of the FCC Rules These limits are designed to provide reasonable protection against harmful interference when the equipment is operated in a commercial environment This equipment generates uses and can radiate radio frequency energy and if not installed and used in accordance with the instruction manual ...

Страница 4: ...t people from stepping on them or objects from resting on them 10 The screen used in this product is made of glass Therefore it can break when the product is dropped or applied with impact Be careful not to be injured by broken glass pieces in case the screen breaks 11 Overloading Do not overload power outlets or extension cords Overloading can cause fire or electric shock 12 Entering of objects a...

Страница 5: ...s A product In a domestic environment this product may cause radio interference in which case the user may be required to take adequate measures An apparatus with CLASS I construction shall be connected to a MAIN socket outlet with a protective earthing connection STABILITY HAZARD If a monitor is not positioned in a sufficiently stable location it can be potentially hazardous due to falling Many i...

Страница 6: ...igned for a maximum daily use of 16 hours Continual use in excess of 16 hours per day is not covered by the warranty Restarting the Android system To maintain stable operation of APPLICATION mode the Android system must be restarted once a day A schedule is set by factory default in this monitor that restarts the system at 3 00 AM See the APPLICATION Mode Reboot of Software Guide If you or a third...

Страница 7: ...ondition specified by the optional equipments Do not block any ventilation openings If the temperature inside the monitor rises this could lead to a malfunction Do not place the monitor on a device which generates heat Adhere to the following when installing the monitor in its portrait orientation Failing to adhere to the following may cause malfunctions Install the monitor such that the power LED...

Страница 8: ...UNCTION 36 Controlling the Monitor with a computer RS 232C 38 Computer connection 38 Communication conditions 38 Communication procedure 38 RS 232C command table 42 Controlling the Monitor with a computer LAN 49 Command based control 49 Troubleshooting 50 Specifications 52 Mounting Precautions For SHARP dealers and service engineers 56 Power cord 1 R03 battery AAA size 2 CD ROM Utility Disk for Wi...

Страница 9: ... input terminal See page 11 9 Power LED See page 18 Remote control sensor See page 16 10 Wireless LAN antenna terminal See page 12 11 LAN terminal See page 12 12 USB port USB 3 0 compliant See page 12 13 USB port USB 2 0 compliant See page 12 14 microSD card slot See page 12 15 POWER button See page 18 16 INPUT button See page 21 17 Expansion slot This section is used to connect optional hardware ...

Страница 10: ...10 E Part Names nRemote control unit 2 1 1 Signal transmitter 2 Operation buttons See page 20 ...

Страница 11: ...udio input and connecting the monitor s audio output to the speakers or other devices The audio input terminals used in each input mode are factory set as follows Input mode Audio input terminal Factory setting DisplayPort DisplayPort input terminal HDMI1 HDMI1 input terminal HDMI2 HDMI2 input terminal D SUB Audio input terminal 1 HDMI1 input terminal 2 HDMI2 input terminal Use a commercially avai...

Страница 12: ... again When connecting monitors in a daisy chain set NO SIGNAL AUTO INPUT SEL to OFF Video output is disabled in the following cases When the power is turned off When the monitor is in input signal waiting mode This terminal does not support HDR signals The output device s screen will not be displayed properly 9 Audio output terminal The output sound varies depending on the input mode The volume o...

Страница 13: ...tlet Main power switch AC input terminal 1 2 For power outlet 3 Power cord Supplied Binding Cables The supplied cable clamps can be used to clamp the power cord and cables connected to the back of the monitor Cable clamp Cable Cable clamp attachment Attach the supplied cable clamps affixing type to a flat surface removing any dust or dirt before attaching Do not attach over a vent Cable clamp affi...

Страница 14: ...ndles and handle screws are for use with this monitor Do not use them for any other devices To attach handles be sure to use the handles and handle screws which were removed from this monitor Be sure the handles are attached securely The handles can be removed Handle Handle screws Attaching the logo sticker Example for landscape orientation Example for portrait orientation ...

Страница 15: ... flash drive SD card cover fixing screw supplied TIPS If the cover will be attached use a USB flash drive no larger than 2 3 4 inch 70 mm L excluding the terminal x 11 16 inch 17 mm W x 5 16 inch 8 mm H 5 16 inch 8 mm 11 16 inch 17 mm 2 3 4 inch 70 mm Attaching the USB flash drive SD card cover Attaching the wireless LAN antenna Wireless LAN antenna supplied Wireless LAN antenna terminal 2 1 ...

Страница 16: ...t be using the remote control for a long time remove the batteries Use manganese or alkaline batteries only Remote control operation range Remote control sensor in The remote control can be operated even when the remote control sensor is stored inside the monitor Point the remote control unit toward the remote control sensor on the bottom of the monitor or the right side of the monitor if using po...

Страница 17: ... could lead to a malfunction Do not expose the remote control unit to liquids and do not place it in an area with high humidity The remote control unit may not work properly if the remote control sensor is under direct sunlight or strong lighting Objects between the remote control unit and the remote control sensor may prevent proper operation Replace the batteries when they run low as this may sh...

Страница 18: ...e power ON OFF You can also turn the power ON OFF by pressing the MONITOR ON button MONITOR OFF button on the remote control unit Power LED POWER button Status Status of the monitor Green lit Power on Orange lit Power off Standby mode Green flashing Input signal waiting mode TIPS When the main power switch is off the monitor cannot be turned on If the monitor is in the input signal waiting mode an...

Страница 19: ... time screen appears 6 Press the RETURN button on the remote control unit The Select a Home app screen appears 7 Select Launcher SHARP Open Architecture Platform 8 Select ALWAYS This is the base screen CONTENT MENU screen when the input mode is APPLICATION For information on APPLICATION mode see the Software Guide Be sure to set the date and time TIPS When Select a Home app screen appears select L...

Страница 20: ...monitor information INPUT MODE SIZE COLOR MODE BRIGHT VOLUME ID No REMOTE No MODEL VERSION S N STATUS INFORMATION1 3 8 4 0 x 2 1 6 0 V 30 Hz H 67 5 kHz HDMI1 WIDE STD 31 15 0 0 PN HM751 X X X X XXXXXXXX 0000 000000 00 0000 01 01 2019 TUE 12 00 00 AM END RETURN NEXT APPLICATION VERSION MONITOR CONTROL SELECT Ethernet IPv4 IP address IPv4 IP settings MAC address Wireless LAN IPv4 IP address IPv4 IP ...

Страница 21: ...t Switch the input mode to DisplayPort 14 SIZE Screen size selection The menu is displayed Press the or button to select the screen size See page 22 15 PIP PbyP The menu is displayed Press the or button to select PIP MODES QUAD SCREEN MODE See page 32 Basic Operation 16 BRIGHT Brightness adjustment Pressing or displays the BRIGHT menu B R I G H T 15 Press or to adjust the brightness If you do not ...

Страница 22: ... ON the screen size is fixed to WIDE mode When dual screen or quad screen display is selected the screen size cannot be changed The appearance of the original video may change if you select a screen size with a different aspect ratio than the original image e g TV broadcast or video input from external equipment When 4 3 video is viewed with the whole screen using the screen size switching functio...

Страница 23: ...OR MULTI PIP OTHERS PICTURE BACK RETURN 1 9 2 0 x 1 0 8 0 MOVE OSD INFORMATION V 60 Hz H 67 5 kHz D SUB 4 Press the or button to adjust the setting BRIGHT CONTRAST BLACK LEVEL TINT COLORS SHARPNESS COLOR ADJUSTMENT ADVANCED RESET 31 40 30 30 30 12 SCREEN PICTURE AUDIO SETUP MONITOR MULTI PIP OTHERS PICTURE BACK RETURN MOVE OSD INFORMATION 1 9 2 0 x 1 0 8 0 V 60 Hz H 67 5 kHz D SUB For items that h...

Страница 24: ...flickers at corners When using the adjustment pattern see page 35 make adjustments so that no horizontal stripe noise appears in it Adjustments to PHASE should be made only after CLOCK has been correctly set H POS D SUB Adjust the horizontal position of the image V POS D SUB Adjust the vertical position of the image RESOLUTION SETTING D SUB H RESOLUTION Sets proper horizontal resolution when the r...

Страница 25: ...sing USER PRESET Selects the color temperature when the WHITE BALANCE is set to PRESET The setting values are shown for reference The color temperature of the screen varies over time This function is not intended to keep the color temperature constant USER Adjusts each item when the WHITE BALANCE is set to USER R CONTRAST Adjusts bright toned red component G CONTRAST Adjusts bright toned green com...

Страница 26: ...is displayed so you can refer to the pattern while adjusting the image When WHITE RED GREEN or BLUE is displayed you can set the level in the range of 0 to 255 OFF No pattern display WHITE White single color pattern display RED Red single color pattern display GREEN Green single color pattern display BLUE Blue single color pattern display USER Red green blue mixed color pattern display When USER i...

Страница 27: ...r encoding signals MODE2 should be used for YCbCr 4 2 0 at 4K Vsync 50 60Hz signals or when non 4K devices are connected and content onscreen are not what is expected CEC SETTING HDMI CEC LINK AUTO HDMI CEC function is used If the device connected to the HDMI input terminal supports CEC the input mode of the monitor changes to HDMI when playback starts on the device Set the operation of the CONTEN...

Страница 28: ...ol this monitor by RS 232C LAN Select to control this monitor by LAN APPLICATION Select to control from the application of APPLICATION mode such as e Signage BAUD RATE Selects the communication speed used for RS 232C communication ID SETTING ID No SET Assigns ID numbers to monitors connected in a daisy chain see page 38 using the RS 232 cables The numbers 1 to 255 are available for ID numbers If 0...

Страница 29: ...not When ON is selected the screen is automatically adjusted when its resolution is 800 x 600 or higher and the timing of input signals changes and other cases ADJUSTING appears on the screen during the adjustment If SELF ADJUST is set to ON set the time it takes to start the SELF ADJUST function in START TIMING For images with black edges etc depending on the signal adjustment may not be possible...

Страница 30: ...FF Display single screen ON Display 4 screens simultaneously SETTING INITIAL SCREEN Set the input mode displayed in each of the 4 screens When AUTO is selected input modes that have input signals are displayed in the order set in PRIORITY AUTO INPUT SEL PRIORITY AUTO INPUT SEL Set the order of priority for the input mode that is displayed when AUTO is selected for SETTING INITIAL SCREEN The lower ...

Страница 31: ...is function is connected to the expansion slot you can set the order in OPTION If the option does not support this function OPTION will not appear Input does not change automatically for terminals without a priority setting The lower the number the higher the priority LOGO SCREEN Sets whether or not to display the logo screen VOLUME Adjusts the volume MUTE AUDIO Temporarily mutes the audio MUTE WI...

Страница 32: ... sub screen horizontal lines may flicker If this happens display the image on the main screen When ROTATE 180 is set to ON you cannot set PIP MODES to PIP PbyP or PbyP2 When HDMI CEC LINK is set to AUTO SOUND CHANGE on the PIP PbyP may be changed to MAIN due to the switching of the monitor s input or due to the operation of the HDMI connected device The sub screen does not support HDR signals nQua...

Страница 33: ...y is selected the FREEZE DP DisplayPort HDMI and OPTION buttons cannot be used When quad screen display is selected the position 1 screen is output from the DisplayPort output terminal Positions 2 to 4 do not support HDR signals nEnlarge You can align several monitors and integrate them into a single large screen to display Up to 5 monitors can be aligned in both the horizontal and vertical direct...

Страница 34: ...er and press the button 2 Set the SCHEDULE See the description below Press the or button to select items and press the or button to change the setting 3 Press the ENTER button SCHEDULE becomes effective 1 SCHEDULE effective SCHEDULE not effective 2 POWER ON Switches the monitor on at the specified time OFF Switches the monitor off at the specified time and puts the monitor in standby mode 3 DAY OF...

Страница 35: ...rol unit Even if the remote control numbers are different you can use the remote control unit to display the INFORMATION screen Adjustments for computer screen display nAutomatic adjustment When you use the D SUB to display a computer screen for the first time or when you change the setting of the computer use the automatic screen adjustment 1 Switch the input to D SUB and display the adjustment p...

Страница 36: ...LOCK TARGET Sets the target to prohibit operation of with ADJUSTMENT LOCK REMOTE CONTROL Prohibits remote control operation MONITOR BUTTONS Prohibits monitor button operation BOTH Prohibits remote control and monitor button operation RS 232C LAN Specifies whether to allow control via RS 232C or LAN See pages 38 and 49 OSD DISPLAY Shows hides the menu modes and messages The FUNCTION screen cannot b...

Страница 37: ...not operate correctly Select ON and select Wipe data factory reset Other items are not used During processing do not turn off the power UPDATE MAIN SOFTWARE Not normally used Used by service technicians when performing repairs or otherwise 3 Press the RETURN button to return to the normal screen TIPS When both abnormal temperature and hardware error are detected the hardware error notification ove...

Страница 38: ...onversion cable supplied To COM port Computer Second monitor First monitor RS 232C input terminal RS 232C output terminal Communication conditions Set the RS 232C communication settings on the computer to match the monitor s communication settings as follows Baud rate Stop bit 1 bit Data length 8 bits Flow control None Parity bit None Set to the same baud rate as the BAUD RATE setting of SETUP men...

Страница 39: ...IDE When control via RS 232C is locked see page 36 E C D K O L Return code 0DH 0AH When MONITOR CONTROL SELECT is set to LAN or APPLICATION U N S E L E C T E D Return code 0DH 0AH nCommunication interval After OK or ERR is returned you must send the following commands To set a timeout for the command response specify 10 seconds or longer When connecting multiple monitors in a daisy chain set the t...

Страница 40: ...with ID number 2 VOLM0020 Sets volume to 20 OK 001 The volume of the monitor with ID number 1 the one directly connected to the computer is set to 20 The IDSL command is effective only once for the immediately succeeding command IDLK The parameter of this command sets the ID number of the monitor The monitor is subject to all subsequent commands Example IDLK0002 Following commands are for the moni...

Страница 41: ... all the connected monitors If you want to determine that a value has been returned by a specific set assign ID numbers to each monitor in advance When some monitors do not return their responses the probable cause is that the monitors could not receive the command or command processing is not complete Do not send a new command Example When 4 monitors are connected and assigned ID numbers 1 throug...

Страница 42: ...NPS W 0 Toggle change for input mode 2 D SUB 10 HDMI1 13 HDMI2 14 DisplayPort 21 OPTION ERR when nothing is attached in the expansion slot 24 APPLICATION R 2 D SUB 10 HDMI1 13 HDMI2 14 DisplayPort 21 OPTION 24 APPLICATION SCREEN menu Function Command Direction Parameter Reply Control Response contents AUTO ASNC W 1 When the input mode is D SUB CLOCK CLCK WR 0 1200 0 1200 When the input mode is D S...

Страница 43: ...M M CRST W 1 Resets the hue C M S SATURATION CMSR WR 10 10 10 10 R CMSY Y CMSG G CMSC C CMSB B CMSM M CRST W 2 Resets the saturation ADVANCED AUTO AGIN W 1 When the input mode is D SUB ANALOG GAIN ANGA WR 0 127 0 127 When the input mode is D SUB ANALOG OFFSET ANOF WR 0 127 0 127 When the input mode is D SUB NR TDNR WR 0 2 0 2 0 OFF 1 LOW 2 HIGH RGB INPUT RANGE INPR WR 0 2 0 2 0 AUTO 1 FULL 2 LIMIT...

Страница 44: ... to expand the functions 9 APPLICATION SCHEDULE BRIGHTNESS SB01 SB08 WR 0 31 0 31 Screen brightness to change 99 99 Disable brightness setting LANGUAGE LANG WR 14 14 ENGLISH 1 1 DEUTSCH 2 2 FRANÇAIS 3 3 ITALIANO 4 4 ESPAÑOL 5 5 РУССКИЙ 6 6 INPUT SELECT DisplayPort STREAM DisplayPort DPST WR 0 2 0 2 0 SST1 2 SST2 HDMI MODES HDMI1 HD1M WR 0 1 0 1 0 MODE1 1 MODE2 HDMI MODES HDMI2 HD2M WR 0 1 0 1 0 MO...

Страница 45: ...s own ID number and the selected ID number on the screen ID DISPLAY IDDP W 0 2 0 OFF 1 ON 2 ON turns OFF after 4 sec The IP address and MAC address are both displayed AUTO ASSIGN ID No HAID W 1 REMOTE No RCNO WR 0 9 0 9 Sets the number of the remote control unit MONITOR menu Function Command Direction Parameter Reply Control Response contents PORTRAIT LANDSCAPE INSTALL STDR WR 0 1 0 1 0 LANDSCAPE ...

Страница 46: ... mode setting and the image position The shortest direction EPSV WR 999 999 999 999 BEZEL ADJUST BZCO WR 0 1 0 1 0 OFF 1 ON TOP BZCT WR 0 1 0 1 0 OFF 1 ON BOTTOM BZCB WR 0 1 0 1 0 OFF 1 ON RIGHT BZCR WR 0 1 0 1 0 OFF 1 ON LEFT BZCL WR 0 1 0 1 0 OFF 1 ON BEZEL WIDTH TOP BZWT WR 0 100 0 100 BOTTOM BZWB WR 0 100 0 100 RIGHT BZWR WR 0 100 0 100 LEFT BZWL WR 0 100 0 100 ENLARGE IMAGE POSITION SETTING E...

Страница 47: ...lected by PRIORITY AUTO INPUT SEL 1 10 Priority setting HDMI1 MPH1 HDMI2 MPH2 D SUB MPD1 APPLICATION MPAP SAVE LAST INPUT CONFIG MSLI WR 0 1 0 1 0 OFF 1 ON TARGET SOUND INPUT SEL MSAO WR 1 4 1 4 1 POS1 2 POS2 3 POS3 4 POS4 Input mode selection in quad screen display MSIP WR 2 2 D SUB 10 10 HDMI1 13 13 HDMI2 14 14 DisplayPort 21 21 OPTION valid when you have used the expansion slot to expand the fu...

Страница 48: ...rature abnormal occurred To delete the information of temperature abnormal turn off the main power 3 Internal temperature abnormal has occurred and backlight brightness is dimmed 4 Temperature sensor abnormal Temperature acquisition ERRT R Value Returns the temperature at the temperature sensors Indicates a temperature sensor abnormality when 126 is returned Cause of last standby mode STCA W 0 Ini...

Страница 49: ...ia terminal software and other appropriate applications Read the manual for the terminal software for detailed instructions 1 Connect the computer to the monitor 1 Specify the IP address and data port number Default setting 10008 and connect the computer to the monitor When connection has been established successfully Login is returned as response 2 Send the user name Send user name If the user na...

Страница 50: ... the automatic screen adjustment when D SUB is in use The video from the HDMI input terminal does not appear properly Does the HDMI cable support 4K and is it HDMI standard compliant The monitor will not work with cables that are not standard compliant Is the input signal compatible with this monitor See pages 52 and 53 If the connected device does not support 4K set HDMI MODES to MODE2 The video ...

Страница 51: ...t decreases automatically in order to prevent high temperature related problems When this occurs TEMPERATURE is displayed on the screen and the Power LED flashes red and green alternately When TEMPERATURE ALERT is set to OSD LED This varies depending on the setting If the internal temperature rises further the monitor automatically enters standby mode The Power LED continues flashing red and green...

Страница 52: ... 60Hz 72Hz 75Hz 60Hz 60Hz 70Hz 75Hz 75Hz 60Hz 75Hz 60Hz 60Hz 60Hz 75Hz 60Hz 60Hz 60Hz 60Hz 60Hz 60Hz 60Hz 60Hz 24Hz 25Hz 30Hz 50Hz 60Hz 24Hz 25Hz 30Hz 50Hz 60Hz 70Hz Analog D sub Yes Yes Yes Yes Yes Yes Yes Yes Yes Yes Yes Yes Yes Yes Yes Yes Yes Yes Yes Yes Yes Yes Yes Yes Yes Yes Yes HDMI Yes Yes Yes Yes Yes Yes Yes Yes Yes Yes Yes Yes Yes Yes Yes Yes Yes Yes Yes Yes Yes Yes Yes Yes Yes Yes Yes ...

Страница 53: ...0p VGA 59 94Hz Yes 60Hz Yes 720 1440 576i 50Hz Yes 720 1440 480i 59 94Hz Yes 60Hz Yes Compatible when HDMI MODES is MODE1 nDDC plug and play The monitor supports the VESA DDC Display Data Channel standard DDC is a signal standard for plug and play between monitors and computers Information about resolution and other parameters is exchanged between the two This function can be used if the computer ...

Страница 54: ...80 5320MHz 100 104 108 112 116ch 5500 5580MHz 132 136 140ch 5660 5700MHz 149 153 157 161 165ch 5745 5825MHz This device is restricted to indoor use due to its operation in the 5 15 GHz to 5 25 GHz frequency range FCC requires this product to be used indoors for frequency range 5 15 GHz to 5 25 GHz to reduce the potential for harmful interference to co channel Mobile Satellite systems High power ra...

Страница 55: ... nRS 232C input terminal pins D sub 9 pin No Function No Function 1 N C 6 N C 2 Transmitted data 7 N C 3 Received data 8 N C 4 N C 9 N C 5 GND nDisplayPort input terminal pins DisplayPort 20 pin No Function No Function 1 MainLane 3 11 Gnd 2 Gnd 12 MainLane 0 3 MainLane 3 13 Gnd 4 MainLane 2 14 Gnd 5 Gnd 15 Aux 6 MainLane 2 16 Gnd 7 MainLane 1 17 Aux 8 Gnd 18 Hot plug detection 9 MainLane 1 19 Gnd ...

Страница 56: ...hat are 5 16 inch 8 mm to 3 8 inch 10 mm longer than the thickness of the mounting bracket Screws M6 Mounting bracket Monitor mounting 5 16 3 8 inch 8 10 mm Do not use an impact driver When moving the monitor be sure to hold the handles or the parts marked by below Do not hold the screen This may cause product damage failure or injury After mounting please carefully ensure the monitor is secure an...

Страница 57: ...PN HM851 HM751 HM651 HB851 HB751 HB651 Mu EN18M 1 ...

Отзывы: