38
E
Controlling the Monitor with a computer (RS-232C)
You can control this monitor from a computer via RS-232C
(COM port) on the computer.
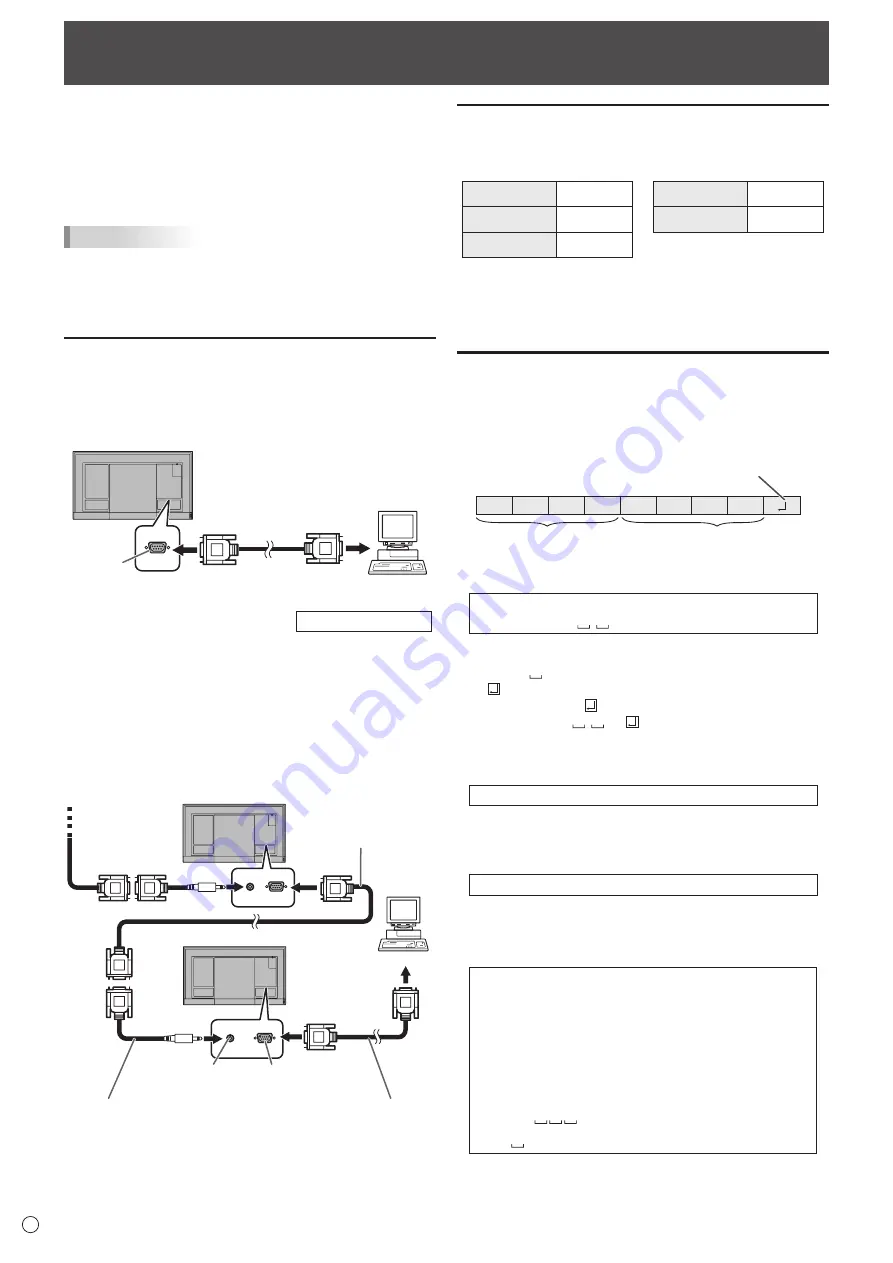
You can also connect multiple monitors via a daisy chain by
using a computer. By assigning ID numbers to each monitor
(see page 39), you can make input mode selection/adjustment
or can check the status of a specific monitor.
TIPS
• To control the monitor via RS-232C, set MONITOR
CONTROL SELECT to RS-232C.
(When this is done, control via LAN or application is not
possible.)
Computer connection
n
One-to-one connection with a computer
Connect with RS-232 straight cable between the computer’s
COM port (RS-232C connector) and the RS-232C input
terminal on the monitor.
RS-232 straight cable
(commercially available)
To COM port
Computer
RS-232C
input terminal
n
Daisy chain connection…
Advanced operation
Connect with RS-232 straight cable between the computer’s
COM port (RS-232C connector) and the RS-232C input
terminal on the first monitor. Next, connect RS-232C conversion
cable (supplied) and RS-232 straight cable to the first monitor’s
RS-232C output terminal and to the second monitor’s RS-232C
input terminal. Connect RS-232 straight cable and RS-232C
conversion cable (supplied) in the same way to the third and
subsequent monitors.
Up to 4 monitors can be connected. (Depending on the length
of the cable used and the surrounding environment.)
RS-232 straight cable
(commercially available)
RS-232 straight cable
(commercially available)
RS-232C conversion
cable (supplied)
To COM port
Computer
Second monitor
First
monitor
RS-232C
input terminal
RS-232C
output terminal
Communication conditions
Set the RS-232C communication settings on the computer to
match the monitor’s communication settings as follows:
Baud rate
*
Stop bit
1 bit
Data length
8 bits
Flow control
None
Parity bit
None
* Set to the same baud rate as the BAUD RATE setting of
SETUP menu. (Initial setting: 38400 bps)
* When connecting multiple monitors in a daisy chain, set all
monitors to the same BAUD RATE.
Communication procedure
n
Command format
When a command is sent from the computer to the monitor,
the monitor operates according to the received command and
sends a response message to the computer.
C1 C2 C3 C4 P1 P2 P3 P4
Return code
Command field
(4 prescribed
alphanumerical characters)
Parameter field
(4 character string comprised of:
0-9, +, -, space, ?)
Example: VOLM0030
VOLM
30
* Be sure to input 4 characters for the parameter. Pad with
spaces (“ ”) if necessary.
(“ ” is a return code (0D
H
, 0A
H
or 0D
H
))
Wrong : VOLM30
Right : VOLM 30
When inputting a negative value, specify a numerical value in
three digits.
Example: OFSR-127
When the parameter part is 5 or more characters, specify
parameters using a specified number of characters without
using spaces.
Example: MPOS010097
If a command has “R” listed for “Direction” in the
“RS-232C command table” on page 42, the current value can
be returned by using “?” as the parameter.
Example:
VOLM ? ? ? ?
←
From computer to monitor (How
much is current volume setting?).
30
←
From monitor to computer
(Current volume setting: 30).
* If an ID number (see page 39) has been assigned
(For example, ID number = 1).
VOLM
?
←
From computer to monitor.
30 001
←
From monitor to computer.


