Sharp MX-M550N Скачать руководство пользователя страница 127

MX-M700N  SIMULATION  7 – 33

43-3

Purpose

Setting (Adjustment)

Function (Purpose)

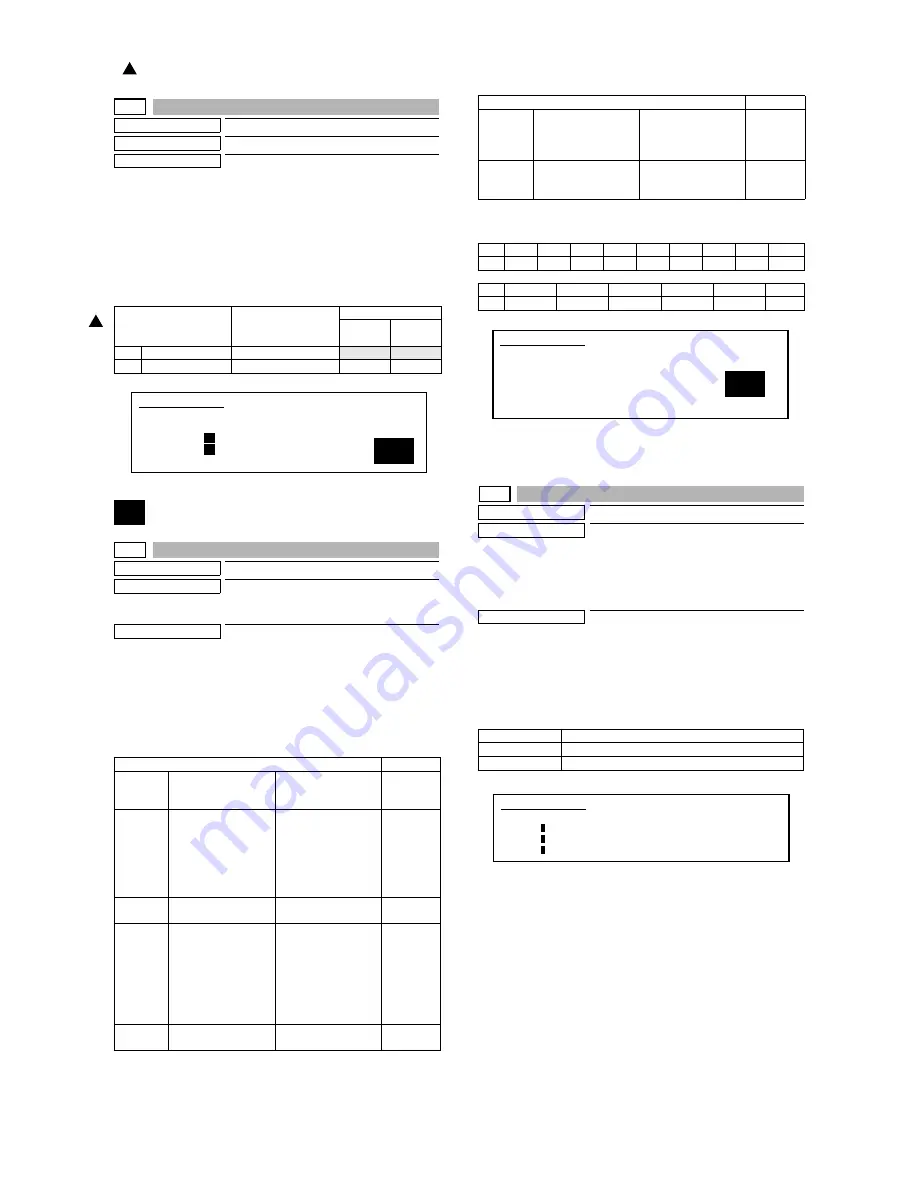
Fusing motor RPM setting.

Section

Setting

Operation/Procedure

1)

Select the number corresponding to the adjustment item with
10-key.

2)

Press the [START] key.

3)

Enter the setting (adjustment) value with 10-key.

4)

Press the [START] key.

Unless special measures are required, do not change the setting
values below.

44

44-1

Purpose

Setting

Function (Purpose)

Used to set enable/disable of correction
operations in the image forming (process)
section.

Section

Image process (Photoconductor/Develop-
ing/Transfer/Cleaning)

Operation/Procedure

1)

Each bit (7 kinds) is assigned to each correction item to set
ENABLE/DISABLE of the operation.

Each bit is assigned with 0 or 1 value. Enter the total values of
items which are desired to be valid with the 10-key. 

2)

Press the [START] key.

NOTE: Set to 222.

When bit=1, correction is made.

NOTE: BIT0 is not displayed, but set to the developing bias correc-

tion function. This setting is forcibly made enable, and can-
not be disabled.

44-2

Purpose

Adjustment

Function (Purpose)

Used to perform the gain adjustment
(image density sensor LED current adjust-
ment) of the image density sensor and the
gain adjustment (OPC drum marking sen-
sor LED current adjustment) of the OPC
drum marking sensor. 

Section

Image process (Photoconductor)

Operation/Procedure

Press [START] key, and the adjustment is automatically performed.
When the adjustment is completed, the adjustment result is dis-
played.

If the adjustment is not completed normally, "ERROR" is displayed.

When an error occurs, the adjustment result is not revised.

Item

Setting range

Default

55/62

(ppm)

70

(ppm)

1

NORMAL

0  -  99

34

34

2

SLOWDOWN

0 - 99

46

44

Item

Default

BIT1

OPC drum membrane 
decrease (sensitivity/
potential) correction

Laser power/main 
charger grid voltage

1

BIT2

The range of the toner 
patch making voltage 
in the developing bias 
voltage/main charger 
grid voltage correction 
is specified. (Voltage 
limit)

Developing bias/main 
grid voltage (adjusted 
by SIM 8-1 and 8-2) +-
100v

1

BIT3

For humidity 
correction

Toner concentration 
correction

1

BIT4

Toner concentration 
correction A

When the developing 
bias/main charger grid 
voltage correction is 
changed more than 
the specified level, the 
toner concentration 
control level is 
corrected.

1

BIT5

Toner concentration 
correction B

Correction for the 
developer life

0

1

SIMULATION 43-3

1

FUSER MOTOR SPEED SETTING. SELECT 1-2, AND PRESS

START.

1. NORMAL

36

2. SLOWDOWN

50

BIT6

Toner concentration 
correction C

Toner concentration 
correction in low 
density image 
continuous print

1

BIT7

OPC drum for 
environment 
correction

1

Bit

15

14

13

12

11

10

9

8

7

0

0

0

0

0

0

0

0

Env

Bit

6

5

4

3

2

1

Tcon_C

Tcon_B

Tcon_A

Humidity

Pcon_lm

Drum

DMLED

Drum marking sensor gain adjustment value

PCLED

Image density sensor gain adjustment value

DRUM

Kind of the drum 0 = Other/1 = SHARP drum

Item

Default

SIMULATION 44-1

PROCESS CORRECTION VALUE SETTING. INPUT VALUE 0-999
AND PRESS START.
BIT1: DRUM
BIT2: PROCON_LM

BIT3: HUMIDITY

BIT4: TONERCON_A

BIT5: TONERCON_B

BIT6: TONERCON_C

BIT7: ENVIRONMENT

223

SIMULATION 44-2

PROCON GAIN ADJUSTMENT. PRESS START.
DMLED:

0

PCLED:

0

DRUM :

0

: '07 Feb 15

1

Содержание MX-M550N

Страница 1: ...UCTURE 5 1 6 ADJUSTMENTS 6 1 7 SIMULATION 7 1 8 SELF DIAG AND TROUBLE CODE 8 1 9 MAINTENANCE 9 1 10 ROM VERSION UP 10 1 11 ELECTRICAL SECTION 11 1 12 OTHERS 12 1 DETAILS OF EACH SECTION A EXTERNAL OUTFIT A 1 B OPERATION PANEL B 1 C DSPF SECTION C 1 D SCANNER SECTION D 1 E MANUAL PAPER FEED SECTION E 1 F TRAY PAPER FEED SECTION F 1 G PAPER TRANSPORT SECTION G 1 H DUPLEX SECTION H 1 i LSU SECTION i ...

Страница 2: ...TFIT A 1 B OPERATION PANEL 1 Electrical and mechanism relation diagram B 1 2 Operational descriptions B 2 3 Disassembly and assembly B 2 C DSPF SECTION 1 Electrical and mechanism relation diagram C 1 2 Operational descriptions C 5 3 Disassembly and assembly C 6 4 Maintenance C 19 D SCANNER SECTION 1 Electrical and mechanism relation diagram D 1 2 Operational descriptions D 2 3 Disassembly and asse...

Страница 3: ...TION 1 Electrical and mechanism relation diagram O 1 2 Operational descriptions O 2 3 Disassembly and assembly O 2 4 Maintenance O 7 P DRIVE SECTION 1 Disassembly and assembly P 1 2 Maintenance P 14 Q PWB SECTION 1 Disassembly and assembly Q 1 R FAN AND FILTER SECTION 1 Disassembly and assembly R 1 2 Maintenance R 6 S SENSOR SWITCH SECTION 1 Disassembly and assembly S 1 ...

Страница 4: ...e power cord only to a power outlet that meets the specified voltage and current requirements Avoid complex wiring which may lead to a fire or an electric shock It may cause a fire or an electric shock 2 If there is any abnormality such as a smoke or an abnormal smell interrupt the job and disconnect the power plug It may cause a fire or an electric shock 3 Be sure to connect the grounding wire If...

Страница 5: ... ammonium The organic photoconductor OPC drum used in the machine may undergo qualitative change due to organic gases such as ammonium Installation of this machine near a diazo type copier may result in dirt copy 6 Place of too much dust When dust enters the machine it may affect the operation of the machine 7 Place too close to a wall All machines require clean intake and exhaust of air If the in...

Страница 6: ...mall Diameter Belt Transfer System With reduced effect to paper types drum paper release is stabilized and transfer efficiency is improved Easier Paper Jam Fixation with Open Paper Path Jammed paper on vertical paper path can be easily removed by opening the left side cover which shortens time to fix paper jam 2 Strengthened Frame Structure Highly Rigid Frame Improved stability with less machine d...

Страница 7: ...t data Fax data Store Install DSK Install DSK Security is assured by encrypting the data to be stored Security is assured by encrypting the data to be stored PIN printing Password input Data Security Data Security PIN printing Password input Store Store Recall Job settings Recall Job settings Raw compressed data Raw compressed data Raw compressed data HDD memory Encrypted data Encrypted data Encry...

Страница 8: ...r fax PC or MFP that are connected by network Fax data Print data PC PC Fax PC i Fax PC Fax is like printing Word data etc onto fax paper i Fax data Send HDD Send E mail Send E mail Print Copy Scan FAX i FAX Internet Fax G3 Fax G3 Fax Internet Fax PC Document Filing initial screen List of data stored in Main folder Telephone line Network LAN MX M550N U MX M620N U MX M550N U MX M620N U MX M620N U M...

Страница 9: ...pm Facsimile expansion kit Printer function Standard Network expansion kit Barcode font kit FAX momory 8MB 256MB expansion memory board Data security kit PS3 expansion kit Network scanner expansion kit Application communication module External account module SHARPDESK 1 5 10 50 100 license kit Application integration module kit Internet FAX expansion kit 55 62 70 ppm ...

Страница 10: ...Sharpdesk 1 license kit MX USX1 OPT OPT Sharpdesk 5 license kit MX USX5 OPT OPT Sharpdesk 10 license kit MX US10 OPT OPT Sharpdesk 50 license kit MX UX50 OPT OPT Sharpdesk 100 license kit MX USA0 OPT OPT FAX system Internet FAX expansion kit MX FWX1 OPT OPT Yes Facsimile expansion kit AR FX8 OPT OPT FAX expansion memory 8MB AR MM9 OPT OPT Other options Application integration module kit MX AMX1 OP...

Страница 11: ...adations After turned on 120 seconds or less Pre heat YES Jam recovery time Approx 30 sec After leaving the machine with the side cover open for 60sec in the standard condition and the polygon stop conditions A3 289 412mm 11 17 271 424mm B4 242 356mm 8 5 14 208 348mm A4 202 289mm 8 5 13 208 322mm B5 174 249mm 8 5 11 208 271mm A5 140 202mm 5 5 8 5 132 208mm 7 25 10 5 183 259mm 8K 262 382mm Postcard...

Страница 12: ... change and the software setting A4 User can change 8 5 11 User can change B5 Size setting by serviceman B5 available through bolt fixing and setting by serviceman YES Inch 8 5 11 AB A4 16K is not supported Plain paper 60 to 105g m2 16 to 28lbs 1200 sheets 80g m2 Normal paper printed paper recycled paper letterhead punched paper color paper Enable Paper empty and 3 steps Within 12sec Free fall Pap...

Страница 13: ...m Main unit top surface face down paper exit Paper exit capacity 250 sheets 80g m2 paper Paper exit paper size kind All kinds of paper which can be fed Remaining paper detection None Paper exit paper full detection Provided copy mode Platen Magnification ratio 25 to 99 Normal ratio 101 to 171 172 to 400 Scan resolution dpi 600 600 600 600 600 600 600 600 2 DSPF Magnification ratio 25 to 99 Normal ...

Страница 14: ... 200 100dpi 1bit 48 sheets min 200 100dpi 1bit Original standard position Center reference Document size Automatic detection Inch series 1 11 17 8 5 14 8 5 11 8 5 11R 8 5 5 5 A4 Inch series 2 11 17 8 5 13 8 5 11 8 5 11R 8 5 5 5 A4 AB series 1 2 A3 B4 A4 A4R B5 B5R A5 8 5 11 8 5 13 AB series 3 8K A4 A4R B4 16K 16KR A5 8 5 13 Mix paper feed Same series same width paper enabled Manual setting Min 64 ...

Страница 15: ...ng provided Card shot Yes Centering provided Center binding Yes Centering provided Book copy Yes Duplex copy system switch Yes Large volume document mode Yes Max 10000 sheets Magnification ratio Density Paper can be changed for every bundle Black white reversion Yes except UK Mirror image Yes Date print Yes Stamp Yes Page print Yes Character print Yes Scanner Scan to E mail Scan to Desktop Scan da...

Страница 16: ... from the list direct entry from the list selection from LDAP server No Transmission message message body Mail footer preset Item Scanner Internet Fax Fax Address specification Specification by one touch group direct address input No of registration items of direct address input Group interface broadcasting total max 5 000 items Broadcast send Yes Broadcast send is disabled for FTP Desktop SMB Yes...

Страница 17: ...record width 293mm Record size A3 to A5 11 x 17 to 5 5 x 8 5 Item Fax Sub address Yes Max 20 digits Pass code Yes Max 20 digits IBM PC AT compatible machine Macintosh OS Custom PCL5e 6 SPDL2 Custom PS PPD GPD Windows 98 Yes Yes Yes No Me Yes Yes Yes No NT 4 0 SP5 or later Yes Yes Yes No 2000 Yes Yes Yes No XP Yes Yes Yes No Server2003 Yes Yes Yes No Server2003 x64 No No No Yes XP x64 No No No Yes ...

Страница 18: ...is executed Yes Yes ROPM One RIP process allows to print two or more copies Yes Yes Conforming to multi access RIP process can be executed during printing Printing can be executed during scanning Yes Yes Setting of the paper direction for duplex print of letterhead paper and punched paper For letterhead and punching sheet which has attribute of front and back duplex print can be made in the proper...

Страница 19: ...mplex No print Cover paper Yes Insert paper Yes OHP insert paper No Yes White paper Yes Printed paper Functions PCL5e PCL6 PS PPD Paper exit destination setting Center tray Finisher o Tray 1 Finisher oTray 2 Saddle stitch finisher oTray 1 Saddle stitch finisher oTray 2 Saddle stitch finisher o Saddle stitch tray Staple Finisher No staple 1 position 2 positions Saddle stitch finisher No staple 1 po...

Страница 20: ...tal Vertical Zoom 25 to 400 Fit page No Function Macintosh Usable built in fonts Traditional 35 PS Latin fonts Category 1 In font chapter 5 fonts Category 2 In font chapter Download system which can be selected Yes Mac OS9 x x LaserWriter Function Macintosh Units composition setting Yes Watermark Yes Overlay No Print hold Yes Job retention Yes PIN code input enable Sample print Yes Print departmen...

Страница 21: ...nt e mail Yes No Yes No Direct print Web No No Yes No Scan send Yes No Yes No Scan to HDD Yes Yes No No FAX receive No No No No FAX send Yes No Yes No Internet FAX receive No No No No Internet FAX send Yes No Yes No PC Fax PC INternet Fax transmisson Yes Yes Yes No Data input Yes Yes Yes No Item Standard North America Europe Western North Australia China Taiwan Safety standards UL60950 1 CSA C22 2...

Страница 22: ...C drum x 1 62 70ppm 300k 55ppm 250k AR 620DM 10 No Part name Content Life Model name Packing Remark 1 Toner cartridge Black Toner cartridge Black Toner Net weight 1815g With IC chip x 10 830k 83k x 10 AR 621CT 1 Life setting by A4 6 document 2 Developer Black Developer Black Developer Net weight 725g x 10 62 70ppm 1500k 150k x 2bags x 5 55ppm 1250k 125k x 2bags x 5 AR 620CD 1 Two bags needed 3 Dru...

Страница 23: ...x 1 x 1 x 1 x 1 x 1 x 1 x 1 300K AR 620KA 10 2 Maintenance kit 2 Transfer cleaning roller Transfer belt Transfer roller Transfer gear x 1 x 1 x 1 x 1 300K AR 620KB 10 3 Upper heat roller kit Upper heat roller Fusing separation pawl Upper x 1 x 6 300K AR 620UH 10 4 Lower heat roller kit Lower heat roller Fusing separation pawl Lower x 1 x 4 300K AR 620LH 10 5 Cleaner blade Cleaner blade x 10 300K x...

Страница 24: ... Heat roller bearing Lower CL roller DG2 CL roller SP CL roller bearing Auxiliary CL roller SP CL auxiliary roller DG Heat CL sheet base N AS Web roller DG2 Pressure roller DG2 Web bearing Pressure bearing Pressure SP x 1 x 1 x 6 x 4 x 1 x 2 x 1 x 2 x 4 x 2 x 1 x 1 x 1 x 1 x 2 x 2 x 2 300K MX 705KC 5 4 Fusing unit Fusing UN Heater lamp 230V x 1 MX 705FU 1 5 DSPF roller kit DSPF paper feed roller D...

Страница 25: ...aring Lower CL roller DG2 CL roller SP CL roller bearing Auxiliary CL roller SP CL auxiliary roller DG Heat CL sheet base N AS Web roller DG2 Pressure roller DG2 Web bearing Pressure bearing Pressure SP x 1 x 1 x 6 x 4 x 1 x 2 x 1 x 2 x 4 x 2 x 1 x 1 x 1 x 1 x 2 x 2 x 2 300K MX 705KC 5 4 Fusing unit Fusing UN Heater lamp 230V x 1 MX 705FU 1 5 DSPF roller kit DSPF paper feed roller DSPF pickup roll...

Страница 26: ...oller DG2 CL roller SP CL roller bearing Auxiliary CL roller SP CL auxiliary roller DG Heat CL sheet base N AS Web roller DG2 Pressure roller DG2 Web bearing Pressure bearing Pressure SP x 1 x 1 x 6 x 4 x 1 x 2 x 1 x 2 x 4 x 2 x 1 x 1 x 1 x 1 x 2 x 2 x 2 300K MX 705KC 5 4 Fusing unit Fusing UN Heater lamp 230V x 1 MX 705FU 1 5 DSPF roller kit DSPF paper feed roller DSPF pickup roller DSPF separati...

Страница 27: ...ler DG2 CL roller SP CL roller bearing Auxiliary CL roller SP CL auxiliary roller DG Heat CL sheet base N AS Web roller DG2 Pressure roller DG2 Web bearing Pressure bearing Pressure SP x 1 x 1 x 6 x 4 x 1 x 2 x 1 x 2 x 4 x 2 x 1 x 1 x 1 x 1 x 2 x 2 x 2 300K MX 705KC 5 4 Fusing unit Fusing UN Heater lamp 100V x 1 MX 705FU2 1 5 DSPF roller kit DSPF paper feed roller DSPF pickup roller DSPF separatio...

Страница 28: ...hing 4 Automatic document feeder This automatically feeds and scans multiple sheet originals Both sides of two sided originals can be scanned at once 5 Front cover Open to replace toner cartridge 6 Operation panel Performs various setting display and simulation operations 7 Center tray Finished sheets are deposited here 8 Bypass tray Special papers including transparency film and copy paper can be...

Страница 29: ...ed by the indication on the operation panel 5 Main power switch Keep this switch turned on when the fax option or network scanner option is installed 6 Right side cover Open when a misfeed has occurred in bypass tray or large capacity tray 7 Upper cover of large capacity tray Open when a misfeed has occurred in large capacity tray 8 Left side cover release Push this knob up to open the left side c...

Страница 30: ...printing is being performed 4 JOB STATUS key Press to display the current job status 5 SYSTEM SETTINGS key This is used to store edit and delete user names and folder names for the document filing function and to configure the administrator settings and printer configuration settings 6 Numeric keys Use to enter number values for various settings 7 key LOGOUT key This key is used in copy mode docum...

Страница 31: ...t available touch the current job key to select it and then touch the DETAIL key described in 10 2 Mode select key This switches the job list display between JOB QUEUE and COMPLETE JOB QUEUE Shows stored jobs and the job in progress COMPLETE Shows finished jobs Files saved using the FILE and QUICK FILE functions and finished broadcast transmission jobs appear as keys in the finished job screen The...

Страница 32: ...d then touching this key 10 DETAIL key This shows detailed information on the selected job Files saved using the FILE and QUICK FILE functions and finished broadcast transmission jobs appear as keys in the finished job screen A Quick File in the finished job screen or the Filing key can be touched followed by the CALL key to call up a finished job and print or transmit it A finished broadcast tran...

Страница 33: ...nector level NOTE L H AINPD AINPD Duplex ADU paper entry detector Duplex ADU paper entry detection detection of paper exit to finisher Transmission type Paper pass Paper transport system sensor APPD1 APPD1 Duplex ADU paper pass detector 1 Duplex ADU upstream paper pass detection Transmission type Paper pass Paper transport system sensor APPD2 APPD2 Duplex ADU paper pass detector 2 Duplex ADU midst...

Страница 34: ... unit from duplex ADU No 1 3 4 paper feed Transmission type Paper pass Paper transport system sensor POD1 POD1 Paper exit detector 1 Paper exit detection from fusing Transmission type Paper pass Paper transport system sensor POD2 POD2 Paper exit detector 2 Paper pass detection from paper exit Transmission type Paper pass Paper transport system sensor POD3 POD3 Paper exit detector 3 Paper exit dete...

Страница 35: ... L H SOCD SCOV DSW R DSW L TH CL DMS PCS RTH3 RTH1 WEBEND RTH2 THPS2 TLS TH EX HUS DV TH DV TNCA TCS TANSET DSW ADU M1PWS HUS TC M1SS4 M2SS4 SOCD OCSW SCOV MHPS PDSELX LEDX MHPS TH EX TH RA DSW ADU DSW L THPS2 DSW DSK TLS HUS DV TH DV TFSD T1SPD TANSET M1SPD M1SS1 M1SS2 M1SS3 M1SS4 M1PWS M2SPD T2SPD TCS RTH3 RTH1 WEBEND RTH2 TH CL DMS PCS DSW F DSW R PDSELX LEDX HUS TC M1SS2 M1SS3 M2SS1 M2SS4 M2SS...

Страница 36: ...g quantity detection Paper feed tray 3 Transmission type Remaining paper quantity 66 or less Paper feed tray remaining quantity sensor M1SS1 M1SS1 Paper size detector Paper feed tray 3 Paper size detection by combination of ON OFF of MISS 1 4 Contact switch Multi paper feed tray vertical size detection Refer to the separate table in the 11 SIGNAL NAME LIST 1 M1SS2 M1SS2 Paper size detector Paper f...

Страница 37: ...ty detection Paper feed tray 1 Transmission type Remaining paper quantity 50 or less Paper feed tray remaining quantity sensor T2SPD T2SPD Paper remaining quantity detector Paper feed tray 2 Paper remaining quantity detection Paper feed tray 2 Transmission type Remaining paper quantity 33 or less Paper feed tray remaining quantity sensor TANSET TANSET Paper feed tray 1 2 detection signal Paper fee...

Страница 38: ... door open close detector Micro switch Front door open close detection Main charger power source Developing bias power line open close DSW L DSW L Left door open close switch Micro switch Left door open close detection Main charger power source Developing bias power line open close DSW R DSW R Manual paper feed unit open close switch Micro switch Manual paper feed unit open close detection Main ch...

Страница 39: ...er pickup solenoid Paper feed tray 3 Presses the paper pickup roller onto paper Electromagnetic solenoid M2PFC M2PFC Paper feed clutch Paper feed tray 4 Paper freed tray 4 section roller ON OFF control Electromagnetic clutch M2PUS M2PUS Paper pickup solenoid Paper feed tray 4 Presses the paper pickup roller onto paper Electromagnetic solenoid MFPUS MFPUS Paper pickup solenoid Manual paper feed Pre...

Страница 40: ... clutch T2PUS T2PUS Paper pickup solenoid Paper feed tray 2 Presses the paper pickup roller onto paper Electromagnetic solenoid Code Signal name Name Type Function Operation NOTE ADM1 ADM1 Duplex ADU motor 1 Stepping motor Drives the paper transport roller 2 and the paper transport roller 19 High speed ADM2 ADM2 Duplex ADU motor 2 Stepping motor Drives the paper exit rollers 20 and 21 Selection of...

Страница 41: ...y 1 DC brush motor Drives the lift plate of the paper feed tray Selection of Rotation mode Brake mode T2LUM T2LUM Paper feed tray lift up motor Paper feed tray 2 DC brush motor Drives the lift plate of the paper feed tray Selection of Rotation mode Brake mode TM1 TM1 Toner motor 1 Synchronous motor Transports toner in the toner hopper to the developing unit Transports waste toner to the waste tone...

Страница 42: ...ld Cathode Fluorescent Tube Backlight for LCD DL DL Discharge lamp Lamp Discharges electric charges on the OPC drum CL1 CL1 Scanner lamp Xenon lamp Radiates lights onto a document for the CCD to scan the document image LEDCL LEDCL CIS lamp LED LED Radiates lights onto a document for the CIS to scan the document image CL1 LEDCL DL CCFT ...

Страница 43: ...sh less motor Exhaust heat from the fusing section PWM control CFM U3 CFM U3 Fusing section cooling fan motor 3 Paper exit duplex ADU section Top surface DC brush less motor Exhaust heat from the fusing section PWM control CFM U4 CFM U4 Fusing section cooling fan motor 4 Paper exit duplex ADU section Paper cooling fan motor DC brush less motor Cools paper which is discharged to the inner tray PWM ...

Страница 44: ...ion light reception PWB Generates the document size detection signal 18 Document size detection light emitting PWB Generates lights to detect the document size 19 High voltage power PWB MC DV TC Generates the main charger voltage the developing bias voltage the transfer voltage and the transfer belt cleaning voltage 20 Transfer bias high voltage PWB TD CL Provides the bias voltage for the transfer...

Страница 45: ...ction NOTE 1 F201 Fuse Time lag 250V 6 3A PCU PWB protection 24V1 DC main power PWB 100V series 200V series 2 F202 Fuse Time lag 250V 6 3A Driver PWB protection 24V2 DC main power PWB 100V series 200V series 3 F203 Fuse Time lag 250V 6 3A Scanner control PWB protection 24V3 DC main power PWB 100V series 200V series 4 F204 Fuse Time lag 250V 6 3A LCC control PWB protection 24V4 DC main power PWB 10...

Страница 46: ...ction Main source AC power PWB EX100 100V system 17 F3 Fuse Time lag 250V 2 0A Thermal heater overcurrent protection AC power PWB EX100 100V system 18 F5 Fuse Time lag 250V 2 5A MSW detection circuit overcurrent protection AC power PWB EX100 100V system 19 F1 F2 Fuse Time lag 250V 10A AC power source overcurrent protection Main source AC power PWBEX200 200V system 20 F3 F4 Fuse Time lag 250V 2 0A ...

Страница 47: ...ng paper Prevention against double feed and multifeed of paper into the paper feed roller Code Name Type Function Operation NOTE HL1 Heater lamp 1 Halogen lamp Heats the center of the upper fusing roller HL2 Heater lamp 2 Halogen lamp Heats the both ends of the upper fusing roller HL3 Sub heater lamp Halogen lamp Heats the fusing roller pressing roller WH1 DESK Dry heater Paper feed tray 1 2 Nichr...

Страница 48: ...ock Locks the paper lift plate 3 Paper tray 2 lock block Locks the paper lift plate 4 Paper tray 3 lock block Locks the paper lift plate 5 Paper tray 4 lock block Locks the paper lift plate 6 Fusing pressure release screw Applies and releases pressure in the fusing unit Release the pressure when storing the machine longer than 30 days 7 OPC drum separation pawl lock block Protects the OPC drum fro...

Страница 49: ...the paper transport section 6 Separation roller No 1 paper feed tray Separates paper to prevent double feed 7 Paper feed roller No 2 paper feed tray Feeds paper to the paper transport section 8 Separation roller No 2 paper feed tray Separates paper to prevent double feed 9 Paper pickup roller No 2 paper feed roller Sends paper to the paper transport section 10 Paper feed roller No 3 paper feed tra...

Страница 50: ...er to provide a transport power of the transport roller to paper 36 Transport roller 11 Drive Transports paper transported from the transport roller 10 to the transport roller 13 37 Transport roller 11 Idle Applies a pressure to paper and the transport roller to provide a transport power of the transport roller to paper 38 Transport roller 12 Idle Reduces friction between paper and the paper guide...

Страница 51: ...zontal 74 Second resist roller Idle DSPF Applies a pressure to paper and the resist roller to provide a transport power of the resist roller to paper 75 Paper exit roller Drive DSPF Discharges paper 76 Paper exit roller Idle DSPF Applies a pressure to paper and the paper exit roller to provide a transport power of the paper exit roller to paper 77 Transfer cleaning roller Cleans the transfer belt ...

Страница 52: ...rection in DSPF mode 48 1 48 5 ADJ7 Adjusting the image off center ADJ 7A Adjust the print image off center print engine section 50 5 50 10 ADJ 7B Adjust the scanned image off center in original table mode scan section 50 12 ADJ 7C Adjust the scanned image off center in DSPF front face mode scan section 50 12 ADJ 7D Adjust the scanned image off center in DSPF back face mode scan section 50 12 ADJ8...

Страница 53: ...ut requirement is satisfied ADJ13 Adjusting the fusing paper guide position ADJ14 Adjusting the paper size detection ADJ14A Adjust the paper width sensor for the manual paper feed tray 40 2 ADJ14B Adjust the paper width sensor for paper feed tray 3 40 12 ADJ14C Adjust the paper width sensor for the DSPF paper feed tray 53 6 ADJ15 Adjusting the original size detection in original table mode ADJ15A ...

Страница 54: ...TC Setting range Default Connector Pin Actual voltage Copy Auto mode 8 1 AUTO 0 750 495 CN2 7 500r5v Text mode CHARACTER 0 750 495 CN2 7 500r5v Text photo mode MIX 0 750 495 CN2 7 500r5v Photo mode PHOTO 0 750 495 CN2 7 500r5v Printer All modes PRINTER 0 750 495 CN2 7 500r5v FAX All modes FAX 0 750 495 CN2 7 500r5v Cleaning mode PLUS 0 250 150 CN2 7 500r5v Press START key Press SYSTEM SETTINGS key...

Страница 55: ...nd then press the Start key The adjustment items SHV FRONT SHV BACK correspond to the AC component of the transfer belt clean ing mode voltage applied to the transfer roller but this volt age component cannot be determined If the voltage seems to be abnormal after setting the default adjustment value therefore the high voltage PWB MC DV TC should be replaced 7 Select the number that corresponds to...

Страница 56: ...eration can be stopped with the SYSTEM SETTINGS key If the output voltage is not within the requirement do the fol lowing steps 8 Enter the adjustment value using the numeric keypad 9 Press the Start key The adjustment value is put into memory and the correspond ing voltage is output for 30 seconds Repeat steps 8 to 9 until the output requirement is satisfied ADJ 2 Adjusting the developing unit 2 ...

Страница 57: ...V doctor or MG roller Repeat steps 2 to 6 until the DV doctor gap meets the requirement 2 B Adjust the developing roller main pole This adjustment is needed in the following situations The developing unit has been disassembled The print density is low The toner is excessively dispersed 1 Remove the developing unit 2 Remove the developing unit cover and blade cover and then place the developing uni...

Страница 58: ...TART using the numeric keypad 7 Press the Start key 19 0 5 mm Select 1 and press START key Select other than 1 and press START key Press START key or press SYSTEM SETTINGS key SIMULATION 64 1 SELF PRINT MODE SELECT 0 7 AND PRESS START 0 TRAY SELECT 1 1 PRINT START 2 PRINT PATTERN 87 3 DENSITY 1 4 MULTI 1 5 MODE 1 6 LEVEL 1 7 DUPLEX 1 1 SIMULATION 64 1 SELF PRINT MODE INPUT VALUE AND PRESS START PR...

Страница 59: ...ual paper feed tray and remove the front frame side side cover fan cover cabinet and fan unit 10 Remove the fan unit 11 Loosen the LSU fixing screws and change the LSU fixing angle If the vertical line image is inclined to the left with respect to the front frame side move the LSU fixing plate in arrow direction a If the vertical line image is inclined to the right with respect to the front frame ...

Страница 60: ...t then do the following steps 6 Loosen the fixing screw of the scanner unit drive pulley that is not in contact 7 Manually turning the scanner unit drive pulley move Scanner Unit B until it comes into contact with the two stoppers on the CCD mounting plate 8 Without moving the scanner unit drive shaft manually turn the scanner unit drive pulley so that Scanner Unit B makes contact with both of the...

Страница 61: ... With the scanner unit drive shaft kept stationary manually turn the scanner unit drive pulley to change the parallelism of Scan ner Units A and B Change the positional relationship between the scanner unit drive pulley and the drive shaft 6 Tighten the scanner unit drive pulley fixing screw Repeat steps 2 to 6 until an acceptable result is obtained If the above steps fail to eliminate distortions...

Страница 62: ...he image scanning direction is equal 3 E Adjust scanned image distortions in the main scanning direction 2 This adjustment is needed in the following situations The scanner reading section has been disassembled Scanned images are distorted 1 Make a test chart on A3 11 x 17 paper as shown below Draw a rectangular with four right angles 2 Set the test chart made in step 1 on the document table and m...

Страница 63: ... the CIS guide boss and the glass for DSPF mode on each of the front and rear frame sides and then close the DSPF unit 3 Gently pulling out each check sheet for DSPF levelness adjustment make sure that no gap is felt between the CIS guide boss and the glass for DSPF mode for each of the front and rear frame sides If the above requirement is not met do step 4 4 Turn the height adjusting screw on th...

Страница 64: ...3 11 x 17 paper in duplex mode and then check the image for skews Set in the DSPF feed tray so that the mark on the adjustment chart is at the edge Check with one of the following methods Check Method 1 Check Method 2 Check that the squareness of the main scanning direction print line for the longitudinal direction of paper is within 0 5mm If the above requirement is met for the copied image of th...

Страница 65: ...result is obtained ADJ 5 Adjusting the image focus The result of this adjustment will affect all image scan modes copy scan and fax 5 A Adjust the image focus in original table mode and DSPF front face mode CCD This adjustment is needed in the following situations The CCD unit has been removed from the machine The CCD unit has been replaced Copied scanned faxed images are not correctly focused 1 G...

Страница 66: ...opied image is not satisfactorily focused and smaller than the original slide the unit in direction A After adjusting the CCD unit position fix the CCD unit so that it is in parallel with the marker line added in step 7 referring to the graduations on the front and rear frames sides of the CCD unit base Repeat steps 4 to 9 until the copied image of the scale is of almost the same size as the actua...

Страница 67: ...sition Image magnification factor 99 100 x 100 99 If the image magnification factor is within the spec 100r0 8 no adjustment is required otherwise do the following steps 5 Go through the modes specified in Simulation 48 1 10 20 30 40 50 60 70 80 90 100110120130140 A5 B5 A4 A5 B4 B5 A3 A4 11 81 2 51 2 A5 B5 B4 A3 A4 A5 B5 A4 81 2 11 13 14 17 51 2 Select 2 and press START key Press START key or pres...

Страница 68: ...99 100 x 100 99 If the image magnification factor is within the spec 100r0 8 no adjustment is required otherwise do the following steps 5 Go through the modes specified in Simulation 48 1 6 Select the number that corresponds to the adjustment item CCD SUB using the numeric keypad This adjustment item is intended to adjust the image magnification in the sub scanning direction in original table mode...

Страница 69: ...djustment item that is intended to adjust the image magnification in the main scanning direction in DSPF front face mode CCD SPF MAIN 7 Press the Start key 8 Adjust the image magnification factor by entering an appropri ate value through the numeric keypad 9 Press the P or Start key Pressing the Start key starts copy operation as well as applying the adjustment value Repeat the above adjustments u...

Страница 70: ... the image magnifi cation in the main scanning direction in DSPF back face mode CIS CIS MAIN 7 Press the Start key 8 Adjust the image magnification factor by entering an appropri ate value through the numeric keypad 9 Press the P or Start key Pressing the Start key starts copy operation as well as applying the adjustment value Repeat the above adjustments until an acceptable result is obtained A4 ...

Страница 71: ...rt key starts copy operation as well as apply ing the adjustment value Repeat the above adjustments until an acceptable result is obtained After adjusting the image magnification in the sub scanning direction through Simulation 48 1 do the following steps if making a copy at a different magnification factor fails to pro duce a correctly scaled copy 1 Go through the modes specified in Simulation 48...

Страница 72: ...y 50 SIMULATION 48 5 SCAN MOTOR SPEED ADJUSTMENT INPUT VALUE 0 99 AND PRESS START 0 MIR 220 50 2 SIMULATION 50 5 LEAD EDGE ADJUSTMENT SELECT 0 20 AND PRESS START 0 TRAY SELECT 1 1 PRINT START ADJUSTMENT DATA LEAD EDGE 2 RRCB 50 20 SIDE2 ADJ 50 RESIST 3 T1 50 4 T2 50 5 T3 50 6 T4 50 7 BPT 50 8 LCC 50 9 ADU 50 OFF CENTER 10 T1 50 11 T2 50 12 T3 50 13 T4 50 14 BPT 50 15 LCC 50 16 ADU 50 VOID SETTING ...

Страница 73: ...elect the adjustment item PLATEN which is intended to adjust the off center in original table mode 3 Press the Start key Select 2 and press START key Press START key or press SYSTEM SETTINGS key Item Setting range Default 0 TRAY SELECT Paper feed tray selection 1 5 1 COPY START Copy START Default 2 MAGNIFICA TION Print magnification ratio 25 400 100 Off center adjustment value 3 PLATEN OC mode adj...

Страница 74: ...creasing the adjustment value by 0 1 mm step causes posi tion of the printed image toward the front side 2 Using the numeric keypad select the adjustment item DSPF SIDE1 which is intended to adjust the off center in DSPF front face mode 3 Press the Start key original copy a b Select 2 and press START key Press START key or press SYSTEM SETTINGS key Item Setting range Default 0 TRAY SELECT Paper fe...

Страница 75: ...ncreasing the adjustment value by 0 1 mm step causes posi tion of the printed image toward the front side 2 Using the numeric keypad select the adjustment item DSPF SIDE2 which is intended to adjust the off center in DSPF back face mode 3 Press the Start key original copy a b Select 2 and press START key Press START key or press SYSTEM SETTINGS key Item Setting range Default 0 TRAY SELECT Paper fe...

Страница 76: ...eplaced U2 trouble has occurred 1 Go through the modes specified in Simulation 50 1 original copy a b Select 2 and press START key Press START key or press SYSTEM SETTINGS key Item Content Setting range Default 0 TRAY SELECT Paper feed tray selection 1 6 1 COPY START Copy START Default 2 MAGNIFICATI ON Print magnification ratio 25 400 Lead edge adjustment value 3 RRCA Document scan start position ...

Страница 77: ...do the following steps 2 Repeat the process of changing the TRAIL EDGE adjust ment value and then pressing the Start key until attaining an acceptable level Repeat the above adjustments until acceptable results are obtained Front rear frame direction image loss adjustment 1 Set the SIDE adjustment value to 20 by entering 20 into the SIDE adjustment value field and then pressing the P key Note that...

Страница 78: ...ntrol PWB has been replaced The scan control PWB has been replaced The EEPROM on the scan control PWB has been replaced The scanner reading section has been disassembled The scanner reading unit has been replaced U2 trouble has occurred The DSPF section has been disassembled The DSPF unit has been replaced 1 Go through the modes specified in Simulation 50 6 Select 2 and press START key Press START...

Страница 79: ...EDGE adjust ment value and then pressing the Start key until attaining an acceptable level Repeat the above adjustments until an acceptable result is obtained Front rear frame direction image loss adjustment Set the FRONT REAR adjustment value to 20 by entering 20 into the FRONT REAR adjustment value field and then pressing Note that changing this adjustment value shifts the image position in the ...

Страница 80: ...canner mode 10 OC LEAD_EDGE OC lead edge 0 10 Unit 1mm 0 0mm 11 OC FRONT REAR OC side 12 OC TRAIL_EDGE OC rear edge 13 SPF LEAD_EDGE SPF lead edge 14 SPF FRONT REAR SPF side 15 SPF TRAIL_EDGE SPF rear edge 16 CIS LEAD_EDGE CIS lead edge 17 CIS FRONT REAR CIS side 18 CIS TRAIL_EDGE CIS rear edge Press START key Press SYSTEM SETTINGS key 0 SIMULATION 50 27 ORIGINAL IMAGE LOSS SETTING FAX SCN INPUT 0...

Страница 81: ...t value Pressing the Start key starts copy operation as well as apply ing the adjustment value 8 Check the copied image density Repeat steps 6 to 8 until an acceptable copied image density is obtained 1 2 W 10 9 Lot No 01A GRAY CHART 8 7 6 5 4 3 R 1 2 W 10 9 Lot No 01A GRAY CHART 8 7 6 5 4 3 R Original Copy 00 Select 2 and press START key Press START key or press SYSTEM SETTINGS key Item Setting r...

Страница 82: ...ress START key Press START key or press SYSTEM SETTINGS key SIMULATION 46 9 SIMULATION 46 9 EXP LEVEL SETUP CHAR 2 INPUT VALUE 0 99 AND PRESS START 3 1 0 SIMULATION 46 9 EXP LEVEL SETUP CHAR 2 NOW COPYING 50 SIMULATION 46 9 EXP LEVEL SETUP CHAR 2 SELECT 1 6 AND PRESS START FEED TRAY 1 TRAY1 2 TRAY2 3 TRAY3 4 TRAY4 5 BPT 6 LCC 1 1 EXP LEVEL SETUP CHAR 2 SELECT 0 11 AND PRESS START 0 TRAY SELECT 1 1...

Страница 83: ...F_CHARA Text mode SPF 64 9 SPF_MIX Text Photo mode SPF 10 SPF_PHOTO Photo mode SPF 11 CIS_AE AE mode CIS 96 12 CIS_CHARA Text mode CIS 64 13 CIS_MIX Text Photo mode CIS 14 CIS_PHOTO Photo mode CIS 64 1 SIMULATION 46 18 GAMMA SETUP COPIER SELECT 1 14 AND PRESS START 0 TRAY SELECT 1 1 PRINT START 2 EXP LEVEL 1 3 OC_AE 64 4 OC_CHARA 5 OC_MIX 64 6 OC_PHOTO 64 7 SPF_AE 64 8 SPF_CHARA 64 9 SPF_MIX 64 10...

Страница 84: ...al mode adjustment Adjust the fax mode print density in standard mode Auto mode Binary mode 46 12 46 13 Manual Binary mode Adjust the fax mode print density in small character mode Auto mode Binary mode 46 14 Half tone mode Manual Binary mode Half tone mode Adjust the fax mode print density in fine mode Auto mode Binary mode 46 15 Half tone mode Manual Binary mode Half tone mode Adjust the fax mod...

Страница 85: ...t frame Then put four or five pieces of A3 11 x 17 paper 2 Go through the simulation modes that correspond to the Fax modes for which to adjust the print density i e the modes specified in Simulations 46 13 14 15 16 or 45 00 Select 2 and press START key Press START key or press SYSTEM SETTINGS key Item Setting range Default 0 TRAY SELECT Paper feed tray selection 1 PRINT START Print start Default ...

Страница 86: ... Print start Default 2 EXP LEVEL Exposure level selection 3 AUTO Auto 0 99 50 4 1 0 Exposure level 1 5 2 0 Exposure level 2 6 3 0 Exposure level 3 7 4 0 Exposure level 4 8 5 0 Exposure level 5 9 AUTO H Auto Half tone 10 1 0 H Exposure level 1 Half tone 11 2 0 H Exposure level 2 Half tone 12 3 0 H Exposure level 3 Half tone 13 4 0 H Exposure level 4 Half tone 14 5 0 H Exposure level 5 Half tone 50 ...

Страница 87: ...he post adjustment image density 11 B Scan mode image density adjustment individual setup standard mode 11 C Scan mode image density adjustment individual setup small character mode 11 D Scan mode image density adjustment individual setup fine mode 11 E Scan mode image density adjustment individual setup super fine mode This adjustment is intended to the image mode for each scan mode individually ...

Страница 88: ...ontrol PWB has been replaced The EEPROM on the MFP control PWB has been replaced The scanner control PWB has been replaced The EEPROM on the scanner control PWB has been replaced One or more parts of the scanner reading section have been replaced The CIS unit has been removed The CIS unit has been replaced The DSPF unit has been removed The DSPF unit has been replaced Press START key Press START k...

Страница 89: ...T Paper feed tray selection 1 TRAY1 2 TRAY2 3 TRAY3 4 TRAY4 5 Manual feed 6 Side LCC 1 PRINT START Print start Default 2 EXP LEVEL Exposure level selection 3 Exposure level1 0 4 Exposure level1 5 5 Exposure level2 0 6 Exposure level2 5 7 Exposure level3 0 8 Exposure level3 5 9 Exposure level4 0 10 Exposure level4 5 11 Exposure level5 0 3 SPF FRONT SPF front front frame side 0 255 128 4 SPF REAR SP...

Страница 90: ...as been disassembled The manual paper feed tray unit has been replaced U2 trouble has occurred The PCU PWB has been replaced The EEPROM of the PCU PWB has been replaced 1 Go through the modes specified in Simulation 40 2 2 Open the manual paper feed guide to the maximum width position Select 4 and press START key Press START key or press SYSTEM SETTINGS key SIMULATION 40 2 BYPASS TRAY ADJUSTMENT S...

Страница 91: ... appears when any of the operations has failed the ERROR message appears 14 B Adjust the paper width sensor for paper feed tray 3 This adjustment is needed in the following situations The paper feed tray section has been disassembled The paper feed tray unit has been replaced U2 trouble has occurred The PCU PWB has been replaced The EEPROM of the PCU PWB has been replaced 1 Go through the modes sp...

Страница 92: ...ion level is recognized 9 Press the SYSTEM SETTINGS key 10 Open the DSPF paper feed guide to the width for the A5R size 11 Select POSITION 2 using the numeric keypad 12 Press the Start key The A4R width detection level is recog nized 13 Press the SYSTEM SETTINGS key 14 Open the DSPF paper feed guide to the minimum width posi tion 15 Select MIN POSITION using the numeric keypad 16 Press the Start k...

Страница 93: ...eric keypad 5 Press the Start key This sets the sensor level with an original detected When each of the above operations has been completed the COMPLETE message appears when any of the operations has failed the ERROR message appears ADJ 16 Adjusting the touch panel coordinates This adjustment is needed in the following situations The operation panel has been replaced U2 trouble has occurred The MF...

Страница 94: ...ND CN3 4 pin 2 Turn RV202 on the DC main power supply PWB so that the voltage is 24 V 38 V supply voltage adjustment 3 Apply a digital multi meter to the DC main PWB 38 V line CN8 1 pin and GND CN8 4 pin 4 Turn RV201 on the DC main power supply PWB so that the voltage is 38 V 12 V supply voltage adjustment 5 Apply a digital multi meter to the DC sub PWB 12 V line CN4 1 pin and GND CN4 6 pin 6 Turn...

Страница 95: ...rature side judgment temperature Counter mode setting LCD When the value is changed it is sent and saved Saved adjustment value send When the power is turned on etc MFP CONTROLLER ENGINE CONTROLLER SCANNER CONTROLLER ADU paper feed counter Toner concentration temperature correction high temperature side judgment voltage White paper exit count setting Staple counter Toner concentration temperature ...

Страница 96: ... key START key ON 4 Select an item with the scroll key and the item key 5 The machine enters the mode corresponding to the selected item Press START key or EXECUTE key to start the simulation operation To cancel the current simulation mode or to change the main code and the sub code press the user setup key Canceling the simulation mode to return to the normal mode 1 Press CA key Note for the simu...

Страница 97: ...the new setting and adjustment values Press the SYSTEM SETTINGS key Press the SYSTEM SETTINGS key Press the EXECUTE button and OK button Operation is made according to the selected mode and item Press the EXECUTE button and OK button Press the EXECUTE button and OK button The display is made according to the selected some and the item Press the EXECUTE button and OK button Is it the same simulatio...

Страница 98: ...rmittent aging cycle setting 8 Warm up time display No aging 8 1 DV bias setting 2 Main charger grid voltage setting 6 Transfer voltage setting 17 Transfer roller setting 18 Transfer cleaning roller setting 19 Fusing bias setting Not used 9 1 ADU output test 2 ADU sensor check 10 1 Toner motor activation 2 Toner rest sensor check 13 U1 trouble cancellation 14 Trouble cancellation 15 LCC trouble ca...

Страница 99: ... 43 1 Fusing temperature control temperature setting Normal Energy save mode 3 Fusing roller RPM setting 44 1 Process correction inhibit allow setting 2 DM ID sensor gain adjustment 4 Standard patch density setting 5 Patch making reference condition setting 9 Process control data display 12 Process control patch data display 14 Temperature humidity sensor output monitor 16 Toner concentration refe...

Страница 100: ...ion adjustment 55 1 Engine soft SW change and check 2 Scanner soft SW change and check 3 Controller soft SW change and check 56 1 Data transfer 60 1 ICU image DRAM read write check 61 1 LSU operation check 2 Laser power setting Copier 3 Laser power setting FAX 4 Laser power setting Printer 62 1 Hard disk format 2 Hard disk read write check 3 Hard disk read write check All areas 6 HDD self diag 7 S...

Страница 101: ...test DTMF signal adjustment send test 17 DTMF signal send mode Signal send level Max 18 DTMF signal send mode Signal send level Soft SW setting 19 Address book backup WR TO FLASH 20 Address book backup RD FROM FLASH 21 FAX information print 23 FAX program download 24 FAST memory data clear 25 MODEM dial in FAX number registration 26 MODEM dial in telephone number registration 27 Voice warp transfe...

Страница 102: ...are displayed The active sensors and detectors are highlighted 2 3 Purpose Operation test Check Function Purpose Used to check the operations of the loads in the automatic document feeder unit and the control circuits Section DSPF Operation Procedure 1 Select the number corresponding to the target of operation check with 10 key 2 Press the START key The load selected in procedure 1 is operated The...

Страница 103: ...3 SPFFAN 2 PI11S Saddle paper exit detection When the saddle unit is installed PI12 Tray 2 paper detection PI12S Semi circular roller phase detection When the saddle unit is installed PI13S Guide HP detection When the saddle unit is installed PI14 Buffer path detection PI14S Paper holding plate lead edge position detection When the saddle unit is installed PI15 Finisher joint detection PI15S Paper...

Страница 104: ... solenoid 20 SL2S No 2 paper deflection plate solenoid 21 SL1S No 1 paper deflection plate solenoid 22 M8S Paper holding motor 23 M7S Stitch motor Front 24 M6S Stitch motor Rear 25 M5S Saddle alignment motor 26 M4S Paper positioning motor 27 M3S Guide motor 28 M2S Paper folding motor 29 M1S Saddle transport motor Item Setting range 1 Saddle stitch folding position adjustment 192 208 1STEP 0 25 mm ...

Страница 105: ...tion can be stopped with the SYSTEM SETTINGS key Side LCC 5 5 1 Purpose Operation test Check Function Purpose Used to check the operation of the display LCD in the operation panel and control cir cuit Section Operation Display Operation key Operation Procedure The contrast changes every 2sec from the current level to MAX MIN the current level During this period each LED is lighted 1 K_MOT Reverse ...

Страница 106: ...INGS key 1 HL1 LOWER Heater lamp 1 Lower 2 HL2 UPPER Heater lamp 2 Upper 3 HL3 LEFT Heater lamp 3 Left SIMULATION 5 2 HEATER LAMP TEST SELECT 1 3 AND PRESS START 1 HL1 LOWER 2 HL2 UPPER 3 HL3 LEFT 2 SIMULATION 5 3 COPY LAMP TEST SELECT 1 2 AND PRESS START 1 COPY LAMP 2 CIS 1 SIMULATION 5 4 DISCHARGE LAMP CHECK SELECT 1 AND PRESS START 1 DL 1 1 MSWPR MSW reset signal 2 HLPR Heater power relay signa...

Страница 107: ...ng of this simulation is kept valid until the power is turned off Press START key to start registration and operation The operation mode is kept until the power is turned off or setting is made again 1 VFM EX Exhaust fan motor VFM EX1 2 3 VFM BKL VFM BKU 2 CFM UP Heat exhaust fan motor Paper exit upper CFM U1 2 3 VFM BKR 3 CFM R Cooling fan motor Right side CFM R1 2 3 4 CFM DC Cooling fan motor Po...

Страница 108: ...Cleaning Operation Procedure 1 Select the number that corresponds to the adjustment item with 10 key 2 Press the START key 3 Enter the adjustment value with 10 key 4 Press the START key The set value is stored and the output corresponding to the set value is outputted for 30sec The operation can be stopped with the SYSTEM SETTINGS key The main charger grid output voltage adjustment and output chec...

Страница 109: ...Purpose Used to check and adjust the fusing bias voltage and the control circuit Not used Section Fusing Operation Procedure 1 Select the number that corresponds to the adjustment item with 10 key 2 Press the START key The voltage is outputted for 30sec The operation can be stopped with the SYSTEM SETTINGS key The output voltage can be adjusted with the adjustment volumes VR101 VR102 on the high v...

Страница 110: ... toner motor rotates 2 turns and the toner presence empty in the toner hopper is displayed Toner empty Normal display Toner remained Highlighted display 13 13 0 Purpose Clear Cancel Trouble etc Function Purpose Used to cancel the self diag U1 trouble Only when FAX is installed Section FAX Operation Procedure 1 Select 1 YES with 10 key 2 Press START key The trouble display is canceled 14 14 0 Purpo...

Страница 111: ...ding to the maintenance timing display 2 Press START key The condition entered in procedure 1 is set 1 YES After canceling the LCC trouble the machine returns to the main code entry standby mode 2 NO Without canceling the trouble the machine returns to the main code entry standby mode 1 YES After canceling the U2 trouble the machine returns to the main code entry standby mode 2 NO Without cancelin...

Страница 112: ... WEB SEND SIMULATION 22 2 JAM TROUBLE COUNTER DATA DISPLAY PAPER JAM SPF JAM TROUBLE Code Description NO_JAM_CAUSE No jam Also used to cancel a jam TRAY1 Tray 1 paper feed jam PFD2 not reached PFD2_NM1 PFD2 not reached jam Tray 3 feed paper PFD2_NM2 PFD2 not reached jam Tray 4 feed paper PFD2_NAD PFD2 not reached jam ADU re feed paper PFD2_ST1 PFD2 remaining jam Tray 1 feed paper PFD2_SM1 PFD2 rem...

Страница 113: ...D1_S MPFD1 remaining jam LPPD_N LPPD not reached jam LPPD_S LPPD remaining jam LPPD_LCC LPPD jam No reply in a certain time after preliminary paper feed from LCC and issuing the paper feed command LCC LCC paper feed jam LTD not reached jam LTD_S LTD remaining jam FES_N FINISHER entry port sensor not reached jam FES_S FINISHER entry port sensor remaining jam FFPS_N FINISHER Saddle not reached jam F...

Страница 114: ...ose Adjustment Setup Operation data output Check Display Print Function Purpose Used to check the system configuration option internal hardware Section Operation Procedure The system configuration is displayed The model names of the installed devices and options are displayed 0 TRAY SELECT TRAY SELECT auto only Selection is not allowed 1 PRINT START PRINT START SPF Document feed quantity SCAN Numb...

Страница 115: ...e wide LCC Side LCC not installed Model code Side LCC installed Model code Side LCC installed large size support MEMORY 0MB Expansion memory not installed MB Expansion memory MB HD 0MB Hard disk not installed MB Hard disk installed NIC Network Expansion kit not installed Model code Network Expansion kit installed PS3 expansion kit PS expansion kit not installed Model code PS expansion kit installe...

Страница 116: ...play Print Function Purpose Used to check the trouble history of paper jam and misfeed If the number of misfeed and troubles is considerably great it may be judged as necessary to repair Section Operation Procedure 1 Select 1 PRINT START 2 Press the START key The trouble history of paper jam and misfeed is printed This data can be cleared by SIM 24 1 DRUM OPC drum Count value counts Rotating time ...

Страница 117: ... 4 Press the START key 0 TRAY SELECT AUTO ONLY Auto only No selection allowed 1 PRINT START Print execution Print of the set data is executed 2 PRINT PATTERN Print pattern 1 Paper transport time data Transport route section Reference value ms Previous value ms TRAY1 PFD2 On ms ms PFD2 On PPD On ms ms RRC On POD1 On ms ms POD1 On POD2 On ms ms POD2 On TOP TRAY ms ms Switch Back AINPD On ms ms AINPD...

Страница 118: ...ess the START key The confirmation to clear is opened 3 Select Yes NO of counter clear with 10 key YES Clear NO Not clear 4 Press the START key 24 7 Purpose Data clear Function Purpose Used to clear the OPC drum counter Per form this simulation when the OPC drum is replaced Section Image process Photoconductor Develop ing Transfer Cleaning Operation Procedure 1 Select the counter to be cleared wit...

Страница 119: ...leared with 10 key 2 Press the START key The confirmation to clear is opened 3 Select Yes NO of counter clear with 10 key YES Clear NO Not clear 4 Press the START key 1 DRUM OPC drum counter 1 PRINTER Printer counter Print mode 2 OTHERS Other effective paper counter Self print mode 1 FAX SEND Number of FAX send 2 FAX RECEIVE Number of FAX receive 3 FAX OUTPUT Number of FAX print 4 SEND IMAGES Numb...

Страница 120: ... in software Section Paper feed Operation Procedure 1 Select the number corresponding to the paper feed unit for set ting the paper size with 10 key 2 Press the START key 3 Select the number corresponding to the paper size 4 Press the START key 26 3 Purpose Setting Function Purpose Used to set the specifications of the auditor Setting must be made according to the auditor use conditions Section Au...

Страница 121: ...nction is valid only in Japan and UK versions Depends on the destina tion setting of SIM26 6 For the other desti nations the same setting can be made by the user program P22 Section Operation Procedure 1 Select YES NO of the toner save mode with 10 key 2 Press the START key Default 1 1 TOTAL COUNTER Total counter 2 MAINTENANCE DRUM COUNTER Maintenance counter OPC drum counter 3 DV COUNTER Develope...

Страница 122: ...sponding to whether AMS operation is automatically performed or nor in the center binding mode with the 10 key 2 Press the START key Default 0 26 50 Purpose Setting Function Purpose Black White reverse YES NO setting Section Operation Procedure 1 Select ENABLE DISABLE of the B W reverse mode with 10 key 2 Press the START key Default 1 No B W reverse function for UK 0 NO CE mark control NO Normal o...

Страница 123: ...ouble occurs between the host computer and MODEM the self diag display U7 00 is printed and setting for inhibition of print or not is made Section Communication unit RIC MODEM etc Operation Procedure 1 Select the number corresponding to the operation mode with 10 key 2 Press the START key Default 0 27 5 Purpose Setting Function Purpose Used to enter the machine tag No This function allows to check...

Страница 124: ... 2 remaining quantity sensor TPED2 Tray 2 paper sensor MPLD1 Manual tray length detection 1 MPLD2 Manual tray length detection 2 MTOP1 Manual tray pull out detection 1 MTOP2 Manual tray pull out detection 2 MPED Manual feed paper empty detection 2 MPFD1 Detection 1 of paper pass from manual paper feed MPFD2 Detection 2 of paper pass from manual paper feed MPRD1 Manual relay paper detection 1 MPRD2...

Страница 125: ...re The sensor and detector operation conditions are displayed The active sensors and detectors are highlighted The paper width detection level is also displayed 40 12 Purpose Adjustment Setup Function Purpose Used to check the multi purpose tray width detection adjustment value Section Paper feed Operation Procedure 1 Open the paper feed tray 3 paper feed guide to the max width position 2 Select M...

Страница 126: ...eceiving value A D value and the threshold value A D value of PD1 PD7 are in the range of 1 255 The default of threshold value is 128 43 43 1 Purpose Setting Function Purpose Used to set the fusing temperature in each operation mode Section Fusing Operation Procedure 1 Select the number corresponding to the setting mode with 10 key 2 Press the START key 3 Enter the setting value with 10 key 4 Pres...

Страница 127: ... the adjustment is not completed normally ERROR is displayed When an error occurs the adjustment result is not revised Item Setting range Default 55 62 ppm 70 ppm 1 NORMAL 0 99 34 34 2 SLOWDOWN 0 99 46 44 Item Default BIT1 OPC drum membrane decrease sensitivity potential correction Laser power main charger grid voltage 1 BIT2 The range of the toner patch making voltage in the developing bias volta...

Страница 128: ...R Reference laser power for developing bias voltage correction Item NOTE DRUM ROTATION TIME OPC drum rotation time sec Reset by SIM 24 11 SIMULATION 44 4 1 PROCON INITIAL DENSITY SETUP PRESS START 1 PROCON INI DENSITY 32 1 SIMULATION 44 5 1 PROCESS CONTROL TEST SELECT 1 3 AND PRESS START 1 GRID BIAS VOL 2 DEVE BIAS VOL 280 3 LASER POWER DEVE MIXING TIME Developing roller rotation time sec Reset by...

Страница 129: ...y 4 Press START key The paper feed tray is selected TH DV Not used Developing section temperature sensor 0 255 TH RA Not used Room temperature sensor 0 255 TH CL Process section temperature sensor 0 255 TH EX Paper discharging section temperature sensor 0 255 HUS DV Developing section humidity sensor 0 255 HUS TC Not used Process section humidity sensor 0 255 HUMIDITY AREA Humidity area INT HUMIDI...

Страница 130: ...copy density adjust ment level with 10 key Select one of 3 11 2 Press the START key 3 Enter the copy density level with 10 key 4 Press the P or START key The adjustment value is set When START key is pressed copy is performed and the adjustment value is set simultaneously Check the density of the printed copy image To select paper paper feed tray perform the following procedures 1 Enter 0 with 10 ...

Страница 131: ...he FAX print image density is adjusted with this sim ulation the print image densities of all the FAX modes are changed to the image density level set with this simulation That is the print image density of each FAX mode set with SIM 46 13 14 15 and 16 is changed to the print image density level adjusted with this simulation To select paper paper feed tray perform the following procedures 1 Enter ...

Страница 132: ...l mode Print density adjustment level Normal mode Print density adjustment level Half tone mode Auto mode Auto mode Half tone mode 2 Enter the print density level with 10 key 3 Press the P or START key The adjustment value is set When START key is pressed printing is performed and the adjustment value is set simultaneously Check the density of printed image To select paper paper feed tray perform ...

Страница 133: ...aper feed tray is selected NOTE When P key is pressed after entering an adjustment value in this simulation the adjustment value is set When START key is pressed the adjustment value is set and copying is performed 1 TRAY1 TRAY1 2 TRAY2 TRAY2 3 TRAY3 TRAY3 4 TRAY4 TRAY4 5 BPT Manual paper feed 6 LCC Side LCC Item Setting range Default 0 TRAY SELECT Paper feed tray selection 1 PRINT START Print sta...

Страница 134: ...r corresponding to the adjustment item with 10 key 2 Press the START key 3 Enter the shading gain change value with 10 key 4 Press the START key There is normally no need to change the shading gain with this sim ulation Only when the scanned image density is unsatisfactory though shading is performed the above procedure is performed Item Setting range Default 0 TRAY SELECT Paper feed tray selectio...

Страница 135: ...nt Function Purpose Used to set the auto mode operation speci fications in each mode copy scan FAX Section Operation Procedure Toner save operation YES NO setting in the auto mode 1 Select 1 AE MODE with 10 key 2 Press the START key 3 Select the number that corresponds to the operation specifica tions with 10 key 4 Press the START key When START key is pressed the adjustment value is set Auto copy...

Страница 136: ...mage densities in all the scan modes are changed to the image density level set with this simulation That is the image densities set with SIM 46 22 23 24 25 and 45 are changed to the image density level set with this simulation 1 AE MODE AE mode 2 AE STOP MODE COPIER AE fixed mode Copier 3 AE STOP MODE SCANNER AE fixed mode Scanner 4 AE STOP MODE FAX AE fixed mode FAX Mode Set value Item Default A...

Страница 137: ... density adjustment level Normal mode Image density adjustment level Half tone mode Auto mode Auto mode Half tone mode 2 Press the START key 3 Enter the image density adjustment value with 10 key 4 Press START key or press P key The adjustment value is set NOTE Only the set value is changed and no printing is performed Item Setting range Default 0 AUTO Auto 0 99 50 1 1 0 Exposure level 1 2 2 0 Exp...

Страница 138: ...arpness adjustment After completion of the above procedures perform the following procedures 1 Enter the sharpness level with 10 key 2 Press the START key The greater the adjustment value is the greater the sharpness is Item Setting range Default 0 AUTO Auto 0 99 50 1 1 0 Exposure level 1 2 2 0 Exposure level 2 3 3 0 Exposure level 3 4 4 0 Exposure level 4 5 5 0 Exposure level 5 6 AUTO H Auto Half...

Страница 139: ... 1 Level 1 Half tone Sharpness Light 1 3 2 Level 2 Sharpness Medium light 3 Level 3 Normal Sharpness Medium 1 SIMULATION 46 31 SHARPNESS LEVEL SETUP SELECT 1 16 AND PRESS START 1 OC_AE 3 2 OC_CHARA 3 3 OC_MIX 3 4 OC_PHOTO 3 5 SPF1_AE 3 6 SPF1_CHARA 3 7 SPF1_MIX 3 8 SPF1_PHOTO 3 9 SPF2_AE 3 10 SPF2_CHARA 3 11 SPF2_MIX 3 12 SPF2_PHOTO 3 13 CIS_AE 3 14 CIS_CHARA 3 15 CIS_MIX 3 16 CIS_PHOTO 3 1 SIMULA...

Страница 140: ...erformed 48 5 Purpose Adjustment Function Purpose Used to adjust the copy magnification ratio in the sub scanning direction Section Optical Image scanning Operation Procedure When the sub scanning direction image magnification ratio adjust ment with SIM 48 1 cannot provide a satisfactory result if a different magnification ration is set and a copy is made perform this simula tion When there is an ...

Страница 141: ...d press START key 1msec step If the lead edge image loss is not 1 5mm Change the adjustment value of RRCA and perform the adjustment Change the adjustment value of RRCA and press START key The adjustment value should be changed in steps of 0 2mm Trailing edge void area adjustment Adjust so that the rear edge void area is 3 5mm Change the adjustment value of TRAIL EDGE and press START key Front rea...

Страница 142: ...ctory result is not obtained with the above proce dures through the adjustment values are changed individ ually the normal adjustment cannot be made Perform procedures 3 to 6 continuously Trailing edge void area adjustment Adjust so that the rear edge void area is 3 5mm Change the adjustment value of TRAIL EDGE and press START key Front rear frame direction image loss adjustment Set the adjustment...

Страница 143: ...a Adjust so that the total of the front rear direction void areas is 7 0mm Change the adjustment values of FRONT REAR and press START key Front frame void area 3 5mm Rear frame void area 3 5mm Paper resist adjustment 1 Enter the number corresponding to the paper feed tray to be adjusted with 10 key Select one of 3 9 Table 1 2 Press the START key 3 Enter the adjustment value with 10 key 4 Press P k...

Страница 144: ...me direction image loss adjustment Set the adjustment value of the front surface and the back surface FRONT REAR to 20 Enter 20 as the adjustment value of FRONT REAR and press P key Note that changing this adjustment value shifts the image position in the front rear frame direction NOTE When P key is pressed after entering an adjustment value in this simulation the adjustment value is set When STA...

Страница 145: ... loss adjustment Set the adjustment value of SIDE to 20 Enter 20 as the adjust ment value of SIDE and press P key Note that changing this adjustment value shifts the image position in the front rear frame direction NOTE When P key is pressed after entering an adjustment value in this simulation the adjustment value is set When START key is pressed the adjustment value is set and copying is perform...

Страница 146: ...n adjustment value in this simulation the adjustment value is set When START key is pressed the adjustment value is set and copying is performed 5 LEAD_EDGE Front surface lead edge image loss set value 0 99 15 6 FRONT_REAR Front surface side edge image loss set value 20 7 TRAIL_EDGE Front surface rear edge image loss set value 0 20 0 Image loss set value SIDE 2 8 LEAD_EDGE Back surface lead edge i...

Страница 147: ...ress the START key NOTE When P key is pressed after entering an adjustment value in this simulation the adjustment value is set When START key is pressed the adjustment value is set and copying is performed 50 27 Purpose Adjustment Function Purpose Used to adjust the image loss of the scan image in the FAX scan mode Section Operation Procedure Select the scan mode to be adjusted 1 Enter the number...

Страница 148: ...lead edge 0 10 Unit 1mm 0 0mm 11 OC FRONT REAR OC side 12 OC TRAIL_EDGE OC rear edge 13 SPF LEAD_EDGE SPF lead edge 14 SPF FRONT REAR SPF side 15 SPF TRAIL_EDGE SPF rear edge 16 CIS LEAD_EDGE CIS lead edge 17 CIS FRONT REAR CIS side 18 CIS TRAIL_EDGE CIS rear edge Item Setting range Default 55 62 ppm 70 ppm 0 TRAY SELECT Paper feed tray selection 1 6 1 PRINT START Print start Default 1 SIMULATION ...

Страница 149: ...e Section DSPF Operation Procedure 1 Select the number corresponding to the set item with 10 key 2 Press the START key 3 Enter the set value with 10 key 4 Press the START key 53 8 Purpose Adjustment Function Purpose Used to adjust the document scan start position Used to adjust the scanner scan position in the SPF mode front scan Section Operation Procedure 1 Enter 2 with 10 key 2 Press the START ...

Страница 150: ...he transfer result is displayed If there is no error the machine is automatically reset after completion of data transfer If there is an error NG is displayed The machine is not reset When restoring from HDD fit the configurations of the Flash ROM and the optional Flash ROM at back up 1 SIMULATION 55 1 ENGINNE SOFT SW SETTING SELECT 1 16 AND PRESS START 1 SIMULATION 55 2 SCANNER SOFT SW SETTING SE...

Страница 151: ...se Used to adjust the laser power absolute value in the FAX mode Only when FAX is installed Section Scanner write unit LSU Operation Procedure 1 Select the number corresponding to the adjustment mode with 10 key 2 Press the START key 3 Enter the adjustment value with 10 key 4 Press the START key NOTE Be sure to set the default value If not a trouble may occur in the LSU 61 4 Purpose Adjustment Fun...

Страница 152: ...ations of the hard disk The self diag operation of the SMART function is executed Section MFP controller HDD Operation Procedure 1 Select the number corresponding to the self diag check mode 2 Press the START key During the self diag operation EXECUTING is displayed If the self diag is completed normally 0 is displayed If not any value but 0 is displayed 62 7 Purpose Operation test Check Function ...

Страница 153: ...NG is displayed When formatting is completed normally OK is displayed If not NG is displayed NOTE When executed this function internally executes the same function as SIM66 10 deleting reservation data bulletin board data and confidential data 63 63 1 Purpose Adjustment Setup Operation data output Check Display Print Function Purpose Used to check the result of shading correc tion The shading corr...

Страница 154: ... START key To set the print quantity perform the following procedures 1 Select MULTI with 10 key 2 Enter the print quantity with 10 key 3 Press the START key To set the print quality mode perform the following procedures 1 Select MODE with 10 key 2 Enter the number corresponding to the print quality mode with 10 key 3 Press the START key To set the print level perform the following procedures 1 Se...

Страница 155: ... Horizontal 54 Yes All surface 1 by 3 Vertical 55 Yes All surface 1 by 3 Horizontal 56 Yes All surface 1 by 4 Vertical 57 Yes All surface 1 by 4 Horizontal 58 Yes All surface 1 by 5 Vertical 59 Yes All surface 1 by 5 Horizontal 60 Yes All surface 2 by 2 Vertical 61 Yes All surface 2 by 2 Horizontal 62 Yes All surface 2 by 3 Vertical 63 Yes All surface 2 by 3 Horizontal 64 Yes All background 65 Yes...

Страница 156: ... 66 2 Purpose Data clear Function Purpose Used to clear the FAX soft switch function data and to set to the default Excluding the adjustment values Section FAX Operation Procedure 1 Set the destination code with 10 key Destination code The codes other than the above are recognized as Japan 2 Press the START key 3 The confirmation menu of YES NO of clear is displayed Select one 4 Press the START ke...

Страница 157: ...ASH MODEM EEPROM MODEM SRAM G A MODEM SRAM MODEM SDRAM SIMULATION 66 3 FAX PWB MEMORY CHECK INPUT 1 13 AND PRESS START 1 All Memory Device Check once 2 MFP SRAM once 3 MFP SRAM repeat 4 MFP FLASH OP FLASH once 5 MFP FLASH OP FLASH repeat 6 MODEM EEPROM once 7 MODEM EEPROM repeat 8 MODEM SRAM G A once 9 MODEM SRAM G A repeat 10 MODEM SRAM once 11 MODEM SRAM repeat 12 MODEM SDRAM once 13 MODEM SDRAM...

Страница 158: ...T START Print start 1 PRINT START Print start SIMULATION 66 5 SIGNAL OUTPUT CHECK SOFT SW SELECT 1 32 AND PRESS START 1 NOSIGNAL 2 33 6 V34 3 31 2 V34 4 28 8 V34 2 26 4 V34 6 24 0 V34 7 21 6 V34 8 19 2 V34 9 16 8 V34 10 14 4 V34 11 12 0 V34 12 9 6 V34 13 7 2 V34 14 4 8 V34 15 2 4 V34 16 14 4 V33 17 12 0 V33 18 14 4 V17 19 12 0 V17 20 9 6 V17 21 7 2 V17 22 9 6 V29 23 7 2 V29 24 4 8 V27t 25 2 4 V27t...

Страница 159: ...nter set the number of FAX dial signal output test The dial number set by this simulation is outputted when the dial signal output test is made by SIM 66 14 16 Only when FAX is installed Section FAX Operation Procedure 1 Enter the dial number with 10 key Use 10 key key and key to enter the number The upper limit is 20 digits When CLEAR key is pressed the mode returns to the initial state 2 Press t...

Страница 160: ...sed to check the operation Only when FAX is installed Section FAX Operation Procedure 1 Enter the DTMF signal 1 9 0 to be sent with 10 key 2 Press the START key The output is delivered at the max send level When SYSTEM SETTINGS key is pressed during execution the operation is stopped 66 18 Purpose Setting Function Purpose Used to check the dial signal DTMF out put in the FAX tone dial mode An outp...

Страница 161: ...or development Section FAX Operation Procedure 1 Turn OFF the power 2 Remove the protect pin 3 Turn ON the power 4 Enter the SIM 66 23 mode 5 Press the START key During execution EXECUTING is displayed When execu tion is completed normally COMPLETED is displayed If an error occurs FAIL is displayed 6 Turn OFF the power and attach the protect pin One touch dial Item name FTP expansion File name Gro...

Страница 162: ...r the number corresponding to the registration number with 10 key 2 Use the handset to record a voice message Max 6sec 3 Onhook the handset End There are following five kinds of recording When SYSTEM SETTING key is pressed recording is inter rupted 66 29 Purpose Clear Function Purpose Used to clear data related to an address book one touch registration program reg istration expansion relay memory ...

Страница 163: ...de under the following conditions 66 35 Purpose Setting Function Purpose Modem program reloading Only when FAX is installed Not used in the market For development Section FAX Operation Procedure 1 Select YES NO of Modem program reload 2 Press START key When reload is completed normally OK is displayed In case of an error CHECK SUM is displayed The result of Modem reload is displayed HS1 Polarity r...

Страница 164: ...iting to the FAX PROGRAMA Cancel the write protection 1 Present setting is highlight displayed on the side of item 2 Use the numeric keys to enter the adjustment value Press the P key to memorizes the input value 3 Press 1 to writing the adjustment value collectively to PIC that installed to the FAX BOX If the operation is normally completed WRITING OK is dis played When the error occurs NG is dis...

Страница 165: ...ose Used to check the operation of the network card Section MFP controller Operation Procedure During check CHECKING is displayed When check is com pleted normally OK is displayed In case of an error NG is dis played Display message CHECKING Checking OK Check end Normal NG Check end Error SIMULATION 66 60 ACR SETTING SELECT NUMBER AND PRESS START SWITCHING OF MENU 1 Local Carrier Number 2 Long dis...

Страница 166: ...machine recognizes a trouble it stops the operation and dis plays the trouble message A warning message is displayed when a consumable part life is nearly expired or is expired When a warning message is displayed the machine may be or may not be stopped The trouble messages and the warning messages are displayed by the LCD Some trouble messages are automatically cleared when the trou ble is repair...

Страница 167: ...copy lamp Scanner L1 L3 U2 80 81 FAX board breakdown MFP control FAX F6 F7 FAX power OFF MFP control Network error MFP control CE Staple breakdown MFP control F1 10 U 2 U 2 U 2 U 2 Paper feed tray breakdown PCU F3 U6 LCC U 3 U 3 U 3 U 3 Process control breakdown PCU F2 31 32 37 U 4 U 4 U 4 U 4 PCU section breakdowns Motor fusing section etc PCU C1 C2 C3 H2 H3 H4 H5 L4 excluding L4 30 L8 U2 90 91 F...

Страница 168: ...le memory unconditionally 2 Power ON trouble detection sequence When the power is turned ON if H3 H4 H5 U1 U2 PF L4 31 F3 12 22 or U6 LCC related sub code 09 only is saved a trouble code is immediately displayed E7 50 55 56 57 60 65 66 67 trouble is not saved Power ON sequence H3 H4 U1 U2 U6 PF trouble check To the corresponding block Trouble cancel sequence When executing SIM 13 14 15 16 17 MFP c...

Страница 169: ... z 66 Incompatibility check MFP controller detection MFP control z E7 67 Incompatibility check MFP controller detection MFP control z 80 Communication trouble between the MFP control and the scanner MFP control detection MFP control z 90 MFP control PCU communication trouble MFP control detection MFP control z EE EL Auto developer adjustment trouble Overtoner error PCU z EU Auto developer adjustme...

Страница 170: ...CU z 01 Fusing section low temperature trouble HL2 PCU z 02 Fusing section low temperature trouble HL3 PCU z H5 01 5 time continuous POD notreached JAM detection PCU z L1 00 Scanner feed trouble Scanner z L3 00 Scanner return trouble Scanner z L4 01 Main motor lock detection PCU z 02 Drum motor lock detection PCU z 03 Fusing motor lock detection PCU z 04 Developing motor lock detection PCU z 06 Tr...

Страница 171: ...ge to confirm that the Primary Secondary E mail server address or the FTP server Desktop PC address as the destination is properly set 3 When the above address is described with the Hostname check that the DNS server is properly set or not Case 3 Cause An error occurs in the SMTP server FTP server NTS Check and remedy Check the SMTP server FTP server NTS for any trouble Details The specified serve...

Страница 172: ...eck and remedy Scanner PWB check Details While reading writing the HDD system area data the HDD returns an error response or no response at all for longer than 30 seconds Section Controller Case 1 Cause No HDD is installed on the MFP control PWB Check and remedy Check installation status of the HDD on the MFP control PWB Case 2 Cause HDD does not properly function Check and remedy CHECK connection...

Страница 173: ...t Improper installation of the CCD unit CCD unit abnormality Check and remedy CCD unit check Case 4 Cause Scanner PWB abnormality Check and remedy Scanner PWB check Details The CCD white reference plate scan level abnormality when lighting the copy lamp When the proper gain setup value is not obtained at turning on the power or CCD shading with SIM 63 2 Retry number 256 times Section Scanner Case ...

Страница 174: ...s An error is detected in the internal incompatibility check in the MFP control PWB Section MFP control PWB Case 1 Cause MFP control PWB trouble Check and remedy Check the MFP control PWB Details Communication establishment error framing parity protocol error Follows the communication protocol specifications Communication error timing abnormality of the communication data and the communication sig...

Страница 175: ...tate of the shutter close sensor is detected Section Finisher Case 1 Cause Motor lock Motor RPM abnormality Overcurrent to the motor Finisher control PWB trouble Check and remedy Use SIM 3 3 to check the transport motor operation Details When opening the oscillation unit the opening process is not completed in 1sec When closing the oscillation unit the closing operation is not completed in 3sec Wh...

Страница 176: ...nsor does not turn off within the specified time Section Finisher Case 1 Cause Sensor breakage Harness disconnection Console finisher control PWB trouble Check and remedy Use SIM 3 2 to check the sensor operation Details Communication error between the finisher and the saddle When the motor rotation speed linear velocity at every 200msec falls below the specified level When moving to the home posi...

Страница 177: ...e motor in recovery Section Finisher Case 1 Cause Finisher control PWB trouble Malfunction caused by noises Check and remedy Replace the finisher control PWB Details The home position sensor does not turn off within the specified time after normal starting of the motor The home positions sensor does not turn on within the specified time after reverse starting of the motor in recovery Section Finis...

Страница 178: ...tor harness trouble Connector not connected Check and remedy Check connection of the toner control sensor Check connection of the connector harness to the main PWB Check for disconnection of the harness Details Toner remains in the toner bottle when undertoner is detected by the toner concentration sensor in the developing unit Section Engine Case 1 Cause Toner concentration sensor trouble Toner r...

Страница 179: ... is detected as 235 or greater or 22 or smaller for 3 times continuously Section Engine Case 1 Cause Improper connection of the process thermistor harness Check and remedy Check connection of the connector and the harness of the process thermistor Case 2 Cause Process thermistor trouble Check and remedy Check the process thermistor Case 3 Cause PCU PWB trouble Check and remedy Check the PCU PWB De...

Страница 180: ... the tray in case of a tray size error Section Engine Case 1 Cause MCPED MCLUD trouble No 3 tray lift up motor trouble Improper connection of the harness of the PCU PWB the lift up unit and the paper feed unit Check and remedy Check the harness and the connector of MCPED and MCLUD Lift up trouble unit check Details MCPED does not turn on within the specified time MCLUD does not turn on within the ...

Страница 181: ...w one Check and remedy Replace the TEL LIU PWB with a new one Details The FAX BOX PWB is not one for the main unit FAX detection If the FAX BOX modem controller PWB information hard detection is not for the main unit it is judged as an error Section FAX Case 1 Cause Because the FAX BOX modem controller PWB information hard detection is not for the main unit Check and remedy Check the FAX BOX modem...

Страница 182: ... power trouble Check and remedy Use SIM 5 2 to check flashing of the heater lamp When the lamp flashes normally Check the thermistor and the harness Check the thermistor input circuit on the control PWB When the lamp keeps ON Check the AC PWB and the lamp control circuit on the control PWB Use SIM 14 to cancel the trouble Details The fusing temperature exceeds 241 5 C An input voltage of 1 3V or l...

Страница 183: ...n the lamp flashes normally Check the thermistor and the harness Check the thermistor input circuit on the control PWB When the lamp does not turn on Check for disconnection of the heater lamp or the thermostat Check the interlock switch Check the AC PWB and the lamp control circuit on the control PWB Use SIM 14 to cancel the trouble Details When POD1 not reached jam is detected 5 times continuous...

Страница 184: ...elt motor operation Case 2 Cause Improper connection of the harness between the PCU PWB and the transfer belt separation motor Control circuit trouble Check and remedy Check connection of the harness and the connection of the harness between the PCU PWB and the transfer belt separation motor Details The motor lock signal is detected during rotation of the controller fan motor The motor lock signal...

Страница 185: ...e Insertion of EEPROM which is not initialized Check and remedy Use SIM 16 to cancel the U2 trouble Case 3 Cause MFP control PWB EEPROM access circuit trouble Check and remedy Replace the MFP control PWB Details EEPROM counter area checksum error If this error occurs the process will retrieve for effective data within 8 blocks Section Controller Case 1 Cause EEPROM trouble Check and remedy Check t...

Страница 186: ...t delete of the counter data adjustment values write down the counter adjustment values Case 2 Cause Insertion of EEPROM which is not initialized Check and remedy Use SIM 16 to cancel the U2 trouble Case 3 Cause Scanner PWB EEPROM access circuit trouble Check and remedy Replace the scanner PWB Details When counter data sum error is detected Section Scanner Case 1 Cause EEPROM trouble Check and rem...

Страница 187: ...proper connection or disconnection of the connector and the harness Desk control PWB trouble Control PWB PCU trouble Malfunction caused by noises Check and remedy Canceled by turning ON OFF the power Check the connector and the harness in the communication line Details The lock detection signal is detected continuously for 1sec after delay of 1sec from start of the motor When the motor lock detect...

Страница 188: ... when installing 2 DV seal P G No 37 5 3 MG holder F R 4 DV side seal F P G No 36 14 5 DV side seal R P G No 36 13 6 Toner bottle Assembly when installing Replacement by user when empty 7 Toner hopper Clean the shutter area Fusing unit 1 Heat roller P G No 48 3 2 Pressure roller P G No 46 24 3 Sub heat roller P G No 46 14 4 Web roller P G No 49 42 5 Pressure connect roller P G No 49 44 6 CL roller...

Страница 189: ...e UKOG 0012QSZZ 6 Belts Picture relations 1 Others 1 Sersors 2 Reflection sensor 55ppm PM 250K When calling 250 K 500 K 750 K 1000 K 1250 K 1500 K 1750 K 2000 K Remark Refer to the Parts Guide Block Item No Only the replacement parts are described 62ppm 70ppm PM 300K 300 K 600 K 900 K 1200 K 1500 K 1800 K 2100 K 2400 K Unit name No Part name 55ppm PM 250K When calling 250 K 500 K 750 K 1000 K 1250...

Страница 190: ...aper feed rollers Note 2 2 Torque limiter Note 2 Transport section 3 Transport rollers 4 Transport paper guides Drive section 5 Gears Refer to sm for LCC 6 Belt Others 7 Sensors Saddle finisher Punch unit Transport section 1 Transport rollers 2 Transport paper guides Drive section 3 Gears Refer to sm for Finisher 4 Belts Staple process section 5 Knurling belt Note 3 6 Paddle Note 3 Others 7 Sensor...

Страница 191: ...er to the Parts Guide Block Item No Only the replacement parts are described 62ppm 70ppm PM 300K 300 K 600 K 900 K 1200 K 1500 K 1800 K 2100 K 2400 K Unit name No Part name Drum peripheral section 1 Drum 2 Cleaning blade Maximum 1 year use P G No 43 5 3 Cleaning brush roller P G No 43 29 4 Toner reception seal P G No 43 11 5 Side seal P G No 43 33 43 35 6 Drum separation pawl P G No 42 33 7 Sawtoo...

Страница 192: ... 250 K 500 K 750 K 1000 K 1250 K 1500 K 1750 K 2000 K Remark Refer to the Parts Guide Block Item No Only the replacement parts are described 62ppm 70ppm PM 300K 300 K 600 K 900 K 1200 K 1500 K 1800 K 2100 K 2400 K Unit name No Part name Transfer section 1 Transfer drum gear P G No 45 25 2 Transfer belt P G No 45 50 3 Transfer roller P G No 45 47 4 Transfer roller collar P G No 45 48 5 Shaft Conduc...

Страница 193: ...Parts Guide Block Item No Only the replacement parts are described 62ppm 70ppm PM 300K 300 K 600 K 900 K 1200 K 1500 K 1800 K 2100 K 2400 K Unit name No Part name Developing section 1 Developer Supply when installing 2 DV seal P G No 37 5 3 MG holder F R 4 DV side seal F P G No 36 14 5 DV side seal R P G No 36 13 6 Toner bottle Assembly when installing Replacement by user when empty 7 Toner hopper...

Страница 194: ...ller P G No 48 3 2 Pressure roller P G No 46 24 3 Sub heat roller P G No 46 14 4 Web roller P G No 49 42 5 Pressure connect roller P G No 49 44 6 CL roller P G No 47 46 7 CL auxiliary roller bearing 8 Cleaning sheet desk P G No 46 23 9 Heat roller separation pawl P G No 48 9 10 Pressure roller separation pawl P G No 47 26 11 Thermistor upper lower Paper dust removal is required 12 Heat roller gear...

Страница 195: ...r to the Parts Guide Block Item No Only the replacement parts are described 62ppm 70ppm PM 300K 300 K 600 K 900 K 1200 K 1500 K 1800 K 2100 K 2400 K Unit name No Part name Scanner section 1 Mirror Dry cotton cloth 2 Lens 3 Reflector 4 Sersors 5 Table glass Recommended cleaner 6 Dust proof glass Dry cotton cloth 7 OC 8 White standard glass 9 Rails 10 Drive belt 11 Drive wire 12 Pulley 5 11 12 12 2 ...

Страница 196: ...K Remark Refer to the Parts Guide Block Item No Only the replacement parts are described 62ppm 70ppm PM 300K 300 K 600 K 900 K 1200 K 1500 K 1800 K 2100 K 2400 K Unit name No Part name DSPF Paper feed 1 Pickup roller Note 1 2 Paper feed roller Note 1 3 Separation roller Note 1 4 Torque limiter Note 1 5 Resist roller Transport section 6 Transport roller 7 Exposure section CIS unit Paper exit sectio...

Страница 197: ... Torque limiter 800K 400K for manual paper feed section 55ppm PM 250K When calling 250 K 500 K 750 K 1000 K 1250 K 1500 K 1750 K 2000 K Remark Refer to the Parts Guide Block Item No Only the replacement parts are described 62ppm 70ppm PM 300K 300 K 600 K 900 K 1200 K 1500 K 1800 K 2100 K 2400 K Unit name No Part name Paper feed section 1 Pickup roller Note 1 2 Paper feed roller Note 1 3 Separation...

Страница 198: ...00 K Remark Refer to the Parts Guide Block Item No Only the replacement parts are described 62ppm 70ppm PM 300K 300 K 600 K 900 K 1200 K 1500 K 1800 K 2100 K 2400 K Unit name No Part name Transport section paper exit reverse section duplex section 1 PS follower roller 2 Transport rollers 3 Transport paper guides 4 Paper dust clean unit 5 Discharge brush 6 Shaft Conductive grease UKOG 0012QSZZ 1 2 ...

Страница 199: ...K 2000 K Remark Refer to the Parts Guide Block Item No Only the replacement parts are described 62ppm 70ppm PM 300K 300 K 600 K 900 K 1200 K 1500 K 1800 K 2100 K 2400 K Unit name No Part name Drive section 1 Gear Grease UKOG 0307FCZZ 2 Gear Grease UKOG 0299FCZZ 3 Gear Grease UKOG 0062FCZZ 4 Gear Grease UKOG 0235FCZZ 5 Gear Conductive grease UKOG 0012QSZZ 6 Belts 1 2 1 1 1 1 1 1 2 1 2 2 1 3 3 4 2 1...

Страница 200: ... count mode in each section and each operation mode 22 1 Check the number of paper jam troubles 22 2 Check the positions and contents of paper jams 22 3 Check the positions and contents of paper jams DSPF section 22 12 Check the contents of troubles 22 4 Print the setting values and the adjustment values 22 6 Check the number of use of the DSPF the scanner the finisher and inserter the stapler and...

Страница 201: ... trouble data are cleared 24 1 The use quantity counter of each paper feed section is cleared 24 2 The numbers of use of the DSPF the scanner the finisher the inserter the stapler and the punch are cleared 24 3 The maintenance counter is cleared 24 4 Print the setting values and the adjustment values 22 6 ...

Страница 202: ...installing a new spare part ROM for repair to the machine 3 When installing a new spare part PWB unit for repair with the ROM installed 4 When there is a trouble in the ROM program and it must be repaired Section Name Type Capacity Replaceable PCU PWB PCU ROM Flash ROM 8Mbit Replaceable SCN PWB SCN ROM Flash ROM 8Mbit Replaceable MFP CONTROL PWB BOOT ROM Flash ROM 128Mbit 64Mbit 2 Replaceable MAIN...

Страница 203: ... of a USB jump drive If the firmware is in a folder Simulation 49 01 cannot open the folder Secure Jumpdrive will not work If the USB memory is not inserted INSERT A USB MEMORY DEVICE CONTAINING MFP FIRMWARE PLEASE USE FAT 12 16 FORMAT is displayed Non compliant to FAT32 If it s inserted CAN NOT SUPPORT FAT32 PLEASE USE FAT 12 16 FORMAT is displayed 1 Insert the USB memory device into the main uni...

Страница 204: ...llectively without disassembling the ROM s from the PWB s and when writing the program files into an optional ROM NOTE The PCU ROM the FAX ROM and the scanner control PWB ROM must be provided with the program to operate An empty ROM cannot be used 1 Connect the PC and the MFP control PWB with a I F cable 2 Turn on the PC and the machine 3 Copy the file transfer tool and ROM program file into the s...

Страница 205: ... on the MFP control PWB ROM 2 Connect the PC and the MFP control PWB with a I F cable 3 Turn on the PC and the machine 4 Copy the file transfer tool and ROM program file into the same folder of the PC When writing with the file transfer tool File2PRN exe Copy the collective ROM programming file and the file transfer tool File2PRN exe into the folder you desire on the PC 5 The following display is ...

Страница 206: ...nter The PC must have an appropriate printer driver installed and configured with an I F port to use D Countermeasures against Result NG Factors of Result NG The following cases may be factors of Result NG The DIP switch for write protect is not set properly The FAX cable is not connected NG for FAX ROM defect Very rare case 5 Turning OFF the power during the version up procedure If the power is t...

Страница 207: ...K Update completed Update completed Write with an empty socket 5 If the Flash ROM itself is defective replace it with a new one and try again YES NO YES NO YES NO Booted normally Remove the Flash ROM and replace it with a spare Write the on board files collectively 4 Result OK Update completed Write with the empty socket 6 Result OK Update completed If the Flash ROM itself is defective replace it ...

Страница 208: ...MX M700N ROM VERSION UP 10 7 YES NO Write the on board files collectively 4 Result OK Update completed If the Flash ROM itself is defective replace it with a new one and try again ...

Страница 209: ...HPS OCSW ORSLED PWB SCNcnt OPE PWB BUZZER MRSW MSW SCN JNT PWB SPSM SPFM SPFC SPED1 SCOV STRRBC STRRC SPPD2 STUD SPPD1 STRC STRBC SRRC SRRBC T1SPD T1S PWB T1PFC T1LUM T1PUS T2S PWB T2SPD T2PFC T2PUS T2LUM DSW F PNC PROCESS un PSPS PCS DMS DL INTPWB TH CL PS un PSBC PPD DEVELOPER un TCS HUS DV TFSD TM1 CRUM HOPPER un OPTI ON FAX DC PS AC IN PWB DC PS1 ORSPD CCDPWB CL STMP PANEL TOUCH FAX PWB TANSET...

Страница 210: ...T 䍃MAIN 䍃OPTION Mask DIMM 32MB PS Kanji LDATA 15 0 Address Buffer Data Gate EEPROM 64Kbit I O G A ASIC1 IOA 17 0 IOD 15 0 232C Driver RIC I F Engine I F Scanner I F TD62503F PCI Bus ICU ASIC SDRAM 32MB PM1075 IDE Controller Soft NIC RTC LCD Controller FAX I F SysAD 31 0 SRAM 4Mbit USB Controller USB I F CPLD EPM3064A PM 22A PM 22B IDE I F CPU I F Memory I F Local I F PCI I F Buffer TD62503F PM2060...

Страница 211: ... Analog input Analog output PCU _RESET System CLOCK UART TXD RXD LCC FINISHER INSERTER LCC FINISHER INSERTER LCC FINISHER INSERTER High voltage control signal Enable PWM output Clutch solenoid relay Brushless motor PWM output FAN 24V1 FLASH ROM write control FWP 24V Interlock line 24V Interlock line BD control signal VIDEO signal Paper width detection Door open detection Interlock switch FWS Fusin...

Страница 212: ...FLASH ROM write control FWP FLASH ROM write voltage VCCW Stepping motor control signal SCNcnt PWB SPF CCFT SEG F MFPOPE Sensor input Analog input Document detection light reception Touch panel X Touch panel Y SPF document width detection LCD backlight TH ORSLED CL FAN RES _CCD1 IMAGEDATACCDȪLVDSȫ LCDDATAȪLVDSȫ IMAGE DATA CIS LVDS UART RES_CCD2 LED lighting circuit CONTROLLER Clutch solenoid Clutch...

Страница 213: ... DESK SCN unit WH PWB WH2_DESK WH1_DESK NO 10W 7W 18W 10W WH HEATER SET OPTION Transformer FAX MAIN őŐŘņœ FAX POWER RL3 RL1 RL2 TD1 TD2 SSR3 SSR1 SSR2 TD3 20A 250V NF Switching POWER L1 N1 L1 N1 MAIN POWER SW POWER SW SUB POWER N1 L1 POWER SECTION N F N F no mounting Voltage generation 12V1 5V1 FW generating circuit Voltage generation 24V1 7 3 3V 5V2 12V2 38V1 3 MSW detection circuit DCPS RL1 T2AH...

Страница 214: ...0V 10A N F N F no mounting Voltage generation 12V1 5V1 FW generating circuit Voltage generation 24V1 7 3 3V 5V2 12V2 38V1 3 MSW detection circuit DCPS RL1 Transformer FAX MAIN POWER FAX POWER TD1 TD2 SSR3 SSR1 SSR2 TD3 10W 10W 18W WH1_DESK WH2_DESK DESK WH_LCC LCC RL3 RL1 RL2 10AH240V 10AH240V NF Switching POWER L1 N1 L1 N1 MAIN POWER SW POWER SW SUB POWER N1 L1 POWER SECTION RY1 FW_sub 12VL 170ûC...

Страница 215: ...GND1 GND1 5V1 GND2 SPFM SPSM 24V3 GND1 FW FW_SUB FIN 24V5 GND1 SUB Power Supply UN HL3 24VPR 12VS HL2 HL1 L N FW_SUB 24V5 5V FIN 24V5 GND1 24V5 5V 5V2 3 3V 2 5V 1 3V 5V2 3 3V 3 3V GND1 MIM CCD LVDS GND2 GND2 3 3V 24V3 GND1 3 3V GND2 5V2 2 5V 5V2 2 5V GND2 3 3V DC DC DC DC DC DC SLUM 24V3 GND1 Xe Lamp 24V3 LSU LD PM Inverter DSW L_HV Transfer Bias PWB Driver WEBM 24V1 Inverter LCD BACKLIGHT 24V3 GN...

Страница 216: ... 1 DATA2 1 DATA1 1 DATA0 1 CLK GND 1 DBL GND CN4 8AL068S 305C3 WH WH ELR 02VF ELP 02V WH N SCN WH BK ELP 02V WH L SCN WH L SCN WH N SCN 24V3 GND 12V2 GND 5V2 GND CN3 VHR 9N CN5 VHR 4N CN6 VHR 10N 24V3 GND 12V2 GND 5V2 GND CN8 B6PS VH MHPS GND 5V2 MIMA MIMB MIMA MIMB 24V3 24V3 RD BL YL OR BK WH CN7 S6B PH K R CN6 B3B PH K S LB GY BL MFP_Power RD GY PL GY BL GY RD GY PL GY BL GY MFP_Signal T24FAZ SM...

Страница 217: ...1 2 CN13 B2B PH K S CIS_TH GND CN5 B13B PH K S PNC COPY CA READY ADU 5V2 GND 24V3 N C TC 24V3 PNC a GND 24V3 CV_COPY CV_CA CV_STAPLE CV_COUNT CV_START CV_DUPLEX CV_SIZE0 CV_SIZE1 CV_SIZE2 CV_SIZE3 GND RES SCN DSR SCN RXD SCN TXD SCN DTR SCN 5V2 N C SLUMA SLUMB SLUMA SLUMB SPF_SET SRRBC SRRC STRC STRBC SPFC SPFFAN SPPD4 SPPD3 SPPD2 STLD SPWS SPLS2 SPLS1 SOCD SPOD CN11 S20B PHDSS B 1 1 2 3 4 5 6 7 8...

Страница 218: ...3 42 41 40 39 38 37 36 35 34 33 32 31 30 29 28 27 26 25 24 23 22 21 20 19 18 17 16 15 14 13 12 11 10 9 8 7 6 5 4 3 2 1 81 82 83 84 85 86 87 88 89 90 91 92 93 94 95 96 97 98 99 100 51 52 53 54 55 56 57 58 59 60 61 62 63 64 65 66 67 68 69 70 71 72 73 74 75 76 77 78 79 80 GND2 GND2 GND2 GND2 GND2 GND2 GND2 GND2 GND2 GND2 GND2 GND2 GND2 GND2 GND2 12V1 VIDEOin POF FWP PCU DTR PCU DCCNT TXD PCU VIDEOin ...

Страница 219: ...2B POM2XB ADM1A ADM1XA ADM1B ADM1XB ADM2A ADM2XA ADM2B ADM2XB TRMA TRMXA TRMB TRMXB VPMA VPMXA VPMB VPMXB CN 10 12 11 10 9 8 7 6 5 4 3 2 1 CN 1 POM1 A POM1A POM2 A POM2A B12B PH K S POM1B POM1 B POM2B POM2 B 24V2 24V2 24V2 24V2 22 21 20 19 18 17 16 15 14 13 12 11 10 9 8 7 6 5 4 3 2 1 26 25 24 23 27 28 29 30 31 32 B32B PHDSS B CN 5 GND2 5V2 POD1 GND2 POD2 5V2 GND2 POD3 5V2 24V1 GND2 24V1 GND2 24V1 ...

Страница 220: ...PD GND2 T2SPD 5V2 5V2 1 2 PHR 2 GND2 GND2 3 2 1 PHR 3 T1SPD 5V2 2 1 24V1 SMR 02V N SMP 02V NC T2PUS 2 1 4 3 2 1 5V2 T1LUD GND2 T1PED S4B PH K S 4 3 2 1 4 3 2 1 5V2 GND2 T1LUD T1PED SMR 04V N SMP 04V NC 3 2 1 PHR 3 4 3 2 1 5V2 T2PED T2LUD GND2 S4B PH K S T2LUD T2PED 5V2 GND2 2 1 24V1 SMR 02V N SMP 02V NC T1PUS 2 1 1 2 PHR 2 GND2 9 8 7 6 5 4 3 2 1 9 8 7 6 5 4 3 2 1 10 10 SMP 10V NC SMR 10V N T1LUM T...

Страница 221: ... MPLD2 MTOP1 GND2 MTOP2 GND2 GND2 5V2 MPLD1 PHR 3 179228 2 PS 187 DSW R 1 2 MPLD2 MTOP1 MTOP2 GND2 MPFPWS 7 9 8 6 5 4 3 2 1 PHNR 09 H BU09P TR P H MPFD1 GND2 Vref Vref 24V1 2 1 24V1 MFPUS 1 2 SMR 02V N SMP 02V NC 3 2 1 GND2 5V2 DF3 3S 2C MPED 2 1 1 3 3 2 NC PHNR 03 H BU03P TR P H MPFC DRAWER QR P4 24S C 01 QR P4 24P C 01 B30B PHDSS B PHR 3 5V MPFD1 GND2 TXD FIN RXD FIN DTR FIN DSR FIN RES FIN 9 8 ...

Страница 222: ...A ADUM2B ADUM2 B 6 5 4 3 2 1 2 1 3 4 5 6 SMR 06V N SMP 06V NC 24V2 24V2 3 2 1 3 2 1 24V1 GND2 SMR 03V N SMP 03V NC CFM DV 24V DSW 5V PFD2 THPS2 PFD2 5V THPS2 DSW L DSW L 24V1 GND2 TURM NC 24V1 GND2 TURM DSW L 5V PFD2 5V THPS2 PFD2 THPS2 TCB PWM TCB PWM 9 8 7 6 5 4 3 2 1 ADM1 A ADM1A B9B PH K S CN 5 ADM1B ADM1 B ADM2 A ADM2 B ADM2A ADM2B 24V2 24 23 22 21 20 19 18 17 16 15 14 13 12 11 10 1 9 8 7 6 5...

Страница 223: ... 5V2 DRAWERTSR 04V K 2 1 1 2 SMR 02V N SMP 02V NC TM1a TM1b SRA 01T 3 2 2 1 1 2 SMR 02V N SMP 02V NC TM2a TM2b TSDP 12V K TSDR 12V K 33 34 M2SS1 M2SPD GND2 M2SS4 M2SS3 M2SS2 M1SPD GND2 M1SS4 M1SS3 M1SS2 M1SS1 5V2 5V2 GND2 GND2 B34B PHDSS B GND2 HUS DV MPRD2 GND2 5V2 5V MPRD2 MPRD1 5V MPRD1 GND2 TSGOUT GND2 TCS 24V1 GND2 PPD 5V2 DVCH4 DVCH3 DVCH2 DVCH1 24V1 PSBC 24V1 24V1 T2PFC 24V1 HPFC CN 12 B30B...

Страница 224: ... VH 3 2 1 B2P3 VH B2P3 VH BL CN 3 CN 4 CN 5 ELP 02V ELR 02V 1 1 ELP 02V ELR 02V 1 1 ELP 02V ELR 02V 1 1 2 2 2 2 2 2 WH N SCN WH N SCN WH L SCN WH L SCN WH N DSK1 WH N DSK1 WH L DSK1 WH L DSK1 WH N DSK2 WH N DSK2 WH L DSK2 WH L DSK2 SRA 21T 4 3 2 1 B2P3 VH BK ELP 12V ELR 12V 5 5 12 12 4 4 WH N LCC WH N LCC WH L LCC WH L LCC F GND 5 6 B06B PASK GND2 12VS GND2 AC MON FW SUB HLCNT3 HLPR12 GND2 HLCNT2 ...

Страница 225: ...PD2 AINPD DSW L 29 31 30 32 B32B PHDSS B ADU ADU RRC 5V APPD1 5V THPS2 5V AINPD 5V PFD2 5V APPD2 DGS 1 3 5 7 9 11 13 15 17 19 21 10 12 14 16 18 20 22 2 4 6 8 23 24 B24B PHDSS B GND2 GND2 GND2 GND2 GND2 GND2 GND2 GND2 VIDEOin VIDEOin HSYNC PAGE FWP PCU PRON FAX PROFF CNT 5VS MOTH MOTH POF DCCNT 1 3 5 7 9 11 13 15 17 19 10 12 14 16 18 20 2 4 6 8 PCS PCS DMS DL PTDL TH CL PSPS GND2 GND2 GND2 TLS HUS ...

Страница 226: ... ADU motor 2 Downstream side control signal Phase A Duplex ADU motor 2 Upstream control Phase A 10 13 PCU ADM2B Duplex ADU motor 2 Downstream side control signal Phase B Duplex ADU motor 2 Upstream control Phase B 10 15 PCU ADM2XA Duplex ADU motor 2 Downstream side control signal Phase A Duplex ADU motor 2 Upstream control Phase A 10 14 PCU ADM2XB Duplex ADU motor 2 Downstream side control signal ...

Страница 227: ...ar all Coin vendor Clear 4 6 SCN CV_COPY Copy enable signal Coin vendor Copy enable Coin vendor Copy enable 4 3 SCN CV_COUNT Count up signal Coin vendor Count up Coin vendor Count UP 4 4 SCN CV_DUPLEX Print count identification signal Duplex mode For coin vendor Print count identification signal Duplex mode For coin vendor Identification of single count or double count Duplex mode 4 8 SCN CV_SIZE0...

Страница 228: ...VM T Developing motor lock detection signal Developing motor lock detection Rotation Stop Lock 6 10 PCU DVPWM Developing bias voltage control signal PWM Developing bias PWM control 15 14 PCU DVREM Developing bias control ON OFF signal Developing bias ON OFF ON OFF 15 15 PCU F0 Operation panel LED matrix signal 0 Switching 1 78 SCN F1 Operation panel LED matrix signal 1 Switching 1 80 SCN F2 Operat...

Страница 229: ...1PED Paper empty detection signal Paper feed tray 3 Paper empty detection Paper feed tray 3 Paper empty Paper present 16 7 PCU M1PFC Paper feed clutch M1 control signal Paper feed tray 3 Paper feed tray 3 paper feed control Paper transport 16 25 PCU M1PFD Paper pass detection signal Multi paper feed tray 3 Paper feed tray 3 paper pass detection Paper pass 16 21 PCU M1PUS Paper pickup solenoid cont...

Страница 230: ...per pass detection Paper pass 18 6 PCU MPFGS Manual feed gate solenoid control signal Manual feed gate control Paper pass enable Stopper 13 17 PCU MPFPWS Manual feed paper width detection signal Manual feed paper width detection 13 16 PCU MPLD1 Manual feed paper length detection signal 1 Manual paper feed tray paper length detection Short Paper present 13 6 PCU MPLD2 Manual feed paper length detec...

Страница 231: ...g side paper transport 10 2 PCU POM1XB Paper exit motor 1 Fusing side control signal Phase B Paper exit unit Fusing side paper transport 10 4 PCU POM2A Paper exit motor 2 Paper exit side control signal Phase A Paper exit unit paper exit side paper transport 10 5 PCU POM2B Paper exit motor 2 Fusing side control signal Phase B Paper exit unit paper exit side paper transport 10 7 PCU POM2XA Paper exi...

Страница 232: ... signal DSPF document detection Paper present 11 14 SCN SPFC DSPF paper feed clutch control signal DSPF paper feed clutch control ON 11 10 SCN SPFFAN DSPF fan motor control signal DSPF fan motor control ON 11 11 SCN SPFMA DSPF paper feed paper transport motor control signal Phase A DSPF paper feed paper transport motor control Phase A 12 13 SCN SPFMB DSPF paper feed paper transport signal Phase B ...

Страница 233: ...er limit detection signal Paper feed tray 2 Paper tray upper limit detection Paper feed tray 2 Upper limit 14 21 PCU T2LUM Paper tray lift up motor control signal Paper feed tray 2 Paper tray lift up motor control Paper feed tray 2 Stop Up 14 2 PCU T2PED Paper empty detection signal Paper feed tray 2 Paper presence detection Paper feed tray 2 Paper empty Paper present 14 23 PCU T2PFC Paper clutch ...

Страница 234: ...ial I F data Scanner control PWB Serial I F data Controller Scanner control PWB 9 8 SCN VCCW_SCN Scanner flash ROM write protect signal Scanner flash ROM write protect Write enable 9 10 SCN VFM BKL Exhaust fan motor control signal Rear left Exhaust fan motor control signal O3 exhaust process section heat exhaust Max force of wind Stop 5 22 PCU VFM BKR Exhaust fan motor control signal Rear right Ex...

Страница 235: ...rizontal direction Touch panel coordinates identification Horizontal direction Y axis 1 95 SCN Vertical size detection Connector level Paper size Multi stage tray 1 M1SS1 M1SS2 M1SS3 M1SS4 AB series Inch series China series Multi stage tray 2 M2SS1 M2SS2 M2SS3 M2SS4 1 L L H L B5 Extra K16 2 H L H L A4 A5R LT INVR A4 A5R 3 H L L L B5R EX R K16R 4 H H L L A4R LTR A4R 5 L H L L Foolscap Extra Foolsca...

Страница 236: ...nd Internet FAX send Finish stamp use number Count is made when stamp is ON Sim24 3 Staple counter All modes Including inserter stand alone process Staple number Count is made when bundle exit process is completed Double count is made when stapling two positions In the inserter stand alone mode count is made when process is completed Sim24 3 Punch counter All modes Including inserter stand alone p...

Страница 237: ... final send result is counted A send error is counted Cancel and CE error are not counted Sim24 15 Accumulated number of internet FAX receive Internet FAX send Page number of scan Even in the serial transmit operation the page number of one scan is counted The number of receivers is not counted The final send result is counted A communication error except for document jam is counted Cancel and CE ...

Страница 238: ...s not counted I FAX send page number counter z Department FAX send page number In the serial transmit operation each communication is counted as one individually Document filing counter z Total use page number counter Department counter PRINTS OTHERS Key operation number Driver specification account number OTHERS Printer job Without account administration Printer job With account specification Pri...

Страница 239: ...rint Duplex 2 4 2 1 2 4 2 1 Insert paper Without print U 0 0 1 2 1 1 With print Single face 1 2 1 1 1 2 1 1 With print Duplex 2 4 2 1 2 4 2 1 OHP insert paper Without print 0 0 1 2 1 1 With print Single face 1 2 1 1 1 2 1 1 With print Duplex Duplex print inhibition Counter Count up timing Count up number Clear Simplex print Duplex print Paper feed tray Main unit paper exit Paper feed tray ADU ADU ...

Страница 240: ...made when an event occurs A jam by closing the door during paper transport is not counted 3 TROUBLE z Count is made when an event occurs Follows the trouble count method of SIM 26 35 08 Document staple counter display 1 SPF document feed page number z One count is made every time when SPF document is paper feed 2 Scan number z One count is made every time when scan is completed 3 Staple number z O...

Страница 241: ... the FAX SRAM 13 Process section count data display 1 Drum counter z Refer to the Count Specifications Same as the developer counter 2 Drum rotating time z Count for every second of rotation 3 Toner counter z Refer to the Count Specifications Same as the developer counter 4 Toner supply time z Count for every second of rotation 5 Developer counter z Refer to the Count Specifications Same as the de...

Страница 242: ...et FAX scan A communication error except for document jam is counted Cancel and CE error are not counted A send Transfer F code relay broadcast without document scan is not counted Saved in the FAX SRAM 5 I FAX send Send counter 32bit z Accumulated number of internet FAX send A send error is counted Resend is not counted Cancel and CE error are not counted Saved in the 32bit counter and the FAX SR...

Страница 243: ... as follows User name service Password shArp The password can be optionally changed in the following procedures 1 Enter xxx xxx xxx xxx IP address password_setting html and press ENTER key 2 Enter a new password 3 Enter the new password again in the check column 4 Press SUBMIT button C Description 1 Font Form Download Font download 1 Press xxx xxx xxx xxx IP address font_down html and press ENTER ...

Страница 244: ... 1 Press xxx xxx xxx xxx IP address i FAX_ftp html and press ENTER key 2 Enter the user name and the password and press OK button 3 Enter the FTP server address to which i Fax receive data are backed up 4 Enter the directory 5 Enter the user name 6 Enter the password 7 Press SUBMIT button 4 Password Setup 1 Page of the password change for the serviceman Counts regardless of normal or abnormal pass...

Страница 245: ...ck operation startposition AINPD_ON Saddle 435ms 435ms AINPD_N Other ADU paper entry sensor not reached jam DGS ON When the paper lead edge is transported to 30mm apart from the switchback operation startposition AINPD_ON Other 318ms 318ms APPD1_N ADU transport sensor 1 not reached jam AINPD ON APPD1ON 292ms 292ms APPD2_N ADU transport sensor 2 not reached jam APPD1 ON 90mm APPD2 ON 375ms 375ms DE...

Страница 246: ...ne POD1 OFF POD2 OFF 429ms 364ms POD2_SL POD2 remaining jam When paper is discharged on the left side of the machine POM1 ON Switchback start POD2 OFF Paper length 115mm AINPD_S Saddle paper exit ADU paper entry sensor remaining jam POD2 OFF AINPD OFF 187ms 187ms AINPD_S Other ADU paper entry sensor remaining jam POD2 OFF AINPD OFF 187ms 187ms APPD1_S ADU transport sensor 1 remaining jam AINPD OFF...

Страница 247: ...detection timer start trigger JAMTST JAM judge dedtector JAMJD 55 62 PPM MODEL 335mm s 70 PPM MODEL 395mm s BUFPASS M1PFD M1LUD M1PED M2LUD M2PED M2PFD MPED MPFD1 T1S PWB MPRD1 MPFD2 MPRD2 T2S PWB T1PPD PPD LPPD PFD2 APPD1 APPD2 AINPD POD3 POD1 SPLS2 SPLS1 SPED2 SPED1 SPUD SPPD1 SPPD2 SPPD3 SPPD4 SPOD MPLD2 MPLD1 MTOP1 MTOP2 SPWS EMP_SEN REG_SEN TIM_SEN H_SEN HI_SEN PENT BUFENTR BUFPASS PDEL STPTY...

Страница 248: ...L1 FLPSL2 RLNIPSL EXTSL EXITSL PDLSL ESCPSL BESCPSL DSKPFC1 M1PFC M1PUS M2PUS MPFC MFPUS MPFGS LPFCL LPSL LTCL M2PFC DSKPFC2 STRRBC STRRC STRRBC R_CL STRRC STRBC STRC SPFC clutch solenoid cross section MM MM MM FUM POM1 POM2 TM1X TM2X DVM DM ADM1 ADM2 VPM TRM SPFM SPSM SLUMB K_MOT LTM M1 M6 M2 M7 M8 M2S M3S M5S M8S M4S M2P M1P WEBM MM MM MM M1LUM T2LUM T1LUM M2LUM FUM WEBM POM1 H_MOT K_MOT Y_MOT M...

Страница 249: ...rse sensor OFF Max Document length WLT 100mm JAM code Content JAM detection method JAM judgment time Stacker LTR horizontal size Saddle LTR vertical size JAM detection timer start trigger JAM judge detector Common to 55 62 70PPM MODELS Main unit paper exit speed Stacker 800mm s Saddle 420mm s FES_N FINISHER entry port remaining JAM Main unit paper exit command receive The paper entry sensor is not...

Страница 250: ...ms FPNCH FINISHER punch JAM Punch HP OFF after starting punching The punch HP sensor does not turn ON within the specified time 200ms FDOP FINISHER door open JAM One of finisher doors open Finisher door open is detected in finishing process JAM code Content JAM detection method JAM judgment time Stacker LTR horizontal size Saddle LTR vertical size JAM detection timer start trigger JAM judge detect...

Страница 251: ...ction No Parts 1 Front cabinet 2 Rear cabinet upper 3 Rear cabinet 4 Right side cabinet upper 5 Right side cabinet lower 6 Top left cabinet 7 Left lower cabinet 8 Right cabinet center 9 Front cabinet upper 10 Paper exit tray cabinet 11 Left cabinet upper 12 Right cabinet upper 13 Left front cabinet 2 1 9 13 3 4 10 6 11 7 5 8 12 ...

Страница 252: ...ND GND 12V2 12V2 GND 5V2 GND 5V2 GND 3 3V3 FRM CCD1 CLK CCD1 TXD CCD1 RES CCD1 RXD CCD1 ADD CCD1 GND PAGE1 GND GND CL1 PDSEL0 5V2 PD SEG1 SEG2 GND F0 GND F1 GND F2 GND F3 GND BZR GND 5V1 lcdDIS 3 3V3 GND LCD VEE TH CCFT YL XH 24V3 24V3 GND GND CN4 TX25 100P LT H1 CN1 TX24 100R LT H1 T24FAZ SMT TF CN5 CN6 30FMZ BT FFC 30Pin FFC 24Pin 1 1 2 3 4 5 6 7 8 9 10 11 12 13 14 15 16 17 18 19 20 21 22 23 24 ...

Страница 253: ...n panel 1 Operation panel unit 1 Remove the screws Remove the upper right cabinet 2 Remove the cover of the operation section 3 Disconnect each cables 4 Remove the earth terminal 5 Disconnect the cable while saving an operation panel unit a Operation control PWB 1 Remove the operation panel unit See 1 Operation panel unit 2 Remove the earth terminal 3 Remove the operation control PWB No Unit No Pa...

Страница 254: ...it See 1 Operation panel unit 2 Disconnect each cables 3 Remove the LCD INV J PWB d LCD unit 1 Remove the operation panel unit See 1 Operation panel unit 2 Disconnect each cables 3 Remove the LCD cover 4 Remove the LCD unit e Touch panel 1 Remove the operation panel unit See 1 Operation panel unit 2 Disconnect the flat cable 3 Remove the earth wire 4 Remove the LCD unit 5 Remove the touch panel ...

Страница 255: ...A SPFMB SPFMB STRC SPFC SRRC STRBC SRRBC SPF SET SLUMA SLUMB SLUMA SLUMB STRRBC STRRC STRRC STRRBC 5V2 24V3 SPFMB GND SPED1 STUD 24V3 SPFMA SCOV SPPD1 SPFMO2 SPFMO1 SPFMB VAREF GND SPFMA SPPD2 GND GND 5V1 SPWS SLUMB SPED2 STLD SPWS SPLS1 SPLS2 SCN JNT PWB TX24 100R LT H1 CN1 T24FAZ SMT TF GND PD PDSEL2 F3 F2 F0 F1 SEG0 PDSEL1 BZR N C GND KEYIN PDSEL0 24 23 22 21 20 19 18 17 16 15 14 13 12 11 10 9 ...

Страница 256: ...D 9 24V3 SPPD1 GND 2 B3B PH K S B3B PH K S SPFC GND 11 8 SPED1 2 1 1 STUD 1 SCOV 3 PHNR 2 H BU2P TR P H 5V2 SPFC 1 2 B14B PH K S GND 5V2 5V2 13 3 2 SCOV 5V2 STUD 7 B3B PH K S SPED1 2 5V2 1 14 1 5 12 3 24V3 4 6 10 3 B3B PH K S CN5 5V2 GND 5V2 GND 5V2 GND PHNR 2 H DSPF PWB SPFMA1 SPFMB1 B12B PH K S SPFMB1 SPFMA2 SPFMA1 SPFMA2 24V3 SPFMB2 24V3 24V3 SPFMB2 CN1 24V3 5 4 SMR 06V N 3 1 24V3 6 24V3 SPFMB1...

Страница 257: ..._CCD2 CLK_CCD2 FRM_CCD2 PAGE2 ADD_CCD2 RES_CCD2 CISSET GY GY OR BL GY PL GY RD BR BR BR BR OR BL 5V2 BR BR BR BR BR BR BR BR BR BR BR BR BR BR BR BR BR BR BR BR BR BR BR BR CN1 B26B PHDSS CN3 SD0 VLED VDS SD1 VAS SD3 LGATE LD GND SD4 SCN CLK LST DATA SD5 SD2 SCLK SD7 SD6 FFC 35Pin 31 18 32 16 14 28 10 6 11 24 17 19 29 13 30 9 4 5 7 1 15 2 22 3 20 27 12 21 25 8 23 26 33 34 35 9604S 35F 2_DATA1 2_DA...

Страница 258: ...2 11 10 9 8 7 SMP 12V NC SMR 12V N 5V1 34 31 33 32 GND GND OUT SLUMA SRRBC 24V3 PM 24V3 SRRBC GND GND GND GND OUT SLUMA 24V3 STRC N C 5V2 GND 5VPOD 24V3 SRRC 5V2 VAREF N C SRRC STRBC GND 5V2 5V2 OUT SLUMB GND STRC OUT SLUMB GND 5V2 5V2 24V3 STRBC 24V3 FAN 5V2 S22B PHDSS B CN12 CN11 S20B PHDSS B SPFMA1 SPFMB1 B12B PH K S SPFMB1 SPFMA2 SPFMA1 SPFMA2 24V3 SPFMB2 24V3 24V3 SPFMB2 CN1 24V3 11 1 2 3 4 5...

Страница 259: ...m 67 ms SIM adjustment 67 ms 24mm SIM adjustment 167 ms 60mm 30 ms 50 ms 18mm 10 ms 36 ms SIM adjustment 50 ms 18mm 10 ms 5 ms 10 ms 10 ms 5 ms 5 ms 10 ms 5 ms Timer from SPF motor ON SPFC Document feed clutch SPFMCLK1 2 SPFFAN Fan motor COPY key ON SPPD3 SPPD4 STRC Document transport clutch SPPD1 Document transport sensor 1 SPPD2 Document transport sensor 2 SRRC Resist clutch SPOD Document exit s...

Страница 260: ...onized The document is transported to the scan section After being scanned the document discharged to the document exit tray by the paper exit roller The document transport speed varies depending on the scan mode and the scan magnification ratio as shown below E The original scan The CIS Contact Image Sensor unit is the contact type image scan sensor and is assembled to the DSPF to scan document i...

Страница 261: ...ection shown in the figure below 4 Remove the fixing screw 5 Remove the DSPF a Cabinet 1 Open the cover and remove the screws 2 Open the DSPF and remove the screws 3 Unhook the claws on the tray side to remove the front cover 4 Remove the rear cover b Document mat 1 Open the DSPF 45 ...

Страница 262: ...a DSPF document length detector 1 b DSPF document length detector 2 c DSPF document size Width detection analog data detector 1 Remove the cabinet See A 1 a Cabinet 2 Remove the document tray unit See B 1 Document tray unit 3 Remove the screw and remove the cover No Unit No Parts 1 Document tray unit a DSPF document length detector 1 b DSPF document length detector 2 c DSPF document size Width det...

Страница 263: ...ection analog data detector 2 Others a DSPF paper tray lift motor 1 Remove the rear cover See A 1 a Cabinet 2 Remove the DSPF paper tray lift motor b DSPF paper tray detector c DSPF document empty detector 1 Remove the cabinet See A 1 a Cabinet 2 Remove the document tray unit See B 1 Document tray unit 3 Disconnect the connector and remove the DSPF paper tray detector A and the DSPF document empty...

Страница 264: ... feed roller b Pickup roller c DSPF paper feed clutch d DSPF document tray upper limit detector e DSPF document upper limit detector f DSPF cover switch g DSPF document paper pass detector 1 2 Others a Separation roller b DSPF paper feed paper transport motor c DSPF resist roller brake clutch d DSPF resist roller clutch e No 1 resist roller Drive f Torque limiter g DSPF paper transport roller 2 br...

Страница 265: ...ector and remove the DSPF document tray upper limit detector A the DSPF document upper limit detector B the DSPF cover switch C and the DSPF docu ment paper pass detector 1 D 2 Others a Separation roller 1 Remove the paper feed roller and the pickup roller See C 1 a Paper feed roller and C 1 b Pickup roller 2 Remove the cover 3 Unhook the claw to remove the support Remove the reverse roller Cautio...

Страница 266: ... See C 1 Paper feed unit 3 Remove the plastic E ring in the arrow direction and remove the No 1 resist roller idle 4 Remove the separation roller See C 2 a Separation roller 5 Remove the paper feed paper guide lower unit in the arrow direction 6 Remove the bearing reception fixture and remove the torque limiter 7 Remove the electromagnetic clutch See C 2 c DSPF resist roller brake clutch 8 Remove ...

Страница 267: ...abinet 2 Remove the paper feed tray unit See C 1 Paper feed unit 3 Remove the No 1 resist roller idle and the paper feed paper guide lower unit See C 2 e No 1 resist roller Drive 4 Remove the resin E ring on cover and remove link lever 5 Remove the resin E ring and remove the bearing 6 Remove the belt Remove No 1 resist roller Drive 7 Remove the resin E ring and remove the bearing 8 Remove the ele...

Страница 268: ...See C 2 e No 1 resist roller Drive 4 Remove the transport roller 1 Drive See C 2 j Transport roller 1 Drive 5 Disconnect the connector and remove the DSPF document paper pass detector 2 D CIS section 1 CIS control PWB CIS unit 1 Remove the cabinet See A 1 a Cabinet 2 Remove the document tray unit See B 1 Document tray unit 3 Remove the harness Remove the PWB cover 4 Remove each cables and remove t...

Страница 269: ... 1 DSPF paper exit motor 1 Remove the rear cover See A 1 a Cabinet 2 Remove the tension SP and remove the DSPF paper feed paper transport motor CIS cnt PWB CIS unit BLUE No Parts Mainte nance 1 DSPF paper exit motor 2 DSPF paper transport roller 3 brake clutch 3 DSPF paper transport roller 3 clutch 4 No 2 resist roller Drive 5 Paper exit roller Drive 6 DSPF document paper pass detector 3 7 DSPF do...

Страница 270: ...move the resin E ring and remove the DSPF paper trans port roller 3 brake clutch A and the DSPF paper transport roller 3 clutch B 4 No 2 resist roller Drive 1 Remove the cabinet See A 1 a Cabinet 2 Remove the document tray unit See B 1 Document tray unit 3 Remove the resin E ring and jam disengage knob 4 Remove the electromagnetic clutch See E 2 DSPF paper transport roller 3 brake clutch 5 Remove ...

Страница 271: ...g 4 Remove the resin E ring and remove the bearing 5 Disconnect the connecter and remove the paper exit roller Drive in the arrow direction 6 DSPF document paper pass detector 3 7 DSPF document paper pass detector 4 8 DSPF paper exit detector 9 DSPF open close detector 1 Remove the cabinet See A 1 a Cabinet 2 Remove the document tray unit See B 1 Document tray unit 3 Disconnect the connectors and ...

Страница 272: ...ar cover See A 1 a Cabinet 2 Disconnect the connecter and remove the DSPF PWB 3 Drive unit 1 Remove the rear cover See A 1 a Cabinet 2 Remove the electromagnetic clutch 3 Loosen the screw and lift the belt tension roller and fix them with the screws When fixing apply a tension to the spring 4 Remove the drive unit No Parts 1 DSPF fan motor 2 DSPF PWB 3 Drive unit 1 2 3 REVERSE ...

Страница 273: ...ark Refer to the Parts Guide Block Item No Only the replacement parts are described 62ppm 70ppm PM 300K 300 K 600 K 900 K 1200 K 1500 K 1800 K 2100 K 2400 K Unit name No Part name DSPF Paper feed 1 Pickup roller Note 1 2 Paper feed roller Note 1 3 Separation roller Note 1 4 Torque limiter Note 1 5 Resist roller Transport section 6 Transport roller 7 Exposure section CIS unit Paper exit section 8 P...

Страница 274: ...N cnt PWB lcdD0 lcdD1 lcdCP2 1_DATA2 1_DATA1 lcdM lcdD2 1_DATA0 1_DBL lcdS lcdD3 lcdCP2 lcdD0 lcdCP1 lcdS lcdM 1_DATA0 1_CLK 1_DATA2 1_DATA3 1_DBL lcdD3 1_DATA1 lcdD2 lcdCP1 1_CLK 1_DATA3 lcdD1 GND 62 23 59 21 46 48 64 38 54 56 3 17 60 16 55 26 14 12 6 63 36 11 47 35 39 2 22 66 13 15 31 9 57 24 41 61 43 8 25 40 53 34 30 32 65 28 1 44 5 20 42 58 45 37 49 10 52 19 50 4 33 18 67 68 51 7 29 27 TX24 10...

Страница 275: ...quentially shifted by shifting the document by the DSPF and the LED light in the unit is radiated to the back of the document and photo energy is converted into electric energy analog signal Code Signal name Name Function Operation Type NOTE MIM MIM Scanner reading motor Drives the scanner reading section Stepping motor MHPS MHPS Scanner home position sensor detector Scanner home position detectio...

Страница 276: ... image data are converted into laser lighting signals VIDEO signals and sent through the mother PWB and the PCU to the LSU Laser Scan Unit In the LSU the VIDEO signals are converted into laser beams which are radiated onto the drum 4 Carriage lamp unit shift scan speed The carriage scan speed depends on the copy magnification ratio Speed up to 171 220mm s Speed of 172 400 110mm s 5 Timing chart Pl...

Страница 277: ...rew and the fixing plate No Unit No Parts Mainte nance 1 Scanner unit a Table glass b Slit glass DSPF scan mode c Mirror d Lens e Reflector f Scanner dry heater g Rails h Drive belt i Drive wire j Pulley k Scanner lamp l Inverter PWB m CCD PWB lens unit n Scanner relay PWB o Scanner motor p Scanner FLASH PWB q Scanner control PWB r DSPF open close detector s Scanner home position sensor detector t...

Страница 278: ... 1 Loosen the screws in the hinge section and lower the two metal fixtures 2 Open the DSPF and slide the DSPF drop preventing stopper pin of the Hinge L to the drop preventing position 3 Remove the right glass holder 4 Using a cloth etc on the right glass surface to prevent finger prints remove the cover 5 Remove the white reference glass unit When assembling or disassembling the table glass check...

Страница 279: ...aching the dark box cover check to insure that the blade spring is in the original position 5 Remove the lens cover 6 Cary out cleaning of the lens and CCD 7 Cary out cleaning of the reflector f Scanner dry heater 1 Remove the table glass See a Table glass 2 Shift the lamp unit and remove the dark box See c Mirror 3 Remove the dark box and remove the harness clamp and remove the scanner dry heater...

Страница 280: ...ide 4 Turn up the cutout mylar and remove the screw then shift the lamp holder to the front side and take out the lamp from above on the rear side 5 Remove the harness connector from the hole on the front side l Inverter PWB 1 Remove the table glass See a Table glass 2 Remove the core guide 3 Unhook the claw to remove the plastic members on the rear side 4 While holding to prevent from falling rem...

Страница 281: ...ector lock on the CCD PWB to remove the FC cable 5 Remove the screw to remove the CCD PWB lens unit 6 Attach the CCD PWB lens unit to the marked position n Scanner relay PWB 1 Remove the table glass See a Table glass 2 Remove the harness cover B 3 Disconnect the connector and remove the scanner interface PWB o Scanner motor 1 Remove the rear cabinet 2 Remove the spring and disconnect the connector...

Страница 282: ...nector Do not disconnect the PCN harness connector 4 Remove the scanner control PWB unit 5 Remove the scanner control PWB r DSPF open close detector 1 Remove the rear cabinet See o Scanner motor 2 Disconnect the connector and remove the DSPF open close detector When disconnecting the connector hold the housing section and slide straightly to remove s Scanner home position sensor detector 1 Remove ...

Страница 283: ... 3 Remove the document detection fulcrum TIG and remove the document detection arm unit 4 Remove the document detection arm lower and remove the document detection light emitting unit u Document size detection light reception PWB 1 Remove the operation base plate A 2 Remove the document size detection light receiving PWB and disconnect the connector Note for assembly First connect the harness to t...

Страница 284: ...1500 K 1750 K 2000 K Remark Refer to the Parts Guide Block Item No Only the replacement parts are described 62ppm 70ppm PM 300K 300 K 600 K 900 K 1200 K 1500 K 1800 K 2100 K 2400 K Unit name No Part name Scanner section 1 Mirror 2 Lens 3 Reflector 4 Sersors 5 Table glass 6 Dust proof glass 7 OC 8 White standard glass 9 Rails 10 Drive belt 11 Drive wire 12 Pulley 5 11 12 12 2 4 9 7 3 1 9 1 8 1 6 7 ...

Страница 285: ...MM T GND2 TANSET 5V2 GND2 GND2 DSW DSK 5V2 NC TSW LED TSW NC DSW F R GND2 MPLD1 5V2 MPLD2 MTOP1 MTOP2 GND2 MPFPWS Vref MPFC 24V1 24V1 MFPUS GND2 MPED 5V2 24V1 MPFGS 5V MPFD1 GND2 MPFD1 NC DSW R NC NC NC DSW F R DSW R GND2 24V1 MPLD1 MFPUS 5V2 GND2 MPLD2 MPED MTOP1 5V2 MTOP2 24V1 MPFPWS MPFGS Vref 5V MPFD1 MPFC MPFD1 24V1 GND2 GND2 B26B PHDSS B CN 13 24V1 SMR 02V N SMP 02V NC MPFGS GND2 GND2 5V2 5V...

Страница 286: ...ion Contact type Manual paper feed unit DSW R DSW R Manual feed unit open close Switch Manual paper feed unit open close detection Main charger power source Developing bias power line open close Micro switch MPFC MPFC Paper feed clutch Manual paper feed Controls the manual paper feed section paper feed roller ON OFF Electromagnetic clutch MFPUS MFPUS Paper pickup solenoid Manual paper feed Presses...

Страница 287: ...r feed tray unit See A Multi manual paper feed tray unit 2 Remove the manual feed upper cover 3 Remove the manual feed front cover 4 Remove the manual paper feed unit open close switch 2 Manual feed empty detector 1 Pull out the multi manual paper feed tray unit See A Multi manual paper feed tray unit 2 Remove the manual feed upper cover See A 1 Manual paper feed unit open close switch 3 Remove th...

Страница 288: ...e A 2 Manual empty detector 3 Unhook the claw to remove the pickup roller 4 Unhook the claw to remove the paper feed roller 5 Remove the separation roller cover 6 Remove the separation roller 6 Torque limiter 1 Pull out the multi paper feed tray unit See A Multi manual paper feed tray unit 2 Remove the bottom cover 3 Remove the separation roller 4 Remove the separation roller shaft and remove the ...

Страница 289: ...1 Remove the multi manual paper feed tray unit See A Multi manual paper feed tray unit 2 Remove the bottom cover See A 4 Torque limiter 3 Disconnect the connector and remove the manual paper feed paper pass detector 1 9 Paper feed clutch 1 Remove the multi manual paper feed tray unit See A Multi manual paper feed tray unit 2 Remove the upper cover See A 1 Pickup roller 3 Remove the front cover 4 R...

Страница 290: ...e A 7 Paper feed clutch 4 Remove the spring 5 Disconnect the connector and remove the paper pickup sole noid unit 6 Remove the paper pickup solenoid Note installing Check that there is a clearance when the solenoid plunger is pulled 11 Manual paper width size detection PWB 1 Remove the multi manual paper feed tray unit See A Multi manual paper feed tray unit 2 Remove the multi tray 250 lower 3 Rem...

Страница 291: ...ctor and remove the manual feed paper length detector 1 A and manual feed paper length detector 2 B 5 Disconnect the connector and remove the manual paper feed tray pull out position detector 1 A and the manual paper feed tray pull out position detector 2 B B Others 1 Slide the harness holder in the direction of Y and install it The band must be in the range of A Pull section B in the arrow direct...

Страница 292: ...year Torque limiter 400K 55ppm PM 250K When calling 250 K 500 K 750 K 1000 K 1250 K 1500 K 1750 K 2000 K Remark Refer to the Parts Guide Block Item No Only the replacement parts are described 62ppm 70ppm PM 300K 300 K 600 K 900 K 1200 K 1500 K 1800 K 2100 K 2400 K Unit name No Part name Multi manual paper feed 1 Pickup roller Note 1 2 Paper feed roller Note 1 3 Separation roller Note 1 4 Torque li...

Страница 293: ...15 14 13 12 11 10 9 8 7 6 5 4 3 2 1 10 9 8 7 6 5 4 3 2 1 10 9 8 7 6 5 4 3 2 1 4 3 2 1 4 3 2 1 4 3 2 1 2 1 2 1 2 1 2 1 2 1 2 1 4 3 2 1 3 2 1 3 2 1 23 22 21 20 24 19 18 17 16 15 14 13 12 11 10 9 8 7 6 5 4 3 2 1 23 22 21 20 25 26 27 28 29 30 CN 17 M2LUM GND2 24V1 T1PFC 24V1 M2PFC 24V1 DSKPFC2 GND2 TXD FIN RXD FIN RES FIN DTR FIN DSR FIN GND2 5V2 MM MMCLK MM T GND2 TANSET 5V2 GND2 GND2 DSW DSK 5V2 NC ...

Страница 294: ...tation mode Brake mode T1PUS T1PUS Paper pickup solenoid Paper feed tray 1 Presses the paper pickup roller onto paper Electromagnetic solenoid T2PUS T2PUS Paper pickup solenoid Paper feed tray 2 Presses the paper pickup roller onto paper Electromagnetic solenoid MM MM Main motor Drives the paper feed trays 1 2 3 and 4 and the manual paper feed section DC brushless motor Paper pass T1S PWB T1S PWB ...

Страница 295: ...PUS M1PED M1LUD M1PFD M1PUS M1PED M1LUD M1PFD GND2 GND2 GND2 24V1 PHR 3 PHR 3 GND2 GND2 GND2 24V1 SMR 11V N SMP 11V NC M2PUS M2PED M2LUD M2PFD M2PUS M2PED M2LUD M2PFD 5V2 5V2 5V2 5V2 5V2 5V2 5V2 5V2 CN 16 PHR 2 GND2 PHNR 02 H BU02P TR P H 24V1 M1PFC PHNR 02 H BU02P TR P H 24V1 DSKPFC1 SMR 03V N SMP 03V NC M1PWS GND2 M1PWS GND2 24V1 24V1 M1PUS M2PUS GND2 GND2 M1PED M2PED 5V2 5V2 GND2 GND2 M1LUD M2L...

Страница 296: ...per transport roller ON OFF control Electromagnetic clutch M1PUS M1PUS Paper pickup solenoid Paper feed tray 3 Presses the paper pickup roller onto paper Electromagnetic solenoid M2PUS M2PUS Paper pickup solenoid Paper feed tray 4 Presses the paper pickup roller onto paper Electromagnetic solenoid MM MM Main motor Drive the paper feed tray 1 2 3 and 4 and the manual paper feed section DC brush les...

Страница 297: ...nt operation is started the motors MM FUM VPM and TRM and the clutch TRC are turned on to turn on the solenoid T1PUS at the timing of paper pickup This rotates and falls the take up roller to pick up paper 2 At the same time the paper feed roller rotates to feed paper to the transport section At that time the separation roller rotates to prevent against double feed of paper C Paper size of paper f...

Страница 298: ...andard mm Range mm A A3 A4 297 0 303 0 to 291 0 B WLT LT 279 4 285 4 to 273 4 C B4 B5 257 0 263 0 to 251 0 D LG LTR Foolscap 215 9 221 9 to 209 9 E A4R 210 0 216 0 to 204 0 F Exective R 184 1 190 1 to 178 1 G B5R 182 0 188 0 to 176 0 Vertical size detection Pattern Detection SW state AB size Inch size Width of detection range CSS1 CSS2 CSS3 CSS4 1 ON ON OFF ON B5 Extra 147 0 to 198 0 2 OFF ON OFF ...

Страница 299: ... tray starts lifting up to the time when the upper detection sensor comes ON The no paper detection sensor detects the state of no remaining paper 1 3 Field Sensor logic Low 2 3 Field Sensor logic Hi 3 3 Field Sensor logic Low During no paper detection Remaining paper 1 3 position Remaining paper 2 3 position Remaining paper 1 3 position Turn plate MCPED paper sensor Remaining Paper Detection Actu...

Страница 300: ...y feed section and then remove the pickup roller b Paper feed roller 1 Pull out the paper feed tray units 1 2 See 1 Paper feed unit Paper feed tray 1 2 2 Unhook the claws to remove the paper guide See a 1 Pickup roller 3 Unhook the claw to lift up the first paper feed tray feed section and then remove the paper feed roller No Unit No Parts Mainte nance 1 Paper feed unit Paper feed tray 1 2 a Picku...

Страница 301: ...er d Torque limiter 1 Pull out the paper feed tray units 1 2 See a Paper feed unit Paper feed tray 1 2 2 Unhook the claws to remove the paper guide See a 3 Separation roller 3 Remove the separation roller unit 4 Remove the torque limiter e Lift wire Rear 1 Remove the paper feed tray units 1 2 See 1 Paper feed unit Paper feed tray 1 2 2 Remove the E ring slide the winding pulley and loosen the wire...

Страница 302: ... 2 See 1 Paper feed unit Paper feed tray 1 2 2 Push down the tray and remove the screw and remove the paper feed tray 1 2 front cabinet 3 Remove the E ring slide the winding pulley and loosen the wire 4 Disengage the pawl and remove the wire 5 Remove the resin E ring 6 Remove the wire Pass the nylon clamp Attach so that the red wire is on the outside Turn it counterclockwise and fit with the T sha...

Страница 303: ... feed unit Paper feed tray 1 2 2 Disconnect the connecter and remove the paper feed tray lock arm unit 3 Disconnect the connecter and remove the paper remaining quantity detector c Paper feed tray 1 2 detection sensor 1 Remove the rear cabinet 2 Disconnect the connecter and remove the Paper feed trays 1 2 detection sensor d Dry heater 1 Remove the rear cabinet See c Paper feed trays 1 2 sensor 2 D...

Страница 304: ...onnect the connectors No Unit No Parts Mainte nance 1 Paper feed unit Paper feed tray 3 4 a Pickup roller b Paper feed roller c Separation roller d Torque limiter e Paper pickup solenoid f Paper feed tray upper limit detector g Paper feed tray empty detector h transport roller 8 10 I Transport roller 5 7 j Paper pass detector 2 Others a Paper size detection PWB b Paper remaining quantity detector ...

Страница 305: ...ay 3 4 See 1 Paper feed unit Paper feed tray 3 4 2 Remove the paper guide See a Pickup roller 3 Release the pawl and remove the paper feed roller c Separation roller 1 Remove the paper feed unit Paper feed tray 3 4 See 1 Paper feed unit Paper feed tray 3 4 2 Remove the paper guide See a Pickup roller 3 Disengage the pawl and remove the separation roller d Torque limiter 1 Remove the paper feed uni...

Страница 306: ... paper feed tray 3 4 See 1 Paper feed unit Paper feed tray 3 4 2 Remove the cover 3 Remove the solenoid unit 4 Remove the paper pickup solenoid f Paper feed tray upper limit detector g Paper feed tray empty detector 1 Remove the paper feed tray 3 4 See 1 Paper feed unit Paper feed tray 3 4 2 Remove the cover See e Paper pickup solenoid 3 Remove the paper feed tray upper detector unit a and the pap...

Страница 307: ... the cover See e Paper pickup solenoid 3 Remove the E ring and remove the pulley bearing 4 Remove the transport roller 5 7 j Paper pass detector 1 Remove the paper feed tray 3 4 See 1 Paper feed unit Paper feed tray 3 4 2 Remove the cover See e Paper pickup solenoid 3 Remove the paper pass detector unit 4 Remove the paper pass detector 2 Others a Paper size detection PWB 1 Remove the paper feed tr...

Страница 308: ...1 Remove the paper feed tray 3 4 unit lower See 1 Paper feed unit Paper feed tray 3 4 2 Disconnect the connector and release the pawl and remove the width detection unit 3 Remove the spring and remove the paper width mounting base Remove the width detection arm and remove the paper feed tray paper width detector d Dry heater 1 Remove the paper feed tray 3 4 unit lower See 1 Paper feed unit Paper f...

Страница 309: ...eed tray 1 and 2 200K or 1 year Paper feed tray 3 and 4 100K or 1 year Torque limiter 800K 55ppm PM 250K When calling 250 K 500 K 750 K 1000 K 1250 K 1500 K 1750 K 2000 K Remark Refer to the Parts Guide Block Item No Only the replacement parts are described 62ppm 70ppm PM 300K 300 K 600 K 900 K 1200 K 1500 K 1800 K 2100 K 2400 K Unit name No Part name Tray paper feed unit 1 Pickup roller Note 1 2 ...

Страница 310: ... DSKPFC2 GND2 TXD FIN RXD FIN RES FIN DTR FIN DSR FIN GND2 5V2 MM MMCLK MM T GND2 TANSET 5V2 GND2 GND2 DSW DSK 5V2 NC TSW LED TSW NC B30B PHDSS B S5B PH K S GND2 5V2 MM MMCLK MM T 12 11 10 9 8 7 6 5 4 3 2 1 6 5 4 3 2 1 2 1 3 4 5 6 B12B PH K S TRMB TRM B CN 2 TRM A TRMA VPM A VPMA VPMB VPM B 24V2 24V2 24V2 24V2 VPM A VPM B VPMA VPMB SMR 06V N SMP 06V NC 24V2 24V2 DRIVER PWB 24 23 22 21 20 19 18 17 ...

Страница 311: ...ND2 5V MPRD2 MPRD1 GND2 5V MPRD1 MPRD2 5V MPRD2 GND2 PHR 3 RED 24V1 HPLS SMR 08V N SMP 08V NC SMR 18V N SMP 18V NC PPD PSBC MPRD1 MM TRM RRC VPM MPRD2 12 11 10 9 8 7 6 5 4 3 2 1 6 5 4 3 2 1 2 1 3 4 5 6 6 5 4 3 2 1 2 1 3 4 5 6 B12B PH K S TRMB TRM B CN 2 TRM A TRMA VPM A VPMA VPMB VPM B 24V2 24V2 24V2 24V2 TRM A TRM B TRMA TRMB SMR 06V N SMP 06V NC VPM A VPM B VPMA VPMB SMR 06V N SMP 06V NC 24V2 24...

Страница 312: ...clutch Resist roller braking Electromagnetic clutch MM MM Main motor Drives the paper feed trays 1 2 3 and 4 and the manual paper feed section DC brush less motor Paper pass TRM TRM Resist roller front drive motor Drives the paper transport roller 15 Stepping motor Normal speed mode Resist roller front paper transport timing control Warp amount control VPM VPM Vertical paper transport motor Drives...

Страница 313: ...PD MPFD2 14 13 12 11 10 1 9 8 7 6 5 4 3 2 24 23 22 21 20 19 18 17 16 15 25 26 27 28 29 30 PCU PWB CN 17 M2LUM GND2 24V1 T1PFC 24V1 M2PFC 24V1 DSKPFC2 GND2 TXD FIN RXD FIN RES FIN DTR FIN DSR FIN GND2 5V2 MM MMCLK MM T GND2 TANSET 5V2 GND2 GND2 DSW DSK 5V2 NC TSW LED TSW NC B30B PHDSS B 30 29 28 27 26 25 24 23 22 21 20 19 18 17 16 15 14 13 12 11 10 9 8 7 6 5 4 3 2 1 2 2 1 1 GND2 TH DV GND2 HUS DV M...

Страница 314: ...n DC brushless motor Paper pass HPFC HPFC Horizontal paper transport clutch Manual paper feed paper feed tray 2 section LCC paper transport roller ON OFF control Electromagnetic clutch MPRD1 MPRD1 Paper feed tray 2 paper pass detector 1 Manual feed paper feed tray 2 LCC paper pass detection Transmission type Paper transport system sensor MPRD2 MPRD2 Paper feed tray 2 paper pass detector 2 Manual f...

Страница 315: ...wer cabinet unit 5 Remove the left vertical transport PG stopper plate 6 Open the left vertical transport unit and remove it 7 Remove the paper feed tray 1 and 2 left PG unit a Transport roller 11 Drive 1 Remove the paper feed tray 1 and 2 left PG unit See 1 Paper feed tray 1 and 2 left PG unit 2 Remove the E ring the drive collar and the one way gear Be careful of the installing direction 3 Remov...

Страница 316: ... See 2 Vertical transport upper unit 2 Remove the upper transport fulcrum plate holder and remove the vertical transport upper open close PG 3 Remove the open close PG earth and remove the drive con nection stopper screw and the bearing 4 Remove the upper PG holding plate 5 Remove the vertical transport upper PG 6 Remove the transport roller 13 Drive b Transport sensor 1 Remove the vertical transp...

Страница 317: ...rocess unit 2 Remove the paper dust removing unit 3 Remove the rear frame side cover and disconnect the con nector No Unit No Parts Mainte nance 1 Resist roller unit a Resist roller Idle b Resist roller brake clutch c Transport roller 15 d Resist roller Drive e Resist roller front paper pass detector 2 Others a Paper dust cleaner 2 a 1 a 1 b 1 d 1 c 1 e 1 ...

Страница 318: ...g the gear and the pin b Resist roller brake clutch 1 Remove the resist roller unit See 1 Resist roller unit 2 Remove the cover See a Resist roller Idle 3 Remove the resist roller brake clutch fixture 4 Remove the E ring and the resist roller break clutch c Transport roller 15 1 Remove the resist roller unit See 1 Resist roller unit 2 Remove the front side cover 3 Remove the E ring the gear and th...

Страница 319: ...ove the paper guide 6 Remove the E ring the gear and the bearing 7 Remove the coupling on the rear side 8 Remove the resist roller Drive e Resist roller front paper pass detector 1 Remove the resist roller unit See 1 Resist roller unit 2 Remove the cover See a Resist roller Idle 3 Remove the resist roller front paper pass detector 2 Others a Paper dust cleaner 1 Open the front cabinet Open the pro...

Страница 320: ...move the relay pass unit a Paper guide lock solenoid 1 Remove the relay pass unit See 1 Relay pass unit 2 Remove the connector and remove the paper guide lock sole noid unit 3 Remove the paper guide lock solenoid No Unit No Parts Mainte nance 1 Relay pass unit a Paper guide lock solenoid b Paper guides c Transport roller 3 drive d Transport roller 4 Drive e Transport roller 2 Drive f Paper feed tr...

Страница 321: ...positioning plate and remove the paper feed port PG of the paper feed tray 1 and 2 4 Remove the bearing the belt and the relay pass drive shaft unit 5 Remove the transport roller 3 and 4 Drive 6 Remove the E ring from transport roller 3 and 4 Drive and remove the belt pulley e Transport roller 2 Drive 1 Remove the relay pass unit See 1 Relay pass unit 2 Remove lower paper guide unit See b Paper gu...

Страница 322: ...r feed relay unit 1 Remove the multi manual paper feed unit See A 1 Multi manual paper feed tray unit in the MANUAL PAPER FEED SECTION 2 Remove the manual interface paper guide upper 3 Remove the manual feed relay paper guide upper 4 Lift the No 5 paper feed relay unit and remove the connector 5 Remove the No 5 paper feed relay unit a Manual paper pass detector 2 b No 5 paper feed relay detector 1...

Страница 323: ...50 K 500 K 750 K 1000 K 1250 K 1500 K 1750 K 2000 K Remark Refer to the Parts Guide Block Item No Only the replacement parts are described 62ppm 70ppm PM 300K 300 K 600 K 900 K 1200 K 1500 K 1800 K 2100 K 2400 K Unit name No Part name Transport section 1 PS follower roller 2 Transport rollers 3 Transport paper guides 4 Paper dust clean unit 1 2 4 2 2 2 2 2 2 2 2 2 2 2 2 ...

Страница 324: ... CN 7 GND2 GND2 TCBIAS NC NC NC DRAWER QR P4 32S C 01 QR P4 32P C 01 GND2 PFD2 PHR 3 APPD1 PHR 3 GND APPD2 PHR 3 SMR 12V N SMP 12V NC 5V APPD1 5V APPD2 5V PFD2 GND2 GND2 179228 3 THPS2 5V THPS2 2 1 GND2 PHR 2 TURM PHNR 03 H BU03P TR P H GND2 GND2 GND2 AINPD 5V AINPD 5V AINPD AINPD 179228 3 179228 3 DSW ADU 5V DSWD ADUM1 A ADUM1A ADUM1B ADUM1 B SMR 06V N SMP 06V NC 24V2 24V2 ADUM2 A ADUM2A ADUM2B A...

Страница 325: ...ver open close detection Transmission type Door switch PFD2 PFD2 Paper pass detector 2 Paper pass detection Left door unit from duplex ADU Paper feed tray 1 3 4 Transmission type Paper transport system sensor THPS2 THPS2 Transfer belt contact separation home position sensor 2 Transfer belt separation home position detection 2 Transmission type Other sensor switch ADM1 ADM1 Duplex ADU motor 1 Drive...

Страница 326: ...D duplex paper entry detection It rotation is changed from reverse direction to normal direction to transport the next paper 2 Paper transport speed in duplex print The transport speed in duplex print is changed to the high speed 800mm sec to increase the job speed in some positions of paper The transport speed is changed to the high speed in the Following positions 1 From when the paper rear edge...

Страница 327: ...motor 2 h Paper exit gate solenoid i Duplex paper entry detector j Duplex paper pass detector 1 k Left door transport paper guide R unit l Duplex paper pass detector 2 m Paper pass detector 2 n Transfer high voltage transformer o Transfer separation motor p Transfer belt separation home position sensor q Switchback gate r Paper exit gate s Left door open close detector t Duplex cover open close de...

Страница 328: ...Pull out the left door 2 Remove the ADU opening closing door 3 Remove the ADU paper exit upper paper guide 4 Remove the ADU brake collar 5 Remove the E ring to remove the transport roller 2 assembly 6 Remove the E ring to remove the bearing pulley gear and pin from the paper exit roller c Transport roller 19 d Transport roller 20 e Transport roller 21 1 Pull out the left door 2 Remove the ADU open...

Страница 329: ...m the transport roller 19 8 Remove the rear belt collar 9 Remove the ground plate 10 Remove the belt 11 Remove the E ring and lift up the switching lever to remove the transport roller 20 assembly 12 Remove the bearing pulley gear and pin from the transport roller 20 13 Remove the U turn paper guide 14 Apply the bearing attachment plate to remove transport roller 21 ...

Страница 330: ...t door 2 Remove the cover 3 Remove the duplex motor 1 g Duplex motor 2 1 Pull out the left door 2 Remove the cover 3 Remove the duplex motor 2 h Paper exit gate solenoid 1 Pull out the left door 2 Remove the cover 3 Remove the paper exit gate solenoid i Duplex paper entry detector 1 Pull out the left door 2 Remove the paper guide unit ...

Страница 331: ...tector j Duplex paper pass detector 1 1 Pull out the left door 2 Remove the cover 3 Remove the duplex paper pass detector 1 k Left door transport paper guide R unit 1 Pull out the left door 2 Remove the transfer unit 3 Remove the cover and remove the connector the snap band and the earth terminal ...

Страница 332: ...r 2 1 Pull out the left door 2 Remove the left door transport paper guide R unit 3 Remove the paper pass detector 2 n Transfer high voltage transformer 1 Pull out the left door 2 Remove the left door transport paper guide R unit 3 Remove the transfer high voltage transformer o Transfer separation motor 1 Pull out the left door 2 Remove the left door transport paper guide R unit 3 Remove the transf...

Страница 333: ...sor 1 Pull out the left door 2 Remove the left door transport paper guide R unit 3 Remove the transfer belt separation home position sensor q Switchback gate 1 Pull out the left door 2 Remove the paper guide unit 3 Remove the paper exit gate r Paper exit gate 1 Pull out the left door 2 Remove the paper guide unit Open the door and remove the cabinets ...

Страница 334: ...ort paper guide R unit 4 Remove the left door open close detector t Duplex cover open close detector 1 Pull out the left door 2 Open the door and remove the cover 3 Remove the duplex cover open close detector u Fusing discharge brush 1 Pull out the left door 2 Remove the fusing discharge brush Attach the fusing discharge brush so that it is fit with the rear end ...

Страница 335: ...nance Check Clean Replace U Adjust Lubricate Shift position Clean replace or adjust according to necessity 55ppm PM 250K When calling 250 K 500 K 750 K 1000 K 1250 K 1500 K 1750 K 2000 K Remark Refer to the Parts Guide Block Item No Only the replacement parts are described 62ppm 70ppm PM 300K 300 K 600 K 900 K 1200 K 1500 K 1800 K 2100 K 2400 K Unit name No Part name Duplex 1 Transport rollers 2 T...

Страница 336: ...e constant speed rotation RW Control signal PMCLK Clock signal for driving the polygon mirror motor RW Control signal START Polygon mirror motor drive start signal RW Control signal VIDEO VIDEO Image signal RW Control signal SYNC Sync signal SYNC from BD sync signal for 1 line 30 29 28 27 26 25 24 23 22 21 20 19 18 17 16 15 14 13 12 11 10 9 8 7 6 5 4 3 2 1 9 8 7 6 5 4 3 2 1 9 8 7 6 5 4 3 2 1 12 11...

Страница 337: ...reduce noises and increase reliability C Outline of LSU specifications Effective scan width 297 mm Resolution 600 dpi Beam diameter Main scan 60 to 85 Pm Sub scan 75 to 110 Pm Laser power 55 62ppm 0 385 r 0 04mW 70ppm 0 480 r 0 04mW Laser power 770 to 795 nm 3 Disassembly and assembly A Laser scan unit LSU 1 LSU 1 Pull out the multi paper feed tray and remove the manual paper feed cover F 2 Pushin...

Страница 338: ...MX M700N LSU SECTION i 3 3 Disconnect the connector and remove the process cooling fan unit 4 Disconnect the connectors to remove the LSU unit ...

Страница 339: ... from the drum 7 Separation pawl oscillation shaft Moves in the front and rear frame direction to install the separation pawl 8 Waste toner transport screw Transports toner from the cleaner unit to the waste toner transport pipe 9 Waste toner transport pipe Transports toner from the cleaner unit to the waste toner box in the toner cartridge front section 20 19 18 17 16 15 14 13 12 11 10 9 8 7 6 5 ...

Страница 340: ... 1 9 8 7 6 5 4 3 2 19 18 17 16 15 12 11 10 9 8 7 6 5 4 3 2 1 13 14 15 16 PCU PWB MHV THV GB PS 187 RD PS 187 YL Bias PS 187 GR HV CN 15 GND2 GND2 GBPWM MHVREM MHV T THV PWM CHV PWM CHV REM CHVACPWM CHVACREM DVPWM DVREM HVREM CN 1 B16B PH K S NC GND2 GND2 GBPWM MHVREM MHV T THV PWM CHV PWM CHV REM CHVACPWM CHVACREM DVPWM DVREM HVREM 24V1 DSW F DSW F 24V1 NC THV REM THV REM GND2 B34B PHDSS B FPS 187...

Страница 341: ...arges to decrease the OPC drum surface voltage Electric charges remain at a position where LED lights are not radiated As a result latent electrostatic images are formed on the OPC drum surface 3 After transfer operation remaining toner is removed by the cleaning blade Toner removed from the OPC drum surface is transported to the waste toner section in the toner cartridge by the waste toner transp...

Страница 342: ...aring 7 Pull out the process unit by clasping the bolt head No Unit No Parts Mainte nance 1 Process unit a OPC drum b Separation pawl c Cleaning blade d Toner reception seal e Side seal F R f Side seal R base sheet g Cleaning brush h Process adsorption plate i Drum separation pawl solenoid j OPC drum cleaner temperature sensor k Discharge lamp l Image density sensor m OPC drum marking sensor 1 a 1...

Страница 343: ...rum can be used without replacement When replacing the OPC drum apply friction reducing pow der UKOG 0309FCZZ to all over the drum F and R in order to reduce friction and membrane decrease of the OPC layer on both sides of the OPC drum Use PARTEL UKOG 0311FCZZ b Separation pawl 1 Remove the OPC drum See a OPC drum 2 Remove the resin E ring 3 Remove the separation pawl c Cleaning blade 1 Remove the...

Страница 344: ... R apply friction reducing pow der UKOG 0309FCZZ to all over the side seals F R in order to reduce friction and membrane decrease of the OPC layer on both sides of the OPC drum Use PARTEL UKOG 0311FCZZ g Brush roller 1 Remove the OPC drum See a OPC drum 2 Remove the toner receiving seal 3 Remove the blue screw to remove the lever 4 Remove the brush roller h Process adsorption plate 1 Remove the co...

Страница 345: ...m cleaner temperature sensor 2 Remove the discharge lamp Be careful not to break the pawl when fixing l Image density sensor 1 Remove the upper cover See j OPC drum cleaner temperature sensor 2 Remove the connecter 3 Remove the OPC drum See a OPC drum 4 Remove the image density sensor m OPC drum marking sensor 1 Remove the OPC drum See a OPC drum 2 Remove the OPC drum marking sensor Execute cleani...

Страница 346: ...Loosen the screw 2 Remove the screen grid from the claw b Sawtooth plate 1 Remove the blue screw 2 Lifting one end up slide off the saw blade holder c MC cleaner 1 Remove the screen grid See a Screen grid 2 Remove the saw teeth plate See b Saw teeth plate 3 Remove the MC cleaner No Unit No Parts 1 Main charger unit a Screen grid b Sawtooth plate c MC cleaner 1 a 1 c 1 1 b ...

Страница 347: ... the replacement parts are described 62ppm 70ppm PM 300K 300 K 600 K 900 K 1200 K 1500 K 1800 K 2100 K 2400 K Unit name No Part name Drum peripheral section 1 Drum 2 Cleaning blade After installation the used product for one year is recommendable to exchange P G No 43 5 3 Cleaning brush roller P G No 43 29 4 Toner reception seal P G No 43 11 5 Side seal P G No 43 33 43 35 6 Drum separation pawl P ...

Страница 348: ...Mixes toner in the toner hopper 3 Waste toner box drive gear Drives the waste toner transport parts 4 Waste toner transport plate Remains toner evenly in the waste toner box 5 Waste toner transport plate Remains toner evenly in the waste toner box 6 Waste toner shutter Serves as a shutter to receive waste toner from the process unit 7 TH shaft Toner supply roller to the toner unit section 8 Toner ...

Страница 349: ...ridge from the machine the TB shutter closes The toner discharge port of the toner bottle is sealed by the heat seal Do not rotate the toner bottle manually or the heat seal is dismantled and toner is discharged from the TB shutter port C Operation The toner remaining quantity sensor in the toner hopper detects the toner remaining quantity by the toner stirring roller rotation When there is little...

Страница 350: ...bottle unit 2 Open the process cover 3 Remove the toner hopper unit 4 Clean the shutter area a Toner sensor 1 Remove the toner hopper unit See 2 Toner hopper unit 2 Remove the cover 3 Remove the toner sensor b Toner motor 1 1 Remove the toner hopper unit See 2 Toner hopper unit 2 Remove the toner motor 1 No Unit No Parts 1 Toner bottle unit 2 Toner hopper unit a Toner sensor b Toner motor 1 3 Othe...

Страница 351: ...ve the toner motor 2 4 Maintenance Check Clean Replace U Adjust Lubricate Shift position Clean replace or adjust according to necessity 55ppm PM 250K When calling 250 K 500 K 750 K 1000 K 1250 K 1500 K 1750 K 2000 K Remark Refer to the Parts Guide Block Item No Only the replacement parts are described 62ppm 70ppm PM 300K 300 K 600 K 900 K 1200 K 1500 K 1800 K 2100 K 2400 K Unit name No Part name D...

Страница 352: ...t 5 AG roller Mixes toner supplied from the toner hopper and supplies toner to the DV box evenly 12 11 10 9 8 7 6 5 4 3 2 1 13 14 15 16 17 18 B18B PHDSS B CN 6 GND2 DM DMCLK DM T 5V2 GND2 DVM DVMCLK DVM T 5V2 GND2 5V2 FUM FUMCLK FUM T 24V1 GND2 VFM BKR 30 29 28 27 26 25 24 23 22 21 20 19 18 17 16 15 14 13 12 11 10 9 8 7 6 5 4 3 2 1 20 19 18 17 16 15 14 13 12 11 10 9 8 7 6 5 4 3 2 1 20 19 18 17 16 ...

Страница 353: ...e developing bias voltage negative is applied to the developing roller Negatively charged toner is attracted and attached to the area on the OPC drum where negative voltage is reduced by exposure On the other hand the negative voltage at an area where exposure is not made is higher than the developing bias voltage and toner is not attached 3 Disassembly and assembly A Developer tank section 1 Deve...

Страница 354: ... developing tank See 1 Developing unit 2 Take out the old DV seal 3 Wipe the sealing face with alcohol 4 Affix the new DV seal at the reference position c MG holder F and R 1 Take out the developing tank See 1 Developing unit 2 Remove the DV cover See a Developer 3 Remove the doctor cover 4 Remove the DV cover front 5 Remove the bias line and main pole position adjusting plate and screws 6 Remove ...

Страница 355: ...ut the developing tank See 1 Developing unit 2 Remove the doctor cover 3 Peel off the right and left side seals 4 Clean the peeled area 5 Peel off the new right and left seals from the mounting paper and affix in the designated positions e Toner density sensor 1 Take out the developing tank See 1 Developing unit 2 Remove the DV cover See a Developer 3 Remove the toner concentration sensor ...

Страница 356: ...750 K 1000 K 1250 K 1500 K 1750 K 2000 K Remark Refer to the Parts Guide Block Item No Only the replacement parts are described 62ppm 70ppm PM 300K 300 K 600 K 900 K 1200 K 1500 K 1800 K 2100 K 2400 K Unit name No Part name Developing section 1 Developer Supply when installing 2 DV seal P G No 37 5 3 MG holder F R 4 DV side seal F P G No 36 14 5 DV side seal R P G No 36 13 5 4 3 1 2 3 ...

Страница 357: ...8 PCU PWB GND2 DM DMCLK DM T S5B PH K S 5V2 2 1 38V B2PS VH GND1 B1v8B PHDSS B CN 6 GND2 DM DMCLK DM T 5V2 GND2 DVM DVMCLK DVM T 5V2 GND2 5V2 FUM FUMCLK FUM T 24V1 GND2 VFM BKR AC PWB 11 10 12 14 15 16 38V 38V GND1 GND1 38V GND1 CN 5 B16B PADSS 1 DM CN 8 20 19 18 17 16 15 14 13 12 11 10 9 8 7 6 5 4 3 2 1 PCS LED PCS DMS LED DMS DL PTDL PSPS HUS TC GND2 TH CL GND2 TLS GND2 B20B PHDSS B NC 24V1 5V2 ...

Страница 358: ...e transfer cleaning roller is switched to negative and toner is returned from the transfer cleaning roller to the transfer belt and toner on the transfer belt is attracted to the drum and cleaned by the cleaning blade Cleaning timing After completion of the job When warming up After canceling a jam After execution of process control 3 Transfer belt separation contact Transfer belt is separated by ...

Страница 359: ...ansfer unit 2 Loosen the blue screw and unhook the hook lever in order to open the transfer belt unit in the arrowed direction 3 Remove the spring 4 Remove the transfer belt unit in the arrowed direction No Unit No Parts Mainte nance 1 Transfer unit a Transfer drive gear b Transfer belt c Transfer auxiliary roller d Transfer roller e Transfer roller collar f Transfer cleaning roller g Transfer cle...

Страница 360: ...it See 1 Transfer unit 2 Remove the transfer belt unit See a Transfer drive gear 3 Pull out the transfer belt c Transfer auxiliary roller d Transfer roller e Transfer roller collar 1 Remove the transfer unit See 1 Transfer unit 2 Remove the upper transfer roller unit See a Transfer drive gear 3 Remove the transfer belt See b Transfer belt 4 Remove the transfer tension roller bearing to remove the ...

Страница 361: ...heck Clean Replace U Adjust Lubricate Shift position Clean replace or adjust according to necessity When cleaning the transfer belt never use alcohol solvent and water 55ppm PM 250K When calling 250 K 500 K 750 K 1000 K 1250 K 1500 K 1750 K 2000 K Remark Refer to the Parts Guide Block Item No Only the replacement parts are described 62ppm 70ppm PM 300K 300 K 600 K 900 K 1200 K 1500 K 1800 K 2100 K...

Страница 362: ...re rises abnormally For the sub heat roller Analog input HL3 HL3 Heater lamp 3 Heats the sub heat roller FUM FUM Fusing motor Drives the fusing unit WEBEND WEBEND Web end sensor Transmission type Detects the web paper end Replacement End detection WEBM WEBM Web motor Drives the web roller RT H1 RTH2 RTH 3 HLTS1 HLTS2 HL1 HL FUM WEBM WEBEND 2 HL3 HLTS3 4 6 7 3 10 1 8 9 5 2 2 3 2 1 B03P VL CN 1 HL3 ...

Страница 363: ...ter lamp is provided for the sub heat roller for the pressure roller to sub heat paper from above and below This is because toner on paper must be heated from above and below to be fused on paper Pressure roller are of silicon rubber because of the following rea sons and purpose This is the following reason objective 1 Paper is separated upward Since the heat roller is of higher hardness the press...

Страница 364: ...condition Print mode Standard paper 185 C 185 C Thick paper 220 C 180 C Tab paper 220 C 180 C Postcard 200 C 200 C Pre heat 140 C 140 C No Name 1 Cleaning sheet 2 Pressure roller 3 Discharge brush 4 Heat roller 5 Sub heat roller 6 CL roller 7 Web roller 8 Lower CL roller DG2 4 2 3 8 6 1 5 7 No Unit Parts Mainte nance 㧔 㧕 Fusing unit a Web end sensor b Web motor c Pressure bearing d Pressure roller...

Страница 365: ...nit Caution for handling at a high temperature Hold the both sides of the unit When removing the unit be careful not to tilt it and remove slowly This is because the unit includes paper dust scraped by the scraper a Web end sensor 1 Remove the fusing unit See 1 Fusing unit 2 Check the web end sensor b Web motor 1 Remove the fusing unit See 1 Fusing unit 2 Disconnect the connector and remove only t...

Страница 366: ...ring and remove the gear from the web motor c Pressure bearing d Pressure roller e Web roller f Web bearing 1 Remove the fusing unit See 1 Fusing unit 2 Remove the web unit See b Web motor 3 Disconnect the connector Remove the screws and remove the web drive unit Remove the bearings 4 Disconnect the connector Remove the screws and remove the cover Note The shoulder screws go on the front side and ...

Страница 367: ...Remove 2 screws of backup plate 7 Remove the web roller wind up side When installing rotate the web roller until the blue line approx 30cm is hidden after installing the web roller rotate the gear 8 Remove the spring and remove the pressure bearing Remove the pressure roller 9 Remove the web tension bearing and the backup plate 10 Remove the web roller ...

Страница 368: ...nt hole B of the mark side 13 Remove the web bearings g Heat roller separation pawl 1 Remove the fusing unit See 1 Fusing unit 2 Remove the heat roller separation pawl unit When installing the unit install to the standard position A If the picture quality may be degraded damaged by the roller damage change the installing position to B 3 Remove the heat roller separation pawl unit h Pressure roller...

Страница 369: ...ntry side may be deformed 3 Remove the screws and open the fusing unit 4 Remove the pressure roller unit 5 Remove the bearings from the pressure roller Caution when attaching When installing the pressure roller to the fusing unit be careful not to damage the cleaning plate If the cleaning plate would be deformed copy dirt would be resulted 6 Remove the CL roller unit 7 Remove the CL roller bearing...

Страница 370: ...the front side drawer CN side and then in the rear side gear side in this sequence Check that the screw is securely tightened again If the screw is loose the contact becomes defective to cause an overheating 5 Remove the heater lamp main and sub 6 Remove the heat roller unit 7 Remove the ring and remove the heat rollers gear and bearings q Thermistor upper 1 Remove the fusing unit See 1 Fusing uni...

Страница 371: ... remove the lower cover 3 Remove the thermistor lower Cleaning When there is paper dust or foreign material on the heat sensi tive surface of the thermostat clean and remove dust or for eign material Caution when attaching Be careful not to mistake the install position of the washer 4 Disconnect the connector Remove the screws and the ther mistor lower If the picture quality may be degraded damage...

Страница 372: ... heater lamp x Sub heat roller bearing y Sub heat roller 1 Remove the fusing unit See 1 Fusing unit 2 Remove the lower cover See t Thermostat lower 3 Remove the springs 4 Remove the thermostat terminals 5 Remove the thermistor If the picture quality may be degraded damaged by the roller damage change the installing position to B 6 Remove the sub heat roller unit 7 Remove the lamp fixtures 8 Remove...

Страница 373: ...it 1 Heat roller P G No 48 3 2 Pressure roller P G No 46 24 3 Sub heat roller P G No 46 14 4 Web roller P G No 49 42 5 Pressure roller P G No 49 44 6 CL roller P G No 47 46 7 CL auxiliary roller bearing 8 Cleaning sheet table P G No 46 23 9 Heat roller separation pawl P G No 48 9 10 Pressure roller separation pawl P G No 47 26 11 Thermistor upper lower Paper dust removal is required 12 Heat roller...

Страница 374: ...6 GND2 GND2 GND2 POD1 POD2 POD3 PHR 3 SMR 06V N SMP 06V NC SMR 06V N SMP 06V NC 5V2 5V2 5V2 POM2 A POM2A POM2 B POM2B POM1 A POM1A POM1B POM1 B 24V2 24V2 24V2 24V2 CN 4 B26B PHDSS B POM1A POM1XA POM1B POM1XB POM2A POM2XA POM2B POM2XB ADM1A ADM1XA ADM1B ADM1XB ADM2A ADM2XA ADM2B ADM2XB TRMA TRMXA TRMB TRMXB VPMA VPMXA VPMB VPMXB GND2 GND2 B26B PHDSS B POM1A POM1XA POM1B POM1XB POM2A POM2XA POM2B PO...

Страница 375: ...tion Front surface Exhaust heat from the fusing section DC brush less motor PWM control CFM U4 PWM RSV1 Fusing cooling fan motor 4 Paper exit duplex ADU section Paper exit section rear side Cools paper which is discharged to the inner tray DC brush less motor PWM control INTPWB Paper exit temperature sensor Paper exit section temperature detection No Name Function Operation 1 Transport roller 16 T...

Страница 376: ...rt roller 16 1 Remove the paper exit unit See 1 Paper exit unit 2 Remove the ground plate Remove the E ring to remove the pulley 3 Remove the stopper Remove the E ring to remove the bear ing 4 Remove the E ring to remove the gear 5 Remove the transport roller 16 b Paper exit roller 1 1 Remove the paper exit unit See 1 Paper exit unit 2 Remove the upper unit ...

Страница 377: ...ar 6 Remove the paper exit roller 1 c Fusing cooling fan motor 1 d Fusing cooling fan motor 3 e Fusing cooling fan motor 4 1 Remove the paper exit unit See 1 Paper exit unit 2 Remove the upper cover 3 Remove the fusing cooling fan motor 1 A 3 B and 4 C Caution when attaching When assembling be careful of the direction of the fan Fit the fan with the mark rotating direction Fan blowing direction RE...

Страница 378: ... See 1 Paper exit unit 2 Remove the follower roller unit 3 Remove the paper exit detection 1 detector h Paper exit detector 2 1 Remove the paper exit unit See 1 Paper exit unit 2 Remove the upper cover See c Fusing cooling fan motor 1 3 Remove the paper exit detection 2 detector i Discharge brush 1 Remove the paper exit unit See 1 Paper exit unit 2 Remove the discharge brush When attaching attach ...

Страница 379: ...ove the paper guide 4 Remove the cover and the remove the paper exit detector 3 k Paper exit roller 2 1 Remove the paper exit unit See 1 Paper exit unit 2 Remove the upper cover See c Fusing cooling fan motor 1 3 Remove the paper guide See j Paper exit detector 3 4 Remove the ground plate Remove the E ring to remove the bearing 5 Remove the E ring and the gear Remove the spring pin and the bearing...

Страница 380: ...en calling 250 K 500 K 750 K 1000 K 1250 K 1500 K 1750 K 2000 K Remark Refer to the Parts Guide Block Item No Only the replacement parts are described 62ppm 70ppm PM 300K 300 K 600 K 900 K 1200 K 1500 K 1800 K 2100 K 2400 K Unit name No Part name Paper exit reverse section 1 Transport rollers 2 Discharge brush 3 Shaft Conductive grease UKOG 0012QSZZ 1 1 1 2 3 3 2 ...

Страница 381: ...Remove the screw which was indicated with the arrow mark a Paper exit motor 1 b Paper exit motor 2 1 Remove the fusing unit See 1 Fusing unit in the FUSING SECTION 2 Remove the fusing drive unit See b 1 Fusing motor 3 Disconnect the connector and remove the fusing drive frame 4 Remove the paper exit motor 1 A and the paper exit motor 2 B 2 Others a Fusing motor 1 Remove the rear cabinet and the re...

Страница 382: ...n the DEVELOPING SECTION A 1 Process unit in the PHOTOCONDUCTOR SECTION 2 Remove the OPC drum motor and the developing motor See 2 a OPC drum motor 2 b Developing system 3 Disconnect the connector and remove the harness from the harness holder 4 Disconnect the connector and remove the harness clamp and remove the drum drive unit Remove the screw which was indicated with the arrow mark No Unit No P...

Страница 383: ...ty sensor 1 Remove the developing unit See 1 Developing unit in the DEVELOPING SECTION 2 Remove the process unit See a Process unit in the PHO TOCONDUCTOR SECTION 3 Remove the OPC drum motor and the developing motor See 2 a OPC drum motor a b Developing motor 4 Remove the drum drive unit See 1 Drum drive unit 5 Remove the drum earth plate Remove the set screw and the flywheel joint Remove the E ri...

Страница 384: ...or 3 Remove the main motor See 2 a Main motor 4 Disconnect the connector and remove the eternal outfit mounting plate 5 Remove the plastic E ring the belt holding sheet the belt and the pulley Remove the joint plate When installing be careful of the direction of the belt holding sheet 6 Disconnect the connector and remove the main drive unit Remove the screw which was indicated with the arrow mark...

Страница 385: ... roller unit in the PAPER TRANSPORT SECTION 2 Remove the flywheel See B 2 a OPC drum motor 3 Remove the main motor See 2 a Main motor 4 Remove the main drive unit See 1 Main drive unit 5 Disconnect the connector and remove the main drive frame 6 Disconnect the connector and remove the resist roller clutch unit When installing be sure to ensure that the projection of the plate is engaged in the clu...

Страница 386: ...al paper feed unit Remove the screw which was indicated with the arrow mark E 1 2 paper feed drive section No Unit 1 Manual paper feed drive unit 1 No Unit No Parts 1 1 2 paper feed drive unit a Vertical paper transport motor b Paper feed tray 3 4 paper transport clutch 2 c Paper feed clutch Paper feed tray 1 d Horizontal paper transport clutch e Paper feed clutch Paper feed tray 2 f Paper pickup ...

Страница 387: ...ve the harness and remove the drive joint plate When installing temporarily fix the 1 2 paper feed drive unit to the main unit and install the drive joint plate Then tighten the screw of the drive unit securely 8 Disconnect the connector and remove the harness clamp Remove the 1 2 paper feed drive unit If the left door is completely pulled out the unit may drop off Be careful to avoid it Remove th...

Страница 388: ...r 3 Disconnect the connector and remove the harness clamp and remove the paper feed tray 3 4 paper transport clutch 2 4 Remove the E ring and remove the paper feed tray 3 4 paper transport clutch 2 c Paper feed clutch Paper feed tray 1 1 Remove the 1 2 paper feed drive unit See 1 1 2 paper feed drive unit 2 Remove the 1 2 paper feed drive frame lower See a Vertical paper transport motor 3 Disconne...

Страница 389: ...r feed drive unit See 1 1 2 paper feed drive unit 2 Remove the 1 2 paper feed drive frame lower See a Vertical paper transport motor 3 Disconnect the connector and remove the harness clamp and remove the paper feed clutch paper feed tray 2 4 Remove the E ring and remove the paper feed clutch paper feed tray 2 f Paper pickup solenoid Paper feed tray 2 1 Remove the 1 2 paper feed drive unit See 1 1 ...

Страница 390: ... from the paper tray lift up motor b Paper tray lift up motor Paper feed tray 2 1 Remove the high voltage PWB unit See D 1 Manual paper feed drive unit 2 Disconnect the connector and remove the lift up motor unit 3 Release the pawl and remove the lift up coupling Remove the liftup spring from the lift up motor c Paper pickup solenoid Paper feed tray 2 1 Remove the high voltage PWB unit See D 1 Man...

Страница 391: ...Remove the external outfit mounting plate 4 Disconnect the connector and remove the harness clamp Remove the 3 4 paper feed drive unit Remove the screw which was indicated with the arrow mark a Paper feed clutch Paper feed tray 3 1 Remove the 3 4 paper feed drive unit See 1 3 4 paper feed drive unit 2 Remove the E ring and remove the parts 3 Remove the 3 4 drive frame lower No Unit No Parts 1 3 4 ...

Страница 392: ...er See a Paper feed clutch Paper feed tray 3 3 Disconnect the connector and remove the paper feed clutch unit 4 Remove the E ring and remove the paper feed clutch c Paper feed tray 3 4 paper transport clutch 1 1 Remove the 3 4 paper feed drive unit See 1 3 4 paper feed drive unit 2 Remove the parts and remove the belt 3 Remove the 3 4 drive frame lower See a Paper feed clutch Paper feed tray 3 4 D...

Страница 393: ...t up motor Paper feed tray 3 b Paper tray lift up motor Paper feed tray 4 1 Remove the rear cabinet 2 Disconnect the connector and remove the paper tray lift up motor paper feed tray 3 A and the paper tray lift up motor Paper feed tray 4 B 3 Release the pawl and remove the lift up coupling Remove the lift up spring from the lift up motor A B ...

Страница 394: ...50 K 2000 K Remark Refer to the Parts Guide Block Item No Only the replacement parts are described 62ppm 70ppm PM 300K 300 K 600 K 900 K 1200 K 1500 K 1800 K 2100 K 2400 K Unit name No Part name Drive section 1 Gears grease UKOG 0307FCZZ 2 Gears grease UKOG 0299FCZZ 3 Gears grease UKOG 0062FCZZ 4 Gears grease UKOG 0235FCZZ 5 Gear Conductive grease UKOG 0012QSZZ 6 Belts 1 2 1 1 1 1 1 1 2 1 2 2 1 3 ...

Страница 395: ...onnector and remove the PCU PWB 3 Driver PWB 1 Remove the rear cabinet and the rear cabinet upper 2 Disconnect the connector and remove the harness clamp and the SCAN harness cover 3 Remove the connector and the harness clamp Remove the driver PWB unit No Parts 1 PCU FLASH PWB 2 PCU PWB 3 Driver PWB 4 Mother PWB 5 Controller cooling fan motor 6 HDD cooling fan motor 7 HDD 8 Soft NIC PWB 9 MFP FLAS...

Страница 396: ...nnector and remove the harness clamp Remove the controller cooling fan motor unit 3 Remove the controller cooling fan motor When assembling fit the mark with the fan flow direction 6 HDD cooling fan motor 1 Remove the rear cabinet and the rear cabinet upper See 3 Driver PWB 2 Disconnect the connector and remove the harness clamp 3 Disconnect the connector and remove the HDD cooling fan motor When ...

Страница 397: ...pper 2 Pull out the NIC control unit 3 Remove the soft NIC PWB unit 4 Remove the soft NIC PWB angle from the soft NIC PWB 9 MFP FLASH ROM PWB 1 Pull out the NIC control unit See 8 Soft NIC PWB 2 Release the lock and remove the MFP Flash PWB 10 MFP controller PWB 1 Remove the manual feed cover F the right cabinet middle and the right cabinet upper See 8 Soft NIC PWB 2 Pull out the NIC control unit ...

Страница 398: ...ller PWB B Power section 1 AC power PWB 1 Remove the rear cabinet 2 Disconnect the connector and remove the AC power PWB No Parts 1 AC power PWB 2 DC main power PWB 3 Power cooling fan motor 1 4 Power cooling fan motor 2 5 Dehumidifier heater relay PWB 6 DC sub power PWB 7 High voltage PWB MC DV TC 1 3 4 2 6 7 5 ...

Страница 399: ...onnect the connector and remove the harness clamp Remove the AC power PWB unit 3 Disconnect the connector and remove the DC main power PWB Method 2 1 Remove the rear cabinet See 1 AC power PWB 2 Remove the connecter 3 Remove the AC DC power unit 4 Remove the AC power PWB unit 5 Remove the DC power PWB unit ...

Страница 400: ... rotating direction label on the back surface 5 Dehumidifier heater relay PWB 1 Remove the rear cabinet See 1 AC power PWB 2 Disconnect the connector and remove the supporter Remove the dehumidifier heater relay PWB 6 DC sub power PWB 1 Remove the paper exit tray cabinet 2 Disconnect the connector and remove the supporter Remove the DC sub power PWB 7 High voltage PWB MC DV TC 1 Remove the rear ca...

Страница 401: ...Disconnect the connector and remove the paper cooling fan motor When installing arrange so that the arrow mark on the side of the duct faces in the same direction with the arrow mark on the side of the fan No Parts 1 Developing section cooling fan motor 2 Paper cooling fan motor 3 Fusing cooling fan motor 2 4 Process exhaust fan motor 5 5 Process exhaust fan motor 4 6 Process exhaust fan motor 1 7...

Страница 402: ...the paper exit rear duct unit 7 Disconnect the connector and remove the fusing cooling fan motor Be careful of the direction of the fan 4 Process exhaust fan motor 5 1 Remove the rear cabinet See 1 Developing cooling fan motor 2 Disconnect the connector and remove the harness clamp Remove the sub duct unit 3 Disconnect the connector and remove the process exhaust fan motor 5 Be careful of the dire...

Страница 403: ...ner unit in the Scanner section 3 Pull out the multi paper feed tray unit and remove the manual paper feed cover F 4 Remove the right cabinet middle 5 Remove the right cabinet upper 6 Remove the front cabinet band and remove the front cabinet 7 Remove the toner bottle See 1 Toner bottle unit in the Toner hopper and toner bottle section 8 Remove the toner hopper unit See 2 Toner hopper unit in the ...

Страница 404: ...nnector and remove the process cooling fan motors 1 A 2 B and 3 C When assembling fit the mark with the fan rotating direction label on the back surface 9 Process cooling fan motor 1 LSU process section 10 Process cooling fan motor 2 LSU process section 11 Process cooling fan motor 3 LSU process section 1 Pull out the multi paper feed tray and remove the manual paper feed cover F 2 Pushing the low...

Страница 405: ... the process cooling fan motors 1 A 2 B and 3 C When assembling fit the mark with the fan rotating direction label on the back surface B Filters 1 Ozone filter 1 Remove the rear cabinet 2 Release the pawl and remove the ozone filter A B C Fan blowing direction REVERSE Marks Mark No Parts 1 Ozone filter 2 DV ozone filter 3 Toner filter 1 2 3 ...

Страница 406: ...eplace U Adjust Lubricate Shift position Clean replace or adjust according to necessity A B 55ppm PM 250K When calling 250 K 500 K 750 K 1000 K 1250 K 1500 K 1750 K 2000 K Remark Refer to the Parts Guide Block Item No Only the replacement parts are described 62ppm 70ppm PM 300K 300 K 600 K 900 K 1200 K 1500 K 1800 K 2100 K 2400 K Unit name No Part name Filters 1 Ozone filter P G No 75 7 2 Toner fi...

Страница 407: ...nd remove the power switch When installing be careful of the connector connecting posi tion and the installing direction Also be careful not to break the SW pawl 8 Disconnect the connector and remove the main power switch unit When installing be careful of the connector connecting posi tion and the installing direction Also be careful not to break the SW pawl No Parts 1 Power switch 2 Main power s...

Страница 408: ...he front door open close switch unit 4 Left door open close detector 1 Open the left door 2 Remove the left front cabinet 3 Disconnect the connector and remove the left door open close detector unit Remove the left door open close detector 5 Dry heater switch 1 Remove the rear cabinet 2 Disconnect the connector and remove the dry heater switch ...

Страница 409: ...m temperature sensor 1 Pull out the multi paper feed tray and remove the manual paper feed cover F 2 Pushing the lower part remove the right cabinet center 3 Disconnect the connector release the pawl and remove the machine temperature sensor ...

Страница 410: ...bout 220 C which is about 40 C higher than that of conventional lead solder and its soldering capacity is inferior to conventional one it is apt to keep the soldering iron in contact with the PWB for longer time This may cause land separation or may exceed the heat resistive temperature of components Use enough care to separate the soldering iron from the PWB when completion of soldering is confir...

Страница 411: ...sfara vid felaktigt batteribyte Använd samma batterityp eller en ekvivalent typ som rekommenderas av apparattillverkaren Kassera använt batteri enligt fabrikantens instruktion German Achtung Explosionsgefahr bei Verwendung inkorrekter Batterien Als Ersatzbatterien dürfen nur Batterien vom gleichen Typ oder vom Hersteller empfohlene Batterien verwendet werden Entsorgung der gebrauchten Batterien nu...

Страница 412: ...ademark or copyright of Microsoft Corporation in the U S A and other countries Windows 95 Windows 98 Windows Me Windows NT 4 0 Windows 2000 Windows XP Windows 2000 Server Windows Server 2003 and Internet Explorer are trademarks or copyrights of Microsoft Corporation in the U S A and other countries IBM and PC AT are trademarks of International Business Machines Corporation Acrobat Reader Copyright...

Отзывы: