background image

AR-M256/M257/M258/M316/M317/M318/5625/5631  SIMULATION 8 - 10

Operation/procedure

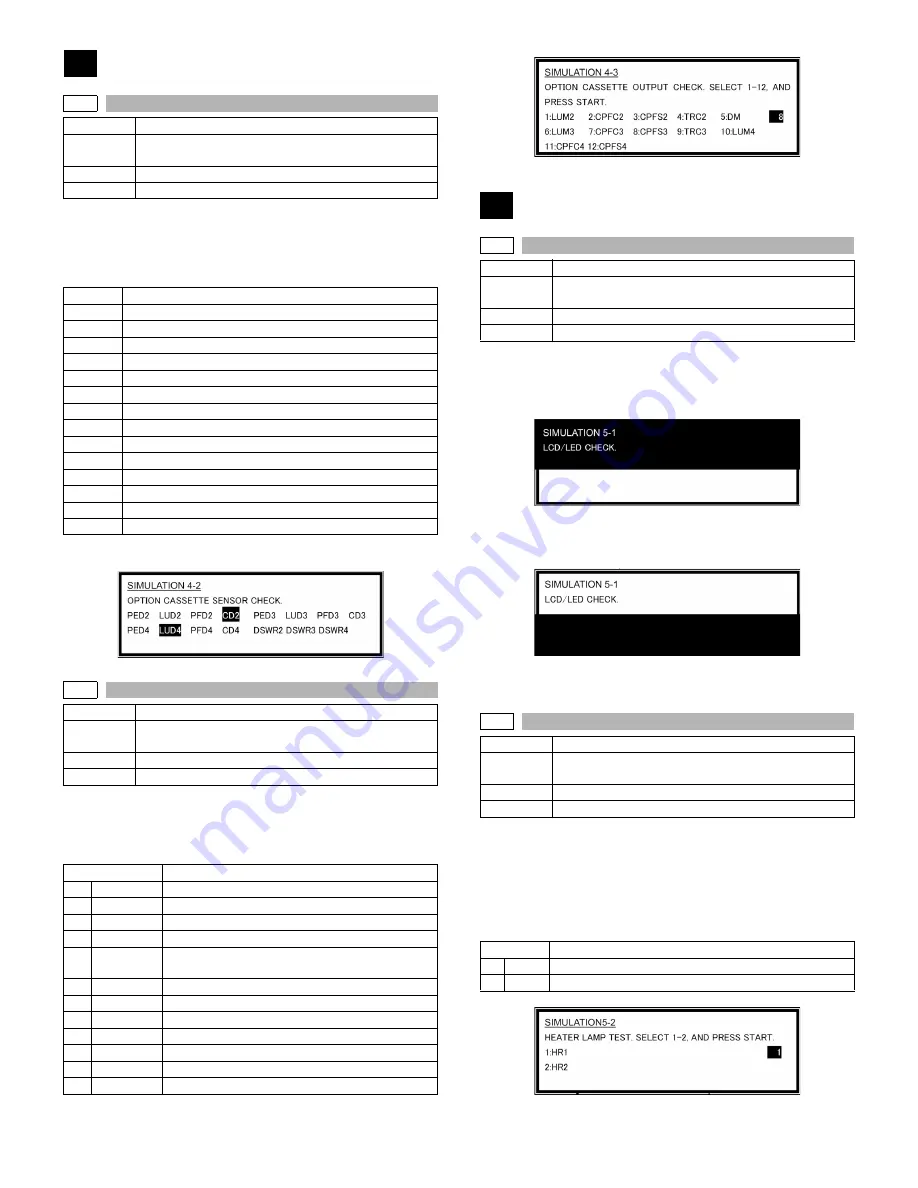
The operating states of the sensor and the detector are displayed.
(Only the installed option cassettes are displayed. For the standard
tray, use SIM 30-2.)

The active sensors and detectors are highlighted.

Note: Execution is possible only when the option cassette is installed.

Operation/procedure

Select the load to be checked with the 10-key, and press the [START] key.

The motor for 10sec, the solenoid ON for 500msec, OFF for 500msec.

The lift-up motor operates only when the tray is opened. (20 times)

Note: Execution is possible only when the option cassette is installed.

Operation/procedure

The LCD is displayed as follows. (All LED’s are ON.)

With the upper half highlighted and the lower half normally displayed,
contrast changes “Standard 

 MAX 

 MIN.” in every 2sec.

(6 sec later)

With the upper half normally displayed and the lower half highlighted,
contrast changes “Standard 

 MAX 

 MIN.” in every 2sec.

* When returning to the sub menu selection menu, the display of the

standard contrast is displayed for an instant.

Operation/procedure

1.

Select the lamp to be checked with the 10-key, and press the
[START] key. 

ON/OFF operation of the heater lamp is repeated 5 times in an interval
of 100ms/900ms.
When completing the operation, the cooling fan is rotated at a low speed. 

Item Content

4

4-2

Purpose

Operation test/check

Function 
(Purpose)

Used to check the operation of sensor and detector in 
the option cassette and the related circuit.

Section

Paper feed

Item

Operation

PED2

2nd cassette paper empty sensor

LUD2

2nd cassette paper upper limit detection sensor

PFD2

2nd cassette paper pass sensor

CD2

2nd cassette empty sensor

PED3

3rd cassette paper empty sensor

LUD3

3rd cassette paper upper limit detection sensor

PFD3

3rd cassette paper pass sensor

CD3

3rd cassette empty sensor

PED4

4th cassette paper empty sensor

LUD4

4th cassette paper upper limit detection sensor

PFD4

4th cassette paper pass sensor

CD4

4th cassette empty sensor

DSWR2

2nd cassette right door detection sensor

DSWR3

3rd cassette right door detection sensor

DSWR4

4th cassette right door detection sensor

4-3

Purpose

Operation test/check

Function 
(Purpose)

Used to check the operation of the load in the option 
tray and the control circuit.

Section

Paper feed

Item

Operation

Item

Content

1

LUM2

2nd cassette lift-up motor

2

CPFC2

2nd cassette pick-up solenoid

3

CPFS2

2nd cassette paper feed clutch

4

TRC2

2nd cassette transport roller clutch

5

DM

2nd cassette paper transport motor 
(3rd cassette paper transport motor)

6

LUM3

3rd cassette lift-up motor

7

CPFC3

3rd cassette pick-up solenoid

8

CPFS3

3rd cassette paper feed clutch

9

TRC3

3rd cassette transport roller clutch

10

LUM4

4th cassette lift-up motor

11

CPFC4

4th cassette pick-up solenoid

12

CPFS4

4th cassette paper feed clutch

5

5-1

Purpose

Operation test/check

Function 
(Purpose)

Used to check the operation of the display (LED), LCD 
in the operation panel, and control circuit.

Section

Operation (screen/operation)

Item

Operation

5-2

Purpose

Operation test/check

Function 
(Purpose)

Used to check the operation of the heater lamp and the 
control circuit.

Section

Fusing

Item

Operation

Item

Content

1

HL1

Heater lamp 1 (Main) operation

2

HL2

Heater lamp 2 (Sub) operation

Содержание AR-5625

Страница 1: ...RVICE MANUAL CONTENTS CODE 00ZARM318 S2E DIGITAL MULTIFUNCTIONAL SYSTEM AR M256 M257 AR M258 M316 AR M317 M318 MODEL AR 5625 5631 AR M257 M317 AR M256 M258 AR M316 M318 AR 5625 M5631 1 NOTE FOR SERVICING 1 1 2 CONFIGURATION 2 1 3 SPECIFICATIONS 3 1 4 CONSUMABLE PARTS 4 1 5 UNPACKING AND INSTALLATION 5 1 6 EXTERNAL VIEW AND INTERNAL STRUCTURE 6 1 7 ADJUSTMENTS SETTING 7 1 8 SIMULATION 8 1 9 TROUBLE...

Страница 2: ...BI Agent All model 4 3 2 Production number identification 4 4 TD cartridge 4 4 Drum 4 4 3 Environment conditions 4 4 A Ambient conditions for transporting 4 4 B Ambient storage conditions sealed 4 4 C Operating ambient conditions 4 4 4 Life packed conditions 4 4 5 UNPACKING AND INSTALLATION 1 Installation 5 1 A Environment 5 1 B Power source 5 1 C Transport 5 1 D Other precautions 5 2 2 Removal of...

Страница 3: ...Transport section 10 23 O Operation section 10 24 P Switch 10 24 11 OTHERS 1 Flash ROM version up procedure 11 1 A Program download method for Copier and fax program 11 1 B Printer Control Board firmware download method 11 2 C Others Troubleshooting 11 3 2 Key operator program list 11 3 A Common program of digital copier 11 3 B Copy function setting program 11 4 C Printer function setting program ...

Страница 4: ... than a serviceman to touch inside the machine It may cause an electric shock a burn or an injury 7 When servicing do not breathe toner developer and ink exces sively Do not get them in the eyes If toner developer or ink enters you eyes wash it away with water immediately and consult a doctor if necessary 8 The machine has got sharp edges inside Be careful not to dam age fingers when servicing 9 D...

Страница 5: ...d PS3 expantion kit Network scanner expantion kit Sharpdesk license kit Application integration module kit AR SM5 256MB AR SM6 512MB FAX expantion kit Data security kit FAX memory 8MB AR FX7 AR PF1 AR PF2 AR MM9 AR PK1N MX NSX1 MX USX1 MX USX5 MX US10 MX US50 MX USA0 MX AMX1 AR FR24 For 25cpm AR FR25 For 31cpm AR FR24U For 25cpm AR FR25U For 31cpm Copier Printer SPLC model Copier Printer SPLC mode...

Страница 6: ...F F AR PN1D F F F F FAX system FAX expansion kit AR FX7 F F F F FAX memory 8MB AR MM9 F F F F Printer system Printer expansion kit PCL AR P27 F F Standard Bar code font kit AR PF1 F F F AR P27 must be installed Flash ROM kit AR PF2 F F F PS3 expansion kit AR PK1N F F F Memory board 256MB expansion memory board AR SM5 F F F F 512MB expansion memory board AR SM6 F F F F Software Network scanner expa...

Страница 7: ...ing the door standard condition polygon stop Max document size A3 paper 11 17 Picture quality mode Density adjustment step Toner save mode Text Auto mode 1 step Selectable Text mode 5 steps Selectable Text Photo mode 5 steps Selectable Photo mode 5 steps Copy magnification ratio Magnification range fixed magnification Zoom width 25 to 400 50 to 200 for RSPF Fixed magnification mode AB Series 25 50...

Страница 8: ... A4R B5R 16KR 8K 11 17 8 5 14 8 5 13 8 5 11 8 5 11R Paper size change method Changeable by the user By the operation on the LCD panel Paper type setting Normal paper Recycled paper Letterhead Color paper Paper size setting when shipping AB series A4 Inch series 8 5 x 11 Allowable paper type and weight for paper feed 56 to 105g m2 15 to 28lbs Bond Paper capacity 500 sheets 80g m2 paper Plain paper ...

Страница 9: ...Exit paper weight 52 to 128g m2 14 to 34 1lbs Paper pass Center same as main unit Exit area finishing Face down paper exit to the upper surface of the main unit paper exit section Machine weight 0 6 kg Exit capacity 100 sheets 80g m2 paper Tray full detector Yes Concept of function Upper exit tray Job separator Copy FAX Printer This setting can be done by users Lower exit tray main machine exit tr...

Страница 10: ...nction shifter or finisher required Mix paper feed Yes Only when this function is set Preheating Yes Conditions are set with the key operator program Auto power shut off function Yes Conditions are set with the key operator program Message display Yes Key operator program Yes Printer status monitor Printer administration utility Yes A PCL printer board is required TCP IP only To use another protoc...

Страница 11: ... Print 16MB 90 sheets max 1500 sheets with A4 standard documents at 600dpi Offset paper exit by the shifter function Group function 32MB Copy 16MB Print 16MB 90 sheets max 1500 sheets with A4 standard documents at 600dpi Offset paper exit by the shifter function Rotation copy If there is paper of the same size as the document size the image is rotated and printed even though the paper is set in a ...

Страница 12: ...e 5 5 x 8 5 Folio Executive COM 10 DL C5 8K 16K Custom Paper Size 1 size Source Selection Auto Bypass Auto Bypass Manual Tray 1 2 3 4 Paper Input Paper Type Tray Normal paper letter head paper recycle paper colored paper Bypass Normal paper recycle paper OHP label paper gift wrapping paper postcards double postal card no folding line envelope postcard paper coarse paper No 2 master drawing thick p...

Страница 13: ...8 5 x 13 inch Yes Yes Yes Yes Yes Yes Yes Yes Yes Yes 8K 270 x 390 mm Yes Yes Yes Yes Yes Yes Yes Yes N A Yes 16K 195 x 270 mm Yes Yes Yes Yes Yes Yes Yes Yes N A Yes DL 110 x 220 mm Yes N A N A N A N A Yes Yes N A N A Yes C5 162 x 229 mm Yes N A N A N A N A Yes Yes N A N A Yes Com10 4 125 x 9 5 inch Yes N A N A N A N A Yes Yes N A N A Yes Custom W 100 to 297 mm L 148 to 431 8 mm Yes N A N A N A N...

Страница 14: ...30 118 100 300 5870 0 A5 4960 3508 4720 118 100 300 4760 0 Ledger 8400 5100 8160 120 100 300 8200 0 Legal 8400 5100 8160 120 100 300 8200 0 Letter 6600 5100 6360 120 100 300 6400 0 Invoice 5100 3300 2860 120 100 300 4900 0 Foolscap 7800 5100 7560 120 100 300 7600 0 Folio 7800 4980 7560 120 100 300 7600 0 Executive 6300 4350 6060 120 100 300 6100 0 COM 10 5700 2474 3460 120 100 300 5500 0 C5 5408 3...

Страница 15: ...Net weight 400g 10 75K 10 AR 271CD CD SD 10 3 Drum Drum 1 75K AR 310DR No Item Content Life Model name Remarks 1 Toner cartridge black Toner cartridge With IC chip Toner Net weight 745g TNCA replacement operation manual 10 10 25K 10 AR 310ET Life setting by A4 8 5 11 6 document ET FT 10 2 Developer black Developer Developer Net weight 400g 10 75K 10 AR 271CD CD SD 10 3 Drum Drum 1 75K AR 310DR No ...

Страница 16: ...t 1 100K AR 310IR 9 Fusing unit Fusing unit 120V heater lamp 1 150K AR 310FU 10 Staple cartridge Staple cartridge 3 3000 staples 3 AR SC1 For AR FN5A For 30 sheets staple Common with the cartridge for FN4 11 Staple cartridge Staple cartridge 3 5000 staples 3 AR SC2 For AR F14N For 50 sheets staple Common with the cartridge for FN7 No Item Content Life Model name Remarks 1 Upper heat roller kit Upp...

Страница 17: ... unit 10 25cpm 75K 10 31cpm 100K 10 AR 310MC AR 310MC AR 310NC 10 The order places an order in AR 310MC Addition of Sterling 5 Cleaner blade Cleaner blade 10 25cpm 75K 10 31cpm 100K 10 AR 270CB AR 270CB AR 270BL 10 The order places an order in AR 270CB 6 Drum frame unit Drum frame unit 1 25cpm 225K 31cpm 300K AR 310DU The life of the toner reception seat attached to the drum frame is 225K 25cpm 30...

Страница 18: ... October Y November and Z December 3 4The production day 3 Environment conditions A Ambient conditions for transporting B Ambient storage conditions sealed C Operating ambient conditions 4 Life packed conditions Photoconductor drum 36 months from the production month Developer toner 24 months from the production month 1 2 3 4 Label position Serial number 0001 9999 Version no Date of oroduction loc...

Страница 19: ...ace where there is ammonium gas Installation near a diazo copier may lead to dirty copy Be sure to have enough space around the machine Be sure to allow the required space around the machine for servicing and proper ventilation B Power source Be sure to use only the power outlet with the earth terminal of 15A or more and 100V Install the machine near the power outlet to facilitate disconnection of...

Страница 20: ...Do not throw toner or the toner cartridge into a fire Keep toner or the toner cartridge away from the children When the exclusive table option is used be sure to use the adjust ers 4 pcs on the floor When it is required to move the machine for rearrangement of the office etc release the adjuster locks and move the machine The fusing section is heated to a high temperature When removing a paper jam...

Страница 21: ...eck that the DV seal is free from developer If developer is attached to the DV seal clean and remove it 5 Attach the developer tank to the developer cartridge After supplying developer into the developer cartridge do not tilt or shake the developer cartridge 6 Attach the developer cartridge to the copier and fix it with the screw Note When replacing the OPC drum with a new one be sure to clear the...

Страница 22: ...s 1 4 1 Set paper on the tray 2 Press the CUSTOM SETTINGS key The custom settings menu screen will appear 3 Touch the TRAY SETTINGS key The tray settings screen will appear 4 Select the tray in which you loaded paper If the desired tray does not appear in the display use the key or key to scroll until it appears 5 Select the size and type of paper that is loaded in the tray The currently selected ...

Страница 23: ... the copier and then remove the power plug of the copier from the outlet 1 Remove the shielding plate Remove five screws and remove the shielding plate 2 Cut and remove the cut out portion from the left rear cabinet Cut and remove the cut out portion of the left rear cabinet using a tool such as diagonal cutters Be careful about the direction of the tool so that the cut surface is flat TRAY 4 BYPA...

Страница 24: ...ith the AR P27 for setting the PS driver 2 Installation procedure To enable the PS3 the product key must be acquired For the method of acquiring the product key contact the SHARP authorized dealer 1 Check that AR P27 operates normally Turn on the power and wait until warming up is complete Press the PRINT key on the operation panel of the main unit If the LCD in the operation panel of the main uni...

Страница 25: ...river etc Installation caution sheet and Operation Manual License numbers of 10 user clients of Sharpdesk are specified 2 Installation procedure To use the scanner expansion kit a S O DIMM memory module 128 MB or more is needed If no memory is added an S O DIMM module must be mounted on PCL PWB For the mounting method and the memory capacity see below To enable the scanner function the product key...

Страница 26: ...hielding plate Remove the five screws and remove the shielding plate 2 Mount the memory module Insert the memory module until it clicks The memory module is lock when it is inserted However be sure to check that the module slit is engaged with the connector rib when it is inserted 3 Reattach the shielding plate Reattach the shielding plate using the five screws F AR SM5 SM6 1 Parts included 2 Inst...

Страница 27: ... to scan face down here 10 Power switch Press to turn the machine power on and off 11 Handles Use to move the machine 12 Operation panel Contains operation keys and the touch panel 13 Job separator tray Upper tray optional Print jobs and received faxes are delivered to this tray When the job separator tray installed 14 Center tray Finished copies are delivered to the center tray 15 Front cover Ope...

Страница 28: ...paper 4 Photoconductive drum Copy images are formed on the photoconductive drum Do not touch the photoconductive drum green portion Doing so may damage the drum and cause smudges on copies 5 Fusing unit release levers To remove a paper misfeed in the fusing unit push up on these levers and remove the paper The fusing unit is hot Do not touch the fusing unit when removing misfed paper Doing so may ...

Страница 29: ...fax mode when the fax function is installed LINE indicator This lights up while faxes are being sent or received DATA indicator Blinks when a fax has been received to memory and lights steadily when a fax is waiting in memory for transmission When the fax option is installed 3 JOB STATUS key Press to display the current job status 4 CUSTOM SETTINGS key Use to adjust various settings of the machine...

Страница 30: ...e priority to a job or pause or delete a job touch the key of the job and then use the key described in 7 or 8 2 Mode switching keys Use to select the job list mode JOB QUEUE Stored currently executing jobs or COMPLETE Finished jobs JOB QUEUE Shows jobs that have been stored and the job that is currently being executed COMPLETE Shows the jobs that have been finished Note that copy jobs do not appe...

Страница 31: ...ror home position sensor MHPS Mirror scanner home position detection 2 Document cover sensor OCSW Document cover open close detection 3 Document size sensor DSIN3 Document size detection Inch series PD3 4 AB series PD4 5 4 2nd paper exit sensor POD2 2nd paper exit detection 5 2nd paper exit full detection sensor TOPF 2nd paper exit section full detection 6 Right cabinet door switch DSWR0 Right cab...

Страница 32: ... 5 6 7 8 9 10 11 No Name Function and operation 1 Copy lamp Image radiation lamp 2 Copy lamp unit Operates in synchronization with 2nd 3rd mirror unit to radiate documents sequentially 3 LSU unit Converts image signals into laser beams to write on the dum 4 Lens unit Reads images with the lens and the CCD 5 MC holder unit Supplies negative charges evenly on the drum 6 Paper exit roller Paper exit ...

Страница 33: ... No A Process section 1 Developing doctor gap adjustment Developing doctor gap adjustment 2 MG roller main pole position adjustment MG roller main pole position adjustment 3 Developing bias voltage adjustment SIM8 1 4 Grid bias voltage adjustment High mode SIM8 2 5 Grid bias voltage adjustment Low mode SIM8 3 B Mechanism section 1 Print start position adjustment SIM50 5 2 RSPF image lead edge posi...

Страница 34: ... Character Photo 145mm s 500 500V 4 PHOTO 145 Photo 145mm s 500 500V 5 TONER SAVE 145 Toner save 145mm s 400 400V 6 AE 122 AE 122mm s 400 400V 7 TEXT 122 Character 122mm s 450 450V 8 TEXT PHOTO 122 Character Photo 122mm s 450 450V 9 PHOTO 122 Photo 122mm s 450 450V 10 TONER SAVE 122 Toner save 122mm s 375 375V Item Content Setting range Default 1 AE 145 AE 145mm s 1 12 4 555V 2 TEXT 145 Character ...

Страница 35: ...ition adjustment 1 Set a scale on the OC table as shown below Note Since the printed copy is used as a test chart put the scale in paralleled with the edge lines 2 Make a copy then use the copy output as an original to make an RSPF copy again 3 Check the copy output If necessary perform the following adjust ment procedures 4 Execute SIM 50 6 5 Set the RSPF lead edge position set value so that the ...

Страница 36: ... the specified value 1 99 About 0 127mm Step 10 Make an enlargement copy 400 and check that there is no shade of the cabinet printed at the lead edge 11 If there is a shade printed at the lead edge in procedure 9 adjust SIM 50 1 Item 10 1 5 About 0 677mm If there is no problem set to 3 Adjustment mode SIM Set value Spec value Setting range Rear edge void 50 1 6 1 step 0 127mm shift 4mm or less 1 9...

Страница 37: ... unit parallelism is proper If one of them is in contact with the positioning plate perform the adjustment of 4 4 Loosen the set screw of the scanner drive pulley which is not in contact with No 2 3 mirror base unit positioning plate 5 Without moving the scanner drive pulley shaft manually turn the scanner drive pulley until the positioning plate is brought into con tact with No 2 3 mirror base un...

Страница 38: ...he adjustment can be made by adjusting the No 2 3 mirror base unit rail height Before performing this adjustment be sure to perform the horizontal image distortion adjustment in the laser scanner section This adjustment must be performed in the following cases When the mirror base wire is replaced When the copy lamp unit and no 2 3 mirror unit are replaced When the mirror unit rail is replaced and...

Страница 39: ...rection scanning direction magnification ratio adjustment SIM 48 1 2 SIM 48 1 3 a OC mode in copying Note Execute the procedure after completion of SIM 48 1 1 1 Put a scale on the original table as shown below and make a nor mal 100 copy 2 Compare the scale image and the actual scale If necessary perform the following adjustment procedures 3 Execute SIM 48 1 2 4 Enter the set value and press the s...

Страница 40: ...eck the printed copy with the test chart If any adjustment is required perform the following procedure 3 Execute SIM 50 12 4 After warm up shading is performed and the current set value of the off center adjustment is displayed on the display section in 2 digits 5 Enter the set value and press the start key The set value is stored and a copy is made Adjustment specification 12 OC RSPF open close d...

Страница 41: ...nt the RSPF lead edge adjustment must be executed Both surfaces There must be no other sheet than the black chart on the glass sur face Especially when in RSPF scan the center area is scanned in the main scan direction Be careful to prevent external light from enter ing the scan area 3 Check that the lead edge is not shifted Both surfaces If the original lead edge adjustment has been made properly...

Страница 42: ... on the copy quantity display If too dark decrease the quantity displayed on the copy quantity display 0 99 TEXT 1 0 7 is copied 3 0 3 is copied 5 0 2 is copied TEXT PHOTO 1 0 6 is copied 3 0 3 is copied 5 0 2 is copied PHOTO 1 0 5 is copied 3 0 3 is copied 5 0 2 is copied AE TONER SAVE 3 is copied TEXT TONER SAVE 1 0 7 is copied 3 0 3 is copied 5 0 2 is copied TEXT PHOTO TONER SAVE 1 0 6 is copie...

Страница 43: ...e sub code press the CUSTOM SETTINGS key Canceling the simulation mode to return to the normal mode 1 Press CLEAR ALL key B How to change the simulation adjustment value set by the touch panel in the adjustment value entry process 1 Target SIM list 3 7 8 1 8 2 8 3 8 10 8 11 8 12 9 5 43 1 44 34 46 2 46 9 46 10 46 11 46 18 46 20 46 30 46 31 48 1 48 2 50 1 50 5 50 6 50 10 50 12 51 1 51 2 51 9 53 7 2 ...

Страница 44: ...he selected mode and item Operation is made according to the selected mode and item Press the START key Press the START key Select YES The selected mode and the item are cleared The display is made according to the selected mode and the item Do you want to change the content Enter the new setting and adjustment values Operation is made according to the select ed mode and the it Other modes Press t...

Страница 45: ...ch printer mode and the control circuit 13 Used to check and adjust the operation of the developing bias voltage in FAX mode and the control circuit 8 14 Used to check and adjust the operation of the main charger grid voltage high mode in FAX mode and the control circuit 15 Used to check and adjust the operation of the main charger grid voltage low mode in FAX mode and the control circuit 9 1 Used...

Страница 46: ...n 72 The letterhead support is set When Letterhead paper setting is selected the set value of SIM 26 46 Image output direction setting is set to Setting Enable accordingly 27 1 Used to set PC MODEM communication trouble U7 00 detection Yes No 5 Used to set the tag number Code Function Main Sub 30 1 Used to display the sensor status attached to the machine 2 Used to display the status of the sensor...

Страница 47: ...images by the unit of 1 step detecting the position up to the glass cover automatically Adjustment value Default 50 Adjustment range 1 99 Adjustment unit 1 about 0 12mm 55 1 Used to set the soft switch 61 1 Used to check the LSU polygon motor operation Check speed can select 145mm s or 122mm s individually Code Function Main Sub 63 1 Used to check the result of shading correction The shading corre...

Страница 48: ...le only when the RSPF is installed 1 1 1 Purpose Operation test check Function Purpose Used to check the operation of the scanner unit and its control circuit Section Optical Image scanning Item Operation Set magnification ratio 25 to 400 1 increment Default 100 Document size Varies depending on the destination Set number of times 1 to 999 0 Continuous operation 1 2 Purpose Operation test check Fu...

Страница 49: ...y sensor FWPS Paper width sensor JGHP1 Side guide plate HP sensor JGHP2 Rear edge plate HP sensor JGPD Tray paper empty sensor T1OD 1st tray exit sensor T1PF 1st tray paper full sensor PGOP JAM processing PG open close detection sensor T2OD 2nd tray exit sensor OFHP Offset HP sensor T2UP Tray position sensor upper T2DN Tray position sensor lower JGDSW Tray jam processing interlock EVRE Lift up dri...

Страница 50: ...urpose Adjustment Function Purpose Used to adjust the alignment position side regulation plate rear edge regulation plate for each paper size Shifts to the specified paper size position Section Finisher Item Operation Item Content Setting range Default 1 PAPER SIZE Paper size 1 A3 2 A4 3 B4 4 B5 5 A4R 6 WLT 7 LT 8 LG 9 FC 10 LTR 11 8K 12 16K 1 12 A4 2 JOGGER POS X Side guide plate 1 99 50 3 JOGGER...

Страница 51: ... the tray cannot descend to the specified position Check to insure that there is no paper in the tray before execution 3 10 Purpose Adjustment Function Purpose Used to make each adjustment of the saddle finisher Item Operation Item Content Installation range Default 1 SADDLE POSITION Saddle stitch position adjustment 0 400 200 2 FOLDING POSITION Saddle folding position adjustment 0 400 200 3 FRONT...

Страница 52: ...ED2 2nd cassette paper empty sensor LUD2 2nd cassette paper upper limit detection sensor PFD2 2nd cassette paper pass sensor CD2 2nd cassette empty sensor PED3 3rd cassette paper empty sensor LUD3 3rd cassette paper upper limit detection sensor PFD3 3rd cassette paper pass sensor CD3 3rd cassette empty sensor PED4 4th cassette paper empty sensor LUD4 4th cassette paper upper limit detection sensor...

Страница 53: ...per transport system and the control circuit Section Paper transport Discharge Switchback Transport Item Operation Item Content 1 LUM1 1st cassette lift up motor 2 CPFC1 1st cassette pick up solenoid 3 CPFS1 1st cassette paper feed clutch 4 MPFS Manual feed pick up solenoid 5 RRC Resist roller clutch 6 PSPS Separation pawl solenoid 7 OGS Paper exit gate switching solenoid 8 LUM2 2nd cassette lift ...

Страница 54: ... the display returns to the original state Linked with the destinations of SIM 26 6 Linked with the auto exposure mode of SIM 46 19 1 The minimum increment is 5V The result of Set value 5 is stored in the EEPROM When reading a value from the EEPROM the value of EEP value 5 is used as the set value Therefore a multiple number of 5 must be entered If not the value 1 to 4 is displayed after pressing ...

Страница 55: ...rpose Adjustment Operation test check Function Purpose Used to check and adjust the operation of the main charger grid voltage high mode in each copy mode and the control circuit Section Image process Photoconductor Developing Transfer Cleaning Photo conductor Item Content Setting range Default 1 AE 145 AE 145mm s 1 12 4 2 TEXT 145 Character 145mm s 6 3 TEXT PHOTO 145 Character Photo 145mm s 6 4 P...

Страница 56: ... each printer mode and the control circuit Section Image process Photoconductor Developing Transfer Cleaning Developer Toner hopper Item Content Installa tion range Default 1 DENS1 145 Density1 145mm s 200 650 450 2 DENS2 145 Density2 145mm s 500 3 DENS3 145 Density3 145mm s 500 4 DENS4 145 Density4 145mm s 526 5 DENS5 145 Density5 145mm s 550 6 TS 145 Toner save 145mm s 400 7 DENS1 122 Density1 1...

Страница 57: ...ger grid voltage low mode in each printer mode and the control circuit Section Image process Photoconductor Developing Transfer Cleaning Photo conductor Item Content Installa tion range Default 1 DENS1 145 Density 1 145mm s 1 12 6 2 DENS2 145 Density 2 145mm s 6 3 DENS3 145 Density 3 145mm s 6 4 DENS4 145 Density 4 145mm s 7 5 DENS5 145 Density 5 145mm s 8 6 TS 145 Toner save 145mm s 4 7 DENS1 122...

Страница 58: ...on procedure Enter the set value with the 10 key When the duplex motor setting is made the duplex 2motor is also set accordingly 8 15 Purpose Adjustment Operation test check Function Purpose Used to check and adjust the operation of the main charger grid voltage low mode in FAX mode and the control circuit Section Image process Photoconductor Developing Transfer Cleaning Photo conductor Setting ra...

Страница 59: ...nt 100K DR count 100K 9 5 Purpose Adjustment Function Purpose Used to adjust the timing of switching from normal rotation to reverse rotation or from reverse rotation to normal rotation of the duplex motor Item Installation range Default 1 145mm s 18 76 18 2 122mm s 18 10 10 0 Purpose Operation test check Function Purpose Used to check the operation of the toner motor and its control circuit Secti...

Страница 60: ... output check display print Function Purpose Used to check the misfeed positions and the number of misfeed at each position When the number of misfeed is considerably great it can be judged as necessary for repair Item Trouble Mis feed Item Jam contents TRAY1 1st cassette pick up miss TRAY2 2nd cassette pick up miss TRAY3 3rd cassette pick up miss TRAY4 4th cassette pick up miss BPT Multi manual f...

Страница 61: ...se Used to check the ROM version of each unit section Item Software S N Machine serial number MCU Main Control Unit IMC IMC OPE Panel Panel label code PRINTER PRINTER NIC NIC FINISHER FINISHER FAX FAX PUNCH UNIT Punch unit Panel display Destination Selection code Panel software support language JPN Japan Japanese American English English EFS SEC AJ AM American English English French Spanish Brazil...

Страница 62: ...to display the original staple counter Item Counter SPF RSPF counter SCAN Scan counter STAPLE Stapler counter PUNCH Punch counter SADDLE STAPLER Saddle stitch counter 22 9 Purpose Adjustment setting operation data output check display print Function Purpose Used to check the number of use of each paper feed section the number of prints Section Paper feed Item Counter BYPASS Manual feed counter TRA...

Страница 63: ...feed is considerably great it can be judged as necessary for repair Section RSPF Item Trouble Misfeed Error code Name Sensor name Paper Reached Not Reached to the sensor DFD_ND RSPF paper in lead edge jam SPF P IN sensor Not Reached DFD_ST RSPF paper in rear edge jam SPF P IN sensor Reached RDD_ND RSPF paper out lead edge jam SPF P IN sensor Reached P_OUT Not Reached RDD_ST RSPF paper out rear edg...

Страница 64: ...ta clear Function Purpose Used to clear the misfeed counter the misfeed history the trouble counter and the trouble history The counters are cleared after completion of maintenance Section Memory Item Counter Item Content 1 JAM JAM counter JAM history 2 SPF JAM RSPF JAM counter RSPF JAM history 3 TROUBLE Trouble counter Trouble history 24 2 Purpose Data clear Function Purpose Used to clear the num...

Страница 65: ...d until Notice Page storing is completed Only when the serviceman call error occurs When in other than the serviceman call error entering the simulation is not allowed from the system check display 24 6 Purpose Data clear Function Purpose Used to clear the copy counter Item Counter Copier 24 7 Purpose Data clear Function Purpose Used to clear the OPC drum membrane decrease correction counter This ...

Страница 66: ... 2 Purpose Setting Function Purpose Used to make the initial setting of toner concentration when replacing developer Section Image process Photoconductor Developing Transfer Cleaning Developer Toner hopper Error content Occurs in case of a communication error between the machine and CRUM Cancel procedure Reset with CA key and cancel with SIM 16 Error content CRUM identification error CRUM model er...

Страница 67: ...e inch series and A4 as Letter in the AB series 0 Detection disable Default 1 Detection valid Set value Setup Remarks 0 Detection invalid Default 1 Detection valid Employed unit Destina tion Document size Set value 0 Invalid 1 Valid Docu ment Document table RSPF AB series FC 8 5 x 13 B4 FC 8 5 x 13 LG 8 5 x 14 B4 FC 8 5 x 13 B4 B4 FC 8 5 x 13 Inch series FC 8 5 x 13 LG 8 5 x 14 FC 8 5 x 13 LG 8 5 ...

Страница 68: ... 500 or more to less than 500 the trail setting is changed from END to SETTING START Note Executable only when the PCL SCANNER is installed Operation procedure The current setup is displayed with ON or OFF Enter an input 20 digits of the E MAIL RIC soft key with the 10 key and press the START key and the collating result is displayed with OK or NG After canceling the simulation if OK the E MAIL RI...

Страница 69: ... Specifications Operation mode Common Item Content Setting range Default 0 OFF Disable 0 1 0 1 ON Enable 26 22 Purpose Setting Function Purpose Used to set the specification language display for the destination Item Specifications Item Language code ASIC expression Remarks 0 JAPANESE ja 6A 61 1 ENG US en 65 6E 2 ENG UK gb 67 62 3 FRENCH fr 66 72 4 GERMAN de 64 65 5 ITALY it 69 74 6 DUTCH nl 6E 6C ...

Страница 70: ...ounter life is expired Item Operation Item Content Default 0 STOP Stop 1 1 NON STOP Non stop 26 41 Purpose Setting Function Purpose Used to set ON OFF of the automatic magnification ratio selection AMS when setting the binding function Item Operation Item Content Default 0 OFF AMS is not set automatically 1 SUK SEF SEEG SEEG2 0 Others 1 ON AMS is set automatically 26 46 Purpose Setting Function Pu...

Страница 71: ...rpose Setting Function Purpose In the power save time setting the pre heat pre heat mode setting and the auto power shut off time can be set to the short time setup pre heat 1 min auto power shut off 4 min and the long time setup pre heat 5min auto power shut off 30min Item Content Default 1 Preheat 1min auto power shut off 4min 2 2 Preheat 5min auto power shut off 30min 26 72 Purpose Setting Func...

Страница 72: ...per sensor 30 2 Purpose Operation test check Function Purpose Used to display the status of the sensors attached to the standard cassette and the manual feed tray Use SIM 4 2 for the option cassettes The sensor of an uninstalled cassette is not displayed Section Paper feed Item Operation PED1 1st cassette paper empty sensor LUD1 1st cassette paper upper limit detection sensor CD1 1st cassette empt...

Страница 73: ...e detection adjustment Hexadecimal display For AB series 1 to 5 is displayed for inch series 1 to 4 During execution EXECUTING is highlighted 41 41 1 Purpose Operation test check Function Purpose Used to check the document size detection photo sensor Section Others Item Operation OCSW Original cover state Open Highlighted display Close Normal display PD1 to 5 Original sensor status Without origina...

Страница 74: ...70 9 WarmUp Temp Main 145 Warmup complete temperature Main 145mm s 0 40 10 10 WarmUp Temp Sub 145 Warmup complete temperature Sub 145mm s 0 40 15 11 WarmUp Temp Main 122 Warmup complete temperature Main 122mm s 0 40 10 12 WarmUp Temp Sub 122 Warmup complete temperature Sub 122mm s 0 40 15 13 600dpi Main 145 600dpi Main 145mm s 150 220 190 195 14 600dpi Sub 145 600dpi Sub 145mm s 150 220 190 195 15...

Страница 75: ... for the LD power for 25 sheet model Setting in the unit of 1K Setting range 1 100 75 SIMULATION 44 02 44 3 Purpose Setting Function Purpose Used to set the DV count correction Section Image process Photoconductor Developing Transfer Cleaning Item Operation Item Content Default 1 DV ADJUST DV count correction Disable Enable 0 Disable 1 Enable 0 2 DV COUNT 31 The DV count value is set for correctio...

Страница 76: ...n information Item Operation TH AREA Current environment area TMP DATA Detection temperature of sensor C HUD DATA Detection humidity of sensor Item Content Default 25cpm 31cpm SIMULATION 44 9 SIMULATION 44 14 44 16 Purpose Setting Function Purpose The correction value for the toner density reference value corresponding to the DV count value is set individually for 145mm s and 122mm s for the 31 sh...

Страница 77: ... paper LTR V1 5 30 5 5 10 V2 THICK 145 145mm s thick paper LTR V2 5 30 14 14 11 V1 THICK S 145 145mm s thick paper LTR V1 5 30 5 5 SIMULATION 44 14 12 V2 THICK S 145 145mm s thick paper LTR V2 5 30 18 18 13 V1 THIN 145 145mm s thin paper LTR V1 5 30 5 5 14 V2 THIN 145 145mm s thin paper LTR V2 5 30 18 18 15 V1 THIN S 145 145mm s thin paper LTR V1 5 30 5 5 16 V2 THIN S 145 145mm s thin paper LTR V2...

Страница 78: ...2 122mm s OHP LTR V2 5 30 8 8 51 V1 OHP S 122 122mm s OHP LTR V1 5 30 5 5 52 V2 OHP S 122 122mm s OHP LTR V2 5 30 12 12 53 V1 POSTCARD 122 122mm s postcard envelope 100mm V1 5 30 5 5 54 V2 POSTCARD 122 122mm s postcard envelope 100mm V2 5 30 16 16 55 V1 POSTCARD S 122 122mm s postcard envelope 100mm V1 5 30 5 5 56 V2 POSTCARD S 122 122mm s postcard envelope 100mm V2 5 30 16 16 44 40 Purpose Settin...

Страница 79: ...A Character TS level 4 0 slant 1 99 55 19 TS 5 0 SHIFT Character TS level 5 0 shift q ty 1 99 72 20 TS 5 0 GAMMA Character TS level 5 0 slant 1 99 60 46 10 Purpose Adjustment Function Purpose Used to adjust the shift amount and the inclination value for each level 1 to 5 of the exposure mode Text Photo Item Picture quality Item Content Setting range Default 1 1 0 SHIFT Character Photo level 1 0 sh...

Страница 80: ...installed Item Content Setting range Default 1 1 0 SHIFT Photo level 1 0 shift q ty 1 99 32 2 1 0 GAMMA Photo level 1 0 slant 50 3 2 0 SHIFT Photo level 2 0 shift q ty 41 4 2 0 GAMMA Photo level 2 0 slant 50 5 3 0 SHIFT Photo level 3 0 shift q ty 50 6 3 0 GAMMA Photo level 3 0 slant 50 7 4 0 SHIFT Photo level 4 0 shift q ty 56 8 4 0 GAMMA Photo level 4 0 slant 61 9 5 0 SHIFT Photo level 5 0 shift ...

Страница 81: ...display returns to the initial menu but the machine is not reset 46 15 Purpose Adjustment Function Purpose FAX exposure level adjustment Super Fine mode individual adjustment Section FAX Item Image quality Normal display NOW PRINTING Error display DOOR OPEN JAM PAPER EMPTY Item Content Setting range Default 1 COPY START Copy start 2 EXP LEVEL Exposure level selection 0 99 50 3 AE PHOTO ON Super Fi...

Страница 82: ...e with the 10 key 46 19 Purpose Adjustment Function Purpose Used to set the control method of the exposure mode Item Picture quality Item Content Default 1 AE MODE 1 EXPOSURE 2 TONER Auto exposure mode 1 Priority on Image quality 2 Priority on toner consumption 2 2 AE STOP COPY 0 FIXED 1 REAL TIME Auto exposure STOP mode COPY 0 Fixed 1 Real time 0 3 AE STOP FAX 0 FIXED 1 REAL TIME Auto exposure ST...

Страница 83: ...arted and the set value is stored 48 48 1 Purpose Adjustment Function Purpose Used to adjust the copy mode magnification ratio main scanning direction sub scanning direction Section Image processing Item Picture quality Item Content Setting range Default 1 F R Main scanning magnification ratio adjustment 1 99 50 2 SCAN Sub scanning magnification ratio adjustment 60 3 SPF SIDE1 RSPF surface sub sca...

Страница 84: ... values of SIM 50 5 Items 1 2 3 4 to the original values and execute test print Check the print out and adjust so that the lead edge image is printed on the lead edge of paper 1 99 About 0 127mm Step 6 Adjust SIM 50 1 Items 2 3 4 5 so that the lead edge void on the print out is the specified value 1 99 About 0 127mm Step 7 Similar to procedure 6 adjust SIM 50 1 Item 6 7 so that the rear edge void ...

Страница 85: ... but the machine is not reset Item Content Setting range Default 1 RRC A Original scan start position adjustment Lead edge position adjustment value OC 1 99 43 2 DEN A Lead edge cancel adjustment Main cassette 1 99 18 3 DEN A MANUAL Lead edge cancel adjustment Manual feed cassette 1 99 18 4 DEN A OPTION Lead edge cancel adjustment Option cassette 1 99 18 5 DEN A DUPLEX Lead edge cancel adjustment ...

Страница 86: ...et 50 8 The adjustments on the machine side must have been normally completed Purpose Adjustment Function Purpose FAX lead edge adjustment read Section FAX Normal display NOW PRINTING Error display DOOR OPEN JAM PAPER EMPTY Item Content Setting range Default 1 COPY START Copy start 2 SCAN SELECT OC SPF RSPF Scan selection 1 OC 2 SPF 3 RSPF back 1 3 1 3 LEAD Scan lead edge position adjustment value...

Страница 87: ...shifted to the ini tial menu but the machine is not reset 50 12 Purpose Adjustment Function Purpose Used to adjust the print image center position Adjustment can be made for each document mode Section Image processing Item Picture quality Image position Item Content Setting range Default 1 OC OC document scan 1 99 50 2 SPF SIDE1 RSPF document front surface scan 3 SPF SIDE2 RSPF document back surfa...

Страница 88: ...ting Function Purpose Used to set the OPC drum separation pawl operation inhibit ON OFF Section Image process Photoconductor Developing Transfer Cleaning Item Operation Item Content Setting range Default 0 ON Enable 0 1 0 1 OFF Disable 51 9 Purpose Setting Function Purpose Used to adjust the OPC drum separation voltage ON OFF timing Section Process OPC drum developing transfer cleaning Item Operat...

Страница 89: ...ite sheet for RSPF exposure correction in the RSPF position If the adjustment is normally completed COMPLETE is displayed and data are written into the EEPROM In case of an abnormality ERROR is displayed and no data is written into the EEPROM The RSPF white correction start pixel Displayed pixel position 34 53 8 Purpose Adjustment Function Purpose Used to adjust the RSPF scan position of the mirro...

Страница 90: ...ntent of the selected soft SW 3 Press the START key to save the set content The FAX related soft SW is displayed on the LCD and changing can be made by monitoring it Note Executable only when the FAX is installed 64 64 1 Purpose Operation test check Function Purpose Used to check the operation of the printer function auto print operation Section Printer Item Operation Item Content Setting range De...

Страница 91: ... China 00100110 Singapore 10011100 Taiwan 11111110 India 01010011 Malaysia 01101100 Hong Kong 01010000 Middle east 11111101 SouthAfrica 10011111 Spain 10100000 Portugal 10001011 Russia 10111000 Denmark 00110001 Norway 10000010 Switzerland 10100110 Italy 01011001 Belgium 00001111 Luxembourg 01101001 Netherlands 01111011 Finland 00111100 1 00001001 1 2 3 4 5 6 7 8 66 3 Purpose Operation test check F...

Страница 92: ...k 1 0dB 2 Soft SW Maintain the break state with keeping the condition to be able to send to the dial pulse line Item Send signal Send level Selection menu 1 66 5 Purpose Operation test check Function Purpose Signal send mode Signal send level soft SW setting Section FAX Item Operation Signal number Send signal Send level Selection menu 1 NO SIGNAL Signal not sent None 2 33 6 V34 33 6 V34 3 31 2 V3...

Страница 93: ...e FAX is installed Operation procedure Select the signal number with the 10 key and press the START key By setting the signal number the specified signal is delivered to the line at the speed of 300bps The signal is continuously sent until the interruption command is provided by pressing the CUSTOM SET TINGS key The signal send level can be selected from 0dB or the soft SW set value The signal sen...

Страница 94: ...ress the START key 2 Set the make time with the 10 key The dial is sent with the set value 26ms The sending dial cannot be interrupted Note Executable only when the FAX is installed Operation Procedure 1 Select the item with the 10 key and press the START key 2 Set the make time with the 10 key The dial is sent with the set value 26ms The sending dial cannot be interrupted Note Executable only whe...

Страница 95: ...n the AR FX5 Note Executable only when the FAX is installed Operation procedure 1 Select the item to be printed 2 Press the START key The information of the selected item is printed Note Executable only when the FAX is installed 66 16 Purpose Operation check test Function Purpose Used to perform the dial test DTFM signal send test Section FAX Item Operation Item Content Setting range 0 EXECUTE Exe...

Страница 96: ...lt is displayed Note Executable only when the FAX is installed Operation procedure The send receive test is performed and the time required for send receive of the image data in the test is measured and displayed 66 24 Purpose Data clear Function Purpose Used to clear the FAST storage data SEC only Section FAX Item Data Initializing 66 30 Purpose Operation test check Function Purpose Used to set t...

Страница 97: ...are checked when the simulation is started the display may not be changed from No message is sent for an uninstalled device Key operations on each display Initial display Pressing the INTERRUPT key shifts the display to the previous menu Pressing the CA key leads to resetting Pressing the C key and the CUSTOM SETTINGS key is invalid Beep sound Display during execution During execution the INTERRUP...

Страница 98: ...id Beep sound Execution display During execution the INTERRUPT key the C key and the CA key are invalid Beep sound Pressing the CUSTOM SETTINGS key produces a valid sound only Check end display After execution the INTERRUPT key and the C key are invalid Beep sound Pressing the CA key leads to resetting Pressing the CUSTOM SETTINGS key produces a valid sound only After completion of the simulation ...

Страница 99: ...from MS DOS Data are sent from the PC by the put file name The process is displayed Check the display After completion the result is displayed When the simulation is completed normally COMPLETE is displayed No display for abnormal completion Pressing CA key cancels the simulation resets the operation Execution of the simulation which performs communication with the PCL board is inhibited until Not...

Страница 100: ...trouble AR F14N F2 02 Toner supply failure 04 Identification error Model error Type error Destination error Data abnormality Misc error 58 Temperature humidity sensor abnormality F5 02 Copy lamp xenon lamp error F6 00 FAX control PWB communication trouble MCU 10 FAX control PWB trouble 80 FAX control PWB communication trouble Protocol 81 FAX control PWB communication trouble Parity 82 FAX control ...

Страница 101: ...PWB trouble Details IMC PWB hardware abnormality Cause IMC PWB abnormality Check and remedy Replace the IMC PWB Trouble code Trouble contents Trouble detection Main code Sub code E1 11 Content IMC PWB ASIC error Details ASIC abnormality on IMC PWB Cause IMC PWB abnormality Check and remedy Replace the IMC PWB 12 Content IMC PWB CODEC IC error Details CODEC IC JBIG chip abnormality on IMC PWB Cause...

Страница 102: ...ect data failure Check and remedy Check the connectors of the IMC PWB and MCU PWB Check the grounding of the copier Check the ROM of the IMC PWB Trouble code Details of trouble Main code Sub code E7 02 Content LSU trouble Details BD signal from LSU is not detected in a constant cycle Kept OFF or ON Cause LSU connector or LSU inside harness trouble or disconnection Polygon motor rotation abnormalit...

Страница 103: ...otor operation AR F14N Use SIM 3 3 6 to check the slide motor operation Trouble code Details of trouble Main code Sub code F1 08 Content Staple motor error AR FN5A Details The staple motor cannot return to the home position Cause Staple motor abnormality Staple motor home position sensor abnormality Staple unit abnormality Finisher PWB abnormality Check and remedy Use SIM 3 3 7 to check the staple...

Страница 104: ...ails Punch motor operation abnormality Cause Motor lock Motor rpm abnormality Overcurrent to the motor Finisher control PWB trouble Check and remedy Use SIM3 3 3 to check the punch motor operation Trouble code Details of trouble Main code Sub code F1 35 Content Punch side registration sensor trouble AR F14N Details Sensor input value abnormality Cause Sensor breakage harness breakage Finisher cont...

Страница 105: ...xenon lamp error Details The copy lamp does not light up Cause Copy lamp abnormality Copy lamp harness abnormality CCD PWB harness abnormality Check and remedy Check the copy lamp SIM 5 3 When the lamp lights Check the harnesses and connectors between the CCD unit and the MCU PWB When the lamp does not light Check the harness and connector between the copy lamp and the MCU PWB Replace the copy lam...

Страница 106: ...trol PWB setup Check and remedy Check the variety of FAX LIU PWB Check the machine destination setup Sim 22 6 and FAX country code Soft SW table Trouble code Details of trouble Main code Sub code F9 00 Content Printer PWB communication trouble Details Communication trouble between MCU and printer PWB Cause Printer PWB connector disconnection Harness trouble between the printer PWB and the MCU PWB ...

Страница 107: ...medy Check the harness and the connector of the thermistor and the MCU Trouble code Details of trouble Main code Sub code H2 01 Content Sub heater lamp thermistor open hard detection Details Fusing sub thermistor open detection Fusing unit not installed Cause Sub thermistor defect Control PWB failure Fusing section connector contact failure Fusing unit not installed Check and remedy Check the harn...

Страница 108: ...SIM 14 Trouble code Details of trouble Main code Sub code H4 01 Content Sub heater lamp abnormally low temperature detection Details The setup temperature about 90 C is not reached within the specified time about 17sec from turning on the power When the temperature of sub heater thermistor falls below 140 C in the standby mode or printing When the temperature of sub heater lamp thermistor falls be...

Страница 109: ...k fusing unit installation Check the POD1 POD2 or PPD2 sensor Clear the trouble with SIM 14 Trouble code Details of trouble Main code Sub code L1 00 Content Scanner feed trouble Details Scanner feed is not completed within the specified time Cause Mirror unit defect Scanner wire disconnection Origin detection sensor error Mirror motor harness abnormality Check and remedy Check the scanning operati...

Страница 110: ...ub code U2 04 Content EEPROM communication error Details EEPROM communication error Cause EEPROM defect ICU PWB EEPROM access circuit failure Check and remedy Check that the EEPROM is properly set Clear trouble with SIM 16 Replace the MCU PWB 20 Content Machine speed code data error Details The machine boot speed information is not identical to the model code speed information Cause EEPROM defect ...

Страница 111: ...ime out error Cause Operation control PWB connector disconnection Harness failure of the operation control PWB and the MCU PWB Check and remedy Check the connectors and the harness of the operation control PWB and MCU PWB Check the grounding of the copier 99 Content Operation panel destination error Details An error occurred in checking the destination of the operation panel and the main body Caus...

Страница 112: ...AR M256 M257 M258 M316 M317 M318 5625 5631 TROUBLE CODE LIST 9 13 ...

Страница 113: ...awl unit Separation pawl unit supply only Individual parts in separation pawl unit can not be supplied Star ring DV unit Developer DV blade DV side seal N DV side seal N2 DV side mylar DV moquette Toner sensor Fusing unit Fusing unit Upper heat roller Lower heat roller Upper separation pawl Upper cleaning pad Lower separation pawl Thermistor Fuser gear Upper heat roller bearing Lower fuser bearing...

Страница 114: ...supply only Individual parts in separation pawl unit can not be supplied Star ring DV unit Developer 75k Except SEC SECL LAG DV blade DV side seal N DV side seal N2 DV side mylar DV moquette Toner sensor Fusing unit Fusing unit Upper heat roller Lower heat roller Upper separation pawl Upper cleaning pad Lower separation pawl Thermistor Fuser gear Upper heat roller bearing Lower fuser bearing Paper...

Страница 115: ...eater lamp 7 Fusing Separation Pawl upper 8 Upper heat roller D Optical section 1 CCD unit 2 Lamp unit a Lamp b PWB c Wire d Mirror motor E Paper feed section 1 Paper feed solenoid 2 Cassette sensor PWB 3 Manual P in sensor Manual empty sensor 4 Multi manual paper feed a Paper feed roller pickup roller b Reverse sensor c Separation sheet d Clutch solenoid 5 Upper 500 sheets tray paper feed a Paper...

Страница 116: ...ing the drum process unit may not be able to install by reason of the drum drive coupling position In this case rotate the drum about 45 degrees and install again 2 Drum section a Main charger b Cleaning blade c Drum frame unit d Moquette F R Note If it disturbs the blade movement replace it and attach new one e Separation pawl Disassembly Hold the tip of the separation pawl and remove it 2 1 4 3 ...

Страница 117: ... attaching the DV side Mylar check the position shown in the figure below and attach it properly 2 When attaching the DV side seal check the position shown in the figure below and attach it properly First of all attach the DV side Mylar The attachment reference is the same but the area of the N2 shape is reduced to half as shown with the red square in the above figure Be sure to attach the DV side...

Страница 118: ... it may break by clogging of toner b Toner sensor Clean the sensor only after removing used DV when replacing DV There is no need to remove the MG roller as shown in the above fig ure Use waste cloth to remove toner from the sensor surface in the arrow direction shown in the figure below C Fusing section 1 Thermostat DV seal Faulting Attaching reference G l u i n g f a c e 0 0 5 DV moquette Toner ...

Страница 119: ...58 M316 M317 M318 5625 5631 DISASSEMBLY ASSEMBLY AND MAINTENANCE 10 7 2 Thermistor 3 Paper guide 4 Fusing Separation Pawl lower 5 Lower heat roller 6 Heater lamp 2 2 1 1 2 2 1 3 3 4 1 2 2 3 4 4 5 6 2 1 3 3 1 1 2 3 3 4 ...

Страница 120: ...258 M316 M317 M318 5625 5631 DISASSEMBLY ASSEMBLY AND MAINTENANCE 10 8 7 Fusing Separation Pawl upper 8 Upper heat roller D Optical section 1 CCD unit 1 2 1 2 2 2 2 2 2 1 1 1 1 2 1 2 3 3 1 1 1 1 1 2 3 4 4 5 1 1 1 2 3 ...

Страница 121: ...AR M256 M257 M258 M316 M317 M318 5625 5631 DISASSEMBLY ASSEMBLY AND MAINTENANCE 10 9 2 Lamp unit a Lamp b PWB c Wire d Mirror motor 4 6 5 4 1 1 1 1 2 3 1 1 2 2 3 3 4 1 2 3 1 2 3 1 2 2 3 1 2 3 1 3 2 ...

Страница 122: ...d solenoid 2 Cassette sensor PWB 3 Manual P in sensor Manual empty sensor 4 Multi manual paper feed a Paper feed roller pickup roller Installation Install so that the cam transmit arm 1 comes under the roller arm 2 A Paper feed roller B Pickup roller C Separation sheet A C B 1 3 2 3 1 2 A B 5 6 1 2 4 3 1 2 2 1 4 3 LOCK ...

Страница 123: ...SEMBLY ASSEMBLY AND MAINTENANCE 10 11 b Reverse sensor c Separation sheet Slightly apply grease GP501MR UKOG 0012QSZZ around the axis One rice grain for each d Clutch solenoid Clutch Solenoid Clutch 1 3 2 1 2 3 4 5 5 6 3 1 2 1 2 2 3 1 2 A A A A A A A ...

Страница 124: ...ay paper feed a Paper feed roller pickup roller Note With the toner cartridge installed do not tilt or shake the devel oper cartridge 4 1 2 3 3 1 2 1 2 When replacing be careful not to adhere conduction grease black to the drive section Slightly apply grease GE676 UKOG 0013QSZZ to the drum boss 2 1 3 1 2 1 2 ...

Страница 125: ...5631 DISASSEMBLY ASSEMBLY AND MAINTENANCE 10 13 b Separation sheet Slightly apply grease GP501MR UKOG 0012QSZZ around the axis One rice grain for each Grease should not come out when assembling 1 2 4 3 4 1 2 3 4 3 3 3 1 1 2 2 3 3 1 1 2 2 1 ...

Страница 126: ...er 500 sheets tray paper feed a Paper feed roller pickup roller b Separation sheet Slightly apply grease GP501MR UKOG 0012QSZZ around the axis One rice grain for each Grease should not come out when assembling c Lift up unit d Transport clutch e Paper feed clutch 1 3 2 4 4 1 2 1 1 1 2 3 2 1 3 ...

Страница 127: ...SEMBLY AND MAINTENANCE 10 15 f Transport clutch g Solenoid h Sensor PWB F Side door unit 1 Transport roller unit Check that two springs are securely inserted into the transfer roller unit bosses 2 Transport roller 1 3 2 1 1 2 3 1 2 3 3 1 2 3 1 1 1 2 1 1 2 3 3 ...

Страница 128: ...25 5631 DISASSEMBLY ASSEMBLY AND MAINTENANCE 10 16 3 DUP transport roller 4 DUP motor G 1st paper exit unit 1 Exit roller 2 Cooling fan Remove the front right cabinet 4 2 3 3 3 3 3 3 1 1 1 3 2 2 1 2 3 4 1 2 3 2 1 1 2 1 3 3 2 2 1 2 1 1 2 ...

Страница 129: ...6 M257 M258 M316 M317 M318 5625 5631 DISASSEMBLY ASSEMBLY AND MAINTENANCE 10 17 Remove the MCU PWB section connector Remove the DUP motor Remove the delivery frame 1 1 1 1 2 3 4 1 1 2 1 2 3 2 1 2 1 2 1 2 1 2 ...

Страница 130: ...DISASSEMBLY ASSEMBLY AND MAINTENANCE 10 18 Note Check to confirm that the solenoid shaft is in the gate bracket and fix with the screw H 2nd paper exit unit 1 Switch 2 Sensor 3 Roller I Laser unit 1 LSU 1 1 1 2 1 2 1 3 2 1 2 B A 1 1 2 1 1 2 2 1 ...

Страница 131: ...AR M256 M257 M258 M316 M317 M318 5625 5631 DISASSEMBLY ASSEMBLY AND MAINTENANCE 10 19 J Power unit 1 Power source K PWB 1 Option CN PWB 1 2 1 3 1 2 2 3 1 1 2 1 2 1 1 1 1 2 3 2 2 2 2 2 1 1 2 3 4 3 3 3 ...

Страница 132: ...AR M256 M257 M258 M316 M317 M318 5625 5631 DISASSEMBLY ASSEMBLY AND MAINTENANCE 10 20 2 IMC PWB 3 MCU PWB 4 Motherboard PWB 2 2 2 3 1 1 2 2 2 1 1 1 1 1 1 1 1 2 1 1 1 1 1 2 1 1 1 1 1 2 1 2 1 1 1 2 ...

Страница 133: ...8 M316 M317 M318 5625 5631 DISASSEMBLY ASSEMBLY AND MAINTENANCE 10 21 5 Second interface PWB L Ozone filter Note Before removing the left cover remove the No 1 cassette in advance 1 1 2 4 3 2 1 1 1 1 2 2 1 1 1 2 1 1 2 ...

Страница 134: ...M257 M258 M316 M317 M318 5625 5631 DISASSEMBLY ASSEMBLY AND MAINTENANCE 10 22 M Drive section 1 DUP reverse motor 2 Main drive motor 3 Toner motor 4 PS transport clutch 1 2 1 1 1 1 3 2 2 1 3 1 2 2 3 1 1 2 3 4 1 ...

Страница 135: ... M257 M258 M316 M317 M318 5625 5631 DISASSEMBLY ASSEMBLY AND MAINTENANCE 10 23 5 Paper feed clutch 6 Drive unit Drive unit Grease application part 7 Lift up motor 2 1 1 1 2 3 4 1 1 2 3 1 3 4 2 3 3 2 2 1 2 3 1 ...

Страница 136: ...8 M316 M317 M318 5625 5631 DISASSEMBLY ASSEMBLY AND MAINTENANCE 10 24 N Transport section 1 Transport roller O Operation section 1 Operation section 2 OPU PWB 1 1 2 3 2 1 2 1 1 1 3 2 1 1 1 2 3 1 1 1 2 1 1 1 3 2 2 2 2 2 ...

Страница 137: ...AR M256 M257 M258 M316 M317 M318 5625 5631 DISASSEMBLY ASSEMBLY AND MAINTENANCE 10 25 3 Key PWB 4 LCD unit P Switch 1 Power switch 1 3 2 2 2 2 1 3 2 1 2 1 2 1 2 2 3 ...

Страница 138: ...AR M256 M257 M258 M316 M317 M318 5625 5631 DISASSEMBLY ASSEMBLY AND MAINTENANCE 10 26 ...

Страница 139: ... fax program 1 Make sure copier is off and connect it to PC with download cable beforehand 2 Start up the maintenance program on PC Select model name AR M256 M257 M258 M316 M317 M318 5625 5631 Series from the model selection dialogue box 3 Make sure only Printer Control Board tree is visible under Simu lation Command List 4 Turn on the copier The machine starts up in the download mode 5 Additional...

Страница 140: ...se try again B Printer Control Board firmware download method Please follow the procedure below 1 Make sure copier is turned off and connect PC and Printer Control board of the copier by parallel cable beforehand Note It is okay to use serial cable instead 2 Turn on the copier 3 Start up in copier test command mode and execute Sim67 14 FLASHDOWNLOAD 4 And then press OK key when notice message PRES...

Страница 141: ... machine among the certain period of time TROUBLESHOOTING Restart maintenance program after confirming communication port or communication cable 7 Communication incoming error Incorrect download procedure The machine did not proceed download procedure correctly TROUBLESHOOTING Restart maintenance program after confirming communication port or communication cable Make sure the communication device ...

Страница 142: ... 0 30 40 50 60 70 0 Function inhibited When the PCL printer expansion board is installed or the model with the board Disabling of center tray counting ON OFF Return from copy mode timing 1 60 Increment of 1sec 60 sec When the printer function or the FAX function is valid MIX size original feeding mode ON OFF When the reversing single pass feeder installed Key operator code change 00000 5 digits Pr...

Страница 143: ...ver card installed Enable ECP ON OFF When the PCL printer expansion board is installed or the model with the board Network settings When the print server card installed IP address setting DHCP ON OFF When the PCL printer expansion board is installed or the model with the board Also displayed when the print server card is not installed To enable the changed setup the power must be rebooted Enable T...

Страница 144: ... counter means the effective paper counter controlled by the MCU Timer information For schedule drive message the Printer controller controls transmis sion time by means and transmits a mail Timer setup is made from the Web setup page D Handling of transmission data In E mail Alerts and E mail Status a transmission task is generated regardless of the job which is under process in the machine These...

Страница 145: ...N11 Sensor Sensor 2nd cassette Unit Optional 2nd cassette Unit Optional CSS2H Casette Detector CSS2H Casette Detector OP interface OP interface PWB PWB OP interface OP interface PWB PWB DRS2H Door Detector DRS2H Door Detector PPD2H Paper Pass Detector PPD2H Paper Pass Detector PAP2H Paper Empty PAP2H Paper Empty LUD2H Lift Up Detector LUD2H Lift Up Detector PCL2H Pick Up Clutch PCL2H Pick Up Clutc...

Страница 146: ...r SW BC TC MCFB GRID MC PS Fan OZON Fan Paper Exit Paper present Sensor Harness Holder PAPER EXIT TRAY UNIT TCS CRUM PWB DV UN LVS UN OPU PWB Key PWB OPeration Panel OP CONNECTOR PWB MCU PWB IMC PWB Fax PWB to PCL PWB or GDI PWB Main Motor Toner Motor Mirror HP Sensor PWB OC Cover Sensor Paper Size Sensor Paper Size Sensor OPTICAL BASE PLATE CCD PWB Copy Lamp Mirror Motor Difimidification Heater P...

Страница 147: ... SCAN0 SENSE4 SENSE3 SENSE2 SENSE1 SENSE0 INFO_LED 2 3 4 5 6 7 8 9 10 11 12 13 14 15 16 17 18 19 GND 5Vsub START_LED BZR_PWM START_KEY 20 21 22 23 24 CN2 52271 2479 COM2 COM1 COM0 SEG3 SEG2 SEG1 SEG0 SCAN4 SCAN2 SCAN3 SCAN1 SCAN0 SENSE4 SENSE3 SENSE2 SENSE1 SENSE0 INFO_LED GND 5Vsub START_LED BZR_PWM START_KEY 1 2 3 4 5 6 7 8 9 10 11 12 13 14 15 16 17 18 19 20 21 22 23 CN1 IMSA 9619S 24C TB CCFT 1...

Страница 148: ...IN0 DSCLK GND 5V LED3 LED2 LED1 1 2 3 4 5 6 7 GND MHP PullUp PullUp GND OCCOVER 1 2 3 3 2 1 S3B PH K S GP1S73P N C N C N C N C N C N C N C N C N C N C N C N C 34 INCH ONLY DSCLK DSCLK GND GND DSIN 2B DSIN 2A 1 1 2 2 3 3 LED 0 LED 0 5V 5V 4 4 5 5 DSIN3 DSCLK GND 5V LED3 LED2 LED1 4 6 8 10 12 14 16 DSIN3 DSCLK GND 5V LED3 LED2 LED1 N C 8 N C 8 1 2 3 4 5 6 7 DSCLK DSCLK GND GND DSIN2B DSIN2A 19 20 21...

Страница 149: ... 4 5 6 7 8 9 10 11 12 13 14 15 16 17 18 19 20 21 22 23 24 25 1 2 3 4 5 6 7 8 9 1 2 3 4 5 6 7 8 9 10 11 12 13 14 15 SVCMD RTS DSR DTR CTS GND SPFPSOL SPFGSOL SPFRSOL SPFPAPER GND GND SPFWS 3 3V YSPF SELA SELB SELC SPFMODA SPFMODB SPFMODA SPFMODB FINPIN FINCRDY FINSTS RESET FINSRDY FINCMD FINDET GND 1 2 3 4 5 6 7 8 9 10 11 12 13 14 15 16 17 18 19 20 21 22 23 24 25 26 27 28 29 30 GND MIRMO0 MIRMO1 MI...

Страница 150: ...2 PullUp 1st PAPER EXIT UNIT Pout GATE SOLENOID CN22 S3B PH K M 24V 1 PGSOL1 PGSOL2 2 3 CN1 B5B PASK 1 DUPLEX MOTOR SW24V 1 DPXA DPXB 2 3 DPXA DPXB 4 5 SHIFTER MOTOR CN2 S6B PH K S SW24V SW24V 1 2 SFTDA SFTDB 3 4 SFTDA SFTDB 5 6 SHIFTER HP SENSOR CN24 S12B PH K S S3B PH K S COOLING FAN COOLING FAN GP1A71L3 PAPER OUT SENSOR PWB 1st PAPER EXIT herness SFTHP 1 GND 5V 2 3 PullUp 4 POUT1 GND 5 6 TFANOU...

Страница 151: ...hermostat harness1 Thermostat harness1 Heater Lamp2 SIDE SRA 51T 3 Heater Lamp1 CENTER 175164 1 1 1 THERMISTER2 1 1 THERMISTER1 THERMOSTAT2 SRA 51T 3 SRA 51T 3 SRA 51T 3 GP1SQ73P PDPX GND PullUP 3 2 1 SRA 51T 3 GND RTH2 GND RTH1 4 5 6 7 CN19 S7B PH K S GND PDPX PullUP 1 2 3 GND PDPX PullUP 1 2 3 3 2 1 GND RTH2 GND RTH1 FUSING section interface harness BU03P TR P H PHNR 3 H PHNR 3 H BU04P TR P H PH...

Страница 152: ...rness 24V HPSOL HPTRAY1 GND HPTRAY2 GND HPSIZE1 GND PullUp HPSIZE2 GND PullUp 3 3V HPWS GND BU15P TR P H PHNR 15 H PHNR 15 H 15 14 13 12 11 10 6 8 7 9 5 4 3 2 1 15 14 13 12 11 10 9 8 7 6 5 4 3 2 1 DUPLEX2 SENSOR harness 1 2 3 BU03P TR P H PHNR 03 H PHNR 03 H PullUp DUP2SEN GND 2 1 3 PullUp 14 DUP2SEN GND 10 12 HAND PAPER IN SENSOR PWB GP1S73P2 HAND PAPER EMPTY SENSOR PWB HPEMPTY GND PullUp 1 3 2 G...

Страница 153: ... L OUT 3 2 1 BC 1 187 BC 187 TC TC GRID N C MCFB 3 2 1 MC 1 2 3 4 5 6 7 8 9 10 11 12 13 2 3 4 5 6 7 8 9 10 12 13 14 11 CN901 B10B PH K S 4 CN201 B10B PASK 1 1 D GND 3 3V 5V 24VOP P GND P GND 14 6 5 8 7 9 1 10 2 3 2 3 4 5 6 7 8 9 10 OP CONNECTOR PWB 2 2 D GND D GND D GND D GND Sub3 3V 3 3V 5V D GND D GND D GND D GND 24V 24V P GND P GND P GND 24V 5V 12V 3 3V 3 3V P OFF HLOUT2 HLOUT1 PR FW Sub5V FAN ...

Страница 154: ...UP 3 2 1 GND 13 TRAYPAPER PullUp 11 9 3 TRAYPAPER 1 GND 2 3 2 1 PAPER EXIT TRAY UNIT PAPER EXIT SENSOR harness PHNR 03 H PHNR 03 H PAPER EXIT TRAY CONNECTOR HOLDER CN3 B2P VH TONER MOTOR TMD TMD 1 2 Auditor UN Option 24V P GND CV_COPY CV_COUNT CV_START CV_CA CV_STAPLE CV_DPX CV_SIZE0 CV_SIZE1 CV_SIZE2 CV_SIZE3 1 2 3 4 5 6 7 8 9 10 11 12 CN27 B12B XASK 1 COIN VENDER OPTION P GND PNC a 24V AUD TC N ...

Страница 155: ...SELA TRCLB TRCLB CSSELC CSSELC ZHR 4 CN503 PAP 04V S PCS1B PCS1B 5VN 5VN CSSELB CSSELB HUD M HUD M PCL1B PCL1B D GND D GND Bl Bl TH_M TH_M Al Al Bl Bl Al Al Soldering Soldering SMR 03V N CN18 B3P VH OPCASSEL OPCASSEL 24VINT 24VINT 24VINT LUM1A LUM1A N C N C 24V 24V SW24V SW24V SW24V TRCLA TRCLA SMP 03V NC 24V 24V SMR 02V N CN11 B04B PH K R PCS1A PCS1A 24V 24V P GND P GND PREMSOL PREMSOL PCL1A PCL1...

Страница 156: ...GDATA0 GDATA12 GDATA10 GDATA14 GDATA7 GDATA5 GDATA11 GDATA9 GDATA3 GDATA1 GDATA13 GDATA15 ESREQ0P ESCS0P GND 9 10 1 2 3 4 5 6 7 8 19 20 11 12 13 14 15 16 17 18 29 30 21 22 23 24 25 26 27 28 39 40 31 32 33 34 35 36 37 38 49 50 41 42 43 44 45 46 47 48 59 60 51 52 53 54 55 56 57 58 PCLPRD PCLPAGE GND FAXACK0P FAXPRD FAXCRDY FAXCMD FAXPAGE PCLACK0P PCLACK1P GDATA4 GDATA2 PCLCMD FWUAX GDATA14 GDATA12 G...

Страница 157: ...bout 220 C which is about 40 C higher than that of conventional lead solder and its soldering capacity is inferior to conventional one it is apt to keep the soldering iron in contact with the PWB for longer time This may cause land separation or may exceed the heat resistive temperature of components Use enough care to separate the soldering iron from the PWB when completion of soldering is confir...

Страница 158: ...sfara vid felaktigt batteribyte Använd samma batterityp eller en ekvivalent typ som rekommenderas av apparattillverkaren Kassera använt batteri enligt fabrikantens instruktion German Achtung Explosionsgefahr bei Verwendung inkorrekter Batterien Als Ersatzbatterien dürfen nur Batterien vom gleichen Typ oder vom Hersteller empfohlene Batterien verwendet werden Entsorgung der gebrauchten Batterien nu...

Страница 159: ...emark or copyright of Microsoft Corporation in the U S A and other countries Windows 95 Windows 98 Windows Me Windows NT 4 0 Windows 2000 Windows XP Windows 2000 Server Windows Server 2003 and Internet Explorer are trademarks or copyrights of Microsoft Corporation in the U S A and other countries IBM and PC AT are trademarks of International Business Machines Corporation Acrobat Reader Copyright 1...

Отзывы: