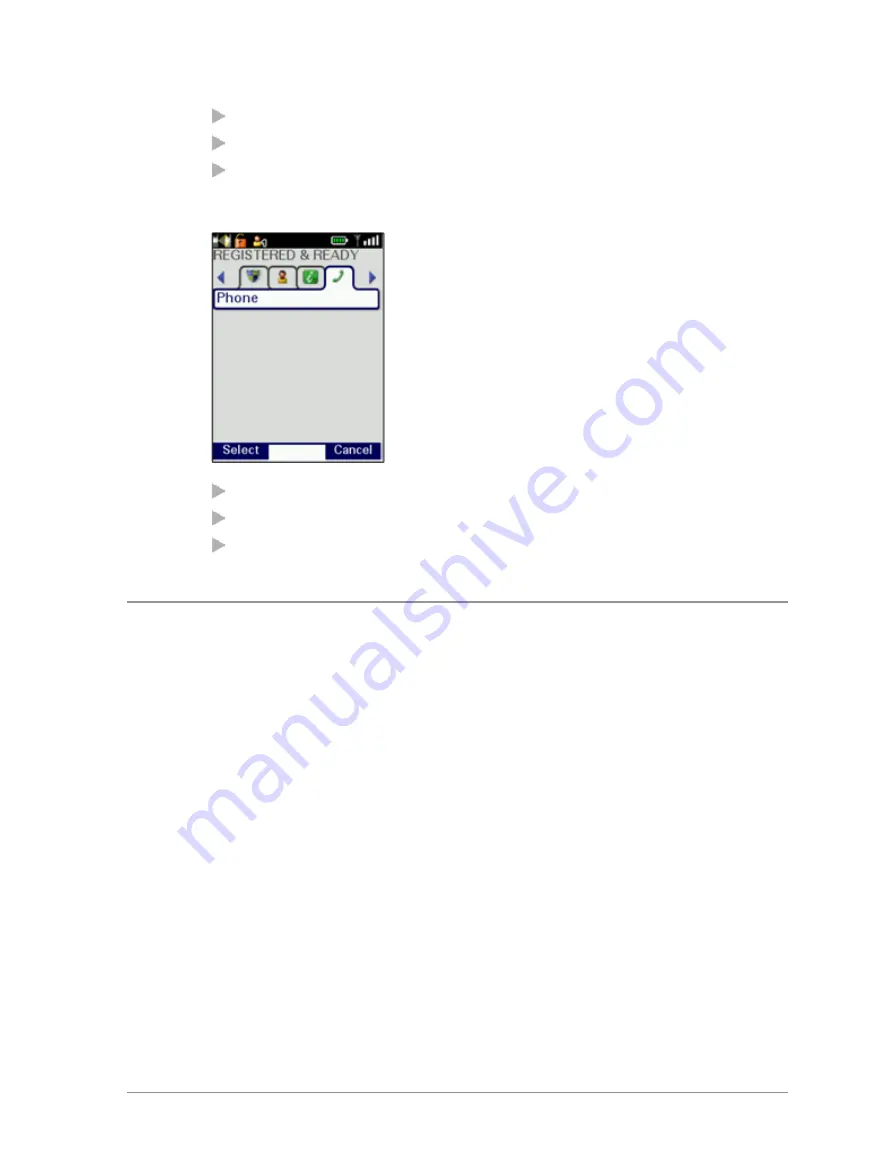
background image

highlight items using the

Down

and

Up

navigation keys.

to open an item press

Select

to return to the top level screen press

Cancel

or the

Cancel/Home

key.

Compatibility style (card)

highlight items using the Left and Right navigation keys

to open an item press

Select

to return to the top level screen press

Cancel

or

Cancel/Home

key.

Time and Date

Your radio can be customised to display the current time and date on the
Home screen. The time is shown in 24 hour format. The day and month
appear in alphanumeric characters, for example Wednesday, 20 May. Your
radio may be customised to use shortened forms for the day (Wed.).

To view and edit the time and date

1. Select

Menu

>

Options

>

Settings

>

Time and Date

.

2. Press

Edit

or press the

Select/Send

key.

3. Enter the digits required (see

Text entry

on page 71

).

4. Press

OK

or the

Select/Send

key to save your changes; press

Cancel

or the

Cancel/Home

key to abandon your changes.

User Guide

45

Содержание SC20 series

Страница 1: ...User Guide SC20 series hand portable radio ...

Страница 2: ...the prior written permission of Sepura plc Disclaimer Sepura s policy is to continually improve its products The features and facilities described in this document were correct at publication but are subject to change without notice Software license agreement NOTICE CAREFULLY READ THE LEGAL AGREEMENT CORRESPONDING TO THE LICENSE YOU PURCHASED WHICH SETS FORTH THE GENERAL TERMS AND CONDITIONS FOR T...

Страница 3: ...ies 9 Controls indicators 11 Navi knob 11 Navigation Keys 11 Soft keys 13 Context keys 14 Status icons 15 LED indicators 19 Emergency button 19 Getting Started 20 Fitting a microSD card 20 Fitting a Smart card 21 Power on 23 Power off 23 Locking and unlocking the keypad 24 Home screen 26 Shortcut Bar 27 Notifications 27 Menu 28 SmartMenus 30 Help 31 Emergency operation 33 User Guide iii ...

Страница 4: ...t the display 40 Adjusting the backlight 40 Day Night mode 41 Adjusting text and icon size 42 Setting the display language 43 Menu style 44 Time and Date 45 Talkgroups and folders 46 Typical folder arrangement 48 Select a talkgroup 49 Working with folders 50 Special folders 51 User Defined Scan Lists 52 Quick Groups 54 Contacts 55 Searching and filtering contacts 56 View contact details 57 Creatin...

Страница 5: ...ying your call setup 69 Text entry 71 Cursor movement 71 Character sets 72 Messages 74 Message Inbox 74 Opening messages 76 View message details 76 Reply to a message 77 Saved messages 77 Picture messages 82 Paging alerts 82 Networks 84 Authentication 84 Change Network 85 Transmit Inhibit 85 Fallback Mode 86 Operating Modes 87 DMO Mode 88 Repeater Mode 91 User Guide v ...

Страница 6: ...tor 106 User profiles 107 Man Down 109 Lone Worker 112 WAP 113 Using WAP 113 Browser menu 114 Navigation menu 115 Settings 115 History menu 118 Using bookmarks 118 Call handling 120 GPS 122 GPS position 122 GPS direction 123 GPS reporting options 124 Bluetooth 125 Bluetooth on off 125 Audio devices 126 Data devices 128 Modify connected devices 131 Security 132 vi SC20 series 04 2016 ...

Страница 7: ...dio after incorrect PIN entry 133 End to End Encryption 133 Zeroising 134 Asset management 136 Labelling 136 RFID tag 137 Customising your radio 138 Accessories 140 Belt clip 141 Klick fast stud 142 Fit an accessory 144 GLOSSARY 146 User Guide vii ...

Страница 8: ...viii SC20 series 04 2016 ...

Страница 9: ...al and controlled conditions It is recommended that you obtain training on how to operate this product Your personal safety could be at risk if you do not understand how to operate this product correctly Sepura products have been tested to meet strict guidelines for personal safety and operational conditions Do not operate this product in environments that exceed those listed on the product techni...

Страница 10: ...injury Note Contains additional information that could be exceptions to the general text They may also contain references to additional information in this guide or other reading material Tip Contains additional information that could help you perform a task quicker by offering an alternative method to that in the general text Bold typeface Used to highlight parts of the radio such as keys and but...

Страница 11: ... Centre context key Press to activate the feature or option that appears directly above the key 5 Right context key Press to activate the feature or option that appears directly above the key 6 Cancel Home key Press and hold 2 seconds to power on your radio From the Home screen press and hold 4 seconds to power off Press and hold 2 seconds to return to the Home screen from any other screen User Gu...

Страница 12: ...o accessory and held in the hand 13 Tri colour LED indicator Indicates various operational states of the radio 14 Blue LED indicator Indicates a missed event such as a call Callout or message Also indicates Bluetooth status 15 Navi knob A continuously rotating knob used to adjust the speaker volume 16 Side Button A B Press to activate a programmed feature 17 PTT Press to talk button Press and hold...

Страница 13: ...e amount of battery charge before lengthy periods of operation A fully charged battery should provide continuous operation for a full shift depending on a number of operational factors such as how the radio is operated the operating environment temperature and network signal strength and the condition of the battery When the radio is powered on the amount of charge remaining may be displayed as a ...

Страница 14: ...ife on a daily basis Ensure that batteries are fully charged at the start of a shift Decrease the amount of time the backlight stays lit between key presses see Adjusting the backlight on page 40 Keep your speaker audio volume to a minimum see Adjusting the volume on page 37 Reduce the length of time the radio is transmitting and keep DMO or telephone type calls to a minimum because they cause hig...

Страница 15: ...damage it Always read the user documentation supplied with the charger for additional safety instructions and how to use it Charging methods The radio may be powered on or off during charging Attach the Charger cable to the sDAC connector at the base of the radio or place the radio with battery attached into a charging dock If the battery is charged attached to the radio and the radio is powered o...

Страница 16: ...n when the battery charge reaches a certain capacity which will drain the battery of its charge Fitting the battery Ensure that the Smart microSD card compartment cover is securely latched before fitting the battery If a belt clip is fitted to the radio lift the belt clip before attempting to fit the battery Do not attempt to insert the battery into the battery compartment sideways under the belt ...

Страница 17: ...battery information such as its authenticity remaining charge and serial number customisable see Getting information about your battery on the next page If your radio detects a non approved battery the message Unidentified battery powering down appears The message is cleared by pressing any key If your radio detects a non approved battery the message Unidentified battery appears If your radio dete...

Страница 18: ...erial number customisable Select Menu Options Battery Information The display shows Charge the current remaining charge given as a percentage Authenticated Unauthenticated a Sepura non Sepura battery is fitted serial number the serial number of the battery Note If a non Sepura battery is fitted the Charge is reported as 0 the battery is marked as Unauthenticated and the serial number is not shown ...

Страница 19: ...ct characters in text entry mode Rotate Navi knob in Text Entry Mode or Editing Mode Scroll through available talkgroups From the Home screen press Groups rotate the Navi knob Scroll through available Status Messages From the Home screen press Groups 2 times rotate the Navi knob Scroll through available User Profiles From the Home screen press Groups 3 times rotate the Navi knob Navigation Keys Yo...

Страница 20: ...and menu levels until the top level menu is reached Left Right Moves between options on the top level menu Moves through the text characters for selection when writing Tip When the display is inverted flipped upside down the left and right navigation keys work in opposite directions 12 SC20 series 04 2016 ...

Страница 21: ...gency Button if not assigned to Emergency operation the programmable side buttons all radio keypad keys 1 9 0 Note During full duplex PSTN PBX calls take care when trying to activate soft keys designated as 0 9 and keys because they also generate DTMF tones There are many functions that can assigned to a Soft key Some functions are activated immediately such as the keypad lock unlock or loudspeake...

Страница 22: ...n option Select The labels and actions of the context keys in the Home screen are Context key Label Action Left Menu Press to enter the main menu Centre Groups Press to change the talkgroup See Select a talkgroup on page 49 Status Press 2 times to send a status message See Send a Status message on page 1 Profiles Press 3 times to select a user profile See User profiles on page 107 Right Shortcut P...

Страница 23: ... PTT button are End to End Encrypted E2E Encryption disabled Indicates that the call is not encrypted Key agreement Briefly displays to indicate that a cryptographic key agreement is in progress during power on and network connection Trunked Mode Operation TMO Outgoing TMO call in progress You are in a call that you initiated Incoming TMO call in progress You are in a call that was initiated by an...

Страница 24: ...Shortcut Bar DMO Gateway detected Appears when the radio has detected a DMO gateway The icon disappears when the radio moves out of range of the gateway DMO Gateway off DMO Repeater detected Appears when a DMO repeater is detected and the radio can communicate with any other radios in the selected DMO talkgroup which are also in range of the repeater Repeater ignored Repeater mode off General icon...

Страница 25: ...erts and displays this icon when covert operation mode is enabled Group Focus Appears when Group Focus is enabled preventing any calls from other talkgroups other than the selected talkgroup connecting to the radio User Profile Appears when a user profile is activated Your radio may be programmed for a number of user profiles The number next to the icon indicates the chosen user profile Connector ...

Страница 26: ...e talkgroup who cannot take part in the call Bluetooth device connected Appears when you have activated Bluetooth and have successfully paired with a device Bluetooth on no device connected Shows that you have activated Bluetooth but do not have a device connected Lone Worker protection enabled Indicates that you have enabled the Lone Worker feature on your radio Man Down motions and tilt sensors ...

Страница 27: ...lour Description Solid green Radio is powering on or in a call and receiving Solid red Radio is in a call and transmitting Intermittent flashing red Attempting to connect to the network or incoming telephone SDS Status message or battery low warning Flashing orange Incoming telephone call or SDS Status message Intermittent four flashes orange Transmit Inhibit mode or Fallback mode are active Emerg...

Страница 28: ... FAT16 file system 1 Lift the cover using a small screw driver or tweezers 2 Carefully lift the metal retainer and insert the card as shown Caution Use care when opening closing the metal card retainer If it becomes detached it can be clipped back into place 3 Carefully close the metal retainer 20 SC20 series 04 2016 ...

Страница 29: ...s IP rating Fitting a Smart card If required by your network operator you may need to fit a Smart card to your radio 1 Lift the compartment cover using a small screw driver or tweezers The cover is secured by two tabs located at the top of the cover either side of the recess 2 Insert the card into the slot on the underside of the cover as shown ensuring that the card is secured between the two tab...

Страница 30: ...t an antenna attached my damage the product Your radio is designed for use with Sepura approved antennas Always ensure that the seal between the antenna and the radio is maintained Never touch the antenna when the radio is transmitting Ensure your radio is powered off before fitting or removing the antenna Fitting the antenna 1 Insert the base of the antenna into your radio s antenna connector 2 R...

Страница 31: ...te If your radio supports Radio User Assignment RUA which authenticates your radio on the network you may be prompted to log on to your network See Authentication on page 84 Note Transmitting in 3W RF is only available when using a Sepura 3W battery During power on the radio checks the authenticity of the battery and whether it has the capacity for the radio to transmit 3W RF A message displays an...

Страница 32: ...ssory is attached Receiving calls with locked keypad If you receive a telephone call when the keypad is locked your radio can be customised so that the Select Send key can still be pressed to answer it If the call is accepted the whole keypad is unlocked Your radio can also be customised so that you can press the Cancel Home key to reject the call and in this case the keypad remains locked Navi kn...

Страница 33: ...bled A message is displayed to remind you that the keypad is locked Alternatively you can 1 Select Menu Options Settings Keypad Lock 2 Press Lock to lock the keypad Setting the radio to automatically lock the keypad You can set the radio to automatically lock the keypad after a period of inactivity 1 Select Menu Options Settings Timed Keypad Lock 2 Press Toggle to enable disable auto keypad lock U...

Страница 34: ...xt key labels at the bottom of the screen indicate what the context key directly below the label is configured to do These labels change according to where you are in the menu hierarchy Description 1 Status line showing the radio coverage signal strength battery charge indicators and operational status icons 2 Information area containing information that only appears on the Home screen This is cus...

Страница 35: ...ight it and press the Select context key 3 Press the Back context key to close the Shortcut Bar without opening a feature Notifications Like a smart phone your radio can display notifications to indicate a missed call or new message They also appear when certain functions are enabled such as mute transmit inhibit and Lone Worker Your radio can display up to 5 notifications and up to 5 shortcuts co...

Страница 36: ...usual way for example read an unread message or respond to a missed call The notification automatically closes and disappears from the Shortcut Bar Menu Your radio is customised by your service provider or organisation with a number of features that are accessed from the main menu To open the main menu in the Home screen press Menu To open a sub menu or menu option scroll to the option highlight i...

Страница 37: ...ns Your radio may be customised with a number of applications such as Man down and Lone Worker Your service provider or organisation may have installed specific applications Short Data Applications to help you in your role Access WAP sites Networks Manage your network connections and DMO options Change your operating mode TMO DMO Repeater Enable disable Transmit Inhibit mode when working in RF sen...

Страница 38: ...Menu Structure SmartMenus SmartMenus are designed to provide quick access to regularly used radio features usually with a common theme Your service provider or 30 SC20 series 04 2016 ...

Страница 39: ...ons are labelled with a number shown to the right of the option To select the option press the key that corresponds to the number of the option for example to select option 3 press the 3 key Note that using this method only options numbered 1 to 12 can be selected using the keys on the keypad press 0 for option 10 the Star key for option 11 and the Hash key for option 12 For options numbered 13 on...

Страница 40: ...Press a dedicated soft key Sepura default is normally key 0 zero Press Menu Help 32 SC20 series 04 2016 ...

Страница 41: ...are working in RF sensitive areas and have enabled Transmit Inhibit prohibiting radio transmission initiating an Alarm call will override the Transmit Inhibit feature and the Alarm call will be transmitted Your service provider or organisation can provide information on how your radio is customised for Alarm calls and how to operate your radio in emergency situations If you are working in a sensit...

Страница 42: ...od of time seconds Live Microphone is cancelled when the time expires or by pressing the PTT button Making an Alarm call You can still make an Alarm call if the keypad is locked To make an Alarm call 1 Press and hold 2 seconds the Emergency button a confirmation beep sounds 2 Release the button and speak into the microphone During an Alarm call the microphone is live for a programmed period second...

Страница 43: ...ar the TETRA Alarm call on the call originator s radio it will not remove the alarm from the system It should also be noted that those radios alerted to the emergency may depending upon the infrastructure configuration remain in the TETRA Alarm call condition until the dispatcher clears the call from the system When the Alarm call is cancelled your radio returns to the talkgroup that was selected ...

Страница 44: ...Assignment RUA which authenticates your radio on the network you may be prompted to log on to your network before the Alarm call is initiated Contact your service provider for information See Authentication on page 84 36 SC20 series 04 2016 ...

Страница 45: ...le tone at the new volume level Loudspeaker on off Tip A soft key may be customised to toggle the speaker on and off 1 Select Menu Options Settings Loudspeaker ON OFF 2 Press Toggle or press the Select Send key Whisper mode Whisper mode allows you to talk more quietly than normal but still be heard and understood by the person you are calling It can be useful to switch to Whisper mode when providi...

Страница 46: ...s loudest level then attempt to increase the volume further The radio sounds a low high level alert when Whisper mode is disabled Audible tone alerts Certain events on your radio initiate audible tone alerts These alerts are attenuated when you select a user profile which uses covert mode see User profiles on page 107 1 To toggle audible alerts 2 Select Menu Options Alerts Audio Alerts 3 Press Tog...

Страница 47: ...ice vibrate on incoming individual half duplex or full duplex calls Vibrator Data vibrate on incoming SDS or Status messages Vibrator Alarm Key vibrate when Emergency Button is pressed Vibrator Key Press vibrate when any key except Emergency Button and PTT is pressed 3 Press Toggle or the Send Select key to enable disable it as required 4 To return to the Display Settings menu press Back or the Ca...

Страница 48: ...d to a soft key or SmartMenu To invert the display 1 Select Menu Options Settings Display Settings Invert Display 2 Press the Toggle context key When a tick appears in the check box the display is flipped and when the check box is empty the display is set to normal Note When the display is inverted the navigation keys work in opposite to their normal function Press the Up key to scroll down and th...

Страница 49: ...klight and keypad illumination to suit your working conditions Night mode reduces the glare from the display making it ideally suited for when the radio is cradled in a vehicle at night time When the preferences for day and night mode have been set switching between the modes automatically adjusts the backlight and display settings To change Day Night mode settings 1 Select Menu Options Settings D...

Страница 50: ...tion in a large character size Very Large Mode displays the talkgroup number or talkgroup name as customised in an extra large size on the Home screen with all other screens in Large mode Custom displays the Home screen menu and WAP browser in predefined text sizes set during customisation Only the Home screen supports Very Large mode with other screens set to either Normal or Large mode Note Depe...

Страница 51: ...ngle language or the currently selected language if two languages are programmed To change the language Tip Your radio may be customised with a soft key or provide an option on a SmartMenu to change the display language 1 Select Menu Options Settings Language 2 Scroll to the language option and then press the Select context key The Home screen appears and the display shows the selected language Us...

Страница 52: ...ettings Menu Style 2 Select one option Grid set Grid menu style List set List menu style Card set Card Compatibility menu style Grid style highlight items using the four navigation keys to open an item press Select to return to the top level screen press Cancel or Cancel Home key List style 44 SC20 series 04 2016 ...

Страница 53: ... be customised to display the current time and date on the Home screen The time is shown in 24 hour format The day and month appear in alphanumeric characters for example Wednesday 20 May Your radio may be customised to use shortened forms for the day Wed To view and edit the time and date 1 Select Menu Options Settings Time and Date 2 Press Edit or press the Select Send key 3 Enter the digits req...

Страница 54: ...kgroup typically contains users who have a similar role or who are within a distinct location or who provide a service that you would use Talkgroups are organised into folders to help you quickly select one that is applicable to your environment or situation A top level folder can have a number of sub folders similar to a folder structure on a computer A folder can contain both folders and talkgro...

Страница 55: ...of all talkgroups Note Talkgroups in the Smart Call Folder 1 or Smart Call Folder 2 folders can only be accessed when the appropriate Smart Call mode has been selected from the Speech Call Settings screen or by using a soft key See Smart Calls on page 68 User Guide 47 ...

Страница 56: ...Typical folder arrangement The following illustration shows how the folders can be used to organise talkgroups 48 SC20 series 04 2016 ...

Страница 57: ...er talkgroup within the same folder simply enter the number of the talkgroup or select the All Folder which contains all the talkgroups and enter the number of the talkgroup 2 Use the Left and Right navigation keys to move between folders at the same level Use the Up and Down navigation keys to move between the folder levels sub folders Rotate the Navi knob to scroll through the talkgroups within ...

Страница 58: ...de a specific folder open that folder 2 Press Options then select Search card or Search all 3 Enter characters you wish to filter against see Text entry on page 71 The list of matching names is dynamically filtered as characters are entered Only matching talkgroups or folders remain in the list 4 To cancel the filter operation select the Stop search option Inserting a talkgroup into a folder If a ...

Страница 59: ...ndard folders created to contain your talkgroups your radio continuously scans talkgroups in special folders for any activity except Favourites When ongoing calls are detected you can join in by pressing the PTT Note Special folders can only contain talkgroups they cannot contain other folders The following special folders may be programmed into your radio during customisation Background talkgroup...

Страница 60: ...e calls from them Your radio can have a maximum of 20 UDSLs and up to 10 talkgroups can reside within each UDSL If you select a UDSL in the same way as you select a talkgroup see Select a talkgroup on page 49 the talkgroups it contains are scanned allowing your radio to receive calls from any of the talkgroups in the UDSL the UDSL icon is displayed in the right hand corner of the radio display one...

Страница 61: ... Select 3 Select Edit Options Save Remove a talkgroup Select the talkgroup you wish to remove then 1 Select Edit Options Delete 2 Select Edit Options Save Changing group scanning priority 1 Select Edit Options Change Priority 2 Select scan priority High Normal or Low then press Select 3 Select Edit Options Save Scanning ON OFF You can enable or disable scanning of talkgroups in the selected UDSL N...

Страница 62: ...roups 1 Select Menu Groups Quick Groups 2 Use the Up and Down navigation keys to highlight a Quick Group then press Select To change the talkgroup associated with a Quick Group Your radio can be customised to allow you to change the talkgroup associated with a Quick Group Note These changes may be overwritten when your radio is reprogrammed To associate to your current talkgroup Select and view a ...

Страница 63: ... radio or to a telephone of the first number associated with it Contacts are arranged in a series of up to 64 folders including the following All contains all contacts in the Phone book Menu contains options to create and delete contacts in your Personal folder Search allows you to search the entire Phone book for contacts and numbers Initially lists the names of all the folders in the phone book ...

Страница 64: ...avigate to the Search folder 2 Press the Up navigation key to open the Search Bar 3 Enter a search string see Text entry on page 71 and press the Search context key 4 When the search is complete any folder containing a possible match to your search and the number of possible matches within that folder appear in the Search folder To open a folder select it and then press the Open context key 5 To c...

Страница 65: ... create are added to your Personal folder To create a contact 1 Select Menu Phone Contacts 2 Navigate to the Menu card and select Create Contact 3 Enter the contact name see Text entry on page 71 then press the Save context key 4 Select a dial mode for this contact either TETRA Network default or telephone mobile network To change the dial mode press the Up navigation key to select the dial mode l...

Страница 66: ...t personal contacts 1 Select Menu Phone Contacts and then select the Personal folder 2 Navigate to the contact you want to edit then press Open To edit the name 1 Select the name and then press Edit 2 Make changes as required then press Save To edit a number 1 Select the number and then press Options Select Edit and press Select 2 Make changes to add additional digits press the number keys to dele...

Страница 67: ...ersonal folder Tip You can also delete individual contacts or numbers associated with them see Editing contacts on the previous page To delete all contacts 1 Select Menu Phone Contacts 2 Navigate to the Menu card then select Delete User Contacts User Guide 59 ...

Страница 68: ...ubscriber via the Gateway full duplex and half duplex calls are supported Individual calls to outside the TETRA network can be made between a terminal or a dispatcher and a telephone subscriber in a network to which the TETRA network has a gateway interface These calls are always full duplex A full duplex call is one in which both parties can speak at the same time The Select Send and Cancel Home ...

Страница 69: ...rity 4 emergency in TMO and to a value from 0 undefined to 3 Emergency pre emptive priority call in DMO Alarm Call The Alarm Call has the highest call priority in TETRA Usually initiated by pressing the Emergency Button Alerts all other radio users on the talkgroup of the emergency situation Data call types Data call type Description Individual full duplex Circuit Mode Data Circuit Mode data calls...

Страница 70: ...y list then press Open To make a call from call history See Individual calls on page 64 Group calls Group point to multipoint calls are calls where you talk to other users within a nominated group of radio users a talkgroup In a Group call only one person can talk at any one time known as half duplex mode During Group calls the microphone at the top of your radio is active and all received audio i...

Страница 71: ...s to Group Call 3 You can also clear the group call by pressing Clear Call soft key if customised Cancel Home key Receiving a group call When a Group call is received the LED flashes red and your radio status changes to Group Call The name of the talk group talk group folder and the caller s ID are displayed When the LED changes to solid green after a few seconds you can respond to the call User G...

Страница 72: ...r phone book or the ISSI of the caller Privacy mode You can press a customised Privacy Mode soft key before dialling or during a call to prevent interruptions from other calls during important or sensitive call When you have Privacy Mode enabled calls made to your radio are marked as missed calls see Call History on page 61 Making individual calls half duplex mode Calling a contact 1 Select Menu P...

Страница 73: ...s full duplex mode Calling a contact 1 Select Menu Phone Contacts to open the contacts menu 2 Navigate to a contacts folder such as the All folder and select your contact Press the Open context key then choose the phone number 3 To initiate the phone call press the Dial context key 4 To end the call press the Clear context key or the Cancel Home key Note If your radio has been customised with a si...

Страница 74: ...e answered before any alerts are audible Answering phone calls in half duplex mode You can answer an incoming full duplex phone call as a half duplex call This is useful for example where a full duplex call could pick up too much background noise for clear communications 1 Press the PTT button to answer the call in half duplex mode 2 Continue as for Group calls and individual half duplex calls To ...

Страница 75: ...right front soft key under the blue LED or the appropriate soft key if a different one has been customised from any screen To close the list Press the Cancel context key To view the message call or Callout information Select the required option from the list using the Up and Down navigation keys To clear all messages or events 1 Display the Missed Events box 2 Press and hold the Missed Event soft ...

Страница 76: ...cy call or if your radio is in Transmit Inhibit mode See Emergency operation on page 33 and Transmit Inhibit on page 85 Smart Calls A Smart Call is a high priority group or broadcast call to a specific talkgroup This can be useful for example where you need to make an announcement to everyone in the vicinity of an incident not just those in your selected talkgroup The radio supports two separate S...

Страница 77: ...ettings menu see Speech call settings below 2 Select Group or Individual Group returns you to your previous talkgroup Individual allow you to make an individual call by dialling Speech call settings Note The Speech Call Settings option is not available if your radio is in Transmit Inhibit on page 85 1 Select Menu Groups Speech Call Settings 2 Select one of the options Modifying your call setup Und...

Страница 78: ...new call are the same as those of any call of that type For example if the new call is half duplex you need to press PTT before starting to speak releasing the PTT allows other parties to take the speech item and the top microphone and half duplex loudspeakers are used Tip When a radio is worn attached to your body a half duplex to full duplex call modification can be difficult to handle since the...

Страница 79: ...nter special characters To insert punctuation full stop comma or semi colon press zero 0 repeatedly until the symbol is highlighted in the Character Selection Box then press the Select context key or wait for the character to be auto inserted To insert a space press 1 on the keypad To insert symbols press the hash key repeatedly until the symbol is highlighted in the Character Selection Box then p...

Страница 80: ...t with a capital letter and end with a full stop question mark or exclamation mark followed by one or more spaces Upper case ABC All characters are entered in upper case Lower case abc All characters are entered in lower case Numeric 123 All characters are numbers Special characters You can select special characters such as full stops semi colon and commas by pressing the 0 key Further special cha...

Страница 81: ...d in the character selection box use the Left and Right navigation keys to select from the characters displayed To see further characters press the Down navigation key and press the Up navigation key to return to characters already viewed The characters are displayed in sets of seven To enter the highlighted character press Insert or press the Select Send key Zhiyan Chinese Zhiyan Chinese characte...

Страница 82: ...sages in your Inbox a new message will appear on tab number 6 If you want to read older messages use the navigation keys to scroll through the message tabs Unread message appear on black labelled tabs Note To keep the Inbox to a manageable size it is recommended that messages are deleted or saved after reading them See Saved messages on page 77 When a new message arrives the New Message icon appea...

Страница 83: ...sage Broken message there was a problem receiving the message Its contents are lost or damaged Saved Messages is nearly full to capacity customisable SDS message with Paging Alert unread SDS message with Paging Alert Picture message unread Picture message Inbox operations Open the message View the message details See View message details on the next page Reply to the message not picture messages F...

Страница 84: ...your Inbox see To open the Inbox on page 74 2 Select a message then use Options Details 3 To exit the Details screen press Cancel 4 Item Description 1 Message location Inbox 2 Size Note this is a relative measure of the message size not number of characters You can use Size to decide which message s to delete if Saved Messages becomes full see Message Inbox on page 74 3 Sender 4 Time received 5 Di...

Страница 85: ...in a URL which you can open in the WAP Browser Note If your radio has been customised to do so URLs in text messages can open automatically in the WAP Browser when they are received Saved messages You can save up to 50 messages in your Saved messages folder When the remaining space is insufficient to save a particular message an error is displayed which indicates the amount of space required to st...

Страница 86: ...s Create Message An empty message box appears 2 Enter your message text see Text entry on page 71 3 EITHER send the message immediately save the updated message Tip To return to the top level menu screen either wait for the inactivity timer to expire or press and hold the Cancel Home key or press and hold the clear soft key To send the message immediately See Sending messages on the facing page Ti...

Страница 87: ...tination you key in Note For setting default destination see Set default destination on page 81 1 Choose one of the following methods Create a text message described on the previous page Select a saved text message see Saved messages on page 77 Select a status message from the Send Status List see Status messages on page 1 2 Select Send or Options Send 3 Select a destination see below Send to defa...

Страница 88: ...ress Shortcut to open the Shortcut Bar then select Quick Status if customised From the Home screen 1 In the Home screen double press the Groups key 2 Press the Left and Right navigation keys to scroll through the status messages 3 To send the message press Send then select Send to default or choose another destination such as your talkgroup contact in your phone book or dial the number Soft key Qu...

Страница 89: ...These cause a pop up box to open when sent messages are successfully delivered and read respectively 1 Select Menu Messages SDS Report Status 2 Navigate to a report type and press Toggle to toggle the report on ticked and off Set default destination You can enter and update the default destination address that your radio offers when you send a status or SDS message This can be either a talkgroup o...

Страница 90: ...eature allows the radio to act as a pager when it is in normal operating mode or when you select a user profile which results in the radio appearing to be switched off See User profiles on page 107 The Paging Alerts feature is triggered by receipt of a Status message which is automatically displayed If there is also an associated SDS message to explain the reason for the Paging Alert this is autom...

Страница 91: ...Tip Your radio can be customised so that a Paging Alert automatically makes it fully operational on receipt of the Status message which triggered the Paging Alert User Guide 83 ...

Страница 92: ...entify you by you user name TETRA services including individual voice and data Status and SDS communication can be set up using your user name provided your user name and your corresponding user ISSI are in the Phonebook Caution If you power on your radio using the Emergency button you must log on to the network before an Alarm call can be initiated Note Network log on off may be initiated by your...

Страница 93: ...our radio to Transmit Inhibit mode to prevent any RF transmission When Transmit Inhibit is activated or deactivated a status message is sent confirming the operational state of your radio You cannot activate Transmit Inhibit when you are in a call Caution Alarm Calls initiated in Transmit Inhibit mode are still transmitted Note You cannot select Transmit Inhibit if user profile Do Not Disturb is s...

Страница 94: ...lback Mode your radio can only communicate with other radios that are registered on the same site no inter site communication is available When your radio enters Fallback Mode the radio status bar indicates Fallback Mode and the yellow warning triangle is displayed momentarily the Fallback Mode text box pops up in the centre of the screen for a few seconds showing a customisable text message the R...

Страница 95: ...age In Repeater Mode your radio enables two or more radios operating in DMO Mode to communicate over an extended range automatically relaying voice and messages by operating as a repeater See also Repeater Mode on page 91 To change operating mode from the Home screen Press the Menu context key then select Networks Operating Mode Scroll to the mode highlight it and press Select Alternatively a soft...

Страница 96: ...group or if customised may switch to TMO to make the call If TMO is unavailable Alarm Calls are made using DMO See Emergency operation on page 33 Individual calls Your radio can be customised to allow you to make individual calls to other radios working in DMO which are attached to the same talkgroup In this case individual calls are initiated by pressing the PTT key See Making individual calls ha...

Страница 97: ...f another user who is in range of a gateway and who is involved in a group call via the gateway In this case the Communication Mismatch icon is displayed to indicate that you cannot take part fully in the call If you attempt to respond to the overheard speech any radios within gateway range which can hear you also display a Communication Mismatch icon to tell them that the speech is not being rout...

Страница 98: ...In the Gateway Repeater Filter screen select one of the following options No GW Rep do not use any gateways and repeaters detected by your radio Use Repeater Use repeaters detected Use Gateway Use gateways detected Use GW Rep Use a gateway or a repeater detected by your radio Note When option Use GW Rep is selected your radio selects the first gateway or repeater that it detects If it selects a ga...

Страница 99: ...p A B and C are in range of the repeater Because of its location the repeater can pass communications between A B and C even though they are out of range of each other You can also use a repeater to enable communication between two radios which cannot communicate directly perhaps because their users are do not have line of sight with each other The following diagram shows radios A and B and a repe...

Страница 100: ...dard Repeater or as a Repeater with Call Participation Standard Repeater If your radio is configured to operate as a Standard Repeater you cannot take part in calls which are being relayed through it Repeater with call participation If your radio is configured to operate in Repeater Mode with Call Participation you can take part in the calls which are being relayed through it if the call participa...

Страница 101: ...l ensure that the radio is always running with the correct repeater configuration even if it turns on unexpectedly after circumstances such as power failures Switching to Repeater Mode To switch to Repeater Mode see Operating Modes on page 87 Note Before you can use the radio as a repeater you must select a Direct Mode talkgroup Changing talkgroups in Repeater Mode You can change talkgroups while ...

Страница 102: ...e states are reported as the following top level screen messages Message Description Ready Repeater The repeater is ready and has no calls in progress Busy DMO Channel The repeater has detected that the DMO channel is being used In this case repeater operation is suspended In Call Repeater A call is in progress through the repeater Talk Repeater Participating in a call and transmitting 94 SC20 ser...

Страница 103: ...ed and to focus your attention on an incident To view Callout messages Press Menu then select Phone Callout Alternatively press the Up navigation key or Shortcut to open the Shortcut Bar then select Callout If Callout messages have been received they are listed with Callout icons on page 101 To see the options for a Callout Highlight a Callout and press Options OR press the Select Send key to acti...

Страница 104: ... that it has been sent to the originator of the Callout If multiple messages have been programmed select one of them and press Select to send it Alternatively if customised you can compose and send a free form text message Depending how the Callout has been configured it may either exit once the acceptance message has been sent or it enter an Information Phase during which information may be sent ...

Страница 105: ...an individual whether the Callout is incoming or outgoing whether or not the Callout is End to End Encrypted User Response Allows you to compose and send a free form text message to the originator of the Callout customisable Callouts not requiring a response Some Callouts do not require a response You can respond to or ignore then as follows Exit Press the Exit context key to exit the Callout and ...

Страница 106: ...f you receive a Callout Test Message either respond or cancel the alert to cancel the Callout Test alert press the Cancel context key The Callout exits and the radio displays the top level screen You can still view the details from Messages Callouts to indicate that you are ready to respond to Callout alerts press Respond or the Left or Right navigation key The following response options are displ...

Страница 107: ...lout times out or is cleared by the Callout originator the Callout ends your radio displays the top level screen and the functionality which had been suspended is restored Protected Callout Mode When it receives a Callout alert your radio goes into Protected Callout Mode and many features are disabled for a set time period or until you respond to or acknowledge the Callout message This mode is des...

Страница 108: ...ct Messages Callout The blue LED flashes and the Missed Call and or Missed Callout icons display after the new Callout has ended Missed Callouts To view information about the missed Callout select Menu Messages Callout Your radio ignores Callouts received when any of the following functions are active Ongoing Alarm Call a highest priority call Alarm Call Quick Call when customised as a higher prio...

Страница 109: ...ge customisable radios with colour display only Indicates severity of the Callout 8 Date received 9 Explanatory text about the Callout 10 Left Right Navigational keys available for more options Callout icons Icon Description Callout Alert message response required Missed Callout Callout Alert message user response has been sent Callout Alert message response not required Callout Availability messa...

Страница 110: ... Callout Mode when there are more options than are shown on the Context keys EITHER Press the Left or Right navigational keys to display a menu of the additional options available OR press the Select Send key to action the first item in the menu of options The Select Send Key Shortcut icon is displayed between the context keys to indicate that this shortcut is available Group calls to Callout grou...

Страница 111: ...ormation Phase when information may be sent to and received from the originator of the Callout Information can include a pre set message a free form text message or a Callout group call Your radio can also be customised to display a backdrop graphic to indicate it is in Information Phase When information is sent for example Will Respond it is displayed and the information sent icon displays Press ...

Страница 112: ...on message has been sent to the originator of the Callout and your radio exits from the Callout and Protected Callout Mode and the top level screen is displayed User Response Send a free form text message see Text entry on page 71Text entry on page 71 Details See the following Callout details the Response required icon the Callout group time and date when the message was received the severity of t...

Страница 113: ...ur radio such as maps product diagrams or photographs or if you will be referencing WAP sites Tip Image details are best viewed in Normal Text Mode See Adjusting text and icon size on page 42 After fitting images and WAP sites are uploaded to the card using Radio Manager During customisation the data is encrypted to prevent undesirable viewing of the data by unapproved persons should the radio or ...

Страница 114: ...rting hazardous material the comments could give advice on what precautions need to be taken when dealing with the incident The date and time and other details are also shown Note No details are available if the image has been loaded on to the microSD card as a Bitmap 5 To exit the image press the Cancel context key Connector Protector When working in salt water environments or in an area with hig...

Страница 115: ...abled until the radio is removed from the charger car kit or data accessory In these circumstances it is not necessary to re enable Connector Protector Tip If the water drop icon is displayed on a radio the radio cannot be programmed User profiles User profiles are pre set combinations of alerts and settings on your radio They allow you to switch settings easily to match your circumstances or envi...

Страница 116: ...ile allows you to prevent any individual calls or group calls from any talkgroup other than the selected talkgroup from being connected to your radio Note Any calls made to a radio which has Group Focus selected are not recorded as Missed Calls Do Not Disturb This user profile allows you to focus on an important task It assumes you do not want to be distracted by a call or alert on your radio The ...

Страница 117: ...ated users being detected you should not regard it as a substitute for compliance with appropriate risk assessment and other safety procedures and practices Do not entrust your safety to the Man Down Alarm Warning Test the Man Down Alert and Alarm regularly to ensure they are functioning correctly Warning Once started the Man Down Alarm sounds either until you switch it off see Cancelling false al...

Страница 118: ... Down off Cancelling false alarms If the active sensors detect a possible Man Down situation the Man Down Alert is sounded and a Man Down Alert message is displayed on the screen If you are safe that is this is a false alarm you need to switch off the alert otherwise a genuine Man Down Emergency situation is considered to have occurred and depending on the customisation of your radio various autom...

Страница 119: ... Man Down 2 Select the Man Down sensors to use Motion Tilt sensors Motion Sensor only or Tilt Only sensor If you enable Man Down from a User Profile the Man Down Settings screen updates to reflect the sensors defined as active in the Profile User Guide 111 ...

Страница 120: ...ich you must acknowledge usually by pressing a pre programmed key otherwise the radio sends an emergency status message to your dispatcher To enable Lone Worker scroll to a user profile which has Lone Worker enabled then press the Select context key See User profiles on page 107 To disable Lone Worker mode repeat the process and but choose a different user profile 112 SC20 series 04 2016 ...

Страница 121: ... radio may be customised to open the WAP URL automatically Open a URL in a message on page 77 Using WAP Exiting the browser Exit at any time by pressing Back or the Cancel Home key if customised Navigation Press the Left navigation key to display the previous screen page and the Right navigation key to display the next screen page Entering text If customised your radio supports the entering of tex...

Страница 122: ...ed in the URL box Resume Browsing Select after browsing has been suspended or when you have exited from the browser The browser displays the last page viewed Bookmarks Select to view all the available bookmarks some of which may be collated into bookmark folders If customised you can create edit and delete bookmarks and bookmark folders and organise the bookmarks into different folders If there ar...

Страница 123: ...creen if customised Mark Page Only visible if the radio is customised to allow the creation and or editing of bookmarks Creates a bookmark for future reference so that the web page may be downloaded quickly Forward Back Use these options to move to the next or previous page in the History if more than one page is stored in History Reload Reloads the current page Settings Selecting Settings from th...

Страница 124: ...k or Smooth so that when scrolling through text the display will either jump from one block of text to the next or scroll smoothly The scroll speed may also be set to Fast Medium or Slow Key Press Timeout This option allows you to set the Key Press Timeout to one of Fast Medium Slow or Off Connection Timeout This options allows you to set the timer that specifies how long the browser will wait bef...

Страница 125: ...ress View You can choose which CAs are used by the radio by selecting on or off Send Referrer If this option is used to set whether the browser sends the HTTP Referrer header as part of the HTTP requests Authentication This option is used to set on off whether the browser caches HTTP authentication credentials Certificate Info If this option is selected information about the root digital certifica...

Страница 126: ...ently selected URL Delete Select this option to delete the history Using bookmarks A bookmark consists an internet address the book mark title and access point and a user name and password if required by the web page Bookmarks can be organised into folders to make it easier for you to find your favourite bookmarks or those of similar topics Any saved bookmarks and bookmark folders are listed and c...

Страница 127: ...bookmark or folder New Bookmark creates a new bookmark New Folder creates a new bookmark folder within the list of bookmarks and folders Move Move the bookmark or folder within the list of folders and bookmarks Select the bookmark or folder then enter the number corresponding to the position in the numbered list where you want the bookmark or folder Delete All deletes all bookmarks and or folders ...

Страница 128: ...Home key if customised When the call is set up and is ongoing it is possible to return to the browser either by selecting a card which allows this Resume Browsing and pressing the Down navigation key or by using a soft key if customised When the browser has been re activated and the call is ongoing it is possible to switch between displaying the call information box and the browser using the Left ...

Страница 129: ... If the radio is switched to Direct Mode Operation DMO while the browser is active the browser remains active and you may view any stored pages A warning message is displayed because the browser is off line Keypad lock If a keypad lock soft key has been customised so that the keypad lock may be selected by pressing and holding the soft key the browser will close and the radio will display the top ...

Страница 130: ...o which the GPS reports are sent may be changed over the air If your radio accepts a change of GPS destination command it sounds a customisable tone and receives an SDS message to inform you Tip If customised you can enable disable the GPS function see GPS reporting options on page 124 Tip for the best GPS performance your radio needs an uninterrupted view of the sky GPS position To locate your GP...

Страница 131: ...w long ago the position was first displayed to refresh the reading press Locate again GPS direction To read the direction your radio is moving 1 Select Menu GPS Direction The Direction screen gives information about the current direction and speed of travel If the radio is stationary no information is displayed However if the radio becomes stationary after a period of movement the direction inform...

Страница 132: ...nt over the air The warning icon is displayed on the top line of the screen as a reminder that GPS reporting has been explicitly disabled Always Send GPS reporting is enabled regardless of any instructions sent over the air No Override your radio will respond to instructions sent over the air GPS reports are sent if requested and is switched off if requested 124 SC20 series 04 2016 ...

Страница 133: ...l the device is deleted from the list of paired devices Caution When you re customise or update the software on your radio the device pairings are preserved Therefore if the radio is being re customised and allocated to a different user with a different set of Bluetooth devices any unnecessary existing pairings must be manually deleted before the radio is reassigned to the new user Caution If you ...

Страница 134: ...e while a call is in progress either using the Bluetooth menu screens or a soft key disconnection only if customised It is also possible to connect to a headset by pressing the button on the headset Tip Before attempting to pair check that the audio device is switched on is set to the discoverable visible state and is close to your radio before attempting a new search If several devices are availa...

Страница 135: ...s found Tip If a device is not found check that the data device is switched on is set to the discoverable visible state and is close enough to your Sepura radio before attempting a new search Any audio devices found are listed on the screen as they are found Audio devices which may be worn on the body show the headset icon and non wearable audio devices such as a car kit or similar device show the...

Страница 136: ... be necessary if you move out of the Bluetooth range while wearing a Bluetooth headset and then you move back within range Note that with these headsets the radio display may indicate that the headset is connected whether or not the audio is routed to the headset Tip If you are choosing a Bluetooth headset it is worth considering that some Bluetooth headsets have a single combined button for Power...

Страница 137: ...h your radio using the generated passcode Refer to the User Guide of the device for details of how to do this Input and accept the generated passcode this passcode is not required after pairing 6 On your radio press Accept to accept the request and to connect with the device A message is displayed to confirm the pairing and the device is listed in the list of paired devices You can also Modify the...

Страница 138: ...ing a new search Any PCs laptop desktop or server found show a PC icon and hand held PDAs show a PDA icon Different classes of Bluetooth Device show no icon is shown alongside the name of a device which has a from a PC or PDA 4 Select the required device in the list and then press Pair The message Pairing appears 5 When a device has been paired the search results are lost and the radio displays th...

Страница 139: ...ces screen You can edit the name of these devices or delete them 1 Press Menu then select Options Bluetooth Devices 2 Select the device name and press Modify To edit a device name Select Edit to rename different devices of the same type to make it easier to distinguish between them To delete a device Select Delete Device to delete the device from the list of paired devices User Guide 131 ...

Страница 140: ...n these areas can be monitored using the RFID tag in the radio and an RFID reader at the location PIN entry You will need to enter the radio s 4 digit PIN at power on Your radio may be customised to allow you to change your PIN see Change PIN on the facing page Caution if you incorrectly enter the PIN 3 times the radio will lock You will then need the 8 digit Master Reset PIN or PUK to unlock the ...

Страница 141: ...N is 00000000 but this can be changed by your Communications or Security Manager To unlock the radio 1 Enter your 8 digit Master Reset PIN 2 Press Confirm or the Select Send key Note If you enter the Master Rest PIN incorrectly you need to wait at least 5 seconds before attempting to enter the PIN again If the Master Reset PIN is successful the radio reverts back to the last known PIN If you radio...

Страница 142: ...nd to End encrypted During voice calls only not SDS calls your radio my allow you to toggle End to End Encryption on off with a soft key When you are in a voice call the Secure Comms icon indicates whether End to End Encryption is operational When the radio participates in a call that is not End to End Encrypted a periodic non intrusive audible alert is generated if customised When you receive an ...

Страница 143: ...Please refer to your Security Officer for details on how to zeroise your radio as well as related operational procedures User Guide 135 ...

Страница 144: ...he State of Health of the battery which can also assist with auditing and end of life strategies Labelling The simplest form of asset management is to attach labels to your radios and batteries Self adhesive labels those with an adhesive backing are recommended as they are easy to apply and commercially available such as 3M Thermal Transfer Polyester label material 7815 Your radio and Sepura batte...

Страница 145: ...tery or the opening closing of the card compartment Place a label on the battery in the Label ID area RFID tag Radio Frequency Identification RFID tags can be useful for asset tracking allowing you to automate audit tracking of pool radios tracking radios in out of service centres and stock tracking It is also useful for pairing pool radios with resources persons and vehicles and facilitating the ...

Страница 146: ... presence of the RFID read write unit even when the radio is powered off or has the battery removed Note The distance between the RFID tag and read write unit may differ depending on the type of read write unit being used Always read the instructions supplied with the RFID Reader on how to operate it Customising your radio Your radio has a large number of parameters that can be customised using th...

Страница 147: ...an RS232 D type connector or a USB connector is available from Sepura for customising a single radio 1 Connect the USB programming cable to the computer 2 Connect the cable to the radio by inserting the hook on the connector into the slot as shown 3 Secure the cable in position Do not over tighten 4 When programming is complete disconnect the cable from the radio User Guide 139 ...

Страница 148: ...to ensure that appropriate EMC testing has been conducted on accessories When your radio powers on and when you attach an accessory during operation your radio performs an authenticity check on any attached accessories including the battery If the accessory is not authenticated a message appears and the accessory should be removed Your radio has two connectors for attaching accessories The rugged ...

Страница 149: ... belt The clip is fitted to the carrying aid attachment recess on the back of your radio Caution Damage to product Always remove the battery before fitting or removing the clip Fit the belt clip 1 Remove the battery 2 Slide the stud into the carrying aid attachment recess 3 Slide until it clicks into place Remove the belt clip 1 Remove the battery 2 Lift the clip User Guide 141 ...

Страница 150: ...to your radio or the clip 4 Slide the clip out of the carrying aid attachment recess Klick fast stud The Klick fast stud is used to attach your radio to clothing The stud is fitted to the carrying aid attachment recess on the back of your radio Caution Damage to product Always remove the battery before fitting or removing the stud 142 SC20 series 04 2016 ...

Страница 151: ...cess 3 Slide until it clicks into place Remove the stud 1 Remove the battery 2 Lift the spring Caution Failure to compress the spring sufficiently to remove the stud will result in damage to your radio or the stud 3 Slide the stud out of the carrying aid attachment recess User Guide 143 ...

Страница 152: ...connector 2 Insert the hook on the accessory connector into the slot as shown 3 Secure the accessory by rotating the screw clockwise Fit an accessory to the sDAC 1 Connect the cable to the radio by inserting the hook on the connector into the slot as shown 144 SC20 series 04 2016 ...

Страница 153: ...2 Secure the accessory in position by rotating the screw clockwise Do not over tighten User Guide 145 ...

Страница 154: ...ration repeater A radio acting as a repeater provides a service to other radio users It extends the range and enhances the reliability of Direct Mode communication compared with basic direct communication between the radios T End to End Encryption E2EE Encryption of the total communication link from one end to the other without intermediate decryption required for maximum security full duplex A ch...

Страница 155: ... as well as controlling the speaker volume S keypad A set of buttons arranged in a block or pad that have either digits symbols or alphabetical characters on or a combination of all of these Do not use key mat keyboard or alphanumeric keypad PABX Public Automatic Branch eXchange sf picture message A small JPEG image file with an accompanying text message sent to recipients over the TETRA Air Inter...

Страница 156: ...ne call and group call Transmit Inhibit mode An operational mode for use in RF sensitive areas that allows the radio to continue operating without transmitting When Transmit Inhibit is activated and deactivated a status message is sent confirming the operational state of the terminal Trunked Mode Operation TMO Radios operating over the TETRA network tri colour LED An LED with three colours that is...

Страница 157: ...Sepura plc 9000 Cambridge Research Park Beach Drive Waterbeach Cambridge CB25 9TL United Kingdom sepura com ...

Отзывы: