611
conductance of the ground conductor. In the high-frequency circuit, you need to use the
multiple-point ground mode and each cable needs to connect to the ground. The length
shall be less than the 1/20 of the signal wavelength.
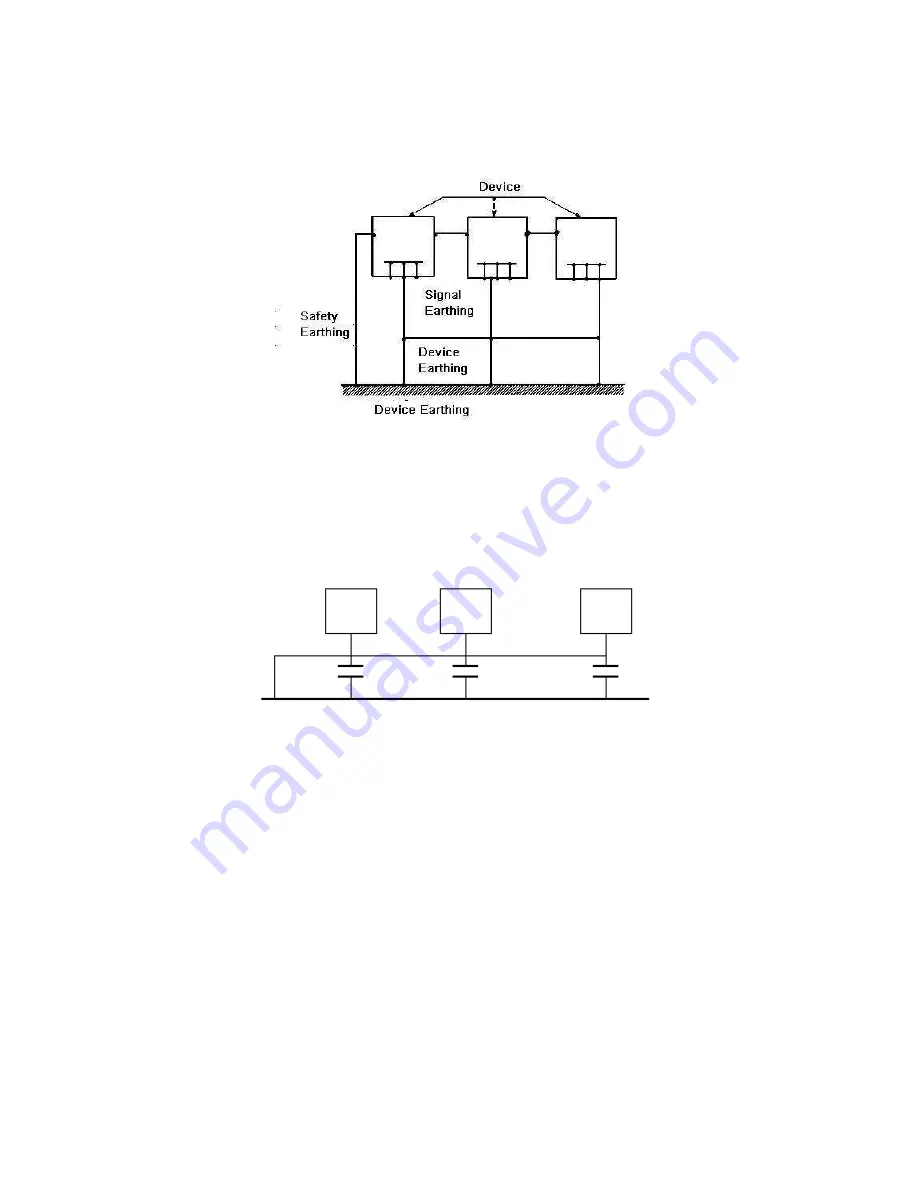
Mixed ground:
The mix ground consists of the feature of the one-point ground and
multiple-point ground. For example, the power in the system needs to use the one-point
ground mode while the radio frequency signal requires the multiple-point ground. So,
you can use the following figure to earth. For the direct current (DC), the capacitance is
open circuit and the circuit is one-point ground. For the radio frequency signal, the
capacitance is conducive and the circuit adopts multiple-point ground.
When connecting devices of huge size (the device physical dimension and connection
cable is big comparing with the wave path of existed interference), then there are
possibility of interference when the current goes through the chassis and cable. In this
situation, the interference circuit path usually lies in the system ground circuit.
When considering the earthing, you need to think about two aspects: The first is the
system compatibility, and the other is the external interference coupling into the earth
circuit, which results in system error. For the external interference is not regular, it is not
easy to resolve.
3. Thunder proof ground method in the monitor system
The monitor system shall have sound thunder proof earthing to guarantee personnel
safety and device safety.
The monitor system working ground resistance shall be less than
1Ω.
Содержание PENDVR-EL16M4K
Страница 1: ...PENDVR EL16M4K ELITE SERIES...
Страница 20: ...247 2 3 Connection Sample...
Страница 128: ...363 restore original status Figure 4 115 Figure 4 116 4 9 1 3 1Upgrade Camera...
Страница 151: ...386 Figure 4 137 Figure 4 138...
Страница 158: ...393 Figure 4 145 Step 2 Draw tripwire 1 Click Draw button to draw the tripwire See Figure 4 146 Figure 4 146...
Страница 162: ...397 Figure 4 149 Step 2 Draw the zone 1 Click draw button to draw the zone See Figure 4 150 Figure 4 150...
Страница 164: ...399 Figure 4 151 Step 2 Draw the zone 1 Click draw button to draw the zone See Figure 4 152 Figure 4 152...
Страница 166: ...401 Figure 4 153 Step 2 Draw the zone 1 Click Draw button to draw a zone See Figure 4 154...
Страница 172: ...407 Figure 4 157 Figure 4 158...
Страница 173: ...408 Figure 4 159 Figure 4 160...
Страница 174: ...409 Figure 4 161 Figure 4 162...
Страница 177: ...412 Figure 4 165 Figure 4 166...
Страница 178: ...413 Figure 4 167 Figure 4 168...
Страница 184: ...419 Figure 4 177 Figure 4 178 4 9 4 1 2 2 Trigger Snapshot...
Страница 186: ...421 Figure 4 180 Figure 4 181 4 9 4 1 2 3 Priority...
Страница 192: ...427 Figure 4 186 Figure 4 187...
Страница 197: ...432 Figure 4 193 Figure 4 194...
Страница 210: ...445 Figure 4 209 For digital channel the interface is shown as below See Figure 4 210 Figure 4 210...
Страница 217: ...452 Figure 4 218 Step 2 Click Add user button in Figure 4 218 The interface is shown as in Figure 4 219 Figure 4 219...
Страница 283: ...518 Figure 5 69 Figure 5 70...
Страница 299: ...534 device Figure 5 86 Figure 5 87...
Страница 305: ...540 Figure 5 94 Figure 5 95...
Страница 306: ...541 Figure 5 96 Figure 5 97 Please refer to the following sheet for detailed information...
Страница 310: ...545 Figure 5 101 Figure 5 102 Figure 5 103 Please refer to the following sheet for detailed information...
Страница 333: ...568 Figure 5 136 Note For admin you can change the email information See Figure 5 137...
Страница 363: ...598 448K 196M 512K 225M 640K 281M 768K 337M 896K 393M 1024K 450M 1280K 562M 1536K 675M 1792K 787M 2048K 900M...


