370
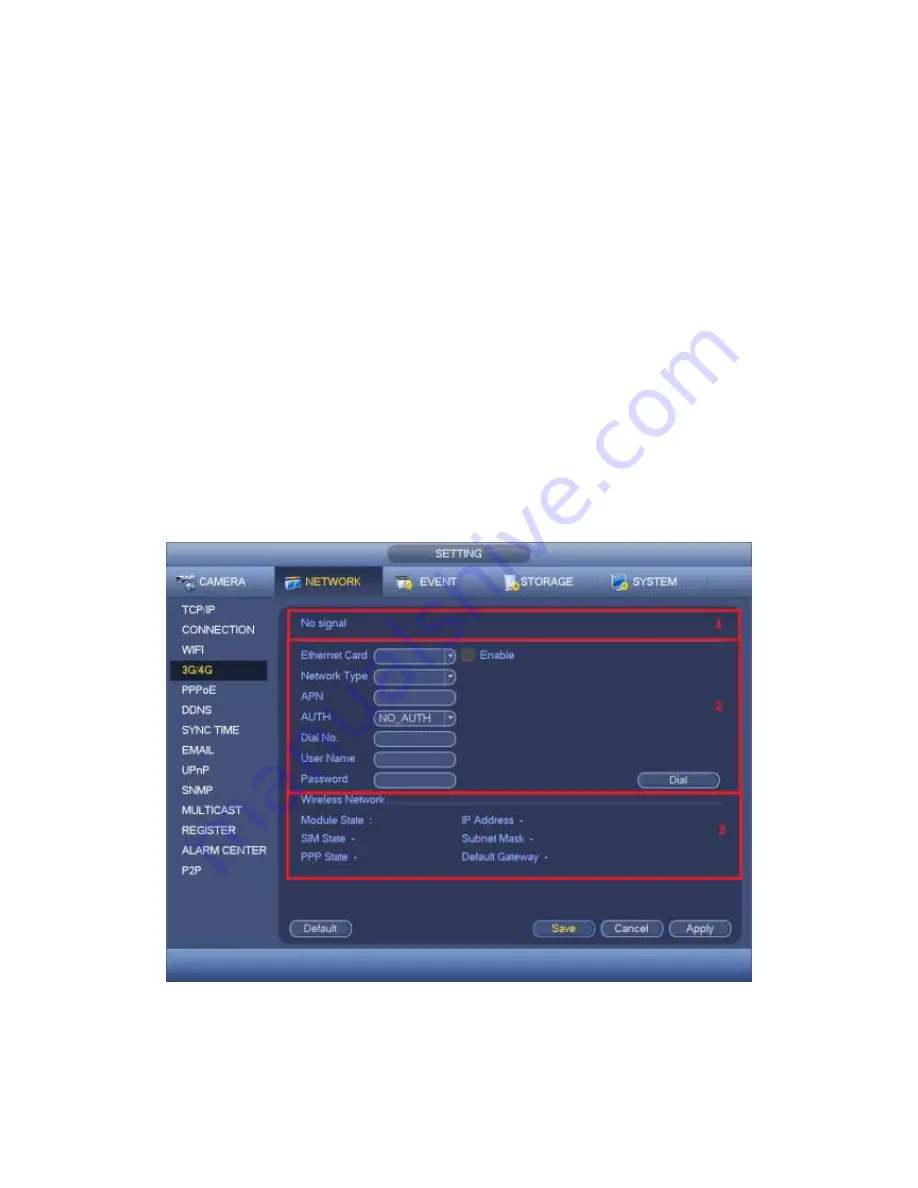
3G/4G module: It is to display current wireless network adapter name.
3G/4G Enable/Disable: Check the box here to enable 3G/4G module.
Network type: There are various network types for different 3G/4G network modules.
You can select according to your requirements.
APN: It is the wireless connection server. It is to set you access the wireless network
via which method.
AUTH: It is the authentication mode. It supports PAP/CHAP.
Dial number: Please input 3G/4G network dialup number you got from your ISP.
User name: It is the user name for you to login the 3G/4G network.
Password: It is the password for you to login the 3G/4G network.
Pulse interval: You can set dialup duration. Once you disable the extra stream, the
connection time begins. For example, if you input 5 seconds here, then 3G/4G
network connection period is 5 seconds. The device automatically disconnect when
time is up. If there is no extra stream, 3G/4G network connection is valid all the time.
If the alive time is 0, then the 3G/4G network connection is valid all the time.
Dial: Here you can enable or disable 3G/4G network connection/disconnection
manually.
3G/4G wireless network: Here is to display wireless network status, SIM card status,
dial status. If the 3G/4G connection is OK, then you can see the device IP address
the wireless network automatically allocates.
Figure 4-122
Step 3 Click Apply or Save to complete setup.
Содержание PENDVR-EL16M4K
Страница 1: ...PENDVR EL16M4K ELITE SERIES...
Страница 20: ...247 2 3 Connection Sample...
Страница 128: ...363 restore original status Figure 4 115 Figure 4 116 4 9 1 3 1Upgrade Camera...
Страница 151: ...386 Figure 4 137 Figure 4 138...
Страница 158: ...393 Figure 4 145 Step 2 Draw tripwire 1 Click Draw button to draw the tripwire See Figure 4 146 Figure 4 146...
Страница 162: ...397 Figure 4 149 Step 2 Draw the zone 1 Click draw button to draw the zone See Figure 4 150 Figure 4 150...
Страница 164: ...399 Figure 4 151 Step 2 Draw the zone 1 Click draw button to draw the zone See Figure 4 152 Figure 4 152...
Страница 166: ...401 Figure 4 153 Step 2 Draw the zone 1 Click Draw button to draw a zone See Figure 4 154...
Страница 172: ...407 Figure 4 157 Figure 4 158...
Страница 173: ...408 Figure 4 159 Figure 4 160...
Страница 174: ...409 Figure 4 161 Figure 4 162...
Страница 177: ...412 Figure 4 165 Figure 4 166...
Страница 178: ...413 Figure 4 167 Figure 4 168...
Страница 184: ...419 Figure 4 177 Figure 4 178 4 9 4 1 2 2 Trigger Snapshot...
Страница 186: ...421 Figure 4 180 Figure 4 181 4 9 4 1 2 3 Priority...
Страница 192: ...427 Figure 4 186 Figure 4 187...
Страница 197: ...432 Figure 4 193 Figure 4 194...
Страница 210: ...445 Figure 4 209 For digital channel the interface is shown as below See Figure 4 210 Figure 4 210...
Страница 217: ...452 Figure 4 218 Step 2 Click Add user button in Figure 4 218 The interface is shown as in Figure 4 219 Figure 4 219...
Страница 283: ...518 Figure 5 69 Figure 5 70...
Страница 299: ...534 device Figure 5 86 Figure 5 87...
Страница 305: ...540 Figure 5 94 Figure 5 95...
Страница 306: ...541 Figure 5 96 Figure 5 97 Please refer to the following sheet for detailed information...
Страница 310: ...545 Figure 5 101 Figure 5 102 Figure 5 103 Please refer to the following sheet for detailed information...
Страница 333: ...568 Figure 5 136 Note For admin you can change the email information See Figure 5 137...
Страница 363: ...598 448K 196M 512K 225M 640K 281M 768K 337M 896K 393M 1024K 450M 1280K 562M 1536K 675M 1792K 787M 2048K 900M...


