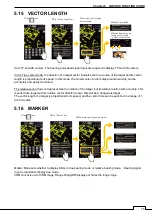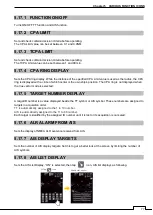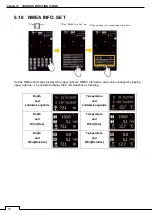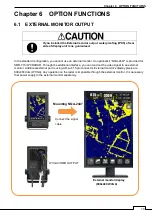
83
Chapter 7 INITIAL SETTINGS
7.3 BEARING ADJUSTMENT
Adjust the bearing so that bearing of the target measured with the ship’s compass matches that of the target
echo on the radar display.
Before adjustment
Measure the bearing of an adequate target (for example, a ship at anchor, a breakwater or a buoy) relative
to own ship’s heading.
Procedure
(1) Radar is set to TX mode.
(2) Adjust GAIN, RAIN and SEA to find the known target on the screen.
(3) Adjust the bearing at the end point to display the target described
in “Before adjustment” at the same
direction as measured.
7.4 RANGE ADJUSTMENT
Adjust the range so that the range of the target on the radar video is indicated correctly. This set up makes
the target RANGE coincident with the VRM readout data. Read out the target range by the VRM function.
The target has the same height with the radar scanner should be better.
Range unit is using the NM in marine radar usually. (1NM=1852m).
Before adjustment
Select a target which range is already known.
Procedure
(1) Radar is set to TX mode.
(2) Adjust GAIN, RAIN and SEA to find the known target on the screen.
(3) Adjust the range on the radar to match to the range of the target described in “Before adjustment”.
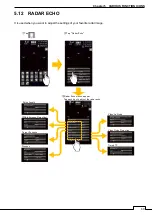
①Tap “Bearing Adjustment”.
②Rotate the Rotary knob to
set the Bearing.
③EBL overlapped with the
existing target.
known target
known target
30.0
Bearing Adjustment
Bearing Adjustment
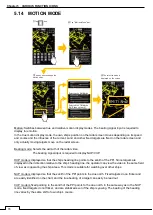
①Tap “Range adjustment”.
②Rotate the Rotary knob to
set the Bearing.
③VRM overlapped with the
existing target.
200
known target
Known target
Range Adjustment
Range Adjustment
Содержание SMR-715 series
Страница 1: ...MARINE RADAR EQUIPMENT INSTRUCTION MANUAL...
Страница 2: ......
Страница 15: ...xiii EQUIPMENT APPEARANCE NKE 1066 SCANNER UNIT NKE 2044 SCANNER UNIT...
Страница 29: ...Chapter 1 INSTALLATION 3 1 2 3 DIMENSIONAL DRAWING OF DISPLAY MOUNTING...
Страница 30: ...Chapter 1 INSTALLATION 4...
Страница 31: ...Chapter 1 INSTALLATION 5 1 2 4 EXAMPLES OF DISPLAY MOUNTING DESK TOP INSTALLATION Mounting bracket...
Страница 32: ...Chapter 1 INSTALLATION 6 DESKTOP MOUNTING TEMPLATE Note Please note the paper size 182 257...
Страница 34: ...Chapter 1 INSTALLATION 8 FLUSH MOUNTING TEMPLATE Note Please note the paper size 182 257...
Страница 43: ...Chapter 1 INSTALLATION 17 NKE 2044 2FT SCANNER Fig 1 3 6 3 Fig 1 3 6 4...
Страница 47: ...Chapter 1 INSTALLATION 21 Fig 1 4 1 3...
Страница 51: ...Chapter 1 INSTALLATION 25 Fig 1 4 2 3...
Страница 157: ...131 Chapter 10 AFTER SALE SERVICE 10 4 RADAR FAILURE CHECK LIST SMR...
Страница 159: ...133 Chapter 12 SPECIFICATIONS Chapter 12 SPECIFICATIONS...
Страница 160: ...134 Chapter 12 SPECIFICATIONS 12 1 SCANNER DIMENSION 12 1 1 NKE 1066 4 40 RUBBER PLATE...
Страница 161: ...135 Chapter 12 SPECIFICATIONS 12 1 2 NKE 2044...
Страница 162: ...136 Chapter 12 SPECIFICATIONS 12 2 DISPLAY DIMENSION 12 2 1 SMR 715 720...
Страница 163: ...137 Chapter 12 SPECIFICATIONS...
Страница 172: ...APPENDIX A 1 APPENDIX NKE 1066 1 5FT SCANNER INTERCONNECTION DIAGRAM FIG A1...
Страница 173: ...APPENDIX A 2 NKE 2044 2FT SCANNER INTERCONNECTION DIAGRAM FIG A2...
Страница 174: ...APPENDIX A 3 SMR 715 720 DISPLAY UNIT INTER CONNECTION DIAGRAM FIG A3...
Страница 175: ...APPENDIX A 4 SMR 715 720 PRIMARY POWER SUPPLY DIAGRAM FIG A4...
Страница 176: ...APPENDIX A 5 SMR 715 720 INTERCONNECTION DIAGRAM FIG A5...
Страница 177: ...APPENDIX A 6 MEMO...
Страница 187: ...APPENDIX A 16 DECLARATION OF CONFORMITY...
Страница 188: ...APPENDIX A 17...
Страница 189: ...APPENDIX...
Страница 191: ...Chapter 3 ADJUST THE RADAR ECHO A 2...
Страница 192: ...Chapter 3 ADJUST THE RADAR ECHO...

