background image

External Control

122

D-73d Series Installation/Operation Manual

IR Command List

(Extended Mode)

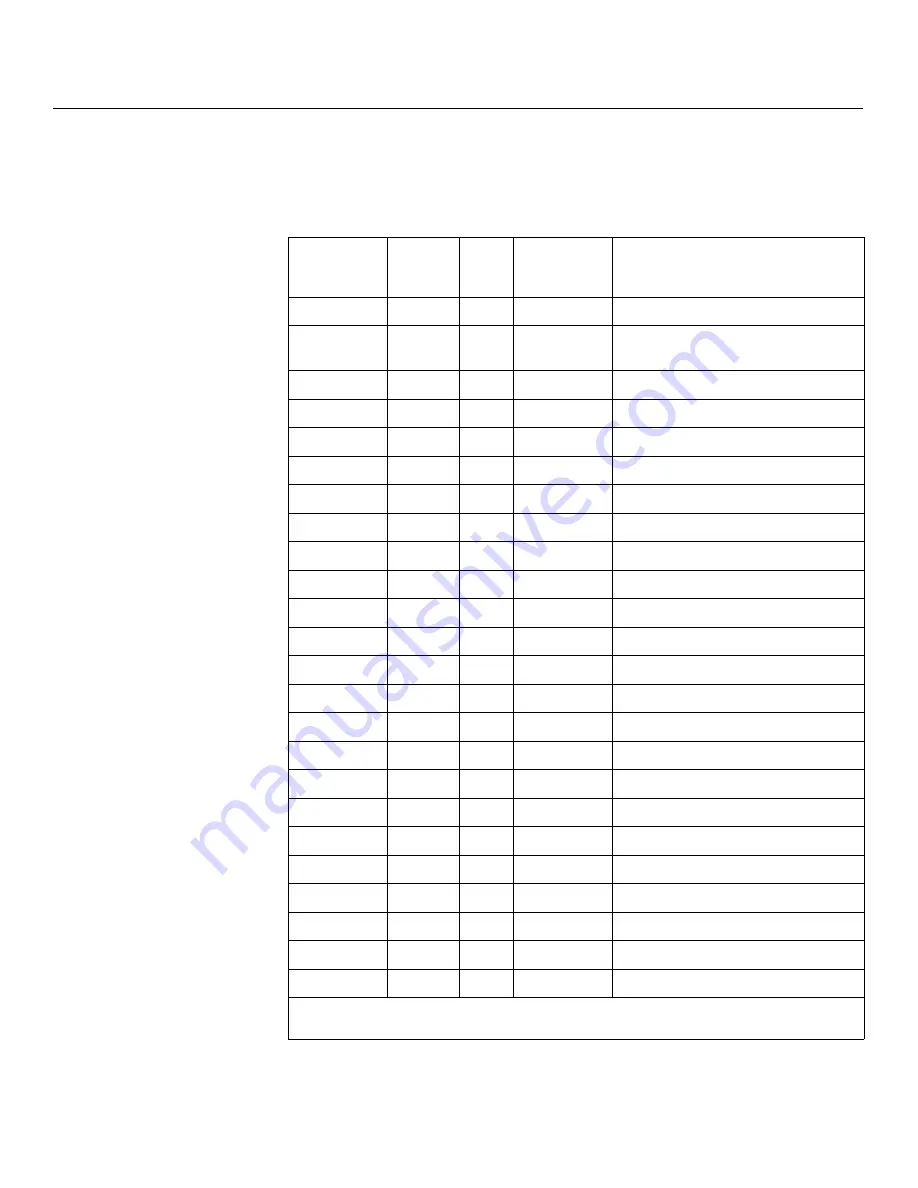
Table 6-3 lists the Extended-mode NEC control codes for the Dimension Digital 
Controller. To use the remote control unit in extended mode, set the address code to 

88999

 (refer to 

Remote Control 

on page 91). 

Table 6-3. NEC Control Codes for the Dimension Digital Controller 
(Extended Mode)

Remote 

Control 

Button Name

Address

Data

NEC Data 

From Remote 

(Note)

Description

ON

8209

65

0x201141BE

Sets the sleep timer to Off

OFF 
(standby)

8209

66

0x201142BD

Sets the sleep timer to 30 minutes

16:9

8209

67

0x201143BC

Sets the sleep timer to 60 minutes

4:3

8209

68

0x201144BB

Sets the sleep timer to 90 minutes

LETBOX

8209

69

0x201145BA

Sets the sleep timer to 2 hours

V-WIDE

8209

70

0x201146B9

Sets the sleep timer to 4 hours

CINEMA

8209

71

0x201147B8

Composite video input 1

V-CINE

8209

72

0x201148B7

Component video input

NATIVE

8209

73

0x201149B6

HD1 video input

1

8209

74

0x20114AB5

HD2 video input

2

8209

75

0x20114BB4

HDMI1 video input

3

8209

76

0x20114CB3

HDMI2 video input

4

8209

77

0x20114DB2

HDMI3 video input

5

8209

78

0x20114EB1

HDMI4 video input

6

8209

79

0x20114FB0

HDMI5 video input

7

8209

80

0x201150AF

HDMI6 video input

8

8209

81

0x201151AE

HDMI7 video input

9

8209

82

0x201152AD

HDMI8 video input

0

8209

83

0x201153AC

DisplayPort video input

ISF DAY

8209

84

0x201154AB

Composite video input 2

ISF NIGHT

8209

85

0x201155AA

SCART video input

SCREEN 1

8209

86

0x201156A9

Composite video input 3

CUST 1

8209

87

0x201157A8

3D Mode = Off

CUST 2

8209

88

0x201158A7

Auto Cinema aspect ratio

Note: 

These codes assume that the default address of 8209 is used. If you change it to 

something other than 8209, you will need to modify these codes accordingly. 

Содержание D-73d Ultra

Страница 1: ...ension Series D 73d LED Home Theater Projection System D 73d D 73d CineWide D 73d CineWide with AutoScope D 73d Ultra D 73d Ultra CineWide D 73d Ultra CineWide with AutoScope INSTALLATION OPERATION MA...

Страница 2: ......

Страница 3: ...or replacement of the product is determined by Runco to not be feasible Runco products are warranted for two 2 years from the date of shipment from Runco Lamps are warranted six 6 months from the dat...

Страница 4: ...may be purchased from a Runco technical support representative The dealer or customer is responsible for paying freight charges and insurance to ship the defective product to the Runco repair depot lo...

Страница 5: ...he warranty 6 Black uniformity issues or other LCD issues associated with usage outside the Runco recommended guidelines and specifications for the product 7 Bright or dark sub pixels that are charact...

Страница 6: ...ANY CLAIM AGAINST THE CUSTOMER BY ANY OTHER PARTY This Limited Warranty gives you specific legal rights and you may have other rights which vary from locality to locality Some localities do not allow...

Страница 7: ...anufacturer 12 Use only with a cart stand tripod bracket or table specified by the manufacturer or sold with the apparatus When a cart is used use caution when moving the cart apparatus to avoid injur...

Страница 8: ...e exposure to electronic stereographic entertainment The quality and appropriateness of the 3D screen materials onto which the image is projected and the quality of the 3D content being displayed both...

Страница 9: ...61000 4 6 Electromagnetic compatibility EMC Part 4 Testing and measurement techniques Section 6 Conducted disturbances induced by radio frequency fields immunity test EN 61000 4 8 Electromagnetic comp...

Страница 10: ...ent from that to which the receiver is connected Consult the dealer or an experienced radio TV technician for help This Class B digital apparatus complies with Canadian ICES 003 Cet appareil num rique...

Страница 11: ...its 3 Key Features and Benefits 4 Parts List 5 2 System Overview 7 Projector 8 Projector Rear Panel 10 Dimension Digital Controller 11 Front Panel Layout 11 Rear Panel Layout 13 D 73d Remote Control U...

Страница 12: ...ng an Audio Processor or Secondary Display Device to the Dimension Digital Controller Optional 40 Additional Connections to the Dimension Digital Controller Optional 41 Connecting Source Components to...

Страница 13: ...Connection and Port Configuration 103 Command Format 103 Response Format 104 Command and Response Examples 105 Serial Command List 105 Using Discrete IR Codes 118 IR Command Protocol 118 IR Command Li...

Страница 14: ...Table of Contents xiv D 73d Series Installation Operation Manual...

Страница 15: ...Shasta Anamorphic Lens Base Plate Exploded View 35 3 11 Mounting Angle Ranges Side to Side and Front to Back 36 3 12 Attaching the Rack Mounting Hardware 37 3 13 RS 232 Connection from the Dimension...

Страница 16: ...2 4 3 Typical Gray Bar Pattern for Adjusting Contrast 72 4 4 Typical Color Bar Pattern for Adjusting Color Saturation and Tint 73 4 5 Typical Test Pattern for Adjusting Sharpness 75 4 6 Overscan Modes...

Страница 17: ...end them to support Runco com Textual and Graphic Conventions Text Conventions The following conventions are used in this manual in order to clarify the information and instructions provided Remote an...

Страница 18: ...ce They also provide supplemental information CAUTIONS alert users that a given action or omitted action can degrade performance or cause a malfunction WARNINGS appear when a given action or omitted a...

Страница 19: ...expensive because they include electronics And because active glasses have LCDs in each lens and turn black every other frame or more frequently active glasses need a transmitter that is synced to th...

Страница 20: ...nd 3D modes with native 1080p DLP 16x9 performance Single chip Digital Light Processing DLP system DisplayPort 1 1a Input on Dimension Digital Controller with High bandwidth Digital Content Protection...

Страница 21: ...secondary anamorphic lens CineWide with AutoScope system secondary anamorphic lens and motorized mount Short throw primary lens 1 64 1 1 86 1 must be factory installed Long throw primary lens 2 52 1 4...

Страница 22: ...Introduction 6 D 73d Series Installation Operation Manual Notes...

Страница 23: ...remote control unit or front panel keypad an external control system or HDMI Consumer Electronics Control CEC messages Figure 2 1 shows how these components connect to and interact with each other Th...

Страница 24: ...phic lens transport The left eye and right eye images are reflected by the screen back toward the viewing area and kept isolated by a second set of polarizing filters the 3D glasses worn by the viewer...

Страница 25: ...over time When shipped from Runco the lenses are unlocked To lock them use the same 5 0 mm Hex wrench provided that you use for lens shift adjustments Turn clockwise two or three turns LENS LOCK D 73d...

Страница 26: ...t for connecting the HDMI Out To Pri Display from the Dimension Digital Controller 3 RS 232C INPUT Left Eye Engine 9 pin female D Sub Connect the Pri Display Control output of the Dimension Digital Co...

Страница 27: ...ecting the HDMI Out To Sec Display from the Dimension Digital Controller 10 POWER INPUT Right Eye Engine 100 to 240 VAC Connect the right optical engine to power here 11 CINEWIDE AUTOSCOPE 12V TRIGGER...

Страница 28: ...TTON Use to direct select aspect ratios or move the menu cursor down in the OSD When no menu is present on screen this button toggles through aspect ratios in the following order 16 9 4 3 Letterbox Vi...

Страница 29: ...nput on the left eye top optical engine on the D 73d projector 7 Sec Display Control Connect this to the RS 232 input on the right eye bottom optical engine on the D 73d projector 8 IR Wired input fro...

Страница 30: ...Standard composite video inputs for connecting a VCR camcorder or other composite video source The Video 1 input also provides composite sync input for SCART RGBS sources 15 HDMI 1 HDMI 8 In Digital...

Страница 31: ...n Digital Controller Remote Control Unit for D 73d The D 73d remote control unit supports an extended key code mode that allows certain buttons to perform alternate functions The following list identi...

Страница 32: ...Scales the input signal to fit 4 3 display mode in the center of the screen In extended mode press to set the Sleep Timer to 90 minutes LETBOX Letterbox Standard Sleep Timer 2 Hours Extended For view...

Страница 33: ...ht memory preset In extended mode press to select the SCART input ISF DAY Standard Video 2 Extended Press to recall settings for the current input from the ISF Day memory preset In extended mode press...

Страница 34: ...2 HDMI 1 SCART HD 2 HD 1 Component Composite 3 Composite 2 Composite 1 RIGHT Button Composite 1 Composite 2 Composite 3 Component HD 1 HD 2 SCART HDMI 1 HDMI 2 HDMI 3 HDMI 4 HDMI 5 HDMI 6 HDMI 7 HDMI...

Страница 35: ...Press to set the 3D Mode to Auto 3D SBS Side by Side Press to set the 3D Mode to 3D Side by Side 3D TAB Top and Bottom Press to set the 3D Mode to 3D Top and Bottom 3D FP Frame Packing Press to set th...

Страница 36: ...System Overview 20 D 73d Series Installation Operation Manual Notes...

Страница 37: ...time remove the batteries to avoid damage from battery leakage Do not expose batteries to excessive heat such as from sunshine fire or the like Notes on Remote Control Operation Make sure that there...

Страница 38: ...gital Controller to the projector 38 7 Connect other external equipment to the Dimension Digital Controller optional Audio processor or secondary display device Control system interface RS 232 12 volt...

Страница 39: ...icult Rear Screen Floor Mount with Zero or Two Mirrors Note Projector is completely hidden Projector is easily accessed Usually good ambient light rejection Requires separate room Installation cost is...

Страница 40: ...e same screen Runco makes its PISCES rated screen list available to authorized Runco dealers so they can support specifying the best screen for every home theater application Ambient Light In general...

Страница 41: ...nimum Maximum Minimum Maximum Standard D 73d 1 94 2 40 140 84 174 24 n a D 73d CineWide Whitney Lens n a 1 94 2 40 186 24 230 40 D 73d CineWide Shasta Lens 1 94 2 40 140 84 174 24 1 46 1 80 139 68 172...

Страница 42: ...Placement Vertical and Horizontal Lens Shift You can use the lens shift controls to center the image on the screen Lens shift is generally expressed as a percentage of the screen height or width as s...

Страница 43: ...4 Horizontal Lens Shift EXAMPLE ONLY 0 Screen Center 100 Width Lens Shift 1 0 x W 50 Width Lens Shift 0 5 x W Screen Width W Note This is a general example of lens shift Lenses vary in their shift ca...

Страница 44: ...hasta Anamorphic Lens Standard Primary with Whitney Anamorphic Lens D 73d Ultra Long Throw Primary with or without Shasta Anamorphic Lens Lens Shift Limits as Percentages of Screen Height or Width Not...

Страница 45: ...ition many video displays and A V receivers introduce additional latency that needs to be compensated for during the installation Table 3 5 shows the amount of possible audio latency given different s...

Страница 46: ...ure Mounting Other Considerations Other considerations and tips that can help improve your installation Keep the ambient temperature constant and below 35 C 95 F Keep the projector away from heating a...

Страница 47: ...utoScope Lens Motor D 73d CineWide with AutoScope Remove Projector Feet Place the projector upside down on a blanket or other soft surface Loosen and remove the two front feet on the projector 1 Do no...

Страница 48: ...own in Figure 3 7 2 Line up the mounting holes on the lens motor housing with those on the underside of the projector 3 Secure the motor to the projector with the eight 8 supplied M6 x 12mm Pan Head P...

Страница 49: ...volt trigger output on the projector labeled CINEWIDE AUTOSCOPE as shown in Figure 3 8 Figure 3 8 Connecting the AutoScope Lens Motor to the Projector After you have installed the AutoScope lens motor...

Страница 50: ...ens base plate on a D 73d CineWide 1 Place the projector upside down on a blanket or other soft flat surface 2 Remove the two front feet from the projector 3 Place the CineWide base plate on the botto...

Страница 51: ...1 Place the projector upside down on a blanket or other soft flat surface 2 Remove the two front feet from the projector 3 Place the two rectangular spacers on the bottom of the projector as shown 4 P...

Страница 52: ...ctor in an Enclosure The projector can also be inverted and placed in an enclosure above and behind the viewing area Install four feet on the inside bottom surface of the enclosure on which the projec...

Страница 53: ...d mounting hardware Place it in a location that provides easy access to the power connectors The Dimension Digital Controller unit requires 2U 3 5 inches or more of vertical rack space To mount the Di...

Страница 54: ...larly connect the HDMI Out To Sec Display connector on the Dimension Digital Controller to the HDMI input on the right eye bottom optical engine on the D 73d projector RS 232 Connection Connect the Pr...

Страница 55: ...2 HDMI 4 HDMI 5 HDMI 6 HDMI 7 HDMI 8 Ethernet HDMI Out To Sec Display HDMI Out To Pri Display HDMI Out Audio Only Component SCART TRIGGERS 1 2 3 HD1 3D SYNC HD2 DisplayPort US Video 1 Y Video 2 Video...

Страница 56: ...al Controller does not transmit HDMI CEC control messages from the HDMI Audio Out connector For more information about CEC refer to Using HDMI CEC Messages on page 123 Note USB To Accessory Box o 2 o...

Страница 57: ...RS 232 Controller Connection Use a straight through 9 pin RS 232 cable to connect a PC or control automation system if present to the RS 232 port on the Dimension Digital Controller see Figure 3 16 F...

Страница 58: ...vated equipment such as retractable screens or screen masks to the other trigger outputs Figure 3 17 Connecting 12 volt Trigger Outputs USB To Access Video 1 Y Video 2 Video 3 Pr Pb HDMI 1 HDMI 2 HDMI...

Страница 59: ...an connect an external IR receiver to extend the range of the remote control See Figure 3 18 Figure 3 18 External IR Receiver Connection RS 232 IR Pri Display Control Sec Display Control DMI 5 DMI 6 H...

Страница 60: ...g and using this connection refer to Network on page 80 Figure 3 19 Ethernet Network Connection to Dimension Digital Controller PC Control RS 232 IR Control Sec Display Control HDMI 7 HDMI 8 Ethernet...

Страница 61: ...ns that follow DisplayPort Source Connection See Figure 3 20 Figure 3 20 DisplayPort Source Connection USB To Accessory Video 1 Y Video 2 Video 3 Pr Pb HDMI 1 HDMI 2 HDMI 3 HDMI 4 Component SCART TRIG...

Страница 62: ...ers with DVI output to these inputs Refer to Supported Timings on page 130 for a list of compatible input signals Tip Note USB To Accessory Bo Video 2 Video 3 PC Contro RS 232 IR Pri Display Control S...

Страница 63: ...shown in Figure 3 22 Figure 3 22 Component Video Source Connections USB To Accessory Box Video 1 Y Video 2 Video 3 Pr Pb HDMI 1 HDMI 2 HDMI 3 HDMI 4 Component SCART TRIGGERS RS 232 1 2 3 HD1 3D SYNC H...

Страница 64: ...nd or other RGB sources to the HD1 and or HD2 inputs as shown in Figure 3 23 Figure 3 23 RGBHV Source Connections Video 1 Y Video 2 Video 3 Pr Pb Component SCART TRIGGERS 1 2 3 HD1 3D SYNC HD2 Display...

Страница 65: ...roller Connect the sync output from your SCART source to the Video 1 input on the Dimension Digital Controller See Figure 3 24 Figure 3 24 SCART RGBS Source Connections Video 1 Y Video 2 Video 3 Pr Pb...

Страница 66: ...ion Digital Controller to a nearby AC outlet AutoScope Lens Motor With AutoScope equipped projectors an additional power cord is provided for the lens motor Plug the female end of the AC power cord in...

Страница 67: ...igital Controller refer to Mounting the Dimension Digital Controller on page 37 3 Connect system components to each other and to external equipment refer to System Interconnections on page 38 4 D 73d...

Страница 68: ...1 Re install anamorphic lenses 2 Align the primary left eye image with the screen by adjusting the Left top anamorphic lens to produce the least amount of distortion Dimension Digital Controller 1 Sel...

Страница 69: ...imension Digital Controller 1 Select Aspect Ratio and set it to Cinema 2 Select Calibration Image Alignment Corner Alignment and adjust corners 3 Select Calibration Image Alignment Midpoint Alignment...

Страница 70: ...ontroller front panel briefly displays Initializing System followed by Starting D 73d 5 When the display is ready for use the fluorescent display indicates the active source input resolution frame rat...

Страница 71: ...of the ceiling mount to minimize keystone distortion Adjust the side to side angle to minimize clocking unwanted roll or rotation about the lens axis Refer to the ceiling mount installation instructi...

Страница 72: ...o from the Service Menu and choose Secondary Alignment 7 Perform Steps 8 through 12 above with the right bottom primary lens When you have completed the primary lens adjustments D 73d CineWide with Au...

Страница 73: ...Holder 2 2 Place the Anamorphic Lens Holder on top of or under if the projector is inverted the CineWide Base Plate Position the bracket so that the slots at the bottom of the lens holder are perpendi...

Страница 74: ...er are perpendicular to the corresponding slots on the base plate 3 Secure the Anamorphic Lens Holder to the plate using the Hex Bolts Washers 6 and Yaw X Adjustment Levers that you removed in Step 1...

Страница 75: ...e Main Menu 4 Select Adjustment Mode from the Calibration Menu and set it to Primary 5 Press EXIT or MENU repeatedly to return to the Main Menu 6 Select Service from the Main Menu 7 Select Test Video...

Страница 76: ...ens see Figure 3 26 or Button head Pitch Adjustment Screws Shasta anamorphic lens see Figure 3 27 on either side of the lens to allow it to pivot freely Then adjust the anamorphic lens angle so that t...

Страница 77: ...igital Controller remote control or front panel press MENU 2 Select Calibration from the Main Menu 3 Select Adjustment Mode from the Calibration Menu and set it to Secondary 4 Press EXIT or MENU repea...

Страница 78: ...trols as and only if needed to re position the image corners mid points and center to eliminate keystoning mis aligned corners or pincushion distortion mid points not aligned with corners See Figure 3...

Страница 79: ...correct a keystoned image by adjusting the image corner positions Select Midpoint Alignment to correct pincushion distortion by adjusting the image edge mid points See Figure 3 29 Figure 3 29 Image Al...

Страница 80: ...ibration from the Main Menu 4 Select Image Alignment from the Calibration Menu 5 Select Corner Alignment to correct a keystoned image by adjusting the image corner positions Select Midpoint Alignment...

Страница 81: ...60 Minutes 90 Minutes 2 Hours or 4 Hours Information Signal read only System Network Field Service Manufacturing Calibration Display Color Common Settings Gain 100 99 0 99 100 Red Green Blue Offset Ga...

Страница 82: ...t Color Space Auto REC601 REC709 RGB PC or RGB Video Not available on Composite 1 Composite 2 or Composite 3 inputs Triggers 1 2 3 Miscellaneous Language English Fran ais Deutsch Italiano Espa ol Sven...

Страница 83: ...o Video Input Source Aspect Ratio Screen Picture Input Position Memory Presets 3D Processing Sleep Timer Information Calibration Service You must perform and save all image adjustments on both the pri...

Страница 84: ...ngs at the source component Most modern DVD BD players and set top boxes have such controls Viewer preference original aspect ratio with black bars or a full screen presentation with some distortion o...

Страница 85: ...ard D 73d without an anamorphic lens the upper and lower portions of the screen are masked but the geometry of the active image area is unchanged With a 2 35 1 screen and an anamorphic lens the Dimens...

Страница 86: ...entered in the display area with no re sizing or overscan This means for example that 720p HDTV programs will display with unused pixels on all sides 320 on the left and right sides and 180 above and...

Страница 87: ...it may be possible to obtain satisfactory picture quality using the naked eye and regular program material Runco recommends using an external test pattern source Ovation Multimedia Digital Video Essen...

Страница 88: ...e brightness so that The darkest black bars disappear into the background The dark gray areas are barely visible The lighter gray areas are clearly visible The white areas are a comfortable level of t...

Страница 89: ...panel 2 Select Service from the Main Menu and press ENTER 3 Enter the Service menu passcode 4 Select Display Device from the Service menu and press ENTER 5 Press ENTER again to select Configure 6 Sele...

Страница 90: ...djust the tint enable blue only display mode in the Diagnostics menu as you would for adjusting color saturation refer to the previous section Color Saturation Select Tint from the Picture menu and pr...

Страница 91: ...s from black to gray and differently sized lines in the sweep patterns at the top and bottom Lower the sharpness setting to eliminate them Figure 4 5 Typical Test Pattern for Adjusting Sharpness Noise...

Страница 92: ...re produced based on the assumption that older television sets may not display the outer edges of the broadcast picture area Overscan effectively trims away these inactive outer edges and enlarges the...

Страница 93: ...the image stabilizes and each pixel is clearly defined You may notice that you can stabilize the image at more than one point Use either setting in such cases Tracking RGB Component or SCART sources T...

Страница 94: ...ation The currently selected preset is indicated by a to its left in the example shown here ISF Night is selected You should save changes to any of the following settings to a preset otherwise they wi...

Страница 95: ...tively to fill the screen Side by Side multiplexing is used with 1080i source material Choose Top and Bottom to have the Dimension Digital Controller scale the top and bottom image halves respectively...

Страница 96: ...et refer to IP Configuration on page 93 Field Service Manufacturing The Field Service and Manufacturing menus are password protected and intended for use only by Runco service personnel and factory te...

Страница 97: ...aintaining good details for blacks and whites If excess ambient light washes out the image and it becomes difficult or impossible to see details in dark areas lower the gamma setting to compensate Thi...

Страница 98: ...ty Diagram Simple Select Simple 5500K 6500K 7500K or 9300K mode from the Color Temp menu with the D 73d this is the only choice to choose one of four color temperature presets 5500K 6500K 7500K and 93...

Страница 99: ...e color gamut defined in SMPTE 170M 1999 Select EBU to use the color gamut defined in EBU Tech 3213 E Select Native for Runco s recommended Personal Color Equalizer preset for typical video sources It...

Страница 100: ...the color coordinates around the white point Saturation adjusts the coordinate s distance from white and Level adjusts the luminance Y of the color relative to white Figure 4 8 Effect of PCE Hue and...

Страница 101: ...e in the Display Color menu see above but adjust the color balance of the incoming signal These settings are also saved independently for each input and display mode Gain Offset HD1 HD2 and Component...

Страница 102: ...al format resolution and frame rate and memory preset onto a clipboard which is a temporary memory location When you do the message Settings Copied briefly appears on screen The Copy Paste menu then r...

Страница 103: ...for each aspect ratio and screen selection refer to Screen on page 70 Screen Masking This control adjusts the amount of cropping on each edge of the output image This differs from the regular Overscan...

Страница 104: ...h Enable When you have finished customizing the splash screen select Splash Enable from the Splash Configure menu Then select On and press ENTER OSD Position To adjust the position of the OSD select O...

Страница 105: ...easuring or adjusting brightness contrast or white balance gain offset Primary Alignment Secondary Alignment Dual Alignment Use this pattern when aligning the output from the projector s primary or se...

Страница 106: ...n press ENTER 3D Use these patterns to confirm that the left eye and right eye images are being processed correctly To do this close your right eye while viewing this test pattern through the 3D glass...

Страница 107: ...Controller you must re program the Dimension Digital Controller remote control to send that same code To enable extended key code mode you must re program the Dimension Digital Controller remote contr...

Страница 108: ...ther display device specific functions Installation Orientation Select Picture Orientation from the Display Device Configure menu then select Orientation to change the picture orientation to suit the...

Страница 109: ...set it to On With this setting the Dimension Digital Controller s IP address subnet mask and default gateway are assigned by the local DHCP server To manually configure these values set DHCP to Off IP...

Страница 110: ...luminance values defined in digital component standards Triggers Select Triggers from the Service menu to configure the 12 volt trigger outputs You can assign one or more trigger outputs to each aspec...

Страница 111: ...olts mV to 15 approximately 300 mV HDMI Select HDMI from the Service menu to set the following options affecting communication between HDMI sources the Dimension Digital Controller and the D 73d HDMI...

Страница 112: ...OFF the LED is always off LCD Select LCD from the Front Panel Brightness menu to adjust the brightness of the front panel LCD The range is from 0 off to 4 Auto Power Off Select Auto Power Off from th...

Страница 113: ...on Fast Startup is a quick start mode that keeps the Dimension Digital Controller running when it is turned off even though it appears to be in standby mode This results in much quicker startup times...

Страница 114: ...Operation 98 D 73d Series Installation Operation Manual Notes...

Страница 115: ...n or replace them Proceed as follows to remove the polarizers from the projector in order to switch clean or replace them 1 Remove the anamorphic lens if present in front of the polarizer 2 Loosen the...

Страница 116: ...o Technical Support 572 2479 00REV00 572 2479 00REV00 Left Polarizer Left Polarizer viewed from the side facing the projector 3D Glasses L R L R Same Angle of Polarization light passes Different Angle...

Страница 117: ...t all Select the correct source Turn on the source component Check connections from the source component to the Dimension Digital Controller Image is too bright and or lacks definition in the bright a...

Страница 118: ...s adjusting Adjust the image size refer to Input Position on page 76 When displaying 3D content crosstalk or ghosting can be seen that is the left eye is perceiving some of what the right eye should b...

Страница 119: ...igure the RS 232 controller or PC serial port as follows no parity 8 data bits 1 stop bit and no flow control Set the baud rate to 19200 to match that of the Dimension Digital Controller RS 232 port C...

Страница 120: ...ed For any response code other than 0 the follower echoes back the command received rather than filling in the fields listed below The response code can be one of the following 0 Command successfully...

Страница 121: ...ng CR Table 6 1 Serial Commands Setting Command Code Read Write Inc Dec Min Value Max Value String Notes Advanced Color Temp Auto Color Enable AAC R W No 0 1 No 0 Off 1 On Advanced Color Temp Diagnost...

Страница 122: ...Right x BRX R W Yes 100 100 No Image Alignment Bottom Right y BRY R W Yes 100 100 No Blank Screen Blue BSB R W Yes 0 255 No Blank Screen Green BSG R W Yes 0 255 No Blank Screen Red BSR R W Yes 0 255...

Страница 123: ...Default Gateway Byte 3 DE3 R W Yes 0 255 No Default Gateway Byte 4 DE4 R W Yes 0 255 No DisplayPort EDID Extension DEE R W No 0 1 No 0 Off 1 On Diagnostic Color DGC R W No 0 6 No 0 White 1 Red 2 Gree...

Страница 124: ...e 19 Display Hardware I2C Fail ure 20 Display Software I2C Failure 21 Display Lamp Error 22 Display Communication Error 25 DC 300 Fan 1 Failure 26 DC 300 Fan 2 Failure 27 DC 300 Overtemp 1 28 DC 300 O...

Страница 125: ...put Name 5 I05 R W No N A N A Yes Input Name 6 I06 R W No N A N A Yes Input Name 7 I07 R W No N A N A Yes Input Name 8 I08 R W No N A N A Yes Input Name 9 I09 R W No N A N A Yes Input Name 10 I10 R W...

Страница 126: ...I 3 10 HDMI 4 11 HDMI 5 12 HDMI 6 13 HDMI 7 14 HDMI 8 15 DisplayPort Information Output Resolution IOR R No N A N A Yes IP Address Byte 1 IP1 R W Yes 0 255 No IP Address Byte 2 IP2 R W Yes 0 255 No IP...

Страница 127: ...DMI 1 20 HDMI 2 21 HDMI 3 22 HDMI 4 23 SCART 24 Video 2 25 Video 3 32 Sleep Timer Off 33 Sleep Timer 30 Mins 34 Sleep Timer 60 Mins 35 Sleep Timer 90 Mins 36 Sleep Timer 2 Hours 37 Sleep Timer 4 Hours...

Страница 128: ...e 11 Korean Image Alignment Left Middle x LMX R W Yes 100 100 No Image Alignment Left Middle y LMY R W Yes 100 100 No Logo LED Brightness LOG R W Yes 0 31 No Display Serial Number LSN R No N A N A Yes...

Страница 129: ...n Vertical OSV R W Yes 0 100 No Output Shift Width OSW R W Yes 50 0 No Overscan Mode OVM R W No 0 1 No 0 Zoom 1 Crop Overscan OVS R W Yes 0 20 No PCE Blue Hue PHB R W Yes 100 100 No PCE Cyan Hue PHC R...

Страница 130: ...R03 W No N A N A No Input Name 4 Restore R04 W No N A N A No Input Name 5 Restore R05 W No N A N A No Input Name 6 Restore R06 W No N A N A No Input Name 7 Restore R07 W No N A N A No Input Name 8 Res...

Страница 131: ...Off 1 On Screen Masking Right SMR R W Yes 0 200 No Screen Masking Top SMT R W Yes 0 200 No Splash Enable SPE R W No 0 1 No 0 Off 1 On Splash Timer SPT R W Yes 5 60 No Status STA R No 0 4 No Sync Thre...

Страница 132: ...r 3 16 9 T31 R W No 0 1 No Trigger 3 4 3 T32 R W No 0 1 No Trigger 3 Letterbox T33 R W No 0 1 No Trigger 3 VirtualWide T34 R W No 0 1 No Trigger 3 Cinema T35 R W No 0 1 No Trigger 3 Virtual Cinema T36...

Страница 133: ...RK R W Yes 100 100 No Image Alignment Top Right x TRX R W Yes 100 100 No Image Alignment Top Right y TRY R W Yes 100 100 No Test Video TST R W No 0 4 No 1 Color Bars 1 2 Full White 11 Color Bars 2 12...

Страница 134: ...0000 00010001 To change it select Remote Control from the Service menu and follow the steps given on page 91 16 data bits eight 8 bits for the command followed by the logical inverse of the command an...

Страница 135: ...Native aspect ratio 1 8209 10 0x20110AF5 Number Button 1 2 8209 11 0x20110BF4 Number Button 2 3 8209 12 0x20110CF3 Number Button 3 4 8209 13 0x20110DF2 Number Button 4 5 8209 14 0x20110EF1 Number Butt...

Страница 136: ...0x20112BD4 Video Source 13 SRC 14 8209 46 0x20112ED1 Video Source 14 3D AUTO 8209 47 0x20112FD0 3D Mode Auto 3D SBS 8209 48 0x201130CF 3D Mode Side by Side 3D TAB 8209 49 0x201131CE 3D Mode Top and B...

Страница 137: ...DMI 7 8209 81 0x201151AE HDMI7 video input HDMI 8 8209 82 0x201152AD HDMI8 video input DisplayPort 8209 83 0x201153AC DisplayPort video input SCART 8209 84 0x201154AB SCART video input VIDEO 2 8209 85...

Страница 138: ...B9 Sets the sleep timer to 4 hours CINEMA 8209 71 0x201147B8 Composite video input 1 V CINE 8209 72 0x201148B7 Component video input NATIVE 8209 73 0x201149B6 HD1 video input 1 8209 74 0x20114AB5 HD2...

Страница 139: ...playback mode Change its OSD language when a similar change is made at the source To use CEC connect your CEC compatible sources to the HDMI inputs on the D 73d Set the CEC option to On refer to CEC...

Страница 140: ...bort Message 0xFF User Control Pressed 0x44 User Control Released 0x45 Give OSD Name 0x46 Menu Request 0x8D Give Device Power Status 0x8F The Dimension Digital Controller does not transmit HDMI CEC co...

Страница 141: ...ture Size 16 9 Screen 2D Content Recommended Width 72 132 in Maximum Width 200 in Picture Size 16 9 Screen 3D Content Recommended Width 72 100 in Maximum Width 200 in Processing Runco Dimension Digita...

Страница 142: ...5 NTSC color gamut in proprietary Runco Native mode with Runco Smart Color and Personal Color Equalizer Presets for SMPTE C REC 709 DCI EBU and others Adobe achievable Maintenance Zero maintenance sol...

Страница 143: ...audio processor Control Options Front panel vacuum fluorescent display and keypad Discrete infrared IR remote RS 232 female DB9 for serial commands USB type B female for firmware upgrade RS 232 male D...

Страница 144: ...y Approvals cTUVus FCC class B CE RoHS China RoHS WEEE C Tick CCC local conformances as required Limited Warranty Two 2 years parts and labor from the date of shipment from Runco Specifications are su...

Страница 145: ...00 NOMINAL 279 4 2X 17 71 449 9 1 38 35 0 7 19 182 6 16 64 422 6 2X 4X 1 65 42 0 4 25 108 0 4 25 108 0 10 00 254 0 1 25 31 8 2X 3 34 84 8 19 43 493 6 6 91 175 4 2 18 55 4 2X 3 00 CLEARANCE FOR AIRFLOW...

Страница 146: ...Side by Side 1920x1080 50 00 28 125 31 250 74 250 72 000 59 94 33 716 74 175 60 00 33 750 74 250 720p TAB Top and Bottom 1280x720 50 00 37 500 75 250 59 94 44 715 74 406 60 00 45 000 74 250 720p SBS...

Страница 147: ...0 00 31 469 25 175 66 59 35 892 29 862 72 00 37 861 31 500 75 00 37 500 31 500 85 00 43 269 36 000 800x600 800x600 60 00 37 879 40 000 72 00 48 077 50 000 75 00 46 875 49 500 85 00 53 674 56 250 832x6...

Страница 148: ...000 75 00 79 976 135 000 85 00 91 146 157 500 1360x768 1360x768 60 00 47 712 85 500 1400x1050 1400x1050 60 00 64 744 101 000 60 00 65 317 121 750 75 00 82 278 156 000 1600x1200 1600x1200 60 00 75 000...

Страница 149: ...80 50 00 28 125 31 250 74 250 72 000 1080 60i 1920x1080 59 94 60 00 33 716 33 750 74 175 74 250 1080 24p 1920x1080 23 98 24 00 26 978 27 000 74 175 74 250 1080 50p 1920x1080 50 00 56 250 148 500 1080...

Страница 150: ...Specifications 134 D 73d Series Installation Operation Manual Notes...

Страница 151: ......

Страница 152: ...Runco International 800 23RUNCO Fax 503 748 8161 www runco com 020 1082 02 Rev A March 2014...

Отзывы: