33
Press
MENU
twice. Use the
or
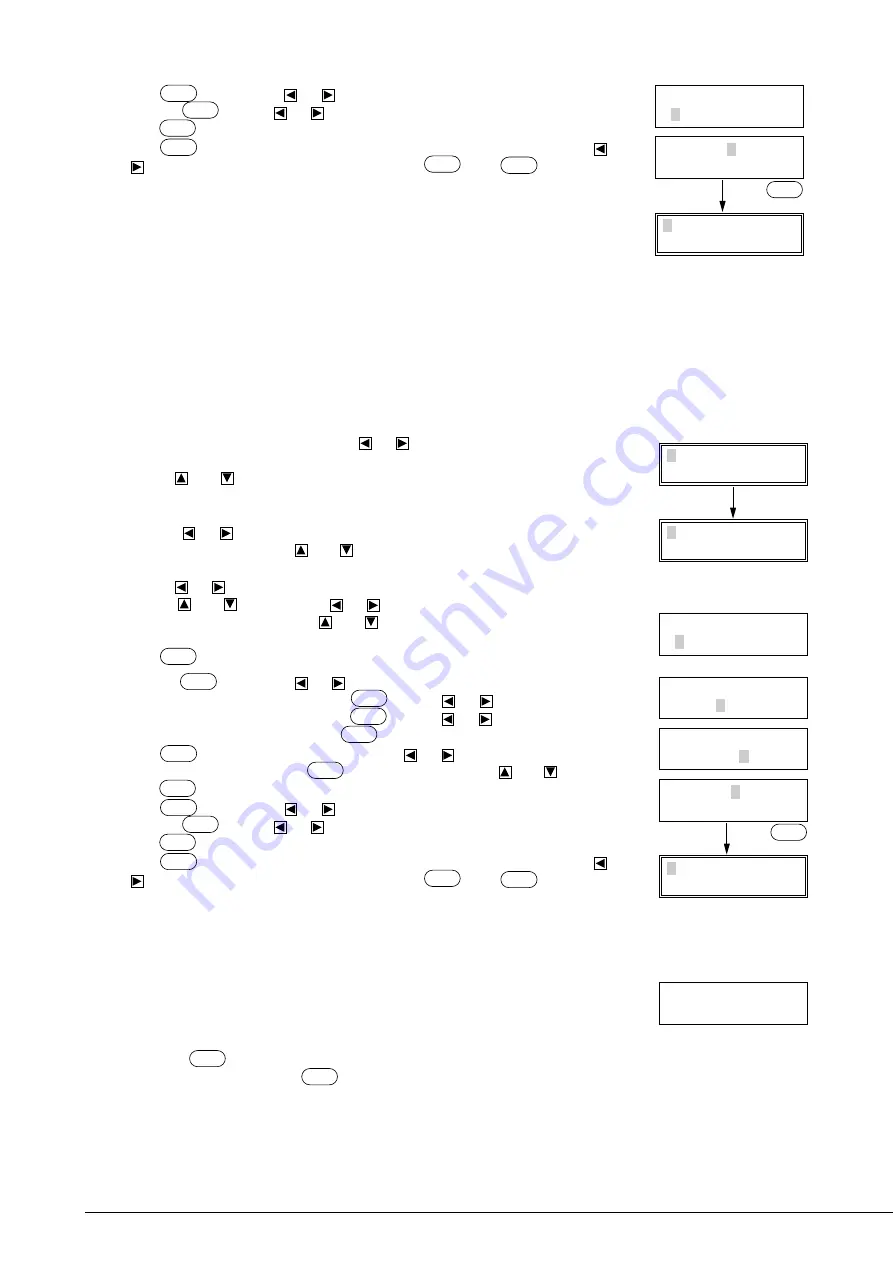
keys to move the blinking cursor to “TOOL-CHG”
and press
ENTER
. Use the
or
keys to move the blinking cursor to “IGNORE” and
press
ENTER
to save the setting.
Press
MENU
three times, and when the screen shown to the right is displayed use the
or
keys to move the blinking cursor to “END”. Press
ENTER
. Press
MENU
once to return
to the top menu.
This completes storage of the pen plotting parameters in the tool number. Because there is
no pen change, leave this tool number displayed.
(B) When there is pen change (plot data with pen change)
Set the PNC-1850/1200 plotting parameters to match the software settings for the pen number.
For example, if eight pens are to be used in plotting, set pen parameters 1 through 8 in the software (or driver) to match the
PNC-1850/1200 tool numbers.
With a water-based fiber-tipped black 0.3 mm marker set as tool number 1, match the software (or driver) settings for pen
number 1 to it. In the same way, set the plot parameters for tool number 1 on the PNC-1850/1200 to a water-based fiber-
tipped pen. With a thick (2.0 mm) black water-based fiber-tipped pen as tool number 2, match the software (or driver)
settings for pen number 2 to it. In the same way, set the plot parameters for tool number 2 on the PNC-1850/1200 to a thick
water-based fiber-tipped pen. DO the same for the other 6 pens as well.
Set the software (or driver) pen number parameters for each pen, then perform the following operations:
When the top menu is displayed press the
or
keys and move the blinking cursor to
the tool number at the left of the top line.
Use the
and
keys to display the tool number for the pen parameters you wish to
use. If you wish to save existing tool number parameters, then display a different tool
number.
Press the
or
keys to move the blinking cursor to “*.** mm”, and then change the
value to “0.000 mm” with the
and
keys. The tool number display on the top line
will change from “CUT” to “PEN”.
Use the
or
keys to move the blinking cursor to “** cm/s”, and change the value
with the
and
keys. Press the
or
keys to move the blinking cursor to “**
gf”, and change the value with the
and
keys. “** cm/s” and “** gf” should use
values for the mounted pen, as per the section on “Optimal Pen Speed/Pen Force”.
Press
ENTER
and save the settings.
Press the
MENU
key. Use the
or
keys to move the blinking cursor to “SUBMENU”
on the right of the bottom line, and press
ENTER
. Use the
or
keys to move the
blinking cursor to “WEIGHT” and press
ENTER
. Use the
or
keys to move the
blinking cursor to “LIGHT”, and press
ENTER
to fix the setting.
Press
MENU
and return to the last screen. Use the
or
keys to move the blinking
cursor to “UPSPEED” and press
ENTER
. Change the value with the
and
keys, and
press
ENTER
to save the setting.
Press
MENU
twice. Use the
or
keys to move the blinking cursor to “TOOL-CHG”
and press
ENTER
. Use the
or
keys to move the blinking cursor to “EFFECT” and
press
ENTER
to save the setting.
Press
MENU
three times, and when the screen shown to the right is displayed use the
or
keys to move the blinking cursor to “END”. Press
ENTER
. Press
MENU
once to return
to the top menu.
This completes storage of the pen plotting parameters in the tool number. Repeat the
process for the remaining tool numbers.
4) When plot data is sent from the computer, plotting will start.
When tool change is used - When “TOOL-CHG” is set to “EFFECT” and a pen change
command is sent from the computer, the right message will be displayed, and all operation will
halt.
When this message is displayed and the tool must be changed, open the front cover, and insert the appropriate pen into the tool
carriage. Press
ENTER
and plotting will restart.
If tool change is not required, press
ENTER
when the message is displayed and plotting will restart.
TOOL-CHG COMMAND
<IGNORE> EFFECT
5 PEN 50cm/s
0.000mm 30gf
PREFEED END
Top menu
Press
ENTER
twice.
1 CUT 50cm/s
0.250mm 30gf
5 PEN 50cm/s
0.000mm 30gf
SHEET WEIGHT
<LIGHT> HEAVY
5 PEN 50cm/s
0.000mm 30gf
UP SPEED
<50cm/s>
PREFEED END
Top menu
TOOL-CHG COMMAND
IGNORE <EFFECT>
TOOL-CHG:TOOLNO2
Press
ENTER
twice.
Содержание Camm-1 PNC-1200
Страница 1: ...USER S MANUAL This User s Manual is intended for both PNC 1850 and PNC 1200 ...
Страница 3: ......
Страница 49: ...43 Appendix 1 CHARACTER SETS Appendices Automatic backspace ...
Страница 53: ...E2090195BE V6 1 ...


