


Basic Operations
Printing from a Computer Data [Direct Print] [USB Job List]
55
Printing USB Data
[USB Job List]
Even if the computer and machine are not connected by cable, you can print original data via a USB Flash Drive.
It is useful when the computer and printer are placed in different places or printing with RZ10 Series in outside loca-
tion.
Note:
• When “User Management” is set by the administrator, the users will be asked to identify themselves during oper-
ations. For details, see
)
p.116.
1
Connect the USB Flash Drive to the
computer.
Note:
• If the Recognition and Identification System
(“Recognized by”) is set to “USB Flash Drive”in
the “User Management”, it is also convenient
for you to use the registered USB Flash Drive
for outputting data.
2
Set printing options from your com-
puter screen.
Use the USB flash-via-Printer Driver.
Note:
• Make sure to remove the checkmark from the
“Collate” option in the Print dialog box.
3
Click [OK] in the print dialog box.
The data created on the computer is stored in the
USB Flash Drive.
4
Make sure the machine is ON.
Check the Control Panel.
Note:
• When the power is OFF, both the Display and
the
key are off. Turn the power ON.
)
p.36
• If the
key is lit, the machine is in the Energy
Saving mode. Press the
key to cancel the
Energy Saving mode.
5
Check for printing paper.
Make sure paper is loaded.
To load or to change paper, see following page.
)
p.39
After replacing with paper of a different size,
adjust the position of the Receiving Tray Paper
Guides and Paper Stopper.
)
p.38
6
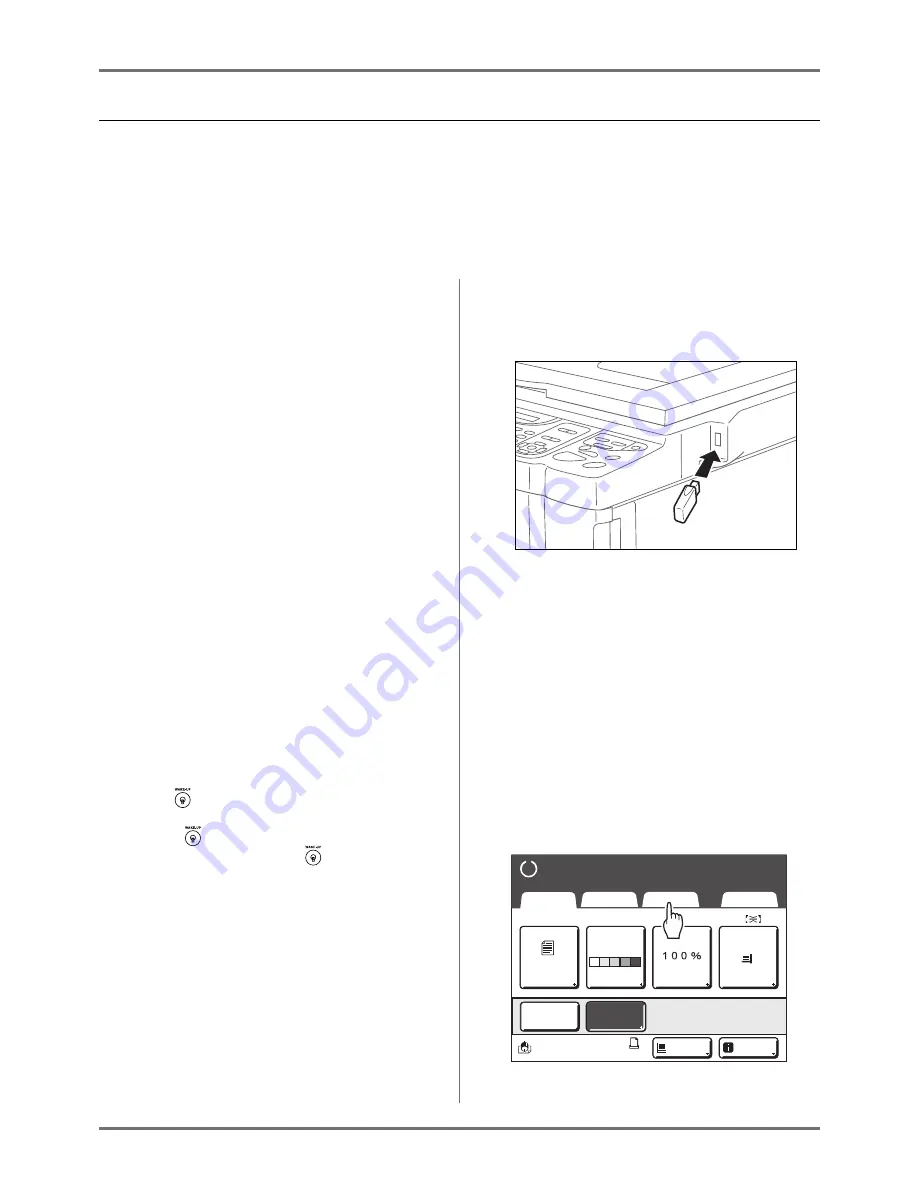
Connect the USB Flash Drive that
contains the original data to print to
the USB slot.
Important!:
• While processing the data, do not remove the
USB Flash Drive. This will cause data to disap-
pear and the USB to malfunction.
Note:
• If the “USB print (Auto Process)” has been set
as the output method (Guide tab), connecting
the USB Flash Drive starts master-making/
printing process as per the “Process” setting.
For detailed settings, refer to the “RISO Printer
Driver User's Guide”.
7
Touch [Functions] on the Master
Making Basic Screen.
READY
A4
Line
Page (A4)
Basic
Selections
Functions
Admin.
Contrast
Auto
Size
Paper
Idle
Multi-Up
D-Feed
Check
Info
Ready to Make Master
Ready to Make Master
Black
Содержание RZ1070
Страница 11: ...Icons Used in This Manual 11...
Страница 21: ...Before Starting to Use Originals 21...
Страница 97: ...Functions for Master Making Checking the Print Image Prior to Making Master Preview 97...
Страница 203: ...Storing Original Data and Use Method Copying Moving Stored Data 203...
Страница 241: ...Maintenance Cleaning 241...
Страница 286: ...286...


