background image

7.

Select the paper size.

8.

Press [OK] twice.

9.

Place the original, and start scanning.

Copying starts automatically.

Copying onto Custom Size Paper from the Paper Bypass Location

Paper that has a horizontal length of 279.4–914.4 mm (11.00–36.00 inches) and a vertical length of
210.0–2000.0 mm (8.27–78.74 inches) can be fed in from the paper bypass location.

1.

Open the front cover, and then pull up the paper holding lever.

2.

Insert the paper copy side up into the paper bypass location.

3.

Lower the paper holding lever, and then close the front cover.

4.

Specify the type of the paper as necessary.

5.

Make sure that the paper bypass location ( ) is selected, and then press the [ ] key.

6.

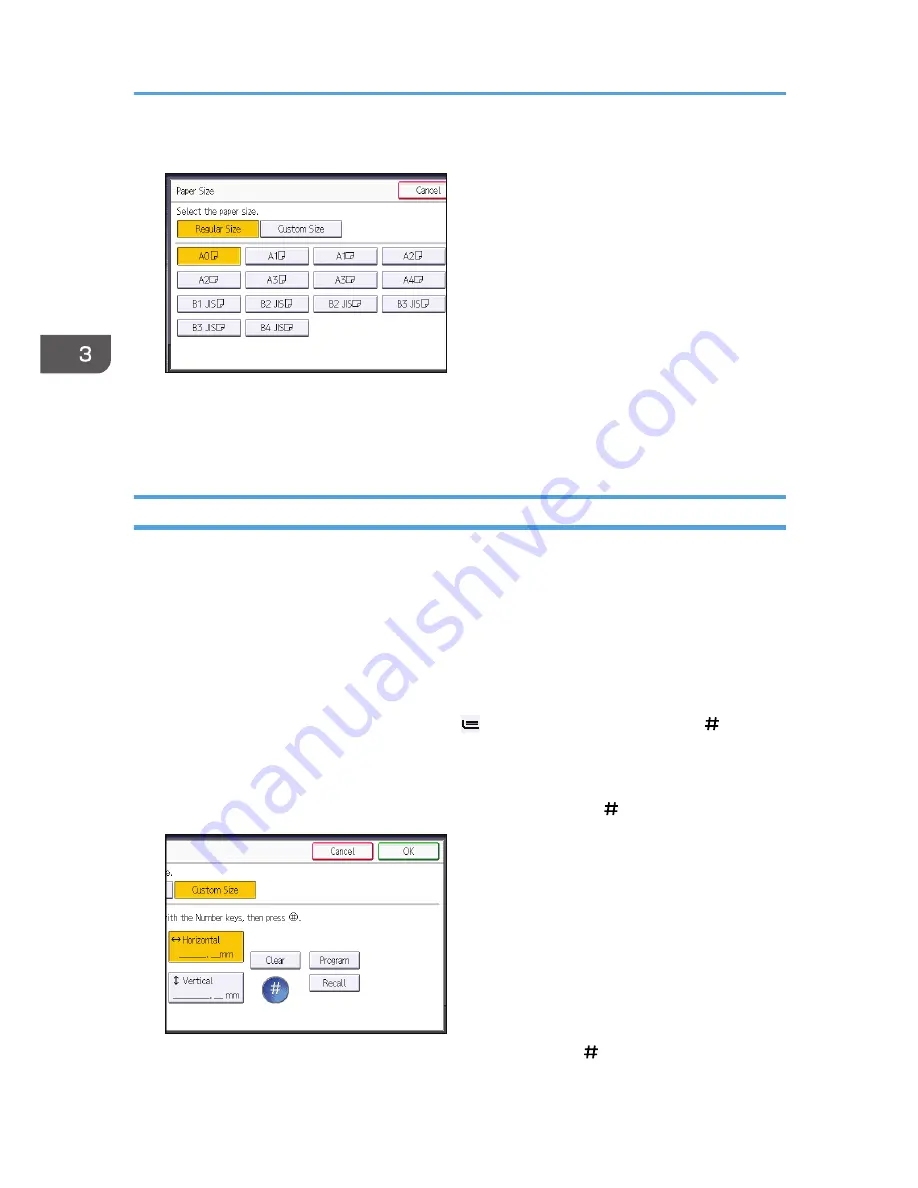
Press [Paper Size].

7.

Press [Custom Size].

8.

Enter the horizontal size with the number keys, and then press [ ].

9.

Enter the vertical size with the number keys, and then press [ ].

3. Copy

60

Содержание MP CW2200

Страница 1: ...sure to read the Safety Information in Read This First before using the machine For information not in this manual refer to the HTML PDF les on the supplied CD ROM Appendix Troubleshooting Adding Pap...

Страница 2: ......

Страница 3: ...ecurity Functions 18 Monitoring and Setting the Machine Using a Computer 19 Preventing an Unauthorized Copy 20 2 Getting Started Guide to Names and Functions of Components 21 Guide to Functions of the...

Страница 4: ...ze Paper from the Paper Bypass Location 59 Copying onto Custom Size Paper from the Paper Bypass Location 60 Storing Data in the Document Server 62 4 Print Installing the Printer Driver for a Network C...

Страница 5: ...ail 89 Registering an E mail Destination 90 Deleting an E mail Destination 91 Entering an E mail Address Manually 92 Basic Procedure for Storing Scan Files 93 Checking a Stored File Selected from the...

Страница 6: ...her the Print heads Scratch the Paper 161 Checking Whether a Nozzle is Clogged 161 Maintenance 163 Print Nozzle Check Pattern 163 Clean Print heads 165 Flush Print heads 166 Adjustment 167 When Messag...

Страница 7: ...rs This symbol is located at the end of sections It indicates where you can find further relevant information Indicates the names of keys on the machine s display or control panels Indicates instructi...

Страница 8: ...on specific Read the information under the symbol that corresponds to the region of your machine mainly Europe If the label contains the following your machine is a region A model CODE XXXX 27 220 240...

Страница 9: ...Names of Major Features In this manual major features of the machine are referred to as follows Roll Unit RU6520 Paper Input Location 2 7...

Страница 10: ...8...

Страница 11: ...for a description by what you want to do Saving Paper BRL059S Printing multi page documents on a single sheet Combine See Combined Copying Copy Document Server Conserving ink when printing Ink Save f...

Страница 12: ...lder Scan Storing scan files on media See Basic Procedure for Saving Scan Files on a Removable Memory Device Scan Managing and using documents converted to electronic formats Document Server See Relat...

Страница 13: ...Registering Destinations CQH101 Using the control panel to register destinations in the Address Book See Registering a destination in the address book manually Scan Registering Destinations 11...

Страница 14: ...Functions Registering frequently used printing settings to the printer driver See Using One Click Presets Print Changing the initial settings of the printer driver to frequently used printing settings...

Страница 15: ...ily by pressing the shortcut icons You can display only the icons of functions and shortcuts that you use You can change the order of the function and shortcut icons For details about the features on...

Страница 16: ...Reduce Enlarge function the machine automatically detects the original size and then selects an appropriate reproduction ratio based on the paper size you select If the orientation in which your origi...

Страница 17: ...ave been previously sent from computers using the printer driver The following types of print jobs can be selected Sample Print Locked Print Hold Print and Stored Print You can print files stored on a...

Страница 18: ...r CQH004 Using the file format converter you can download stored documents to your computer For details about the Document Server in copier mode and how to use the Document Server see Storing Data in...

Страница 19: ...e as a delivery scanner for the ScanRouter delivery software 1 Network delivery scanner You can save scan files in the delivery server or send them to a folder in a computer on the same network 1 The...

Страница 20: ...he use of the machine as well as prevent machine settings from being changed without authorization By setting passwords you can prevent unauthorized access via the network You can erase or encrypt the...

Страница 21: ...ch paper input location is running out of paper register information in the Address Book specify the network settings configure and change the system settings manage jobs print the job history and con...

Страница 22: ...the Copy Data Security unit the machine beeps to notify users that unauthorized copying is being attempted If the document is copied on a machine without the Copy Data Security Unit the hidden text b...

Страница 23: ...s by placing objects near them or leaning things against them If the machine overheats a failure might occur Front CPL001 1 2 3 4 6 7 5 8 9 11 12 18 14 15 13 16 10 17 1 Original cover Open to clear ja...

Страница 24: ...on Load paper here when you copy or print from the paper bypass location Load paper print side up 11 Output basket The delivered paper is stacked here Change the mode of the basket according to the si...

Страница 25: ...holes Prevent overheating 3 Ink collector unit cover Open this cover to replace the ink collector unit Ink used for maintenance collects in the ink collector unit 4 Original output guide Stacks origin...

Страница 26: ...achine s External Options CPL003 2 1 1 Paper holder Use to set a paper roll onto the paper input location This is useful to change quickly to a different size paper roll from the paper holder 2 Paper...

Страница 27: ...For details see Configuring function keys Getting Started 3 Display panel Displays keys for each function operation status or messages See How to Use the Screens on the Control Panel Getting Started...

Страница 28: ...hecking Enquiry Using the User Tools Maintenance and Specifications 10 Simple Screen key Press to switch to the simple screen See Switching Screen Patterns Getting Started 11 key Enter key Press to co...

Страница 29: ...to insert an SD card or a USB flash memory device 20 Media access lamp Lights up when a memory storage device is inserted in the media slot or accessed Guide to the Names and Functions of the Machine...

Страница 30: ...ies For details about how to use the copy function see Copy Document Server 2 Scanner Press to scan originals and save images as files For details about how to use the scanner function see Scan 3 Prin...

Страница 31: ...nger than 32 characters the 32nd character is replaced with Only 30 characters can be displayed in a simple screen If the name of the shortcut is longer than 30 characters the 30th character is replac...

Страница 32: ...nt and then click Device Home Management 4 Click Edit Icons 5 Point to Icon can be added of the position that you want to add and then click Add 6 Select the function or shortcut icon you want to add...

Страница 33: ...4 Press Add Icon 5 Press the Program tab 6 Make sure that Copier Program is selected 7 Select the program you want to add How to Use the Home Screen 31...

Страница 34: ...Specify the position where Blank is displayed 9 Press OK 10 Press the User Tools Counter key Press on the upper right corner of the screen to check the position on the simple screen 2 Getting Started...

Страница 35: ...es Document Server on the initial document print screen Auto Reduce Enlarge Finishing Adjust Print Position Stamp Reduce Enlarge number of prints Scanner Scan Settings density Next Original Wait Origi...

Страница 36: ...leared or reset and after the machine is turned on See Changing the Default Functions of the Initial Screen Convenient Functions If the paper input location you specified in a program runs out of pape...

Страница 37: ...pies of working or architectural drawings Your company name needs to be pre registered in the machine Unified size copy Specify Auto Reduce Enlarge You can print various size copies onto one size of p...

Страница 38: ...Signature You can add a digital signature to an important document such as a contract so that any data tampering can be detected High resolution scan Specify settings to save scanned data in TIFF form...

Страница 39: ...functions 1 Make sure the power cord is firmly plugged into the wall outlet 2 Turn on the main power switch The main power indicator goes on CPL026 Turning Off the Main Power When disconnecting the po...

Страница 40: ...the main power switch indicator turns off Not doing so may result in damage to the hard disk or memory leading to malfunctions Do not turn off the power while the machine is in operation Doing so may...

Страница 41: ...administrator for the Login User Name Login Password and User Code For details about user authentication see Security Guide User Code to enter on User Code Authentication is the numerical value regis...

Страница 42: ...ng Out Using the Control Panel This section explains the procedure for logging out the machine when Basic Authentication Windows Authentication LDAP Authentication or Integration Server Authentication...

Страница 43: ...ed printing before loading the next original If you load the next original while the machine is printing the original might touch the printout and be stained with ink Placing Originals on the Original...

Страница 44: ...Carrier Sheet Paper Specifications and Adding Paper When using the carrier sheet originals should be ejected onto the original output guides If the original is ejected onto the original stackers it mi...

Страница 45: ...dge of the carrier sheet between the original guides CPT009 Placing Rolled Originals When placing rolled originals you can make copies using the output basket 1 Check that the output basket is in basi...

Страница 46: ...l the leading edge of the original up to the original table with the side to be scanned facing down 5 Using both hands carefully insert the original between the original guides CPT035 2 Getting Starte...

Страница 47: ...ttings Connecting the Machine System Settings For details about how to get the output basket ready see Setting the Output Basket Getting Started 1 Press the Home key on the top left of the control pan...

Страница 48: ...original feeds into the machine automatically and copying starts If Press Start Key is selected for Feed Start Method copying starts after you press the Start key 8 When the copy job is finished press...

Страница 49: ...ns described in this section advanced reduce enlarge copy functions are also available For details about these functions see Advanced Reduce Enlarge Copying Copy Document Server Preset Reduce Enlarge...

Страница 50: ...ginal and start scanning Zoom You can specify the reproduction ratio in increments of 0 1 CKN007 To specify a reproduction ratio enter the ratio using the number keys or specify the ratio with or This...

Страница 51: ...s OK twice 5 Place the original and start scanning Auto Reduce Enlarge The machine automatically detects the original size and then selects an appropriate reproduction ratio based on the paper size yo...

Страница 52: ...ope A0 A1 A2 A3 A4 B1 JIS B2 JIS B3 JIS B4 JIS mainly North America Engineering E 34 44 D 22 34 C 17 22 B 11 17 A 81 2 11 Architecture E 36 48 D 24 36 C 18 24 B 12 18 A 9 12 Others 30 21 30 42 1 Press...

Страница 53: ...B1 JIS B2 JIS B3 JIS B4 JIS mainly North America Original size Copy size Engineering E 34 44 E 34 44 D 22 34 C 17 22 B 11 17 A 81 2 11 E 36 48 D 24 36 C 18 24 B 12 18 A 9 12 D 22 34 C 17 22 B 11 17 A...

Страница 54: ...1 Press User Auto R E 2 Check that the combination selected for User Auto Reduce Enlarge is the one you want 3 Place the original and start scanning 3 Copy 52...

Страница 55: ...he paper bypass location with this function There are three types of One Sided Combine 1 Sided 2 Originals Combine 1 Side Copies two 1 sided originals to one side of a sheet 1 Sided 4 Originals Combin...

Страница 56: ...CKN016 1 Press Combine 2 Select the number of originals to combine 3 Press OK 4 Select the paper size 5 Place the original and start scanning 3 Copy 54...

Страница 57: ...gardless of the size of the original You can use this method to copy different sized originals to the same size Variable Cut Cuts the paper to the size entered Synchro Cut Cuts the paper at the same l...

Страница 58: ...l width It is cut in the following sizes mainly Europe Paper roll width Portrait Landscape 841 mm A0 A1 594 mm A1 A2 420 mm A2 A3 297 mm A3 A4 728 mm B1 JIS B2 JIS 515 mm B2 JIS B3 JIS 364 mm B3 JIS B...

Страница 59: ...81 2 11 Architecture Paper roll width Portrait Landscape 36 inch 36 48 24 36 24 inch 24 36 18 24 18 inch 18 24 12 18 12 inch 12 18 9 12 Other Paper roll width Portrait Landscape 30 inch 30 42 21 30 Va...

Страница 60: ...2 Enter the length with the number keys and then press 3 Press OK 4 Select Paper Input Location 1 or 2 5 Place the original and start scanning 3 Copy 58...

Страница 61: ...key 6 Press Paper Size 7 Specify the size of the paper and then press OK twice 8 Enter the number of copies with the number keys 9 Place the original and start scanning Copying starts automatically 1...

Страница 62: ...rom the paper bypass location 1 Open the front cover and then pull up the paper holding lever 2 Insert the paper copy side up into the paper bypass location 3 Lower the paper holding lever and then cl...

Страница 63: ...10 Press OK twice 11 Place the original and start scanning Copying starts automatically Copying from the Paper Bypass Location 61...

Страница 64: ...details about the Document Server see p 97 Storing Data You cannot use the paper bypass location with this function 1 Press Store File 2 Enter a file name user name or password if necessary 3 Press O...

Страница 65: ...DeviceMonitor for Client port you must first download SmartDeviceMonitor for Client from the manufacturer s Web site and install it on your computer Contact your local dealer for information on downlo...

Страница 66: ...restart the computer either now or later and then click Finish Using the IPP port To print via IPP SSL use the SmartDeviceMonitor for Client port Installation of the certificate is especially necessar...

Страница 67: ...the machine you want to use and then click Next The installation starts 13 Follow the instructions that appear Modify settings such as printer name and default printer configuration as necessary You c...

Страница 68: ...ot close this manual 2 Insert the provided CD ROM into the computer s CD ROM drive If the AutoPlay dialog box appears click Run AUTORUN EXE 3 Select an interface language and then click OK 4 Click Pos...

Страница 69: ...k OK 17 Check that the port of the selected printer is displayed in Port 18 Configure the user code default printer and shared printer as necessary 19 Click Continue The installation starts 20 Click F...

Страница 70: ...Click PostScript 3 Printer Driver 5 The software license agreement appears in the License Agreement dialog box After reading the agreement click I accept the agreement and then click Next 6 Select th...

Страница 71: ...from a list or specific location Advanced and then click Next 7 Insert the provided CD ROM into the computer s CD ROM drive If Auto Run starts click Cancel and then Exit 8 Select the Search removable...

Страница 72: ...drive is D the source files are stored in the following locations 32 bit driver D X86 DRIVERS PS XP_VISTA MUI DISK1 64 bit driver D X64 DRIVERS PS X64 MUI DISK1 8 Click Next The installation starts 9...

Страница 73: ...e printer driver location If the CD ROM drive is D the source files of the printer driver are stored in the following locations 32 bit driver D X86 DRIVERS PS XP_VISTA MUI DISK1 64 bit driver D X64 DR...

Страница 74: ...equired to change the printer settings Log on as an Administrators group member You cannot change the machine default settings for individual users Settings made in the printer properties dialog box a...

Страница 75: ...6 In the Orientation list select Portrait or Landscape as the orientation of the original 7 In the Paper Input Location list select the paper input location that contains the paper you want to print...

Страница 76: ...Password box 7 Click OK 8 Click the Detailed Settings tab 9 In the Menu box click the Print Quality icon 10 In the Select Print Quality list select Speed Priority Standard or Quality Priority 11 Chan...

Страница 77: ...print You can select all the Locked Print files at once by pressing Select All Jobs after selecting a file 5 Press Print 6 Enter the password using the number keys and then press OK 7 Enter the number...

Страница 78: ...o specify the print time of the document select the Set Print Time check box and then specify the time You can specify the time in 24 hour format 8 Click OK 9 Click the Detailed Settings tab 10 In the...

Страница 79: ...PL011 2 Press the Print Jobs tab 3 Press Hold Print Job 4 Select the files you want to print You can select all the Hold Print files at once by pressing Select All Jobs after selecting a file 5 Press...

Страница 80: ...o stores the file in the machine 5 Click Details 6 Enter a User ID in the User ID box You can optionally set a file name and a password of a Stored Print file 7 Click OK 8 Click the Detailed Settings...

Страница 81: ...t All Jobs after selecting a file 5 Press Print If you set the password in the printer driver enter the password If multiple print files are selected and some of these require a password the machine p...

Страница 82: ...4 Print 80...

Страница 83: ...Sending by Scan to Folder Scan and confirm the details of the destination computer Also refer to Registering Folders Connecting the Machine System Settings and register the address of the destination...

Страница 84: ...plain how to create a shared folder on a computer running Windows and how to confirm the computer s information In these examples Windows 7 Ultimate is the operating system and the computer is a membe...

Страница 85: ...a normal folder in a location of your choice on the computer 2 Right click the folder and then click Properties When using Windows XP right click the folder and then click Sharing and Security 3 On t...

Страница 86: ...of results select the groups and users you want to grant access to and then click OK 7 In the Select Users or Groups window click OK 8 In the Groups or user names list select a group or user and then...

Страница 87: ...Send of File Transfer settings are applied 10 Press Change under Login User Name 11 Enter the login user name of the destination computer and then press OK 12 Press Change under Login Password 13 Ente...

Страница 88: ...omputer s IP address in the path For example if the IP address of the destination computer is 192 168 0 191 and the folder name is Share the path will be 192 168 0 191 Share 3 Press OK If the format o...

Страница 89: ...is selected 4 Select the name whose folder you want to delete Press the name key or enter the registered number using the number keys You can search by the registered name user code folder name or e...

Страница 90: ...the destination setting enter the user name for logging in to the computer Press Manual Entry to the right of the user name field to display the soft keyboard 7 Depending on the destination setting e...

Страница 91: ...on the Home screen CPL011 2 Make sure that no previous settings remain If a previous setting remains press the Reset key 3 Press the E mail tab 4 If necessary specify the scan settings according to t...

Страница 92: ...mail recipient has opened the e mail 9 Place originals If scanning does not start automatically press the Start key Registering an E mail Destination 1 Press the User Tools Counter key 2 Press Addres...

Страница 93: ...Destination 1 Press the User Tools Counter key 2 Press Address Book Mangmnt 3 Check that Program Change is selected 4 Select the name whose e mail address you want to delete Press the name key or ent...

Страница 94: ...Press Delete All and then press OK 8 Press OK 9 Press Exit 10 Press the User Tools Counter key Entering an E mail Address Manually 1 Press Manual Entry 2 Enter the e mail address 3 Press OK 5 Scan 92...

Страница 95: ...t files The supplier shall not be responsible for any damage that may result from the loss of files For long term storage of files we recommend the use of DeskTopBinder For details contact your local...

Страница 96: ...d then press OK 6 Press OK 7 If necessary press Scan Settings to specify scanner settings such as resolution and scan size 8 If necessary press Next Original Wait 9 Place originals If scanning does no...

Страница 97: ...select a single page file type when scanning multiple originals one file is created for each single page and the number of files sent is the same as the number of pages scanned Multi page TIFF PDF PD...

Страница 98: ...Specifying Scan Settings 1 Press Scan Settings 2 Specify resolution scan size and other settings as required 3 Press OK 5 Scan 96...

Страница 99: ...When scanning by the scanner make sure that all other operations are ended File Name A file name such as COPY0001 and COPY0002 is automatically attached to the scanned document You can change the file...

Страница 100: ...Enter a file name and then press OK 7 Press Password 8 Enter a password with the number keys and then press OK You can use four to eight digits for the password 9 For double check enter the password a...

Страница 101: ...h function see Copy Document Server 1 Select a document to be printed 2 When printing two or more documents at a time repeat step 1 Up to 30 documents can be printed 3 When specifying printing conditi...

Страница 102: ...6 Document Server 100...

Страница 103: ...owser 2 Enter http machine s IP address or host name in your Web browser s URL bar Top Page of Web Image Monitor appears If the machine s host name has been registered on the DNS or WINS server you ca...

Страница 104: ...n Click the Web browser s Refresh button to refresh the entire browser screen Help Use Help to view or download Help file contents 4 Basic Information area Displays the basic information of the machin...

Страница 105: ...cover be careful not to trap or injure your fingers When opening or closing the front cover do not put your fingers over the folding parts of the covers Doing so may result in your fingers becoming t...

Страница 106: ...size When copying onto custom size cut paper using the copier function see p 60 Copying onto Custom Size Paper from the Paper Bypass Location When printing onto custom size paper roll using the print...

Страница 107: ...location When the paper roll is in one of the following conditions you cannot use it Cut off the edge of the paper with scissors before loading it The leading edge is damaged CPT043 Adhesive tape glue...

Страница 108: ...The corners are folded CPT046 The paper curls away from the paper roll CPT050 The edge is dented CPT047 The paper has holes in it 8 Adding Paper and Ink 106...

Страница 109: ...CPT011 Attach the flange with all the paper roll adjustment levers open when loading a paper roll whose core is 50 8 mm 2 inches If you close the paper roll adjustment lever after the paper roll is at...

Страница 110: ...aper holder to other paper roll place the paper roll on a flat surface Names of the parts of the paper holder 5 1 4 2 CPT039 3 3 1 Left flange 2 Spool 3 Paper roll adjustment levers 4 Right flange 5 L...

Страница 111: ...aper roll to the paper holder and machine make sure that the edge of the paper feeds from top of the roll toward the front CPT032 1 1 Right flange 1 Press the Home key on the top left of the control p...

Страница 112: ...tput basket CPT013 4 Pull the bar in front of Paper Input Location 2 forward CPT014 5 When the paper roll is loaded press down the rewind button on the right of the paper input location for one second...

Страница 113: ...it so that the paper feeds out 7 Hold both flanges and place the paper roll on the flat place in front of the bearing CPT016 1 1 1 Bearing 8 Grip the flanges again and then remove it from the paper i...

Страница 114: ...ool from the paper roll CPT018 13 Adjust the paper roll adjustment levers of both flanges according to the core of the paper roll you want to load 14 Insert the flange with the spool from the right si...

Страница 115: ...r roll 17 Lower the lock lever on the left flange CPT040 18 Place the paper roll on the flat place in front of the bearing CPT023 19 Place the right and left edge of the shaft into the bearing Turn th...

Страница 116: ...nches paper roll proceed to step 21 21 Hold the edge of the paper with your hands underneath the paper and feed paper so that the edge of the paper passes over the guides behind the paper roll CPT024...

Страница 117: ...ulled in to the inside of the machine and the beeper sounds CPT031 1 1 1 Roller 23 Replace the bars of the output basket CPT025 1 2 1 2 After pushing the bar that is in front of Paper Input Location 2...

Страница 118: ...step 26 are finished the machine pulls the paper inside and paper is output about one meter 40 inches from the paper output location Then the machine rewinds the paper to the prescribed position Do n...

Страница 119: ...on explains how to specify the size for a custom size roll of paper from the control panel when using RP GL 2 or RTIFF as a printer language For details about how to change the printer language see Sp...

Страница 120: ...orizontal size of the paper using the number keys and then press 6 Enter the vertical size of the paper using the number keys and then press 7 Press OK 8 Press the User Tools Counter key 8 Adding Pape...

Страница 121: ...paper behind the machine in advance If the edge of the paper touches the floor and get dirty a malfunction might occur 1 Make sure that Ready appears on the screen 2 When the paper roll is loaded pre...

Страница 122: ...aper bypass location Align the right corner of the paper to the paper set position on the paper bypass location CPT028 2 1 1 1 Rollers 2 Paper set position 6 Lower the paper holding lever to fix the p...

Страница 123: ...on Press the rewind button to rewind the roll of paper Rewinding it manually may cause paper jams When Film Matted is specified for Paper Type or when Prevent Paper Abrasion is specified press Exit o...

Страница 124: ...Connecting the Machine System Settings When copying from the paper bypass location see p 59 Copying from the Paper Bypass Location When printing from a computer see p 122 Printing from the Paper Bypa...

Страница 125: ...Counter key Specifying a custom size of cut paper using the control panel 1 Press the User Tools Counter key CJS039 2 Press Input Paper Settings 3 Press Printer Bypass Paper Size 4 Press Custom Size I...

Страница 126: ...horizontal size of the paper using the number keys and then press 9 Press OK twice 10 Press the User Tools Counter key Specifying paper type using the control panel 1 Press the User Tools Counter key...

Страница 127: ...5 Select the proper items according to the paper type and thickness you want to use 6 Press OK 7 Press the User Tools Counter key Loading Paper into the Paper Bypass Location 125...

Страница 128: ...mm 440 mm 490 mm 515 mm 594 mm 610 mm 24 inches 620 mm 625 mm 660 mm 680 mm 707 mm 728 mm 800 mm 841 mm 880 mm 914 mm 36 inches Recycled Paper 51 94 g m2 14 25 lb Thin Paper Plain Paper Paper roll Di...

Страница 129: ...m 594 mm 610 mm 24 inches 620 mm 625 mm 660 mm 680 mm 707 mm 728 mm 800 mm 841 mm 880 mm 914 mm 36 inches Coated CAD 80 125 g m2 21 33 lb Plain Paper Middle Thick Paper roll Diameter 176 mm or less Co...

Страница 130: ...Paper Plain Paper Paper roll Diameter 6 9 inches or less Core 2 inches 3 inches Width 11 inches 12 inches 17 inches 18 inches 22 inches 24 inches 30 inches 34 inches 36 inches Recycled Paper 51 94 g...

Страница 131: ...ated CAD 80 125 g m2 21 33 lb Plain Paper Middle Thick Paper roll Diameter 6 9 inches or less Core 2 inches 3 inches Width 11 inches 12 inches 17 inches 18 inches 22 inches 24 inches 30 inches 34 inch...

Страница 132: ...S B2 JIS B3 JIS B4 JIS 880 1230 mm 880 1189 mm 880 615 mm 880 594 mm 800 1189 mm 800 594 mm 707 1000 mm 707 500 mm 680 841 mm 680 420 mm 660 841 mm 660 420 mm 625 880 mm 625 440 mm 620 880 mm 620 440...

Страница 133: ...m 440 420 mm 440 297 mm Custom size Paper width 279 4 914 4 mm Paper length 210 0 2000 0 mm 1 sheet Translucent Paper vellum 51 94 g m2 14 25 lb Thin Paper Plain Paper Cut paper Regular size A0 A1 A2...

Страница 134: ...mm 440 594 mm 440 420 mm 440 297 mm Custom size Paper width 279 4 914 4 mm Paper length 210 0 2000 0 mm 1 sheet Film Matted 51 190 g m2 14 51 lb Thin Paper Thick Paper 1 Cut paper Regular size A0 A1 A...

Страница 135: ...94 mm 440 420 mm 440 297 mm Custom size Paper width 279 4 914 4 mm Paper length 210 0 2000 0 mm 1 sheet Coated Paper 80 220 g m2 21 59 lb Plain Paper Thick Paper 2 Cut paper Regular size A0 A1 A2 A3 A...

Страница 136: ...4 JIS 880 1230 mm 880 1189 mm 880 615 mm 880 594 mm 800 1189 mm 800 594 mm 707 1000 mm 707 500 mm 680 841 mm 680 420 mm 660 841 mm 660 420 mm 625 880 mm 625 440 mm 620 880 mm 620 440 mm 490 594 mm 490...

Страница 137: ...4 B 12 18 A 9 12 Other 81 2 14 30 42 21 30 Custom size Paper width 11 00 36 00 inches Paper length 8 27 78 74 inches 1 sheet Recycled Paper 51 94 g m2 14 25 lb Thin Paper Plain Paper Cut paper Regular...

Страница 138: ...A 9 12 Other 81 2 14 30 42 21 30 Custom size Paper width 11 00 36 00 inches Paper length 8 27 78 74 inches 1 sheet Special Paper 51 220 g m2 14 59 lb Thin Paper Thick Paper 2 Cut paper Regular size En...

Страница 139: ...her 81 2 14 30 42 21 30 Custom size Paper width 11 00 36 00 inches Paper length 8 27 78 74 inches 1 sheet Coated CAD 80 125 g m2 21 33 lb Plain Paper Middle Thick Cut paper Regular size Engineering E...

Страница 140: ...12 Other 81 2 14 30 42 21 30 Custom size Paper width 11 00 36 00 inches Paper length 8 27 78 74 inches 1 sheet Inkjet Plain 51 125 g m2 14 33 lb Thin Paper Middle Thick Cut paper Regular size Enginee...

Страница 141: ...r input location runs out of paper This function is called Auto Tray Switching This saves interrupting a copy run to replenish paper when making a large number of copies See System Settings Connecting...

Страница 142: ...th out any curls in the paper before loading translucent paper vellum When copying or printing an original or data that contains a lot of images such as photos onto the translucent vellum paper let th...

Страница 143: ...ng ink on your clothing If ink comes into contact with your clothing wash the stained area with cold water Hot water will set the ink into the fabric and make removing the stain impossible When removi...

Страница 144: ...possible if only one cartridge is empty When No ink appears on the control panel replace corresponding color print cartridges Follow the instruction on the screen regarding how to replace a print car...

Страница 145: ...g the replacement procedure and do not disconnect the power plug from the wall outlet Once it is inserted do not remove the print cartridge unless necessary Do not remove or tamper with the print cart...

Страница 146: ...r replacing ink avoid getting ink on your clothing If ink comes into contact with your clothing wash the stained area with cold water Hot water will set the ink into the fabric and make removing the s...

Страница 147: ...ntainer please contact your local sales office If you discard it by yourself discard it according to the requirements of your local municipalities mainly North America Please see our local company web...

Страница 148: ...he stain impossible If ink gets into contact with eyes wash eyes immediately with running water Consult a doctor if necessary If ink is ingested induce vomiting by drinking a strong saline solution Co...

Страница 149: ...ce ink may leak inside the machine CPW009 Do not open the ink collector unit cover other than when replacing the ink collector unit Doing so may result in misfeeds Follow the instruction on the screen...

Страница 150: ...8 Adding Paper and Ink 148...

Страница 151: ...eed occurs For details about removing jammed paper see Removing Jammed Paper Troubleshooting Load Paper indicator Appears when paper runs out For details about loading paper see Loading Paper Paper Sp...

Страница 152: ...error message displayed on the function screen and take the appropriate action p 177 Messages Displayed When Using the Copy Document Server Function p 180 Messages Displayed When Using the Printer Fu...

Страница 153: ...The machine is unable to connect to the network A network error has occurred Press Check in the function which error is occurred And then check the displayed message and take appropriate action For d...

Страница 154: ...fully warmed up and is ready for use Five long beeps Soft alert An auto reset was performed through the simple screen of the Copier Document Server function or the Scanner function Five long beeps rep...

Страница 155: ...required varies by function Wait a little longer Can only use the scanner function and scan originals The machine is performing maintenance operations Wait until the maintenance operations are finishe...

Страница 156: ...sage disappears Do not turn off the main power switch while the message is displayed If the machine is not ready in 5 minutes turn off the main power switch and make sure the main power indicator turn...

Страница 157: ...es to store pages that have been scanned Delete unnecessary files by pressing Delete File Press No if you are not storing pages that have been scanned Delete unnecessary files by pressing Delete File...

Страница 158: ...id user name The logged in user name does not have permission for the selected function For details about how to set permissions see Security Guide The edge of the paper roll cannot be fed back into t...

Страница 159: ...en if misfed paper is removed When a misfeed message appears it remains until you open and close the front cover as required Paper is still jammed in the paper input location After removing misfed pap...

Страница 160: ...s Maintenance and Specifications Print is disabled The ink collector unit is full Contact your sales or service representative Misfeeds occur frequently Using curled cut paper often causes misfeeds or...

Страница 161: ...lly Maximum waiting time 2 minute s appears The shut down procedure has begun because the main power switch was turned off while the machine was in standby mode or performing an operation Follow the m...

Страница 162: ...ain The image data size is not valid See the manual for required data appears The image data size is not valid For details about the image data size for shortcut images see Customizing the Home Screen...

Страница 163: ...rasion mode automatically For details about setting Prevent Paper Abrasion mode see General Features Connecting the Machine System Settings Checking Whether a Nozzle is Clogged Print the nozzle check...

Страница 164: ...is should resolve the problem If the test pattern is still patchy contact your service representative For details about printing the test pattern see p 163 Print Nozzle Check Pattern For details about...

Страница 165: ...Paper Abrasion mode s status If you perform an adjustment while Prevent Paper Abrasion mode is enabled and do not want to print using this mode cancel Prevent Paper Abrasion mode and then perform the...

Страница 166: ...he Clean Print heads and Flush Print heads functions in Maintenance For example if the print results indicate that the test pattern of Black 1 is not firing select Black 1 for Clean Print heads or Flu...

Страница 167: ...one color has run out Cleaning may be incomplete if ink in a cartridge gets too low or runs out during cleaning An error will occur and head cleaning will not be possible if There is a misfeed One of...

Страница 168: ...leaning Use this function only if repeated head cleaning fails to reactivate a mis or nonfiring nozzle Perform this function on a color basis Flushing consumes ink Perform this function only when nece...

Страница 169: ...differs depending on the print quality Printing the test pattern consumes ink Perform this function only when necessary Adjustment results vary depending on the Prevent Paper Abrasion mode s status I...

Страница 170: ...e head position for Select Standard for normal printing Select Speed Priority to prioritize the adjustment time Select Quality Priority to prioritize the print quality 5 Press Exit If Auto Adjust Head...

Страница 171: ...esults vary depending on the Prevent Paper Abrasion mode s status If you perform an adjustment while Prevent Paper Abrasion mode is enabled and do not want to print using this mode cancel Prevent Pape...

Страница 172: ...t Quality Priority to prioritize the print quality 5 Check the optimal adjustment value based on the print results of the test pattern The optimal adjustment value is the number above the square patte...

Страница 173: ...m this function only when necessary Adjustment results vary depending on the Prevent Paper Abrasion mode s status If you perform an adjustment while Prevent Paper Abrasion mode is enabled and do not w...

Страница 174: ...n the center of the printed lines and the paper edges CQA006 Adjust so that the margins are 5 mm 0 20 inches For example if the center of the horizontal line is printed 4 mm 0 16 inches from the top e...

Страница 175: ...er feed if misalignment of horizontals or image surface irregularities occurs To check the print results of the test sheet proceed to step 6 Printing the test sheet consumes ink Perform this function...

Страница 176: ...djust and then press Print Test Sheet 5 Press Start Printing 6 Check the optimal adjustment value based on the print results of the test sheet The optimal adjustment value is the number next to the sq...

Страница 177: ...ntals are misaligned in the opposite direction For example 2 square is the faintest and the horizontals on both sides of 6 are in the opposite direction to 2 so the adjustment value is between 3 and 5...

Страница 178: ...Enter the adjustment value with and then press OK 9 Press Exit To check the results of paper feed adjustment print the test sheet again 10 Press the User Tools Counter key For details about Prevent P...

Страница 179: ...details about specifying the settings see Sizes Detectable with Auto Paper Select Paper Specifications and Adding Paper Check paper size An irregular paper size is set Check the settings for Reduce En...

Страница 180: ...ion Cancel the job that is being processed For example press Exit and then press the Home key Next press the Document Server icon on the Home screen and then press the Stop key When the message appear...

Страница 181: ...ile which you are not authorized to delete contact the person who created the file You do not have the privileges to use this function The logged in user name does not have permission for the selected...

Страница 182: ...ob Suspended Printing was temporarily stopped by SmartDeviceMonitor for Client You can resume printing via My Job List in SmartDeviceMonitor for Client or via the Web Image Monitor To resume printing...

Страница 183: ...then check the card The wireless LAN board was not inserted when the machine was turned on The wireless LAN board was pulled out after the machine was turned on The settings are not updated although...

Страница 184: ...cted in the printer driver into the paper input location For details about how to change the paper size see Changing the Paper Size Paper Specifications and Adding Paper Paper size and type are mismat...

Страница 185: ...s without the authority to do so To check your access permission for stored documents or to delete a document you do not have permission to delete see Security Guide Updating the destination list Plea...

Страница 186: ...ize of the multiple files that are selected exceeds 1 GB select files separately When the size of selected file exceeds 1 GB print by using a function other than the Direct printing function from remo...

Страница 187: ...the operation An error occurred while processing an Unauthorized Copy Prevention job The job was cancelled You tried to store a file in the Document Server when Unauthorized Copy Prevention was specif...

Страница 188: ...t how to specify classification code settings see Configuring Classification Codes Print Collate has been cancelled Collate was canceled Turn off the main power switch and then back on again If the me...

Страница 189: ...s stored Delete some of the files stored in the Document Server Reduce the size that you want to send Exceeded max number of files of Document Server Cannot store The maximum file capacity of the Docu...

Страница 190: ...hile using the error job store function to store Normal Print jobs as Hold Print files the maximum page capacity was exceeded Delete unneeded files stored in the machine Reduce the number of pages to...

Страница 191: ...sent to the machine Information for user authentication is already registered for another user The user name for LDAP or Integration Server authentication was already registered in a different server...

Страница 192: ...again Sending data failed The machine received a command to stop transmission from the printer driver Check if the computer is working correctly The selected paper type is not supported This job has b...

Страница 193: ...print the Configuration Page see List Test Print Print Messages Displayed When Using the Scanner Function This section describes likely causes of and possible solutions for the error messages that app...

Страница 194: ...you are using anti virus software add the program to the exclusion list in the application settings For details about how to add programs to the exclusion list see the anti virus software Help To prev...

Страница 195: ...and scan data cannot be saved Even if the memory device appears to have sufficient free space data might not be saved if the maximum number of files that can be saved is exceeded Replace the memory de...

Страница 196: ...tures The file size per page has reached the maximum e mail size specified in Scanner Features Change the Scanner Features settings as follows Increase the e mail size limit in Max E mail Size Change...

Страница 197: ...cifiable alphanumeric characters in a path has been exceeded The maximum number of characters which can be entered for the path is 256 Check the number of characters you entered and then enter the pat...

Страница 198: ...nned data as capturing files is unavailable Too many files are waiting to be delivered Try again after they have been delivered Exceeded max page capacity per file Press Send to send the scanned data...

Страница 199: ...first page could not be scanned Wait for a while and then retry the scan operation Reduce the scan area or scanning resolution For details about changing scan area and scanning resolution see Various...

Страница 200: ...er function is being used such as the Copier function Cancel the job that is being processed For example press Exit and then press the Home key Next press the Copier icon on the Home screen and then p...

Страница 201: ...ata will be resent later A network error has occurred and a file was not sent correctly Wait until sending is retried automatically after the preset interval If sending fails again contact your admini...

Страница 202: ...t access privileges Only file s with access privileges will be deleted You have tried to delete files without the authority to do so To check your access permission for stored documents or to delete a...

Страница 203: ...or sender s name has been cleared A specified destination or sender s name was cleared when the destination list in the delivery server was updated Specify the destination or sender s name again Upda...

Страница 204: ...displaying the entire image is not necessary press the Start key to start scanning with the current scaling factor Not all of the image will be scanned Using Specify Reproduction Ratio to scale down...

Страница 205: ...tificate XXX and YYY indicate the user action There is no device certificate PDF with digital signature or the certificate is invalid A new device certificate PDF with digital signature must be instal...

Страница 206: ...ed For details about the user certificate destination certificate see Security Guide The group destination cannot be selected because it contains a destination with a certificate that is not currently...

Страница 207: ...ication succeeded However the access privileges for scanner function has been denied The logged in user name does not have permission for scanner function For details about how to set permissions see...

Страница 208: ...ectly Cancel the personal firewall of the client computer For details about firewall see Windows Help Use an application such as telnet to make sure SNMPv1 or SNMPv2 is set as the machine s protocol F...

Страница 209: ...eeded the setting range of the machine Check whether the scanning settings made with the application exceed the setting range of the machine Fatal error has occurred in the scanner An unrecoverable er...

Страница 210: ...scan the original again Invalid Winsock version Please use version 1 1 or higher You are using an invalid version of Winsock Install the operating system of the computer or copy Winsock from the oper...

Страница 211: ...e used on this machine Contact your service representative Scanner is not available Check the scanner connection status The machine s main power switch is off Turn on the main power switch Scanner is...

Страница 212: ...ection Tool For the WIA driver check the Network Connection tab in the properties Use Web Image Monitor to set LLMNR of IPv6 to Active In Windows XP IPv6 addresses cannot be obtained from the host nam...

Страница 213: ...edia Center Edition Microsoft Windows XP Tablet PC Edition The product names of Windows Vista are as follows Microsoft Windows Vista Ultimate Microsoft Windows Vista Business Microsoft Windows Vista H...

Страница 214: ...ft Windows Server 2008 R2 Standard Microsoft Windows Server 2008 R2 Enterprise Other product names used herein are for identification purposes only and might be trademarks of their respective companie...

Страница 215: ...anel 25 Document Server 10 16 62 97 99 E E mail address 90 91 92 E mail destination 90 91 92 Energy Saver key 26 Enlarging originals 47 Enter key 26 Error message 177 179 180 181 185 191 205 External...

Страница 216: ...e 47 Prevent Paper Abrasion mode 161 Preventing information leakage 18 Print cartridge 145 Print Nozzle Check Pattern 163 Print heads 161 Printer 73 Printer Bypass Paper Size 122 123 Printer driver 63...

Страница 217: ...mbols 5 Synchro Cut 55 T Trademark 211 Turning off the power 37 Turning on the power 37 U Unauthorized copy prevention 20 Used print cartridge 145 User Auto Reduce Enlarge 50 User code authentication...

Страница 218: ...MEMO 216 EN GB EN US D124 7502...

Страница 219: ...2012...

Страница 220: ...D124 7502 US EN GB EN...

Отзывы: