background image

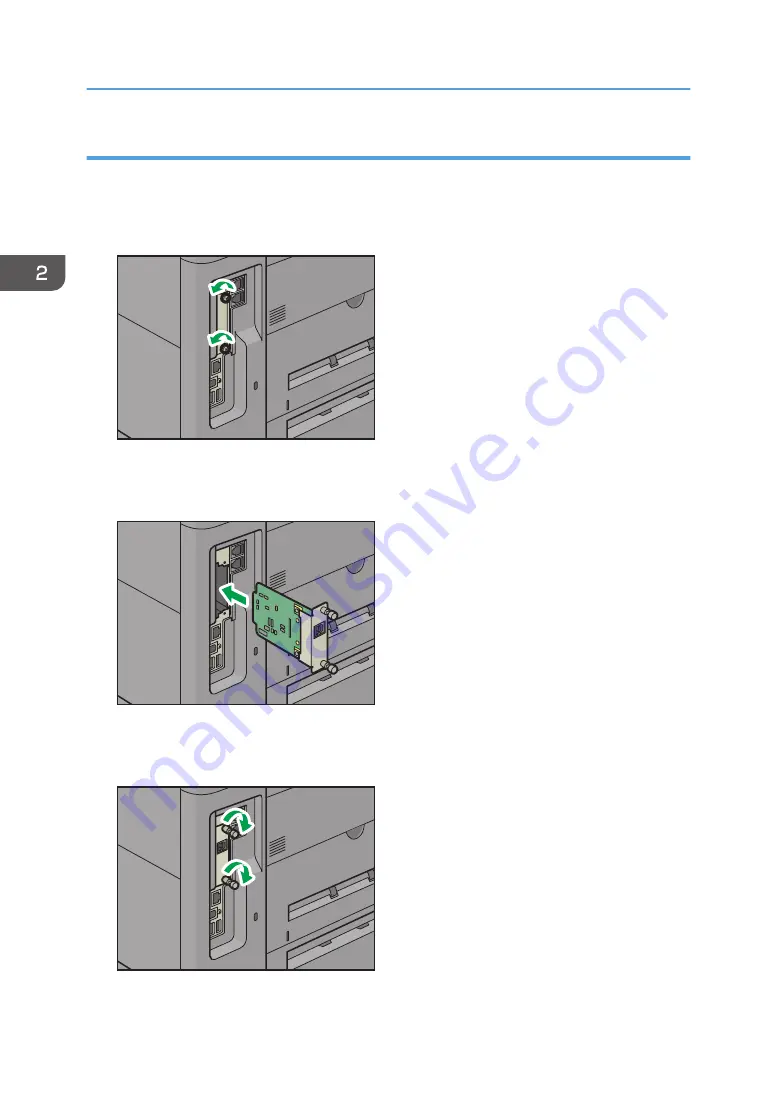
Installing the Extended USB board

1.

Check the contents of the package.

2.

Turn the machine off and unplug the power cord.

3.

Loosen the two screws and remove the slot cover.

DPK101

The removed cover will not be reused.

4.

Fully insert the interface board.

DPK106

Check that the interface board is firmly connected to the controller board.

5.

Tighten the two screws to secure the interface board.

DPK107

6.

Plug in the power cord, and then turn on the machine.

2. Getting Started

36

Содержание MP 501SPF

Страница 1: ... Safety Information in Read This FIrst before using the machine Information for This Machine Troubleshooting Adding Paper and Toner Web Image Monitor Document Server Scan Print Fax Copy Getting Started What You Can Do with This Machine User Guide ...

Страница 2: ......

Страница 3: ... Receiving Faxes via the Internet 20 Sending and Receiving Faxes by Using the Machine without Fax Unit Installed 21 Using the Facsimile and the Scanner in a Network Environment 22 Embedding Text Information in Scanned Files 22 Preventing Information Leakage Security Functions 23 Centrally Controlling Scan Conditions and Distribution 24 Monitoring and Setting the Machine Using a Computer 24 Prevent...

Страница 4: ...the Main Power 69 Turning Off the Main Power 69 Logging In the Machine 71 When the Authentication Screen is Displayed 71 User Code Authentication Using the Control Panel 71 Logging In Using the Control Panel 71 Logging Out Using the Control Panel 72 Placing Originals 74 Placing Originals on the Exposure Glass 74 Placing Originals in the Auto Document Feeder 74 3 Copy Basic Procedure 77 Auto Reduce...

Страница 5: ...ng the Journal Manually 100 5 Print Quick Install 101 Quick Installation via a Network 101 Quick Installation via a USB Connection 101 Displaying the Printer Driver Properties 103 Standard Printing 104 When Using the PCL 6 Printer Driver 104 Printing on Both Sides of Sheets 105 When Using the PCL 6 Printer Driver 105 Types of Two sided Printing 105 Combining Multiple Pages into Single Page 106 Whe...

Страница 6: ...g an E mail Address Manually 126 Basic Procedure for Storing Scan Files 127 Checking a Stored File Selected from the List 128 Specifying the File Type 129 Specifying Scan Settings 130 7 Document Server Storing Data 131 Printing Stored Documents 133 8 Web Image Monitor Displaying Top Page 135 9 Adding Paper and Toner Loading Paper 137 Precautions for Loading Paper 137 Loading Paper into Paper Trays...

Страница 7: ... Messages Displayed When You Use the Scanner Function 197 Messages Displayed on the Control Panel When You Use the Scanner Function 197 Messages Displayed on the Client Computer 207 When Other Messages Appear 214 When There Is a Problem Scanning or Storing Originals 215 When the Address Book Is Updated 216 When Data Cannot Be Sent Due to a Problem with the Destination 217 When the Machine Cannot B...

Страница 8: ...Notes to users in the state of California Notes to Users in USA mainly North America 226 INDEX 227 6 ...

Страница 9: ...g user errors This symbol is located at the end of sections It indicates where you can find further relevant information Indicates the names of keys on the machine s display or control panels mainly Europe and Asia mainly Europe or mainly Asia mainly North America Differences in the functions of Region A and Region B models are indicated by two symbols Read the information indicated by the symbol ...

Страница 10: ...Europe and Asia If the label contains the following your machine is a region A model CODE XXXX 27 29 220 240 V mainly North America If the label contains the following your machine is a region B model CODE XXXX 17 120 127 V Dimensions in this manual are given in two units of measure metric and inch If your machine is a Region A model refer to the metric units If your machine is a Region B model re...

Страница 11: ...Names of Major Features In this manual major features of the machine are referred to as follows Auto Document Feeder ADF 9 ...

Страница 12: ...10 ...

Страница 13: ...cument Server Printing multi page documents and received faxes on a single sheet Combine Copier Fax See Combined Copying Copy Document Server See Combine Two Originals Fax Printing received faxes on both sides of sheets 2 Sided Print See Two Sided Printing Fax Converting received faxes to electronic formats Paperless Fax See Confirming Printing Deleting Received and Stored Documents Fax Sending fi...

Страница 14: ... the URL of the folder in which scan files are stored See Sending the URL by E mail Scan Storing scan files in a shared folder See Basic Procedure When Using Scan to Folder Scan Storing scan files on media See Basic Procedure for Saving Scan Files on a Memory Storage Device Scan Embedding text information in scanned files See Embedding Text Information in Scanned Data Scan Converting transmitted f...

Страница 15: ...ee Registering Entered Destinations to the Address Book Fax See Registering a Destination E mail Address or Folder Scan Using Web Image Monitor to register destinations from a computer See Registering Internet Fax Destination Information Using Web Image Monitor Fax Downloading destinations registered in the machine to the LAN Fax driver destination list See Using the machine s Address Book as the ...

Страница 16: ...stering frequently used printing settings to the printer driver See Using One Click Presets Print Changing the initial settings of the printer driver to frequently used printing settings See Displaying the Printing Preferences Dialog Box Print Adding shortcuts to frequently used programs or Web pages See Adding Icons to the Home Screen Convenient Functions Changing the order of the function and sh...

Страница 17: ...en The programs or Web pages can be recalled easily by pressing the shortcut icons You can display only the icons of functions and shortcuts that you use You can change the order of the function and shortcut icons For details about the features on the Home screen see How to Use the Home Screen Getting Started For details about how to customize the Home screen see How to Customize the Home Screen C...

Страница 18: ...or Enlarging Originals Copy Document Server Copier functions such as Duplex Combine Booklet and Magazine allow you to save on paper by copying multiple pages onto single sheets For details about duplex copying see Duplex Copying Copy Document Server For details about combined copying see Combined Copying Copy Document Server For details about the booklet and magazine functions see Booklet Magazine...

Страница 19: ...g Them Print You can collate printed paper See Collate Print You can print files stored on a removable memory device and specify print conditions such as print quality and print size See Direct Printing from a Memory Storage Device Print Utilizing Stored Document You can store files scanned in copier facsimile printer or scanner mode on the machine s hard disk Web Image Monitor allows you to use y...

Страница 20: ... in copier mode see Document Server Copy Document Server For details about the Document Server in printer mode see Saving and Printing Using the Document Server Print For details about the Document Server in fax mode see Storing a Document Fax For details about the Document Server in scanner mode see Storing and Saving the Scanned Documents Scan Sending and Receiving Faxes without Paper Reception ...

Страница 21: ...nts Fax Transmission You can send a fax from your computer over the network Ethernet or wireless LAN to this machine which then forwards the fax via its telephone connection LAN Fax CJQ605 To send a fax print from the Windows application you are working with select LAN Fax as the printer and then specify the destination You can also check the sent image data What You Can Do with This Machine 19 ...

Страница 22: ...y an e mail address instead of dialing the destination telephone number Internet Fax and e mail transmission See Specifying an Internet Fax Destination Manually Fax This machine can receive e mail messages via Internet Fax or from computers Internet Fax Reception and Mail to Print See Receiving E Mail by Internet Fax Mail to Print Fax Internet Fax compatible machines and computers that have e mail...

Страница 23: ...led You can send and receive faxes through a different machine s fax functions via a network Remote Fax CJQ612 To use the remote fax function install the fax connection unit on the main machine and sub machine The procedure for sending faxes is as same as that of for the machine with the fax unit When a job has finished confirm results displayed on sending history or printed on reports You can for...

Страница 24: ...view of Folder Transmission Function Fax See Basic Procedure When Using Scan to Folder Scan You can use Web Services on Devices WSD to send scan files to a client computer See Basic Operating Procedure of WSD Scanner Push Type Scan Embedding Text Information in Scanned Files You can extract text information from a scanned document and embed it in the file without using a computer If you scan a doc...

Страница 25: ... Scan Preventing Information Leakage Security Functions CJQ608 You can protect documents from unauthorized access and stop them from being copied without permission You can control the use of the machine as well as prevent machine settings from being changed without authorization By setting passwords you can prevent unauthorized access via the network You can erase or encrypt the data on the hard ...

Страница 26: ...e machine s scanner functions Both delivered files and user information can be controlled A A CUL004 xxx xxx xxx 600 dpi xxx xxx xxx 600 dpi You must set up and configure a Windows server to use the distributed scan management system This system is supported by Windows Server 2008 R2 or later For details about how to deliver files using the distributed scan management system see Managing Scan Cond...

Страница 27: ...ge the system settings manage jobs print the job history and configure the authentication settings See Using Web Image Monitor Connecting the Machine System Settings See Web Image Monitor Help Preventing Unauthorized Copying You can print embedded patterns on printouts to prevent unauthorized copying DPK129 What You Can Do with This Machine 25 ...

Страница 28: ...opying is being attempted If the document is copied on a machine without the Copy Data Security Unit the hidden text becomes conspicuous in the copy showing that the copy is unauthorized Using the printer driver you can embed text in the printed document for unauthorized copy prevention If the document is copied scanned or stored in a Document Server by a copier or multifunction printer the embedd...

Страница 29: ...ont and left view DPK052 1 2 3 4 7 6 8 9 10 5 1 ADF Lower the ADF over originals placed on the exposure glass If you load a stack of originals in the ADF the ADF will automatically feed the originals one by one 2 Exposure glass Place originals face down here For details see page 74 Placing Originals on the Exposure Glass 3 Control panel See page 44 Guide to the Names and Functions of the Machine s...

Страница 30: ... the paper size dial set the dial to If this is the case set the paper size using the control panel 7 Paper Tray Paper is loaded here For details about the sizes and types of paper that can be used see page 137 Loading Paper 8 Left Cover Open to access the waste toner bottle For details see Replacing the Waste Toner Bottle Maintenance and Specifications 9 Vents Prevent overheating 10 Standard Tray...

Страница 31: ...ails about the sizes and types of paper that can be used see page 140 Loading Paper into the Bypass Tray 5 Paper guides When loading paper in the bypass tray align the paper guides flush against the paper 6 Front Cover Open to access the inside of the machine and remove jammed paper Open here to replace the print cartridge Rear and left view DPK054 1 1 1 Vents Prevent overheating Guide to Names an...

Страница 32: ...s of the Machine s Options Guide to Functions of the Machine s External Options DPK055 1 2 1 500 sheet paper feed unit Paper is loaded here 2 Caster table A table with casters to place this machine 2 Getting Started 30 ...

Страница 33: ... format converter 5 Insert SD card options Insert in the SD card slot of the machine There are two slots for SD cards Each slot supports different types of SD cards If you want to use two or more SD cards that can be inserted in the same slot contact your sales or service representative Attaching the 500 sheet Paper Feed Unit You can install a 500 sheet paper feed unit It is dangerous to handle th...

Страница 34: ...one upon the other and then attach them as a single unit Before turning on the power remove the packaging material from the paper feed unit 1 Turn the machine off and unplug the power cord 2 Remove the packaging from the paper feed unit 3 Lift the machine using the inset grips on both sides of the machine DPK936 Lifting the machine requires two people When moving the machine do not touch the follo...

Страница 35: ...rrectly Installing the Interface Units Before beginning work ground yourself by touching something metal to discharge any static electricity Static electricity can damage the interface units Do not subject the interface units to physical shocks Installing the Wireless LAN interface board 1 Check the contents of the package 2 Turn the machine off and unplug the power cord 3 Loosen the two screws an...

Страница 36: ...e two screws to secure the interface board DPK103 6 Plug in the power cord and then turn on the machine 7 Print the configuration page to confirm that the board was attached correctly Installing the IEEE 1284 interface board 1 Check the contents of the package 2 Turn the machine off and unplug the power cord 2 Getting Started 34 ...

Страница 37: ...interface board DPK104 Check that the IEEE 1284 interface board is firmly connected to the controller board 5 Tighten the two screws to secure the interface board DPK105 6 Plug in the power cord and then turn on the machine 7 Print the configuration page to confirm that the board was attached correctly Installing Options 35 ...

Страница 38: ...two screws and remove the slot cover DPK101 The removed cover will not be reused 4 Fully insert the interface board DPK106 Check that the interface board is firmly connected to the controller board 5 Tighten the two screws to secure the interface board DPK107 6 Plug in the power cord and then turn on the machine 2 Getting Started 36 ...

Страница 39: ... confirm that the board was attached correctly Installing the USB Device Server The optional USB device server is an interface board that adds an Ethernet port to the machine With this option installed two Ethernet cables can be connected at the same time using the standard port on the machine and an additional port on the USB device server You can assign different IP addresses to each port so the...

Страница 40: ...nsert the interface board DPK109 Check that the interface board is firmly connected to the controller board 5 Tighten the two screws to secure the interface board DPK130 6 Connect the USB device server to the machine For details see the Setup Guide provided with the USB device server 2 Getting Started 38 ...

Страница 41: ...e at the bottom of the screen in the center 2 Flick the screen to the left and then press the User Tools icon 3 Press Machine Features 4 Press System Settings 5 Press Administrator Tools 6 Press Next four times 7 Press Energy Saver Mode to Disable Print Server 8 Press Disable Mode 9 Press OK 10 Press User Tools on the top right of the screen 11 Press Home at the bottom of the screen in the center ...

Страница 42: ...ter DPK111 6 Plug in the power cord and then turn on the machine 7 Print the configuration page to confirm that the board was attached correctly Installing SD Card Options Keep SD cards out of reach of children If a child swallows an SD card consult a doctor immediately Do not subject the card to physical shocks 1 Turn the machine off and unplug the power cord 2 Getting Started 40 ...

Страница 43: ...n the rear cover DPK112 3 Unhook the tab on the interface cover which is located on the side of the rear cover DPK113 4 Unhook the two tabs on the outside of the interface cover DPK114 Installing Options 41 ...

Страница 44: ...nsert two SD cards simultaneously use both slots If you want to use two or more SD cards simultaneously contact your service representative 6 Hook the two tabs on the outside of the interface cover DPK115 7 Hook the tab on the interface cover which is located on the side of the rear cover DPK116 2 Getting Started 42 ...

Страница 45: ...8 Close the rear cover DPK117 9 Plug in the power cord and then turn on the machine 10 Check that the SD card was installed correctly Installing Options 43 ...

Страница 46: ...er indicator flashes slowly In Fusing Unit Off mode the main power indicator is lit 3 Status indicator Indicates the status of the system Stays lit when an error occurs or the toner runs out 4 Data In indicator facsimile and printer mode Flashes when the machine is receiving print jobs or LAN Fax documents from a computer See Fax and Print 5 Fax indicator Indicates the status of the fax functions ...

Страница 47: ...e used on the display English is set as default 1 Press Home at the bottom of the screen in the center 2 Flick the screen to the left and then press the Change Langs Widget 3 Select the language you want to display 4 Press OK Changing the Display Language 45 ...

Страница 48: ... Kilogram force 1 kgf 9 8N To switch between screens flick your finger to the right or left on the screen DPK060 5 6 12 1 3 4 7 8 9 10 11 2 1 Logged in user icon When user authentication is enabled an icon is displayed that indicates that users are logged in Press the icon to show the names of the users that are currently logged in 2 System message Displays messages from the machine system and app...

Страница 49: ...ing this key may be disabled You can specify whether this key is enabled or not in some applications For details about the settings see Screen Features Connecting the Machine System Settings 11 Check Status Press to check the machine s system status operational status of each function and current jobs You can also display the job history and the machine s maintenance information 12 Icon display ar...

Страница 50: ...ee Screen Features Connecting the Machine System Settings Possible Operations on the Standard Application Screen Pinch in Place your thumb and forefinger on the screen and then pinch the fingers together to zoom out the screen Double tapping can also be effective for this operation DNE103 Pinch out Place your thumb and forefinger on the screen and then spread the fingers apart to zoom in the scree...

Страница 51: ...ext screen appears You can display the menu screen of the application you are using DNE101 Drag Slide your finger while pressing the screen You can move an icon to where you want to place it on the screen DNE111 Adding Icons to the Home Screen Adding shortcuts to the Home screen You can add shortcuts to the machine s functions How to Use the Home Screen 49 ...

Страница 52: ... from the list Adding shortcuts to bookmarks on the Home screen You can add shortcuts to bookmarks that have been registered in favorites in the Web Browser to the Home screen 1 Press Home at the bottom of the screen in the center 2 Press 3 Press the Program tab 4 Press and hold down the Bookmark icon The image of where the shortcut is to be placed on the Home screen is displayed 5 Drag the icon t...

Страница 53: ... to where you want to place it on the screen 9 Select the program you want to add from the list Adding widgets to the Home screen You can add widgets to the Home screen to show the remaining amount of toner or change the display language 1 Press Home at the bottom of the screen in the center 2 Press 3 Press the Widget tab 4 Press and hold down the widget icon you want to add The image of where the...

Страница 54: ...60 Scanner Screen Classic Application Screen You can select advanced functions and detailed settings according to the functions and settings you use frequently For details about how to use this screen see How to Use Each Application Getting Started For details about keys that appear on the screen of each Classic Application see Keys that Appear on the Initial Settings Screen and Screens of Each Cl...

Страница 55: ...e screen up or down DPK063 1 6 2 3 4 5 No Icon Description 1 You can adjust the density of the overall original in nine steps Specify the density by touching the icon and dragging it right or left 2 You can reduce or enlarge images 3 You can specify the paper tray containing the paper you want to copy to 4 You can specify the numbers of copies to be made Press a number to enter the number of copie...

Страница 56: ...64 8 9 7 10 11 No Icon Description 7 You can sort copies as a set in sequential order and stack copies of each page in a multi page original 8 You can specify the size of the original when copying custom size originals 9 You can select an original type that is suitable for your originals 10 You can divide an original that has many pages and scan it in smaller batches while copying it as a single d...

Страница 57: ...on you can register it to the Address Book or remove it from the destinations By flicking up and down you can confirm the selected destinations 2 You can perform the following operations related to Fax Reception Check Stored Reception Files Operate Personal Box Print ID Required Print Files Manual Reception Print Memory Lock Check Reception File Settings How to Use Each Application 55 ...

Страница 58: ...dress Book Edit destinations Remove destinations from the destination list 4 You can perform the following operations related to Job Status Confirm Transmission Standby Files Check Transmission Results Check Reception Results Print Journals 5 Press to clear your current settings 6 Press to display the preview screen after scanning originals 7 You can check the settings in Settings 8 Press to open ...

Страница 59: ...nations manually Select from the transmission history Specify a registration number from the Address Book Search for a destination in the Address Book or on the LDAP server Press to display the Remaining Memory Information Settings screen You can switch the three screens described in this section by flicking the screen up or down DPK065 1 2 3 4 5 6 How to Use Each Application 57 ...

Страница 60: ... that is suitable for your originals 3 Press to select the resolution according to the size of the text on your original 4 Press to specify the density to scan the original You can also specify the density by touching the icon and dragging it right or left 5 Press to select the scanning size of the original 6 Press to select the sides of the original DPK066 11 10 7 8 9 2 Getting Started 58 ...

Страница 61: ...rectly or via F code confidential communication at a specified time 10 Specify the Internet Fax E Mail subject 11 Specify the Internet Fax E Mail Text DPK067 15 16 17 12 13 14 No Icon Description 12 You can select a standard message to be printed 13 You can send files over a closed network 14 Requesting Reception Confirmation How to Use Each Application 59 ...

Страница 62: ... Scanner Screen DLV053 1 4 3 13 5 7 2 10 11 12 6 8 9 No Icon Description 1 Displays the type of scanner destination Press to switch between e mail destinations and folder destinations 2 The specified destination is shown here By tapping the destination you can register it to the Address Book or remove it from the destinations By flicking up and down you can confirm the selected destinations 2 Gett...

Страница 63: ...the transmission results screen In the transmission results screen you can do the following Check sent jobs Check error descriptions Cancel transmission of a document in standby Print a list of transmission results 5 Press to clear your current settings 6 Press to display the preview screen after scanning originals 7 You can check the settings in Send Settings 8 Press to open the send settings scr...

Страница 64: ...ion Destinations can be added as follows Input destinations manually Select from the transmission history Specify a registration number from the Address Book Search for a destination in the Address Book or on the LDAP server Send Settings screen You can switch the four screens described in this section by flicking the screen up or down DPK068 1 2 3 4 5 6 No Icon Description 1 Press to select the s...

Страница 65: ...oth sides 5 Press to select the scanning size of the original 6 Press to specify a file name DPK069 7 8 9 10 11 No Icon Description 7 Press to specify the density to scan the original You can also specify the density by touching the icon and dragging it right or left 8 Press to select the orientation of the original 9 Press to specify the sender How to Use Each Application 63 ...

Страница 66: ...of the document when the document is scanned 14 Press to sign and encrypt the e mail 15 Press to scan a large number of originals in several batches and send them together as a single job You can place multi page originals in the ADF 16 Press to scan a large number of originals in several batches and send them together as a single job Place the originals in the ADF one by one 17 Press to divide a ...

Страница 67: ...s to 1 Sided Original after scanning one side of the last page of a batch of two sided originals using the exposure glass press Change Setting and then press 1 Sided Original 19 Press this to notify the sender that the e mail recipient has opened the e mail How to Use Each Application 65 ...

Страница 68: ... Destination Preview Send Settings Quick Applications Quick Copy Density Paper Tray Quantity Reduce Enlarge 2 Sided Combine Original Orientation Quick Fax Destination Line Density Resolution Original Orientation Original Sides Scan Size Original Type Preview Quick Scanner Destination Original Type File Type Resolution Original Orientation Original Sides Scan Size Preview This section explains how ...

Страница 69: ...lues become the default settings which are displayed without recalling the program when modes are cleared or reset and after the machine is turned on See Changing the Default Functions of the Initial Screen Convenient Functions When the paper tray you specified in a program is empty and if there is more than one paper tray with the same size paper in it the paper tray prioritized under Paper Tray ...

Страница 70: ...assic Applications program numbers with next to them indicate that the programs have been registered Programs can be registered to the Home screen and can be recalled easily For details see page 49 Adding Icons to the Home Screen Shortcuts to programs stored in Document Server mode cannot be registered to the Home screen 2 Getting Started 68 ...

Страница 71: ... is done machine power is off Fax files in memory may be lost if you turn this switch off Use this switch only when necessary Turning On the Main Power 1 Make sure the power cord is firmly plugged into the wall outlet 2 Push the main power switch The main power indicator goes on After you switch the main power on the machine might require about 5 minutes before it is ready DPK914 Turning Off the M...

Страница 72: ...e s power and may damage the hard disk or memory and cause malfunctions 1 Push the main power switch The main power indicator goes out The main power turns off automatically when the machine shuts down If the screen on the control panel does not disappear contact your service representative 2 Getting Started 70 ...

Страница 73: ...chine be sure to log out of it to prevent unauthorized usage Ask the user administrator for the Login User Name Login Password and User Code For details about user authentication see Configuring User Authentication Security Guide User Code to enter on User Code Authentication is the numerical value registered in the Address Book as User Code User Code Authentication Using the Control Panel If User...

Страница 74: ...e 6 Press Login Logging Out Using the Control Panel This section explains the procedure for logging out the machine when Basic Authentication Windows Authentication or LDAP Authentication is set To prevent use of the machine by unauthorized persons always log out when you have finished using the machine 1 Press Logout on the top right on the screen 2 Getting Started 72 ...

Страница 75: ...2 Press OK Logging In the Machine 73 ...

Страница 76: ...o the rear left corner Start with the first page to be scanned DPK118 1 1 1 Positioning mark 3 Lower the ADF Placing Originals in the Auto Document Feeder Be sure not to load the original untidily Doing so may cause the machine to display a paper misfeed message Also be sure not to place originals or other objects on the top cover Doing so may cause a malfunction When inserting originals in the AD...

Страница 77: ...1 Original guide 1 Adjust the original guide to the original size 2 Place the aligned originals squarely face up in the ADF Do not stack originals beyond the limit mark The first page should be on the top DPK121 1 1 1 Limit mark Placing Originals 75 ...

Страница 78: ...2 Getting Started 76 ...

Страница 79: ...original in the ADF place them so that the first page is on the top About placing the original on the exposure glass see page 74 Placing Originals on the Exposure Glass About placing the original in the ADF see page 74 Placing Originals in the Auto Document Feeder To copy onto paper other than plain paper specify the paper type in User Tools according to the weight of the paper you are using For d...

Страница 80: ...uce the image of the originals to fit them to the paper CKN008 If you select a reproduction ratio after pressing Auto Reduce Enlarge Auto Reduce Enlarge is canceled and the image cannot be rotated automatically This is useful to copy different size originals to the same size paper When Using the Copy Application About how to use the application s screen see page 53 Copy Screen 3 Copy 78 ...

Страница 81: ...page 2 Sided 2 Sided Copies one 2 sided page on one 2 sided page The resulting copy image will differ according to the orientation in which you place your originals or Original orientation and completed copies To copy on both sides of the paper select the original and copy orientation according to how you want the printout to appear Original Placing originals Original Orientation Orientation Copy ...

Страница 82: ...opy Application About how to use the application s screen see page 53 Copy Screen Specifying the Original and Copy Orientation Select the orientation of the originals and copies if the original is two sided or if you want to copy onto both sides of the paper Top to Top CKN011 Top to Bottom CKN012 3 Copy 80 ...

Страница 83: ...When Using the Copy Application About how to use the application s screen see page 53 Copy Screen Duplex Copying 81 ...

Страница 84: ...the image by 90 degrees to make copies properly Orientation of the original and image position of Combine The image position of Combine differs according to original orientation and the number of originals to be combined Portrait originals CKN015 Landscape originals CKN016 Placing originals originals placed in the ADF The default value for the copy order in the Combine function is From Left to Rig...

Страница 85: ... Sided 2 Originals Combine 1 Side Copies two 1 sided originals to one side of a sheet 1 Sided 4 Originals Combine 1 Side Copies four 1 sided originals to one side of a sheet 1 Sided 8 Originals Combine 1 Side Copies eight 1 sided originals to one side of a sheet 2 Sided 2 Pages Combine 1 Side Copies one 2 sided original to one side of a sheet Combined Copying 83 ...

Страница 86: ...ages of originals onto two sides of one sheet CKN074 There are six types of Two Sided Combine 1 Sided 4 Originals Combine 2 Sides Copies four 1 sided originals to one sheet with 2 pages per side 1 Sided 8 Originals Combine 2 Sides Copies eight 1 sided originals to one sheet with 4 pages per side 1 Sided 16 Originals Combine 2 Sides Copies 16 1 sided originals to one sheet with 8 pages per side 2 S...

Страница 87: ...inals to one sheet with 4 pages per side 2 Sided 16 Pages Combine 2 Sides Copies eight 2 sided originals to one sheet with 8 pages per side When Using the Copy Application About how to use the application s screen see page 53 Copy Screen Combined Copying 85 ...

Страница 88: ...orizontal length of 70 0 216 0 mm 2 76 8 50 inches and a vertical length of 148 0 356 0 mm 5 83 14 01 inches can be fed in from the bypass tray When Using the Copy Application About how to use the application s screen see page 53 Copy Screen 3 Copy 86 ...

Страница 89: ...r weight and paper thickness and the sizes of envelopes that can be used see page 148 Recommended Paper Sizes and Types About handling envelopes supported envelope types and how to load envelopes see page 153 Envelopes The Duplex function cannot be used with envelopes If the Duplex function is specified press 1 sided 2 sided TtoT to cancel the setting To copy onto custom size envelopes you must sp...

Страница 90: ...When Using the Copy Application About how to use the application s screen see page 53 Copy Screen 3 Copy 88 ...

Страница 91: ...w to use the application s screen see page 53 Copy Screen Changing the Number of Sets You can change the number of copy sets during copying This function can be used only when the Sort function is selected When Using the Copy Application About how to use the application s screen see page 53 Copy Screen Sort 89 ...

Страница 92: ...er screen For details about the Document Server see page 131 Storing Data 1 Press Store File 2 Enter a user name file name or password if necessary 3 Specify a folder in which to store the document if necessary 4 Press OK 5 Place the originals 6 Make the scanning settings for the original 7 Select the paper tray 8 Press Start Stores scanned originals in memory and makes one set of copies If you wa...

Страница 93: ...s a power failure the main power switch is turned off or the machine is unplugged for about one hour all the documents stored in memory are deleted As soon as the main power switch is turned on the Power Failure Report is printed to help you check the list of deleted files See When an Error Is Notified via a Report or E Mail Troubleshooting When Using the Fax Application About how to use the appli...

Страница 94: ... to the list of items in the selected title You can select Frequent and one more key for each title 9 Press Fax Dest 10 Press Change under Fax Destination 11 Enter the fax number using the number keys and then press OK 12 Specify optional settings such as SUB Code SEP Code and International TX Mode 13 Press OK 14 Press User Tools on the top right of the screen 15 Press Home at the bottom of the sc...

Страница 95: ...ement icon 3 Check that Program Change is selected 4 Select the name whose fax destination you want to delete Press the name key or enter the registered number using the number keys You can search by the registered name user code fax number folder name e mail address or IP Fax destination 5 Press Fax Dest 6 Press Change under Fax Destination 7 Press Delete All and then press OK under Fax Destinati...

Страница 96: ... fax or IP Fax destinations If you specify Internet Fax e mail folder destinations and group or multiple destinations the transmission mode is automatically switched to Memory Transmission It is recommended that you call the receivers and confirm with them when sending important documents When Using the Fax Application About how to use the application s screen see page 55 Fax Screen 4 Fax 94 ...

Страница 97: ...Use this procedure to cancel scanning or transmitting of the original while it is being scanned If you cancel a transmission using the standard memory transmission function you need to follow a different procedure to cancel the transmission See page 95 Canceling a Transmission After the Original Is Scanned When Using the Fax Application About how to use the application s screen see page 55 Fax Scr...

Страница 98: ...f a file while the file is being sent stored in memory or if it fails to transmit All the scanned data is deleted from memory When Using the Fax Application About how to use the application s screen see page 55 Fax Screen 4 Fax 96 ...

Страница 99: ...cuments will be automatically assigned names such as FAX0001 or FAX0002 Password You can set this function so as not to send to unspecified people A four to eight digit number can be specified as a password You can also change the file information after storing files 1 Place the original and then specify the scan settings you require Specify the Original Orientation setting correctly If you do not...

Страница 100: ...ess OK Re enter the password for confirmation and then press OK 5 Press OK 6 If you have selected Send Store specify the receiver 7 Press Start Sending Stored Documents The machine sends documents stored with the facsimile function in the Document Server The documents stored in the Document Server can be sent again and again until they are deleted The stored documents are sent with the scan settin...

Страница 101: ...humbnails key to switch the screen to thumbnail display 3 If you select a document with a password enter the password using the number keys and then press OK 4 When you want to add your originals to stored documents and send them all at once press Original Stored File or Stored file Original When Original Stored File is pressed the machine sends the originals and then stored files When Stored file...

Страница 102: ...er All Prints the results of communications in the order made Print per File No Prints only the results of communications specified by file number Print per User Prints the results of communications by individual senders When Using the Fax Application About how to use the application s screen see page 55 Fax Screen 4 Fax 100 ...

Страница 103: ... license agreement appears in the License Agreement dialog box After reading the agreement click I accept the agreement and then click Next 3 Click Next 4 Select the machine model you want to use in the Select Printer dialog box 5 Click Install 6 When the port setting screen appears specify a port 7 Configure the user code default printer and shared printer as necessary 8 Click Continue The instal...

Страница 104: ...ned off and not connected to the computer and then click Next Wait for a moment until file copying is complete and Auto detect USB Port screen appears 6 Connect the machine and the computer with a USB cable and then turn on the machine The auto detecting starts 7 In the confirmation dialog box select Yes if you want to use the machine as your default printer 8 Click Finish When you are prompted to...

Страница 105: ...e the printer settings Log on as an Administrators group member You cannot change the machine default settings for individual users Settings made in the printer properties dialog box are applied to all users 1 On the Start menu click Devices and Printers 2 Right click the icon of the printer you want to use 3 Click Printer properties Displaying the Printer Driver Properties 103 ...

Страница 106: ...ect the Frequently Used Settings tab 5 In the Job Type list select Normal Print 6 In the Document Size list select the size of the original to be printed 7 In the Orientation area select Portrait or Landscape as the orientation of the original 8 In the Paper Type list select the type of paper that is loaded in the paper tray 9 In the Input Tray list select the paper tray that contains the paper yo...

Страница 107: ...on you are using and then click Print 2 Select the printer you want to use 3 Click Preferences 4 Click the Frequently Used Settings tab You can also click the Detailed Settings tab and then click 2 Sided Layout Booklet in the Menu box 5 Select the method for binding the output pages in the 2 sided list 6 Change any other print settings if necessary 7 Click OK 8 Start printing from the application ...

Страница 108: ... list and then specify the method for combining pages in the Page Order list To draw a border line around each page select the Draw Frame Border checkbox in 2 Sided Layout Booklet in the Detailed Settings tab 6 Change any other print settings if necessary 7 Click OK 8 Start printing from the application s Print dialog box Types of Combine Printing This function allows you to print 2 4 6 9 or 16 pa...

Страница 109: ...ation From Left to Right Top to Bottom From Right to Left Top to Bottom Landscape 4 Pages per Sheet Right then Down Down then Right Left then Down Down then Left Combining Multiple Pages into Single Page 107 ...

Страница 110: ...ss Envelope in the Paper Type area and then select the appropriate item in the Paper Thickness area 10 Press OK 11 Press User Tools on the top right of the screen 12 Press Home at the bottom of the screen in the center Printing on Envelopes Using the Printer Driver When using the PCL 6 printer driver 1 Click the menu button of the application you are using and then click Print 2 Select the printer...

Страница 111: ...of stored pages in the machine and the sent data has reached 9 000 It may be fewer depending on the print data The hard disk is full Data stored in the Document Server is specified to be deleted after three days 72 hours by the factory default We recommend you back up the data You can send data created on a client computer to the Document Server Storing Documents in Document Server If the machine ...

Страница 112: ... from the application s Print dialog box You can print the documents stored in the Document Server using the control panel For details see page 133 Printing Stored Documents Managing Documents Stored in Document Server You can view or delete the documents stored in the machine s Document Server using Web Image Monitor from a client computer connected to the network 5 Print 110 ...

Страница 113: ... icon 3 Select the user as required 4 If necessary enter the password for the documents The list of both the documents that have not password specified and that matches the entered password is displayed 5 Select documents More than one document can be selected at one time You can perform the following operations on the selected documents Delete Deletes the selected documents Preview Shows the prev...

Страница 114: ...for Administrator Authentication Management or Enhance File Protection using an external application such as Web Image Monitor while using the Quick Print Release function this function is terminated automatically 5 Print 112 ...

Страница 115: ...er 2 Press the Print Scan Memory Storage Device icon 3 Press Media Print 4 Insert a memory storage device in the media slot 5 Press USB or SD Card depending on the type of the storage device 6 Select the document to print You can perform the following operations on the selected document Preview Shows the preview image of the first page of the document Selected Displays the list of the selected doc...

Страница 116: ...specified in Scan Settings the scanned image is saved under the name that conforms to the following naming rules For single page format Transmission date and time YYYYMMDDHHMMSSMMM 4 digit serial page number _nnnn extension tif jpg pdf For example when you send 10 page original in jpeg format at 15 30 15 5 on Dec 31 2020 the file names are from 20201231153015500_0001 jpg to 20201231153015500_0010 ...

Страница 117: ... Certain types of USB flash memory device and SD cards cannot be used Using the Print Scan Memory Storage Device Function 115 ...

Страница 118: ...5 Print 116 ...

Страница 119: ...e 60 Scanner Screen Creating a Shared Folder on a Computer Running Windows Confirming a Computer s Information The following procedures explain how to create a shared folder on a computer running Windows and how to confirm the computer s information In these examples Windows 7 is the operating system and the computer is a member in a network domain Write down the confirmed information Step 1 Confi...

Страница 120: ...sers Use the following procedure to remove Everyone and specify user access rights 1 Create a folder just as you would create a normal folder in a location of your choice on the computer 2 Right click the folder and then click Properties 3 On the Sharing tab click Advanced Sharing 4 Select the Share this folder check box 5 Click Permissions 6 In the Group or user names list select Everyone and the...

Страница 121: ...of results select the groups and users you want to grant access to and then click OK 7 In the Select Users Computers Service Accounts or Groups window click OK 8 In the Groups or user names list select a group or user and then in the Allow column of the permissions list select either the Full Control or Modify check box 9 Click OK Registering an SMB Folder 1 Press Home at the bottom of the screen ...

Страница 122: ... Next 10 Press Specify Other Auth Info on the right side of Folder Authentication When Do not Specify is selected the SMB User Name and SMB Password that you have specified in Default User Name Password Send of File Transfer settings are applied 11 Press Change under Login User Name 12 Enter the login user name of the destination computer and then press OK 13 Press Change under Login Password 14 E...

Страница 123: ...ress Exit If the connection test fails check the settings and then try again 21 Press OK 22 Press User Tools on the top right of the screen 23 Press Home at the bottom of the screen in the center Locating the SMB folder manually 1 Press Change under Path 2 Enter the path where the folder is located For example if the name of the destination computer is User and the folder name is Share the path wi...

Страница 124: ...network as the machine appear Network display only lists client computers you are authorized to access 2 Select the group that contains the destination computer 3 Select the computer name of the destination computer Shared folders under it appear You can press Up One Level to switch between levels 4 Select the folder you want to register 5 Press OK Deleting an SMB Registered Folder 1 Press Home at...

Страница 125: ...y selected A confirmation message appears 7 Press Yes 8 Press OK 9 Press User Tools on the top right of the screen 10 Press Home at the bottom of the screen in the center Entering the Path to the Destination Manually When Using the Scanner Application About how to use the application s screen see page 60 Scanner Screen Basic Procedure When Using Scan to Folder 123 ...

Страница 126: ...n the center 2 Flick the screen to the left and then press the Address Book Management icon 3 Check that Program Change is selected 4 Press New Program 5 Press Change under Name The name entry display appears 6 Enter the name and then press OK 7 Press Next 8 Press the key for the classification you want to use under Select Title The keys you can select are as follows Frequent Added to the page tha...

Страница 127: ...tered e mail addresses appear in both Internet fax address display and e mail address display on the fax function screen and in the address display on the scanner function screen If Internet Fax Destination Only is specified registered e mail addresses only appear in Internet fax display on the fax function screen 13 If you want to use Internet fax specify whether or not to use Send via SMTP Serve...

Страница 128: ...gistered number using the number keys You can search by the registered name user code fax number folder name e mail address or IP Fax destination 5 Press Email 6 Press Change under Email Address 7 Press Delete All and then press OK 8 Press OK 9 Press User Tools on the top right of the screen 10 Press Home at the bottom of the screen in the center Entering an E mail Address Manually When Using the ...

Страница 129: ...us settings remain If a previous setting remains press Reset 4 Place originals 5 Press Store File 6 Press Store to HDD 7 If necessary specify the stored file s information such as User Name File Name Password and Select Folder User Name Press User Name and then select a user name To specify an unregistered user name press Manual Entry and then enter the name After specifying a user name press OK F...

Страница 130: ...ored File Selected from the List This section explains how to preview a file selected from the list of stored files 1 Press Select Stored File 2 Specify the folder in which the file you want to check is stored 3 From the list of stored files select the file you want to check You can select more than one file 4 Press Preview 6 Scan 128 ...

Страница 131: ...file type when scanning multiple originals one file is created for each single page and the number of files sent is the same as the number of pages scanned Multi page TIFF PDF If you select a multi page file type when scan multiple originals scanned pages are combined and sent as a single file Selectable file types differ depending on the scan settings and other conditions For details about file t...

Страница 132: ...Specifying Scan Settings When Using the Scanner Application About how to use the application s screen see page 60 Scanner Screen 6 Scan 130 ...

Страница 133: ...name such as COPY0001 and COPY0002 is automatically attached to the scanned document You can change the file name User Name You can register a user name to identify the user or user group that stored the documents To assign it select the user name registered in the Address Book or enter the name directly Depending on the security setting Access Privileges may appear instead of User Name For detail...

Страница 134: ...rd 11 Enter a password with the number keys and then press OK You can use four to eight digits for the password 12 For double check enter the password again and then press OK 13 Place the original 14 Select the paper tray 15 Specify the original scanning conditions 16 Press Start The original is scanned The document is saved in the Document Server After scanning a list of folders will be displayed...

Страница 135: ...esignate Chapter Slip Sheet Edit Stamp Margin Adj Stamp For details about each function see the each section 1 Select a folder 2 Select a document to be printed 3 When printing two or more documents at a time repeat Step 2 Up to 30 documents can be printed 4 When specifying printing conditions press To Printing Screen and then configure print settings 5 Enter the number of print copies with the nu...

Страница 136: ...7 Document Server 134 ...

Страница 137: ...wser 2 Enter http machine s IP address or host name in your web browser s URL bar Top Page of Web Image Monitor appears If the machine s host name has been registered on the DNS or WINS server you can enter it When setting SSL a protocol for encrypted communication under environment which server authentication is issued enter https machine s IP address or host name Web Image Monitor is divided int...

Страница 138: ...ion Click the web browser s Refresh button to refresh the entire browser screen Help Use Help to view or download Help file contents 4 Basic Information area Display the basic information of the machine 5 Work area Display the contents of the item selected in the menu area 8 Web Image Monitor 136 ...

Страница 139: ...ctions and or user injury Do not stack paper over the limit mark Do not change the size of the paper for the specified printing tray while documents are being scanned or printed To prevent multiple sheets from being fed at once fan the paper before loading it CBK254 If you load paper when only a few sheets of paper remain in the tray multiple sheet feeding may occur Remove any remaining paper stac...

Страница 140: ... position of the tray s side fences may slip out of place When loading a low number of sheets be sure not to squeeze the side fences in too tightly If the side fences are squeezed too tightly against the paper the edges may crease or the paper may misfeed 1 Pull the tray carefully until it stops lift the front side of the tray and then pull it out of the machine DPK907 Place the tray on a flat sur...

Страница 141: ...ard to match the standard size DPL038 5 When loading paper that is larger than A4 or 81 2 11 push the button and then pull the end guide out to match the paper size DPK125 2 1 6 Load the new paper stack print side down Make sure paper is not stacked higher than the upper limit upper line marked inside the tray Loading Paper 139 ...

Страница 142: ...lly until it stops DPL039 To avoid paper jams make sure the tray is securely inserted Letterhead paper must be loaded in a specific orientation For details see Loading Orientation fixed Paper or Two sided Paper Paper Specifications and Adding Paper You can load envelopes in Trays 2 5 When loading envelopes place them in the correct orientation For details see page 153 Envelopes Loading Paper into ...

Страница 143: ...r loading paper specify the paper size and type using the control panel When printing a document specify the same paper size and type in the printer driver as specified on the machine 1 Open the bypass tray DPL019 Pull the extender out when loading A4 81 2 11 or larger paper DPL020 2 Load paper face up until it stops and then adjust both sides of the paper guide to match the paper width DPL022 1 2...

Страница 144: ...tification Sound see Screen Features Connecting the Machine System Settings Printing from the Bypass Tray Using the Printer Function If you select Machine Setting s in Bypass Tray under Tray Setting Priority in System of the Printer Features menu the settings made using the control panel have priority over the printer driver settings For details see System Print The default of Bypass Tray is Machi...

Страница 145: ...and then press the User Tools icon on 3 Press Tray Paper Settings 4 Press Printer Bypass Paper Size 5 Press Custom Size If a custom size is already specified press Change Size 6 Press Horizontal 7 Enter the horizontal size using the number keys and then press 8 Press Vertical 9 Enter the vertical size using the number keys and then press 10 Press OK twice 11 Press User Tools on the top right of th...

Страница 146: ... Printer Bypass Paper Size and then specify the paper size 5 Press OK 6 Press Next 7 Press Paper Type Bypass Tray 8 Select the proper items according to the paper type you want to specify Press OHP Transparency on the Paper Type area when loading OHP transparencies To load thick paper press Do not Display on the Paper Type area and then select the appropriate paper thickness in the Paper Thickness...

Страница 147: ...place the original and paper as shown below Printer mode Specify Auto Detect or On Always for Letterhead Setting in System under the Printer Features menu and then place the paper as shown below For details about the letterhead settings see Input Output Copy Document Server or System Print Original orientation and paper orientation The meanings of the icons are as follows Icon Meaning Place or loa...

Страница 148: ...1 If you place originals in the ADF and copy on orientation fixed paper from the bypass tray without specifying the paper size the image might be copied upside down In order to make copies correctly place the paper upside down or specify the paper size Printer mode Print side Paper trays Bypass tray One sided Two sided In copier mode 9 Adding Paper and Toner 146 ...

Страница 149: ...is changed partway through printing from one sided to two sided printing one sided output after the first copy may be printed facing a different direction To ensure all paper is output facing the same direction specify different input trays for one sided and two sided printing Note also that two sided printing must be disabled for the tray specified for one sided printing For details about how to ...

Страница 150: ...d might occur Tray 1 Paper type and weight Paper size Paper capacity 64 120 g m2 17 lb Bond 44 lb Cover Plain Paper 1 Thick Paper 1 1 A4 A5 A6 81 2 14 81 2 11 51 2 81 2 500 sheets 64 120 g m2 17 lb Bond 44 lb Cover Plain Paper 1 Thick Paper 1 2 A5 B5 JIS B6 JIS 81 2 13 81 4 14 81 4 13 8 13 8 10 71 4 101 2 16K 81 2 132 5 500 sheets 64 120 g m2 17 lb Bond 44 lb Cover Plain Paper 1 Thick Paper 1 Cust...

Страница 151: ... 16K 81 2 132 5 500 sheets 64 120 g m2 17 lb Bond 44 lb Cover Plain Paper 1 Thick Paper 1 Custom size Vertical 162 0 356 0 mm Horizontal 92 0 216 0 mm Vertical 6 38 14 0 inches Horizontal 3 63 8 50 inches 500 sheets Envelopes 2 41 8 91 2 37 8 71 2 C5 Env C6 Env DL Env 3 1 Select the paper size using the paper size dial on the tray 2 Set the paper size dial on the tray to and select the paper size ...

Страница 152: ...cies A4 81 2 11 3 Label paper adhesive labels A4 3 Envelopes 1 41 8 91 2 37 8 71 2 C5 Env C6 Env DL Env 3 1 Select the paper size using the control panel For copier mode see Copying from the Bypass Tray Copy Document Server For printer mode see page 142 Specifying regular sizes using the control panel 2 Enter the paper size For copier mode see Copying from the Bypass Tray Copy Document Server For ...

Страница 153: ...bles above is an example Actual paper capacity might be lower depending on the paper type When loading paper make sure the stack height does not exceed the limit mark of the paper tray If multiple sheet feeding occurs fan sheets thoroughly or load sheets one by one from the bypass tray Flatten out curled sheets before loading them Depending on the paper sizes and types the copy print speed may be ...

Страница 154: ... printed sheets one by one Thick paper This section gives you various details about and recommendations concerning thick paper When loading thick paper of 106 220 g m2 28 lb Bond 80 lb Cover follow the recommendations below to prevent misfeeds and loss of image quality Store all your paper in the same environment a room where the temperature is 20 25 C 68 77 F and the humidity is 30 65 When loadin...

Страница 155: ...cross them CHU024 In copier mode The way to load envelopes varies depending on the orientation of the envelopes When copying onto envelopes load them according to the applicable orientation shown below How to load envelopes Orientation of envelopes Exposure glass Trays 2 5 Bypass tray Envelopes Flaps closed Bottom side of envelopes toward the front of the machine Side to be scanned face down Flaps...

Страница 156: ... envelopes For details see Printing on Envelopes Print To print on envelopes that are loaded with their short edges against the machine body rotate the print image by 180 degrees using the printer driver Recommended envelopes For information about recommended envelopes contact your local dealer For details about the sizes of envelopes you can load see page 148 Recommended Paper Sizes and Types Loa...

Страница 157: ...humidity conditions can reduce print quality and cause envelopes to become creased Depending on the environment copying or printing on envelopes may wrinkle them even if they are recommended Certain types of envelopes might come out creased dirtied or misprinted If you are printing a solid color on an envelope lines may appear where the overlapped edges of the envelope make it thicker Recommended ...

Страница 158: ...so that the toner is not scattered The following explains the warning messages on the plastic bag used in this product s packaging Keep the polythene materials bags etc supplied with this machine away from babies and small children at all times Suffocation can result if polythene materials are brought into contact with the mouth or nose Do not crush or squeeze toner containers Doing so can cause t...

Страница 159: ...e waste consumables in a bag after they are removed For consumables with a lid make sure that the lid is shut Always replace the print cartridge when a notification appears on the machine Fault may occur if you use toner other than the recommended type When adding toner do not turn off the main power If you do settings will be lost Store toner where it will not be exposed to direct sunlight temper...

Страница 160: ...ease the print cartridge lever with another hand DPK918 3 Squeeze the clip on the print cartridge and lift it DPK919 1 2 4 Put the used print cartridge in a plastic bag and seal it so that the toner does not spill out DPK920 9 Adding Paper and Toner 158 ...

Страница 161: ... 6 Shake the new print cartridge at least 10 times to the left and right so that the toner inside it spreads uniformly 10 DPK922 7 Insert the new print cartridge into the machine Press the new print cartridge until it clicks into place DPK924 Adding Toner 159 ...

Страница 162: ...h Status area in the Mach Applic Stat tab For details about how to check contact number where you can order supplies see Inquiry Maintenance and Specifications Sending Faxes or Scanned Documents When Toner Has Run Out When the machine has run out of toner the indicator on the display lights Note that even if there is no toner left you can still send faxes or scanned documents If number of communic...

Страница 163: ...pose of it mainly Europe and Asia If you want to discard your used toner container please contact your local sales office If you discard it by yourself treat it as general plastic waste material mainly North America Please see our local company website for information on the recycling of supply products or you can recycle items according to the requirements of your local municipalities or private ...

Страница 164: ...9 Adding Paper and Toner 162 ...

Страница 165: ...or details about removing jammed paper see Removing Jammed Paper Troubleshooting Load Paper icon Appears when paper runs out For details about loading paper see Loading Paper Paper Specifications and Adding Paper Add Toner icon Appears when toner runs out For details about adding toner see Adding Toner Maintenance and Specifications Waste Toner Full icon Appears when the waste toner bottle is full...

Страница 166: ...reen Check the error message displayed on the function screen and take the appropriate action For details about how to resolve the problems described in error messages see When Messages Appear Troubleshooting 3 Messages Displays a message that indicates the status of the machine and each function 4 Status icons The status icons that can be displayed are described below The function is performing a...

Страница 167: ...opriate action For details about error messages and their solutions see When Messages Appear Troubleshooting You can use other functions normally The machine is unable to connect to the network A network error has occurred Check that the machine is correctly connected to the network and that the machine is correctly set For details about how to connect the network see Connecting to the Interface C...

Страница 168: ...is ready for use 5 long beeps Soft alert An auto reset was performed through the simple screen of the Copier Document Server function or the Scanner function 5 long beeps repeated four times Soft alert An original has been left on the exposure glass or paper tray is empty 5 short beeps repeated five times Strong alert The machine requires user attention because paper has jammed the toner needs rep...

Страница 169: ...gy Saver check that Sleep mode can be enabled For details about enabling Sleep mode see Saving Energy Getting Started The display is turned off The machine is in Sleep mode Touch the display panel Nothing happens when the display panel is touched The power is turned off Make sure the main power indicator is off and then turn on the power The power turns off automatically The Weekly Timer setting i...

Страница 170: ...oaded the paper incorrectly Load the paper correctly For details about loading paper see Loading Paper Paper Specifications and Adding Paper Misfeeds occur frequently Using curled paper often causes misfeeds soiled paper edges or slipped positions while stack printing is performed Flatten the paper with your hands to straighten out the curl Load the paper upside down so that the curled edges face ...

Страница 171: ... removing jammed paper see Removing Jammed Paper Troubleshooting Misfeeds occur frequently There is a foreign object on the output tray Remove the misfed paper For details about removing jammed paper see Removing Jammed Paper Troubleshooting Do not place anything on the output tray Misfeeds occur when printing to envelopes The envelopes are curled Make sure you fully flatten curled envelopes befor...

Страница 172: ...aper tray For details about setting Apply Duplex see Tray Paper Settings Connecting the Machine System Settings Cannot print in duplex mode You have selected a paper type that cannot be used for duplex printing In Tray Paper Settings select a paper type that can be used for duplex printing For details about setting Paper Type see Tray Paper Settings Connecting the Machine System Settings The machi...

Страница 173: ...For details about Function Compatibility see When Multiple Functions Cannot Be Executed Simultaneously Troubleshooting The print image is not properly positioned on the paper The machine has not detected the paper type and or width correctly The print position is not aligned properly Contact the machine administrator or your service representative Originals are misfed in the ADF More than sixty or...

Страница 174: ...e is being used by another function Wait until the current job is completed before trying again In certain cases you can carry out another job using a different function while the current job is being performed For details about Function Compatibility see Function Compatibility Troubleshooting 10 Troubleshooting 172 ...

Страница 175: ...upted Press Exit to display the preview screen without a thumbnail If the selected document contains several pages press Switch on the Display Page area to change the page and then a preview of the next page will appear Check paper size An irregular paper size is set If you press Start the copy will start using the selected paper Exceeded the maximum number of sheets that can be used Copying will ...

Страница 176: ...ress Continue to scan and copy remaining originals The machine checked if the remaining originals should be copied after the scanned originals were printed Remove all copies and then press Continue to continue copying Press Stop to stop copying The selected folder is locked Please contact the file administrator An attempt was made to edit or use a locked folder For details about locked folders see...

Страница 177: ...to resume receiving the Internet Fax if the timeout period has not expired Wait until the mail server s timeout period has expired and then resume receiving the Internet Fax For details about receiving the Internet Fax contact your administrator Functional problems with facsimile Data will be initialized There is a problem with the fax Record the code number shown on the screen and then contact yo...

Страница 178: ... usual even if the message appears on the screen You can turn this function on or off with Parameter Settings For details about how to do this see Parameter Settings Fax When Network Setting Problems Occur Message Cause Solution Check whether there are any network problems 13 10 The alias telephone number you entered is already registered on the gatekeeper by another device Check that the correct ...

Страница 179: ...ck whether there are any network problems 13 24 The password registered for the SIP server is not the same as the password registered for this machine For details about network problems contact your administrator Check whether there are any network problems 13 25 In Effective Protocol the IP address is not enabled or an incorrect IP address has been registered Check that IPv4 in Effective Protocol...

Страница 180: ...nsfer to was not found or the destination for Internet Fax around not through the SMTP server could not be found Check that the following settings in System Settings are listed correctly DNS server Server name and IP address for the SMTP Server For details about these settings see Interface Settings or File Transfer Connecting the Machine System Settings Check that the folder for transfer is corre...

Страница 181: ...ID and password for the computer with the folder for forwarding are correctly specified Check that the folder for forwarding is correctly specified Confirm that the computer with the folder for forwarding is properly working For details about network problems contact your administrator Check whether there are any network problems 14 33 E mail addresses for the machine and the administrator are not...

Страница 182: ...log in to the POP3 IMAP4 server Check that the correct User Name and Password are listed in Fax Email Account of System Settings For details about Fax Email Account see File Transfer Connecting the Machine System Settings For details about network problems contact your administrator Check whether there are any network problems 15 03 No machine e mail address is specified Check that the correct mac...

Страница 183: ...chine System Settings Check that the LAN cable is correctly connected to the machine For details about network problems contact your administrator Check whether there are any network problems 15 12 Cannot log in to the POP3 IMAP4 server Check that the following settings in System Settings are listed correctly the user name and password for Fax Email Account the user name and password for POP befor...

Страница 184: ...ails about how to do this see Parameter Settings Fax If Check whether there are any network problems appears the machine is not correctly connected to the network or the settings of the machine are not correct If you do not need to connect to a network you can specify the setting so this message is not displayed and then Check Status no longer lights up For details about how to do this see Paramet...

Страница 185: ...stem Settings For details about these settings contact your administrator Check that the LAN cable is correctly connected to the machine For details about network problems contact your administrator Connection with the remote machine has failed Check the remote machine status The main machine s power is off Turn on the main machine s power Connection with the remote machine has failed Check the re...

Страница 186: ...istrator Transfer error has occured Check the status of the remote machine A network error occurred during transfer Check that the correct IP address or host name is set for the main machine in System Settings For details about these settings contact your administrator Check that the main machine is working correctly Check that the LAN cable is correctly connected to the machine For details about ...

Страница 187: ...ive Hardware Problem Wireless Card A wireless LAN board or Bluetooth interface unit is referred to as a wireless card The wireless LAN board has malfunctioned The wireless LAN board you are using is not compatible with this machine Turn off the power and then confirm the wireless LAN board is inserted correctly And then turn on the power again If the message appears again contact your service repr...

Страница 188: ...e size or type selected in the printer driver Check that the printer driver settings are correct and then load paper of the size selected in the printer driver into the input tray For details about how to change the paper size see Changing the Paper Size Paper Specifications and Adding Paper Select the tray manually to continue printing or cancel a print job For details about how to select the tra...

Страница 189: ...n other than the Direct printing function You cannot select files of different formats at the same time Unable to access the specified memory storage device An error occurred when the machine accessed the memory storage device or a file stored on the memory storage device An error occurred when the user used the Direct printing function to print from a memory storage device Save the file to a diff...

Страница 190: ...sing an Unauthorized Copy Prevention job The job was cancelled The Enter User Text field on the Unauthorized Copy Prevention for Pattern Details screen is blank On the printer driver s Detailed Settings tab click Effects in Menu Select Unauthorized Copy Prevention and then click Details to display Unauthorized Copy Prevention for Pattern Details Enter text in Enter User Text An error occurred whil...

Страница 191: ...the correct paper size and then print the file again The selected paper type is not supported This job has been cancelled Job reset is automatically performed if the specified paper type is incorrect Specify the correct paper type and then print the file again When there is a problem with the print settings Message Cause Solution Classification Code is incorrect The classification code has not bee...

Страница 192: ...tray Print overrun Images were discarded while printing Select a lower resolution on the printer driver For details about how to change the resolution setting see the printer driver Help When documents cannot be stored in the Document Server Message Cause Solution Cannot store data of this size The paper size exceeded the capacity of the Document Server Reduce the paper size of the file that you w...

Страница 193: ...ent Server Cannot store The maximum page capacity of the Document Server was exceeded Delete some of the files stored in the Document Server or reduce the number of pages that you want to send Exceeded max number of pages Auto While you were using the error job store function to store Normal Print jobs as Hold Print files the maximum page capacity was exceeded Delete unneeded files stored on the m...

Страница 194: ...space Message Cause Solution HDD is full When you were printing with the PostScript 3 printer driver the hard disk capacity for fonts and forms was exceeded Delete unneeded forms or fonts registered on the machine HDD is full The hard disk became full while you were printing a Sample Print Locked Print Hold Print or Stored Print file Delete unneeded files stored on the machine Alternatively reduce...

Страница 195: ... have no privileges to print the PDF document you tried to print Contact the owner of the document You do not have a privilege to use this function This job has been cancelled The entered login user name or login password is not correct Check that the user name and password are correct You do not have a privilege to use this function This job has been cancelled The logged in user is not allowed to...

Страница 196: ...rs and so on For details about user authentication see Configuring User Authentication Security Guide When other errors occur Message Cause Solution 85 Error The specified graphics library is unavailable Check that the data is valid 98 Error The machine could not access the hard disk correctly Turn off the power and then back on again If the message appears frequently contact your service represen...

Страница 197: ...ioning correctly Data storage error You tried to print a Sample Print Locked Print Hold Print or Stored Print file or to store a file in the Document Server when the hard disk was malfunctioning Contact your service representative Error has occurred A syntax error etc occurred Check that the PDF file is valid Exceeded Max Stored Files While printing a Sample Print Locked Print Hold Print or Stored...

Страница 198: ...e the number of files being sent to the machine Insufficient Memory A memory allocation error occurred PCL 6 On the printer driver s Detailed Settings tab click Print Quality Advanced in Menu and then select Raster in the Vector Raster list In some cases it will take a long time to complete a print job Memory Retrieval Error A memory allocation error occurred Turn off the power and then back on ag...

Страница 199: ...r a firewall is preventing the machine from connecting to your computer Antivirus programs and firewalls can prevent client computers from establishing connection with this machine If you are using antivirus software add the program to the exclusion list in the application settings For details about how to add programs to the exclusion list see the antivirus software Help To prevent a firewall fro...

Страница 200: ...ntities of documents were stored by the OCR function Up to 100 jobs can be placed on standby by the OCR function Scan the next document after the current jobs have finished being stored File types have been automatically set for some files because multiple files were selected If there are selected stored documents which cannot be converted to a specified file format those documents are automatical...

Страница 201: ...name cannot start or end with a period The program is recalled Cannot recall the destination s for which access privileges are required The currently logged in user does not have permission to view the destination that was registered in the program For details about how to set permissions see Limiting Available Functions Security Guide The program is recalled Cannot recall the destination s that i...

Страница 202: ...maximum data capacity Specify the scan size and resolution again Note that it may not be possible to scan very large originals at a high resolution For details about the settings for the scanner function see Relationship between Resolution and Scan Size Scan Exceeded max data capacity Check the scanning resolution then reset n original s n in the message represents a variable The scanned original ...

Страница 203: ...iginal again If displaying the entire image is not necessary press Start to start scanning with the current scaling factor Not all of the image will be scanned Check the ratio and then press the Start key again Using Specify Reproduction Ratio to scale down a large document may cause part of the image to be lost Specify a large size in Specify Size and then scan the original again If displaying th...

Страница 204: ...nneeded stored files For details about how to delete stored files see Deleting a Stored File Scan Memory is full Do you want to store scanned file Because there is not enough free hard disk space in the machine for storing in the Document Server only some of the pages could be scanned Specify whether or not to use the data Memory is full Scanning has been cancelled Press Send to send the scanned d...

Страница 205: ... Settings Scan Sending the data has failed The data will be resent later A network error has occurred and a file was not sent correctly Wait until sending is retried automatically after the preset interval If sending fails again contact your administrator Transmission has failed Insufficient memory in the destination hard disk To check the current status press Scanned Files Status Transmission has...

Страница 206: ...iting to be transmitted Waiting status displayed Cancel transmission Waiting status cleared and then delete the file When data cannot be sent because there are too many documents or pages Message Cause Solution Exceeded max number of pages per file Do you want to store the scanned pages as 1 file The file being stored has exceeded the maximum number of pages for one file Specify whether to store t...

Страница 207: ...led Scan Profile is not set on the client computer Set Scan Profile For details about how to do this see Creating a New Scan Profile Scan Cannot start scanning because communication was failed The Take no action setting has been selected on the client computer forcing the client computer to remain inactive when it receives scan data Open scanner properties click the Events tab and then select Star...

Страница 208: ...Solution Cannot write on the memory storage device because remaining free space is insufficient The memory storage device is full and scan data cannot be saved Even if the memory storage device appears to have sufficient free space data might not be saved if the maximum number of files that can be saved is exceeded Replace the memory storage device If the document is scanned as single page or divi...

Страница 209: ...se the maximum number of pages that can be scanned by this machine was exceeded during the scanned data was written to the memory storage device Reduce the number of documents to be written to the memory storage device and then try again Memory is full Press Write to write the current scanned data to the memory storage device or press Cancel to delete The scan could not be completed because there ...

Страница 210: ...etails about how to set permissions see Limiting Available Functions Security Guide Cannot add any more scanning mode The maximum number of registrable scan modes has been exceeded The maximum number of modes that can be stored is 100 Delete unneeded modes Cannot specify any more scanning area The maximum number of registrable scan modes has been exceeded The maximum number of scanning areas that ...

Страница 211: ...ve exceeded the setting range of the machine Check whether the scanning settings made with the application exceed the setting range of the machine Fatal error has occurred in the scanner An unrecoverable machine error has occurred An unrecoverable machine error has occurred Contact your service representative Insufficient memory Close all other applications then restart scanning Memory is insuffic...

Страница 212: ...ed occurs you might not scan an original Remove the misfeed and then scan the original again Invalid Winsock version Please use version 1 1 or higher You are using an invalid version of Winsock Install the operating system of the computer or copy Winsock from the operating system CD ROM No response from the scanner The machine or client computer is not connected to the network correctly Check whet...

Страница 213: ...and the options The ADF cover is open Check whether the ADF cover is closed The name is already in use Check the registered names You tried to register a name that is already in use Use another name When there is a problem connecting to the scanner Message Cause Solution Cannot connect to the scanner Check the network Access Mask settings in User Tools An access mask is set For details about an ac...

Страница 214: ...the previous scan Communication error has occurred on the network A communication error has occurred on the network Check whether the client computer can use the TCP IP protocol Scanner is not available Check the scanner connection status The machine s power is off Turn on the power Scanner is not available Check the scanner connection status The machine is not connected to the network correctly C...

Страница 215: ...ot be obtained from the host name If only IPv6 is set to Active the IPv6 address might not be obtained Check whether the machine s host name is specified in the Network Connection Tool For the WIA driver check the Network Connection tab in the properties Use Web Image Monitor to set LLMNR of IPv6 to Active Messages Displayed When You Use the Scanner Function 213 ...

Страница 216: ...ted although the unit is detected Turn off the power and then check the wireless LAN board is inserted correctly After this turn on the power again If the message appears again contact your service representative Cannot connect with the Bluetooth interface Check the Bluetooth interface The Bluetooth interface unit was installed while the machine was turned on The Bluetooth interface unit was remov...

Страница 217: ...he machine may perform periodic maintenance during operations The frequency and duration of maintenance depends on the humidity temperature and printing factors such as number of prints paper size and paper type Wait for the machine to resume operation When There Is a Problem Scanning or Storing Originals Message Cause Solution Captured file exceeded max number of pages per file Cannot send the sc...

Страница 218: ...For details about the procedure for excluding an IP address see your operating system s Help Updating the destination list Please wait Specified destination s or sender s name has been cleared The destination list is being updated from the network using Web Image Monitor Wait until the message disappears Do not turn off the power while this message is displayed Depending on the number of destinati...

Страница 219: ...on The destination cannot be selected because its encryption certificate is not currently valid The user certificate destination certificate has expired A new user certificate must be installed For details about the user certificate destination certificate see Configuring S MIME Security Guide The group destination cannot be selected because it contains a destination with a encryption certificate ...

Страница 220: ... device certificate PDF with digital signature or PDF A with digital signature must be installed For details about how to install a device certificate PDF with digital signature or PDF A with digital signature see Configuring PDFs with Electronic Signatures Security Guide XXX cannot be YYY because there is a problem with the Digital Signature s device certificate Check the device certificate XXX a...

Страница 221: ...issions see Limiting Available Functions Security Guide The selected file s contained file s without access privileges Only file s with access privileges will be deleted You have tried to delete files without the permission to do so To check your access permission for stored documents or to delete a document you do not have permission to delete see Managing Stored Files Security Guide When the LDA...

Страница 222: ...heck that the correct settings for LDAP server are listed in Administrator Tools of System Settings For details about LDAP server see Programming the LDAP server Connecting the Machine System Settings LDAP server authentication has failed Check the settings A network error has occurred and connection has failed Configure settings correctly for the user name and the password for LDAP server authent...

Страница 223: ...nt computers and other office equipment The program backs the development and dissemination of products that feature energy saving functions It is an open program in which manufacturers participate voluntarily Targeted products are computers monitors printers facsimiles copiers scanners and multi function devices Energy Star standards and logos are internationally uniform For details about the def...

Страница 224: ...Low Power mode 1 minute 1 minute Time of switch out from Low Power mode 1 10 seconds 10 seconds Reduced electrical consumption in Sleep mode 1 1 1 W 1 1 W Time of switch into Sleep mode 1 minute 1 minute Time of switch out from Sleep mode 1 21 seconds 25 4 seconds Duplex Function 2 Standard Standard 1 The time it takes to switch out from energy saving functions and electrical consumption may diffe...

Страница 225: ...n option mainly North America Type 1 Type 2 Reduced electrical consumption in Low Power mode 1 47 6 W 46 7 W Time of switch into Low Power mode 1 minute 1 minute Time of switch out from Low Power mode 1 10 seconds 10 seconds Reduced electrical consumption in Sleep mode 1 1 1 W 1 1 W Time of switch into Sleep mode 1 minute 1 minute Time of switch out from Sleep mode 1 21 seconds 25 4 seconds Duplex...

Страница 226: ...nts and are designed to facilitate recycling Our products or product packaging are marked with the symbol below The symbol indicates that the product must not be treated as municipal waste It must be disposed of separately via the appropriate return and collection systems available By following these instructions you ensure that this product is treated correctly and help to reduce potential impact...

Страница 227: ...d Please refer to either the User s Manual for this information or the packaging of the consumable Recycled paper The machine can use recycled paper which is produced in accordance with European standard EN 12281 2002 or DIN 19309 For products using EP printing technology the machine can print on 64 g m2 paper which contains less raw materials and represents a significant resource reduction Duplex...

Страница 228: ...ice switches to an energy saving mode In these modes the machine consumes less power watts If the machine is to print again it needs a little longer to return from an energy saving mode than from Ready mode For maximum energy savings we recommend that the default setting for power management is used Products that comply with the Energy Star requirement are always energy efficient Notes to users in...

Страница 229: ...Copy 53 77 Copy orientation 80 Creating a shared folder 117 Custom size paper 86 D Data In indicator 44 Data security for copying 25 Destination 217 Display panel 44 Distributed scan management 24 Document Server 12 17 90 109 110 131 133 173 190 Drag 49 DSM 24 Duplex 11 16 79 E E mail address 124 126 E mail destination 124 126 E mail transmission 20 Embedding text information 22 ENERGY STAR Progra...

Страница 230: ...tures 9 Network setting 176 Note for the battery and or accumulator symbol 225 Notes to users in the state of California 226 Number of sets 89 O OCR unit 22 OHP transparencies 16 148 One Sided combine 83 Options 30 Orientation fixed paper 145 Original orientation 80 P Paper capacity 148 Paper guides 29 Paper size 148 Paper size dial 28 Paper thickness 151 Paper tray 28 138 148 Paper type 148 Paper...

Страница 231: ...ored Print 17 Storing a document 97 Storing data 90 131 Storing documents 109 Storing received documents 18 Storing scan files 12 127 Symbols 7 T Thick paper 152 Toner 156 160 161 Tray 28 Tray 1 148 Tray 2 149 Tray 3 149 Tray 4 149 Tray 5 149 Tray extension 28 Turning off the power 69 Turning on the power 69 Two Sided combine 84 Two sided paper 145 Two sided printing 105 U Unauthorized copy preven...

Страница 232: ...MEMO 230 ...

Страница 233: ...MEMO 231 ...

Страница 234: ...MEMO 232 EN GB EN US EN AU D256 7834 ...

Страница 235: ... 2016 ...

Страница 236: ...D256 7834 AU EN US EN GB EN ...

Отзывы: