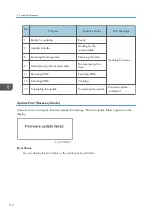


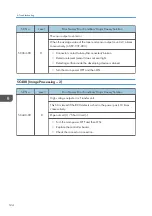
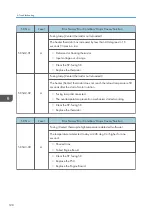

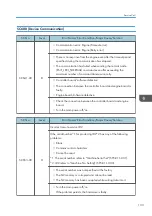

Service Call
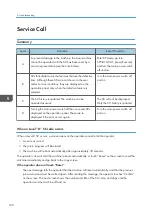
Summary
Level
Definition
Reset Procedure
A
To prevent damage to the machine, the main machine
cannot be operated until the SC has been reset by a
service representative (see the note below).
Enter SP mode, go into
SP5-810-001, press [Execute],
and turn the main power switch
off and on.
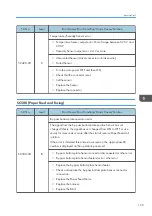
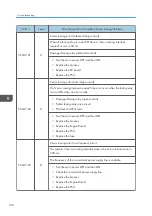
B
SCs that disable only the features that use the defective
item. Although these SCs are not shown to the user
under normal conditions, they are displayed on the
operation panel only when the defective feature is
selected.
Turn the main power switch off
and on.
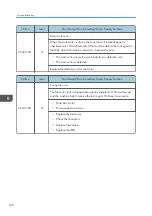
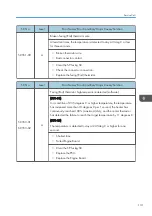
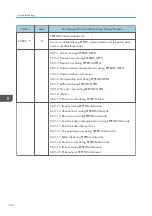
C
The SC history is updated. The machine can be
operated as usual.
The SC will not be displayed.
Only the SC history is updated.
D
Turning the main power switch off then on resets SCs
displayed on the operation panel. These are re-
displayed if the error occurs again.
Turn the main power switch off
and on.
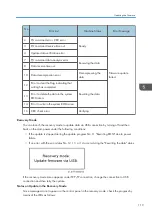
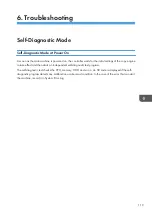
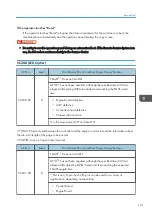
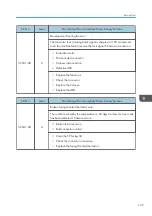
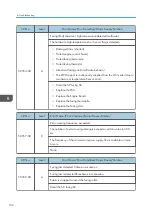
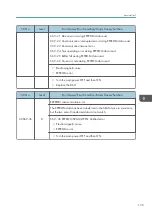
When a Level “D” SC code occurs
When a Level D SC occurs, a screen opens on the operation panel to tell the operator:
• An error occurred
• The job in progress will be erased
• The machine will reboot automatically after approximately 30 seconds.
The operator can wait until the machine reboots automatically or touch “Reset” on the screen to reset the
machine immediately and go back to the copy screen.
If the operator does not touch “Reset”
The next message tells the operator that the machine will reset automatically and that the previous
job was lost and must be started again. After reading the message, the operator touches “Confirm”
on the screen. The next screen shows the number and title of the SC code, and stops until the
operator turns the machine off and on.
6. Troubleshooting
120
Содержание Aficio MP 171
Страница 1: ...Model Gim P1a Machine Code M171 Field Service Manual September 2014 ...
Страница 2: ......
Страница 14: ...12 ...
Страница 34: ...3 Preventive Maintenance 32 ...
Страница 40: ...2 Press the release button and open the front cover A 3 Open the rear cover A 4 Replacement and Adjustment 38 ...
Страница 42: ...2 Press the release button and open the front cover A 3 Open the rear cover A 4 Replacement and Adjustment 40 ...
Страница 44: ...2 Open the rear cover A 3 Release both side hinges to detach the rear cover A 4 Replacement and Adjustment 42 ...
Страница 48: ...3 OPU Board x 7 4 Replacement and Adjustment 46 ...
Страница 57: ...PCDU PCDU 1 Press the release button and open the front cover A 2 Hold the grip to pull the PCDU A out PCDU 55 ...
Страница 59: ...2 Hold the grip to pull the toner cartridge A out Toner Cartridge 57 ...
Страница 105: ...2 Rear Cover Switch A x 1 Hook Electrical Components 103 ...
Страница 106: ...4 Replacement and Adjustment 104 ...
Страница 120: ...5 System Maintenance 118 ...
Страница 166: ...MEMO 164 EN ...
Страница 167: ...Model Gim P1a Machine Code M171 Appendices September 2014 ...
Страница 168: ......
Страница 186: ...2 Appendices Preventive Maintenance Tables 18 ...
Страница 259: ...MEMO 91 ...
Страница 260: ...MEMO 92 EN ...


