background image

Adjusting the Image Density

51

4

Adjusting the Image Density

Adjust the image density when the
print side of the page is shaded or the
print image looks patchy.

Important

Extreme settings may create out-
put that appears dirty.

Image density settings should be
made from the application or the
printer driver whenever possible.

Note

Changing the image density set-
ting might cause a deterioration of
color balance. We recommend that
you leave the image density at its
factory default setting.

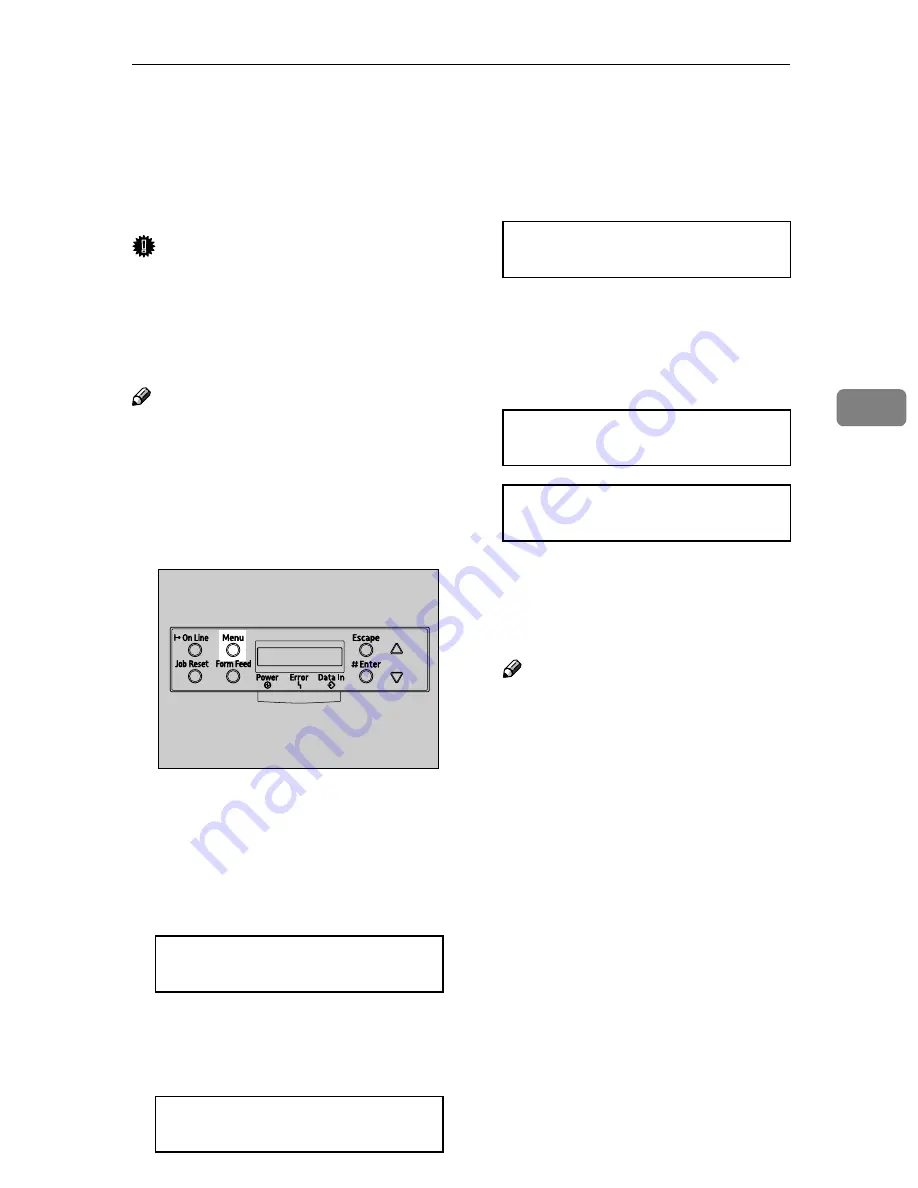
AAAA

Press the 

{{{{

Menu

}}}}

 key.

"Menu" appears on the panel dis-
play.

BBBB

Press the 

{{{{U

U

U

U}}}}

 or 

{{{{T

T

T

T}}}}

 key to dis-

play "Maintenance", and then
press the 

{{{{

Enter #

}}}}

 key.

CCCC

Press the 

{{{{U

U

U

U}}}}

 or 

{{{{T

T

T

T}}}}

 key to dis-

play "Image Density", and then
press the 

{{{{

Enter #

}}}}

 key.

The following message appears on
the panel display.

DDDD

Press the 

{{{{

Enter #

}}}}

 key.

The following message appears on
the panel display, and then press
the 

{{{{

Enter #

}}}}

 key.

EEEE

Compare the colors on the printed
image density test sheet with
those on the Image Density Ad-
justing Card.

Note

If the image density of the Im-
age Density Adjusting Card is
equal to the framed part of the
test sheet, you do not need to
adjust the image density value.

If the image density of the Im-
age Density Adjusting Card is
equal to the density shown
above the frame, select “-” for
the image density setting. If the
image density of the Image
Density Adjusting Card is equal
to the density shown below the
frame, select “+” for the image
density setting. 

  Menu:

   Maintenance

  Maintenance:

   Image Density

ZHBS010E

  Image Density:

  Prt. Test Sheet

  Prt. Test Sheet

  Press # to Start

  Printing...


Содержание Aficio CL2000

Страница 1: ...e Maintenance Guide CD ROM Manuals Manuals for this Printer Administrator Reference Client Reference PostScript 3 Supplement Option Setup Guide Maintenance Guide If the manuals do not open automatical...

Страница 2: ...ation about setting up the options Options Network Printer Configuration Administrator Reference Provides information about server settings and using the control panel and printer settings Windows 200...

Страница 3: ...DriverandCancelingaPrintJob Sample Print Locked Print Troubleshooting PostScript 3 Supplement Provides information about the meaning and features for the PostScript 3 printer driver Using PostScript 3...

Страница 4: ...ts of the viewed manual Note If you want to open multiple manuals at the same time follow the procedure below From the File menu point to Preferences and select General Clear the Open Cross Doc Links...

Страница 5: ...If one or some items are missing please contact your sales or service representative Important This package does not include an interface cable Please purchase one for use with your host computer See...

Страница 6: ...ongly If you do the tray might fall and cause personal injury Pull the paper tray out of the printer until it stops After that lift it slightly and then pull it out completely Place it on a flat surfa...

Страница 7: ...e interface cable is not provided with the printer It is your responsibility to provide the interface cable appropriate for the computer that you are using Confirm that the printer s power switch is o...

Страница 8: ...firm the value to the network administrator The gateway address is the address of the host or router that acts as a gateway when interacting with work stations in another network Confirm the value to...

Страница 9: ...ct and keep it handy for future reference For safe and correct use please be sure to read the Safety Information in this manual before using the machine Getting Started Paper and Other Media Replacing...

Страница 10: ...l the company be li able for direct indirect special incidental or consequential damages as a result of handling or oper ating the machine Caution Use of controls or adjustments or performance of proc...

Страница 11: ...and Other Media Supported by This Printer 15 Paper Sizes 15 Paper Recommendations 18 Loading Paper 22 Loading Paper in Tray 1 Optional Paper Feed Unit 22 Loading Paper in the Bypass Tray 24 3 Replacin...

Страница 12: ...blems 67 Removing Misfed Paper 71 When Remove Misfeed A Internal Path Appears 71 When Remove Misfeed B Fusing Unit Appears 72 When Remove Misfeed Y Paper Tray Appears 74 When Remove Misfeed Z Duplex U...

Страница 13: ...dows Me The product names of Windows 2000 are as follows Microsoft Windows 2000 Advanced Server Microsoft Windows 2000 Server Microsoft Windows 2000 Professional The product names of Windows XP are as...

Страница 14: ...manual the following important symbols are used R WARNING Indicates a potentially hazardous situation which if instructions are not followed could result in death or serious injury R CAUTION Indicate...

Страница 15: ...those specified in this manu al Turn off the power and disconnect the power plug by pulling the plug not the cable if any of the following conditions exists You spill something into the equipment You...

Страница 16: ...f the equipment or expended supply waste at household waste collection points Disposal can take place at an authorized dealer or at appropriate collection sites The inside of the machine becomes very...

Страница 17: ...ft it slowly Lifting it carelessly or dropping it may cause an injury Do not touch the inside of the controller board compartment It may cause a machine malfunction or a burn Keep the machine away fro...

Страница 18: ...t this machine model meets the ENERGY STAR Guidelines for energy efficiency The ENERGY STAR Guidelines intend to establish an international energy saving system for developing and introducing energy e...

Страница 19: ...s instruction is not followed paper might be misfed or data might be lost Be sure to read this Preparation This symbol indicates the prior knowledge or preparations required before operating Note This...

Страница 20: ...8...

Страница 21: ...led Also by us ing induction heating technology in the fusing unit a short warm up time af ter turning the printer on has been achieved and also the recovery time from the Energy Saver mode has been r...

Страница 22: ...a printer malfunction due to over heating 4 Control Panel Contains keys for printer control and a panel display that shows the printer sta tus 5 Front Cover Open this cover when replacing the fus ing...

Страница 23: ...roller Board Slide this out when installing options such as Memory Unit Printer Hard Disk 1394 Interface Unit 802 11b Interface Unit USB2 0 Interface Unit or User Ac count Enhance Unit 6 Parallel Port...

Страница 24: ...options such as Memory Unit Printer Hard Disk 1394 Interface Unit 802 11b Interface Unit USB2 0 Interface Unit or User Ac count Enhance Unit 6 Parallel Port Use a parallel cable to connect the printer...

Страница 25: ...per 4 Toner Cartridges When Add Toner color appears on the panel display replace the indicated color of the toner cartridge 5 Photo Conductor Unit Color Black When Replace Color PCU or Replace Black P...

Страница 26: ...tus when the paper size or type does not match with the actual set size or type 5 Menu Key Press this key to make and check the cur rent printer settings 6 Power Indicator Power indicator is on while...

Страница 27: ...nt of paper that can be loaded into each paper tray in this printer Note The following symbols and terminology are used to represent the feed direc tion Be careful of the paper feed direction The dire...

Страница 28: ...the size is not supported Feed direction Size mm Bypass Tray Tray 1 Paper Feed Unit Tray 2 3 A4 K 210 297 B5 JIS K 182 257 A5 K 148 210 A6 K 105 148 Legal LG 81 2 14 inches K 216 356 Letter LT 81 2 1...

Страница 29: ...ize The supported size is approximately 3 5 8 5 inches in width and 5 8 14 inches in length Means that the size is not supported Feed direction Size inch Bypass Tray Tray 1 Paper Feed Unit Tray 2 3 Le...

Страница 30: ...our sales or service representative Storing Paper Paper should always be stored properly Improperly stored paper might re sult in poor print quality paper misfeeds or printer damage Recommenda tions a...

Страница 31: ...Bypass Tray and select the thick paper mode with the control panel or printer driver Tray 1 or Paper Feed Unit cannot be used Confirm that the top of the stack is not higher than the limit mark insid...

Страница 32: ...iver Remove OHP transparencies from the tray after use to prevent them from sticking to each other Envelopes Use the Bypass Tray Tray 1 and the Paper Feed Unit cannot be used The Bypass Tray can hold...

Страница 33: ...as thermal paper aluminum foil carbon paper and conductive paper Paper whose weight is heavier or lighter than the limitation Paper with windows holes perforations cutouts or embossing Adhesive label...

Страница 34: ...des to the pa per size you want to load D D D D Load paper into the paper tray with the print side up Important Make sure that the top of the stack is not higher than the limit mark inside the tray Th...

Страница 35: ...pa per size you want to load E E E E Load paper into the paper tray with the print side up Important Confirm that the top of the stack is not higher than the limit mark inside the tray F F F F Slide t...

Страница 36: ...e Paper sizes supported by the By pass Tray can be 90 216 mm 3 5 8 5 inches in width and 148 356 mm 5 8 14 inches in length The paper size selected with the printer driver overrides the one se lected...

Страница 37: ...r than the limit mark inside the tray Shuffle the paper before loading the stack onto the tray so multi ple sheets are not fed in at the same time E E E E Set the paper size using the con trol panel a...

Страница 38: ...Press the U U U U or T T T T key to dis play Paper Input and then press the Enter key C C C C Confirm that Bypass Size is dis played and then press the Enter key D D D D Press the U U U U or T T T T...

Страница 39: ...Important You must specify the paper type when using thick paper adhe sive label paper OHP transpar encies or when printing on plain or thick paper that has al ready been printed on one side A A A A P...

Страница 40: ...Paper and Other Media 28 2...

Страница 41: ...lay or Note The color is displayed for XXX If cyan magenta or yellow toner runs out you can print in black and white using the black toner Change the color mode setting to Black and White with the pri...

Страница 42: ...w toner cartridge from the package D D D D Shake the toner cartridge back and forth about 10 times In the illustration black cartridge is used as an example Important Do not open the shutter at the bo...

Страница 43: ...dly install and re move the toner cartridges This could result in a toner leak G G G G Close the upper left cover of the printer Note If the toner cartridge is not in stalled properly you cannot close...

Страница 44: ...the waste toner bot tle that has been removed Ton er may spill E E E E Remove the used waste toner bot tle slowly Do not incinerate spilled toner or used toner Toner dust is flammable and might ignit...

Страница 45: ...in the il lustration G G G G Lock the waste toner bottle by sliding the green arrow to the po sition as shown Important Be sure to lock the waste toner bottle to prevent toner from leaking inside the...

Страница 46: ...A Turn off the power B B B B Open the right cover Do not incinerate spilled toner or used toner Toner dust is flammable and might ignite when exposed to an open flame Disposal should take place at an...

Страница 47: ...er cover until it stays up E E E E Remove the photo conductor unit Photo Conductor Unit Type 125 Black A Pinch the green lever to unlock the unit B Pull out the photo conductor unit slowly Photo Condu...

Страница 48: ...move the cap attached to the photo conductor unit Note The cap will not be needed again and should be disposed of H H H H Peel off the tape which is around Photo Conductor Unit by peeling it downward...

Страница 49: ...ts securely on the rail before pro ceeding to the next step If you do not attach the green arrow of the photo conductor unit securely to the rail you may damage the photo conduc tor unit Photo Conduct...

Страница 50: ...not installed correctly the print quality will be affected For ex ample certain colors may fail to print L L L L Lower the inner cover slowly M M M M Push the green lever to fasten the inner cover N...

Страница 51: ...nit cools down before touching the fusing unit The inside of the machine be comes very hot Do not touch the parts with a v label means hot surface Touching a part with a v label means hot sur face cou...

Страница 52: ...Push the green release buttons on the left and right outwards to un lock the fusing unit E E E E Remove the fusing unit slowly F F F F Take out the new fusing unit from the box G G G G Place the unit...

Страница 53: ...transfer roller into the printer Important The end with a longer shaft must be on the left M M M M Close the front cover slowly N N N N Turn on the power O O O O Make the setting from the control pan...

Страница 54: ...hen press the Enter key C Press the U U U U or T T T T key to dis play Maint Reset and then press the Enter key D Press the U U U U or T T T T key to dis play Fusing Unit and then press the Enter key...

Страница 55: ...the procedure is incomplete A A A A Turn off the power B B B B Open the right cover of the printer C C C C Remove the Waste Toner Bottle Reference See p 32 Waste Toner Bottle Type 155 D D D D Pull ou...

Страница 56: ...portant Do not lock the waste toner bot tle that has been removed Ton er may spill G G G G Remove the waste toner bottle slowly H H H H Turn the green screws on the left and right in the direction of...

Страница 57: ...the belt part K K K K Take out the new transfer belt L L L L Holding the transfer belt as shown insert the transfer belt in the printer M M M M Close the green cover and then insert it until it stops...

Страница 58: ...T T Turn on the power U U U U Make the setting from the control panel When Replace Transfer Belt Appears on the Panel Display A If the following message is on the control panel press the Es cape key...

Страница 59: ...he Enter key D Press the U U U U or T T T T key to dis play Transfer Belt and then press the Enter key The following message appears E Press the Enter key Wait for a few seconds F Press the On Line ke...

Страница 60: ...Replacing Consumables and Maintenance Kit 48 3...

Страница 61: ...printer If there is dust or grime inside the printer wipe with a clean dry cloth Do not remove any covers or screws other than those specified in this manual Some parts of the machine are at a high vo...

Страница 62: ...B B Press the U U U U or T T T T key to dis play Maintenance and then press the Enter key C C C C Press the U U U U or T T T T key to dis play Color Regist and then press the Enter key The following m...

Страница 63: ...dis play Image Density and then press the Enter key The following message appears on the panel display D D D D Press the Enter key The following message appears on the panel display and then press th...

Страница 64: ...hen press the Enter key Note You can adjust the image densi ty in 21 steps from 10 to 10 In creasing the value makes the printouts darker and decreasing the value makes the printouts lighter Pressing...

Страница 65: ...B Press the U U U U or T T T T key to dis play Maintenance and then press the Enter key C C C C Press the U U U U or T T T T key to dis play Registration and then press the Enter key D D D D Print the...

Страница 66: ...ue mm Note Increase the value to shift the print area in the positive di rection and decrease to shift in the negative direction A Print Area B Feed Direction Pressing the U U U U or T T T T key makes...

Страница 67: ...ner The printer is loading the toner Wait for a while Please Wait The printer is initializing the development unit or HDD Wait for a while This message may appear when printing with small size paper c...

Страница 68: ...The paper size or paper type set in the indicated tray differs from the setting made tray number Load paper of the selected size and type in the tray and then change the paper setting with the contro...

Страница 69: ...um value error Turn the power switch off and on If the message appears again contact your sales or service representative Hardware Problem Ethernet The printer detected an Ether net error Turn the pow...

Страница 70: ...replace the interface ca ble that caused the error If the message appears again con tact your sales or service rep resentative Hardware Problem USB There is a problem related to the Universal Serial...

Страница 71: ...pa per tray number Load paper into the indicated paper tray Menu Protected Cannot Change The menu is protected The setting cannot be changed for the selected menu No Files Exist There are no files av...

Страница 72: ...with a new waste toner bottle See p 29 Replacing Consum ables and Maintenance Kit Reset PCU Correctly The black or color PCU is not set correctly or is not set Set the black or color PCU cor rectly Se...

Страница 73: ...SC XXX X Power Off On The Service Code or SC num ber indicates the problem Turn the power switch off and on If the message appears again contact your sales or service representative Toner is Almost Em...

Страница 74: ...n exceeded during Sample Print or Locked Print Delete the stored files or re duce the file size of them Exceeded Max Stored Pages The maximum number of pages has been exceeded dur ing Sample Print or...

Страница 75: ...ctly add memory to the printer or reduce the resolution of the image RPCS Syntax Error Bidirectional transmission may not be working properly or the RPCS printer driver set tings may not be correct Co...

Страница 76: ...g Paper Can you print a configura tion page If you cannot print a configuration page it probably indicates a printer malfunction Contact your sales or service representative See printing the configura...

Страница 77: ...rint to the following port box to confirm that the correct port is selected Windows 2000 A Click Start point to Settings and then click Printers B Click to select the icon of the printer Next on the F...

Страница 78: ...ven after executing above operation go to the following steps D Unplug the IEEE 1394 interface cable which is connected to the printer E Execute the utility tool for 1394 Interface Unit Type 4510 whic...

Страница 79: ...on If this does not solve the problem contact your sales or service representative Color changes extremely when adjusted with the printer driver Do not extreme settings for the color balance under th...

Страница 80: ...rinter has to warm up and this takes time until printing starts To disable the Energy Saver mode select Off for Energy Saver in the System Settings menu Multiple pages are fed at once Number of paper...

Страница 81: ...ed on See p 15 Paper and Other Media The fusing unit is deteriorated or damaged Replace them See p 29 Replacing Consumables and Maintenance Kit Solid areas lines or text are shiny or glossy when creat...

Страница 82: ...the image density press Menu and select Image Density from the Maintenance menu See p 51 Adjusting the Image Density If paper is curled flatten it Curled or folded paper might cause a hazy gray print...

Страница 83: ...rinter This might cause a misfeed and damage the printer When Remove Misfeed A Internal Path Appears R CAUTION A A A A Open the front cover by pushing the front cover release button Note Close the Byp...

Страница 84: ...he front cover release button Note Close the Bypass Tray if it is ex tended If the Bypass Tray is ex tended the front cover does not open B B B B Pull out levers B1 on the left and right ZHBH080E ZHBH...

Страница 85: ...cefully pull it but go to the next step D D D D Pull part B2 toward the front and then open the guide board E E E E Remove the misfed paper F F F F Return the guide board G G G G Return levers B1 on t...

Страница 86: ...fed paper Tray 1 Tray 2 3 C C C C Slide the paper tray completely into the printer Important Be sure to insert the paper tray completely Otherwise mis feeds might occur D D D D Open the front cover by...

Страница 87: ...d the front cover does not open B B B B Pull lever PULL of the Duplex Unit A A A A and then pull up the Du plex Unit until it stops B B B B C C C C Remove the misfed paper D D D D Close the front cove...

Страница 88: ...Troubleshooting 76 5...

Страница 89: ...tions Be cause of this the consumables may require replacement earlier than indi cated 1 The actual printable number of pages varies depending on the image volume and density number of pages to be pri...

Страница 90: ...tal conditions such as tem perature and humidity The print quality may decline before the need for replace ment is indicated 1 3 pages job The actual printable number of pages varies depending on the...

Страница 91: ...rom the printer and then move them separately When moving the machine each person should hold the handles that are located on opposite sides and then lift it slowly Lifting it carelessly or drop ping...

Страница 92: ...rizontally to the place where you want to install it D D D D If you removed options in step B B B B reinstall them Note For more information about installing options see Option Setup Guide Important B...

Страница 93: ...the Printer Control Panel 14 Exterior Front View 10 Exterior Rear View 11 12 Inside 13 I Input Paper Sizes 16 J Job Reset Key 14 L Loading Paper 18 Bypass Tray 24 Optional Paper Feed Unit 22 paper si...

Страница 94: ...Consumables and Maintenance Kit 29 Right Cover 11 12 S Standard Tray 10 Standard Tray Extension 11 12 Storing Paper 18 T Thick Paper 19 Toner Cartridge 13 29 77 Transfer Belt 13 Transfer Roller 13 Tra...

Страница 95: ...rference suppression Declaration of Conformity Product Name Laser Printer Model Number G120 17 G121 17 G122 17 Responsible party Ricoh Corporation Address 5 Dedrick Place West Caldwell NJ 07006 Teleph...

Страница 96: ...EN USA G120 8904...

Страница 97: ...Options 7 Job Type 8 Collate 16 Duplex Printing 17 Color Mode 19 Paper Selection 20 Paper Size 21 Media Type 22 Paper source 23 Resolution 23 Gradation 24 Color Profile 25 Color Setting 27 Dithering 2...

Страница 98: ...ons 41 Downloading PS Fonts 42 Displaying Printer s Fonts 43 Deleting Fonts 44 Initializing the Printer Disk 45 Page Setup 46 Printing Font Catalog 46 Printing Font Sample 46 Renaming the Printer 47 R...

Страница 99: ...r other countries Adobe and PostScript are registered trademarks of Adobe Systems Incorporated Appletalk Apple Macintosh Mac OS Mac OS X is a registered trademark of Apple Computer Incor porated Other...

Страница 100: ...ft Windows ServerTM 2003 Enterprise Edition Microsoft Windows ServerTM 2003 Web Edition The product names of Windows NT 4 0 are as follows Microsoft Windows NT Server 4 0 Microsoft Windows NT Workstat...

Страница 101: ...nvolve personal injury when you misuse the machine without following the instructions under this symbol Be sure to read the instructions all of which are described in the Safety Information section Th...

Страница 102: ...This symbol indicates a reference Keys that appear on the machine s display panel Keys and buttons that appear on the computer s display Keys built into the machine s control panel Keys on the compute...

Страница 103: ...ee the printer driver s Help Preparation For Macintosh Mac OS 8 6 or a later version or Mac OS X 10 1 or a later version is required Mac OS X classic is also supported Limitation If you use Mac OS X t...

Страница 104: ...tail button Sample Print Use this function to print only one set of a multiple print jobs The other sets are saved in the machine The saved job can be printed from the machine s control panel You can...

Страница 105: ...how to use Sample Print see p 10 How to Use Sample Print Locked Print Use this function to save documents in the machine memory with a password and then edit and print them as you want Limitation To u...

Страница 106: ...the application print dialog box more prints than intended may be printed Windows 95 98 Me A A A A From an application select the menu command to print The print dialog box appears B B B B Open the P...

Страница 107: ...up to eight alphanumeric a z A Z 0 9 characters Note Select this to identify the user associated with the job F F F F Click OK to close the Printer Properties G G G G Start printing from the applicati...

Страница 108: ...characters Note This is used to identify the user associated with a job The User ID can consist of up to eight alphanumeric a z A Z 0 9 characters E E E E After making all of the settings you want cl...

Страница 109: ...log box more prints than intended may be printed Windows 95 98 Me A A A A From an application select the menu command to print The print dialog box appears B B B B Open the Printer Properties to set L...

Страница 110: ...e Job Log tab D D D D Select Locked Print in Print Job E E E E Enter the User ID in User ID This can consist of up to eight alphanumeric a z A Z 0 9 characters Then enter a password in Password up to...

Страница 111: ...ob Log from the pop up menu C C C C Select Locked Print in Job Type and then select the appropriate setting D D D D Enter the User ID in User ID This can consist of up to eight alphanumeric a z A Z 0...

Страница 112: ...per Quality tab in the Printing Preferences dialog box Mac OS The Collate check box in the print dialog box Mac OS X The Collate check box on Copies Pages in the printer dialog box The following table...

Страница 113: ...ng items may vary depending on the operating system you are using Windows 95 98 Me Off Disables Duplex Printing Open to Left Windows 95 98 Me Duplex on the Setup tab Windows 2000 XP Windows Server 200...

Страница 114: ...lip on Short Edge Prints output so that you can open it to the short edge when bound along the short edge Flip on Long Edge Prints output so that you can open it to the long edge when bound along the...

Страница 115: ...K are three primary subtractive colors If you want to adjust the print color adjust the settings in the Advanced dialog box accessed from the Advanced button on the Paper Quality tab Windows 95 98 Me...

Страница 116: ...printed with CMYK toner select Black and White in the printer driver as well as in the application Paper Selection Paper Sources and Output Tray Tabs Use this to select the media type input tray and...

Страница 117: ...and Other Media Supported by This Printer in the Maintenance Guide Windows 95 98 Me Size on the Paper tab Windows 2000 XP Windows Server 2003 Paper Output on Advanced on the Paper Quality tab in the...

Страница 118: ...er Media in the Maintenance Guide Windows 95 98 Me Type on All Pages on the Paper tab Windows 2000 XP Windows Server 2003 Media on the Paper Quality tab in the Printing Preference dialog box Windows N...

Страница 119: ...dows Server 2003 The Paper Quality tab in the Printing Preferences dialog box Windows NT 4 0 The Page Setup tab in the Document Defaults dialog box Mac OS Paper Source on General in the print dialog b...

Страница 120: ...y while gradation loses some smoothness Windows 95 98 Me Print Quality tab Windows 2000 XP Windows Server 2003 Gradation on Advanced on the Paper Quality tab in the Printing Preferences dialog box Win...

Страница 121: ...omatically depending on the appear ance of the document to be printed Photographic Use this setting to enhance the reproduction of photos and graphics that include midtones Windows 95 98 Me The Print...

Страница 122: ...Color Use this setting to print specific colors logos and so on User Setting Use this setting to print images with downloaded CRD from your application Note Use this to select a color rendering dictio...

Страница 123: ...selected in the Color Profile setting is used You can select the following items Off No modification to the color setting Fine Windows 95 98 Me Advanced on the Print Quality tab Windows 2000 XP Windo...

Страница 124: ...tting but produce output that is more vivid Use this setting to emphasize light colors This setting performs the printing which output target is Monitor 2 2 Note Use this to select a color rendering d...

Страница 125: ...utomatically depending on the appearance of the document to be printed Photographic Performs dithering using an appropriate pattern for photographs Text Windows 95 98 Me Advanced on the Print Quality...

Страница 126: ...Black Text Note If you use Windows 2000 XP Windows Server 2003 Windows NT 4 0 Mac OS or Mac OS X this function is called Black Text Graphics Windows 95 98 Me Advanced on the Print Quality tab Windows...

Страница 127: ...can select this function Important If you use Windows 95 98 Me you can configure Black Over Print in Advanced by selecting Manual Windows 95 98 Me Advanced on the Print Quality tab Windows 2000 XP Wi...

Страница 128: ...int Quality tab Windows 2000 XP Windows Server 2003 Toner Saver on Advanced on the Paper Quality tab in the Print ing Preferences dialog box Windows NT 4 0 Toner Saver on Document Options on the Advan...

Страница 129: ...dows NT 4 0 this function can not be configured If you use Mac OS this function is called Color Matching Image Color Control Display the Image Color Matching dialog box click this button to specify ex...

Страница 130: ...shows the tabs or menus where you can select this function Reference For more information about using SmartDeviceMonitor for Admin see Help Windows 95 98 Me User Code on the Statistics tab Windows 200...

Страница 131: ...ray 3 You can select the other tray with the following menu for an additional PAPER FEED UNIT Type 3000 Paper Source see p 23 Paper source Note If you use Windows 2000 XP Windows Server 2003 Windows N...

Страница 132: ...on with Printer Hard Disk Type 3000 Collate see p 16 Collate Note This function is for Windows 95 98 Me only Total Memory You can use the following function with Memory Unit Type C 64 128 256 MB Colla...

Страница 133: ...1 9 x or Mac OS X 10 1 x or 10 2 1 Mac OS X 10 0 x and 10 2 are not supported Installing Printer Utility for Mac Follow these steps to install Printer Utility for Mac on the machine A A A A Start the...

Страница 134: ...H H H Double click the folder of the language you use I I I I Move the Printer Utility for Mac file to the Macintosh hard disk using a drag and drop op eration J J J J Drag the CD ROM icon to the Tra...

Страница 135: ...the printer is selected in Chooser on the Apple menu A A A A Double click the Printer Utility for Mac icon The Printer Utility for Mac dialog box appears B B B B Click OK Printer Utility for Mac will...

Страница 136: ...printer you want to use Note If you change zones select a name from Available Network Zones Click Choose Printer on the Printer Utility for Mac menu if you want to change the printer D D D D Select t...

Страница 137: ...s Initialize Printer s Disk Initialize the printer s hard disk drive See p 45 Initializing the Printer Disk Page Setup Set up the paper size to print Printer Font Catalog and Printer Font Sample See p...

Страница 138: ...ching the Dialogue Console Downloading PS Fonts You can download the PS fonts to the printer s memory or hard disk drive Important The following procedures to download the fonts assume that you are a...

Страница 139: ...During the download do not turn off the power switch operate the panel or open or close the cover F F F F When the completion message appears click OK G G G G Click Cancel Displaying Printer s Fonts...

Страница 140: ...B B Select Printer s memory or Printer s disk C C C C Select the fonts you want to delete Limitation You cannot delete the fonts displayed in italic D D D D Click Delete A confirmation message appears...

Страница 141: ...on panel all of the data on the printer s hard disk drive is deleted Before initializing be sure to check the data on the hard disk drive A A A A Select Initialize Printer s Disk on the File menu The...

Страница 142: ...log Print the names of fonts available on the printer Note The paper selected under Page Setup is used A A A A Select Print Fonts Catalogue on the File menu B B B B Click Print Printing Font Sample Yo...

Страница 143: ...A On the File menu click Rename Printer B B B B In the New Name filed enter a new name Limitation You can enter up to 31 digits and letters Do not use symbols for example C C C C Click Rename The prin...

Страница 144: ...whose name you changed in step B and then click Choose Restarting the Printer You can restart the printer A A A A Select Restart Printer on the File menu B B B B Confirm the message that appears on th...

Страница 145: ...nloaded Note Errors are recorded in the log file Selecting the Zone You can change the zone to which the printer belongs under Appletalk Important Confirm that a Macintosh and printer are connected wi...

Страница 146: ...he zone changed in step B C In the Available Printers list select the model of printer in use and then click Choose Displaying the Printer Status You can display and confirm the current status of the...

Страница 147: ...on the Utility menu Open the editing screen The Dialogue Console menu bar appears B B B B Type the PostScript command in the editor screen Note To edit a PostScript file select Open on the File menu t...

Страница 148: ...iles 49 Downloading PS Fonts 42 Duplex Printing 17 F Functions Printer Utility for Mac 41 G Gradation 24 Gray Reproduction 30 I Initializing Printer Disk 45 Installing 37 Printer Utility for Mac 37 J...

Страница 149: ...53 R Renaming the Printer 47 Resolution 23 Restarting the Printer 48 S Selecting the Zone 49 Setting up Options 7 T Toner Saving 32 U User Code 34...

Страница 150: ...54 Copyright 2004...

Страница 151: ...55 EN USA GB GB G120 8714...

Страница 152: ...e Read this manual carefully before you use this product and keep it handy for future reference For safe and correct use please be sure to read the Safety Information in the Maintenance Guide before u...

Страница 153: ...make copies of any item for which copying is prohibited by law Copying the following items is normally prohibited by local law Bank billes revenue stamps bonds stock certificates bank drafts checks pa...

Страница 154: ...ting the Printer Hard Disk drive 17 1394 Interface Unit Type 4510 18 Connecting the cable to the 1394 Interface Unit 21 IEEE 1394 Configuration 21 802 11b Interface Unit Type A 24 IEEE 802 11b Wireles...

Страница 155: ...s instruction is not followed paper might be misfed or data might be lost Be sure to read this Preparation This symbol indicates the prior knowledge or preparations required before operating Note This...

Страница 156: ...lling options the machine should be turned off and unplugged for at least an hour Components inside the machine become very hot and can cause a burn if touched Before moving the machine unplug the pow...

Страница 157: ...not install the 802 11b Interface Unit or Bluetooth Interface Unit T F Install the 802 11b Interface Unit 802 11b Interface Unit Type A Install the 802 11b Interface Unit to the slot on the controller...

Страница 158: ...NIT Type 3000 Loads up to 530 sheets of paper Up to two units can be attached to the print er Tray 2 appears on the panel dis play for the first unit and Tray 3 appears on the panel display for the se...

Страница 159: ...he printer at the same time 5 1394 Interface Unit Type 4510 Note 1394 Interface Unit USB2 0 Inter face Board Bluetooth Interface Unit and 802 11b Interface Unit cannot be installed in the printer at t...

Страница 160: ...e B Note Bluetooth Interface Unit USB2 0 Interface Board 802 11b Interface Unit and 1394 Interface Unit can not be installed in the printer at the same time 5 1394 Interface Unit Type 4510 Note 1394 I...

Страница 161: ...second unit when two units are installed A A A A Check the contents of the package for the following Paper Feed Unit including a paper tray B B B B Turn off the power and then un plug the power cable...

Страница 162: ...acking material F F F F Slide the paper tray completely into the Paper Feed Unit G G G G Lift the printer using the inset grips on both sides of the printer H H H H Align the printer to the two up rig...

Страница 163: ...heck whether the Paper Feed Unit is installed properly Print the configuration page from the List Test Print menu If it is installed properly you will see Paper Feed Unit Tray 2 or Paper Feed Unit Tra...

Страница 164: ...release button D D D D Hold the Duplex Unit as shown in the illustration and then insert it into the inside of the front cover Align the arrows and then insert the Duplex Unit until it clicks E E E E...

Страница 165: ...tions list If the Duplex Unit is not in stalled properly reinstall it from step C If you cannot in stall it properly even after at tempting reinstallation contact your sales or service representa tiv...

Страница 166: ...G to fasten the controller board C C C C While holding the handle pull out the controller board slowly There are two slots for the Memory Unit Use the available slot the one in the front in the illus...

Страница 167: ...oller board to the top and bottom rails and then push in slowly until it stops Note When installing other options on the controller board do not close the controller board but go to the steps for inst...

Страница 168: ...acity for Total Memory If the Memory Unit is not in stalled properly reinstall it from step A If you cannot in stall it properly even after at tempting reinstallation contact your sales or service rep...

Страница 169: ...sk Type 3000 Screw B B B B Turn off the power and then un plug the power cable C C C C Remove the two screws that fas ten the controller board on the back of the printer The removed screws will be use...

Страница 170: ...printer may not work prop erly if the controller board is not set properly H H H H Fasten the controller board to the printer with the two screws that you removed in step C C C C When the power is tu...

Страница 171: ...to dis play Maintenance and then press the Enter key C C C C Press the U U U U or T T T T key to dis play HDD Format and then press the Enter key A message to start to format is shown Note If HDD Form...

Страница 172: ...nistrators permission Before touching the 1394 Interface Unit touch something metal to discharge any static electricity Static electricity can damage the 1394 Interface Unit Unplug all the interface c...

Страница 173: ...n the 1394 Interface Unit F F F F Remove the tapes that fasten the USB2 0 interface unit and the con troller board G G G G Lift the end of USB2 0 Interface Unit A A A A and then remove it from the con...

Страница 174: ...the controller board to the printer with the two screws that you removed in step C C C C Note After finishing installation you can check whether the 1394 In terface Unit is installed proper ly Print t...

Страница 175: ...o configure the printer for use in the IEEE 1394 envi ronment The following table shows the control panel settings and their default values These items are in cluded in the Host Interface menu Dependi...

Страница 176: ...printer contact your network administrator A Press U U U U or T T T T until the fol lowing message appears B Press Enter The current IP address appears on the panel display C Press U U U U or T T T T...

Страница 177: ...U or T T T T to display SCSI print K K K K Press Enter The following message appears on the panel display L L L L Press U U U U or T T T T to select either Active or Not Active and then press Enter S...

Страница 178: ...f the package for the following 802 11b Interface Unit Type A Interface Unit Card Antenna B B B B Turn off the power and then un plug the power cable C C C C Remove the two screws that fas ten the con...

Страница 179: ...h the 802 11b Interface Unit Insert the end of the 802 11b Inter face Unit to the opening A A A A and then push down until it clicks B B B B Confirm that the 802 11b Interface Unit is firmly connected...

Страница 180: ...M M M M Fasten the controller board to the printer with the two screws that you removed in step C C C C Note After finishing installation you can check whether the 802 11b Interface Unit is installed...

Страница 181: ...NW and Active Protocol in the Network Setup For more infor mation about setting the items in the Network Setup see the Quick In stallation Guide A A A A Press Menu Menu appears on the panel dis play B...

Страница 182: ...channel to use A Press U U U U or T T T T to display Channel B Press Enter The channel currently used ap pears on the panel display C Press U U U U or T T T T to enter the channel D Press Enter J J J...

Страница 183: ...s to step K L L L L Press the U U U U or T T T T key to dis play WEP Setting A Press the Enter key B Press the U U U U or T T T T key to dis play Active and then press the Enter key The following mess...

Страница 184: ...characters long the following message appears If you press the Escape key the pointer k moves to the previous character position F After entering the key press the Enter key The screen returns to ste...

Страница 185: ...ks A A A A Check the contents of the package for the following Bluetooth Interface Unit Card Bluetooth Module Antenna Cap B B B B Turn off the power and then un plug the power cable C C C C Remove the...

Страница 186: ...f USB2 0 Interface Unit A A A A and then remove it from the controller board B B B B H H H H Attach the Bluetooth Interface Unit Insert the end of the Blue tooth Interface Unit to the open ing A A A A...

Страница 187: ...he Bluetooth module to the slot and then insert vertically N N N N Align the controller board to the top and bottom rails and then push in slowly until it stops Note When installing other options on t...

Страница 188: ...Bluetooth Interface Unit Type B 34 1 O O O O Fasten the controller board to the printer with the two screws re moved in step C C C C ZHBPB560E...

Страница 189: ...ontents of the package for the following Network Interface Board Type 3000 Ferrite Core 2 B B B B Turn off the power and then un plug the power cable C C C C Remove the two screws that fas ten the con...

Страница 190: ...nd then remove it from the controller board B B B B H H H H Attach the Network Interface Board Insert the end of the Net work Interface Board to the open ing A A A A and then push down until it clicks...

Страница 191: ...n step C C C C Note After finishing installation you can check whether the Network Interface Board is installed properly Print the configura tion page from the List Test Print menu If it is installed...

Страница 192: ...ork interface cable One of them must be attached close to the end of the cable on the end closet to the printer The other must be attached approximate ly 45 cm 18 A apart from the end Attach each ferr...

Страница 193: ...shocks A A A A Check the contents of the package for the following User Account Enhance Unit Screw Note The other screw supplied is not to be used B B B B Turn off the power and then un plug the powe...

Страница 194: ...the controller board F F F F Align the screw hole of the User Account Enhance Unit and the controller board and then fasten the User Account Enhance Unit on the controller board using a supplied screw...

Страница 195: ...the List Test Print menu If it is installed properly you will see Ac counting Module for Control ler Option If the User Account Enhance Unit is not installed properly reinstall it from step B If you c...

Страница 196: ...D440 Duplex Unit 4 10 Available Options 2 B Bluetooth Interface Unit Type B 5 6 31 M Memory Unit Type C SDRAM Module 5 6 12 N Network Interface Board Type 3000 5 35 O Options 2 P PAPER FEED UNIT Type...

Страница 197: ...43 EN USA G120 8804...

Страница 198: ...Copyright 2004...

Страница 199: ...EN USA G120 8804...

Страница 200: ...Software 18 Installing SmartDeviceMonitor for Client 18 Installing the PCL 5c or RPCS Printer Driver 19 Installing the PostScript Printer Driver 24 Changing Port Settings 29 Setting Up Options 30 Sett...

Страница 201: ...PCL 5c or RPCS Printer Driver 60 Installing the PostScript Printer Driver 65 Changing Port Settings 69 Setting Up Options 70 Setting the Printer Shared 74 4 NetWare Configuration Configuring the NetWa...

Страница 202: ...trol Panel 103 Changing the Paper Type 104 Managing the Number of Copies to be Printed 105 Configuring Energy Save Mode 106 Setting a Password 107 6 Using a Web Browser Going to the Top Page 109 Confi...

Страница 203: ...Menu 145 System Menu 153 System Parameters 154 Changing the System Menu 160 Host Interface Menu 163 Host Interface Parameters 164 Changing the Host Interface Menu 172 PCL Menu 175 PCL Parameters 175 C...

Страница 204: ...d 222 Message List 227 System Log Information 227 Precautions 236 Connecting a Dial Up Router to a Network 236 PostScript Printing from Windows 238 NetWare Printing 238 Using DHCP 240 Configuring a WI...

Страница 205: ...ne Software Version Conventions Used in This Manual NetWare 3 x means NetWare 3 12 and 3 2 NetWare 4 x means NetWare 4 1 4 11 and IntranetWare Trademarks Macintosh Mac OS Apple AppleTalk EtherTalk Las...

Страница 206: ...es of Windows 2000 are as follows Microsoft Windows 2000 Advanced Server Microsoft Windows 2000 Server Microsoft Windows 2000 Professional The product names of Windows XP are as follows Microsoft Wind...

Страница 207: ...in minor or moderate injury or damage to property The statements above are notes for your safety Important If this instruction is not followed paper might be misfed or data might be lost Be sure to r...

Страница 208: ...ructions Administrator Reference 9 Keys that appear on the machine s panel display Keys and buttons that appear on the computer s display Keys built into the machine s control panel Keys on the comput...

Страница 209: ...nistrator Reference 10 Confirming a Network Environment NetWare Server Windows 2000 XP Windows Server 2003 Windows NT 4 0 Server Macintosh NetWare Client UNIX Windows 95 98 Me 2000 XP Windows Server 2...

Страница 210: ...onnecting Printer and Computer Network connection Ethernet cable IEEE 1394 cable IP over 1394 IEEE 802 11b wireless LAN Parallel connection parallel cable USB connection USB cable IEEE 1394 SCSI print...

Страница 211: ...Print Server See p 14 Windows 2000 Print Server Configuration See p 35 Windows XP Windows Server 2003 Print Server Configuration See p 54 Windows NT 4 0 Print Server Configuration Netware Configurati...

Страница 212: ...Reference 13 NetWare File Server Print Server Windows 95 98 Me 2000 XP Windows NT 4 0 Windows Server 2003 ACT003S NetWare Print Server NetWare File Server Remote Printer Windows 95 98 Me 2000 XP Windo...

Страница 213: ...rt See p 14 Configuring the Protocols and p 19 Installing the PCL 5c or RPCS Printer Driver or p 24 Installing the PostScript Printer Driver Note If you want to use LPR Port Print Services for UNIX mu...

Страница 214: ...ess use the ping command to confirm that it has been set correctly A On the Start menu point to Programs point to Accessories and then click Command Prompt B Enter the following Example IP address is...

Страница 215: ...click Properties C C C C Check Internet Protocol TCP IP is selected in the Components checked are used by this connec tion box on the General tab Note If the check box for TCP IP is not selected selec...

Страница 216: ...erence Configuring a Windows 2000 computer Follow the procedure below to configure a Windows 2000 computer to use NetBEUI A A A A On the Start menu point to Settings and then click Network and Dial up...

Страница 217: ...a language for the interface and then click OK The following languages are available Cestina Czech Dansk Danish Deutsch German Eng lish English Espanol Spanish Francais French Italiano Italian Magyar...

Страница 218: ...e to certain operating system settings If this is the case launch Setup exe located in the CD ROM root directory C C C C Select a language for the interface and then click OK The following languages a...

Страница 219: ...click the printer name to display its settings Note The details shown for Comment Driver and Port vary depending on the operating system be ing used model of printer selected and port being used I I...

Страница 220: ...appears B Click the printer you want to use and then click OK Note Printers that respond to a broadcast from the computer will be displayed To print to a printer not listed here click Specify Address...

Страница 221: ...will be set as the IPP port name D If a proxy server and IPP user name are used click Detailed Settings and configure the necessary settings Note For more information about these settings see SmartDe...

Страница 222: ...alternative driver after installation See p 34 Setting the Printer Shared O O O O Configure the default printer as necessary Default Printer Select the Default Printer check box to set the printer as...

Страница 223: ...operating system settings If this is the case launch Setup exe located in the CD ROM root directory C C C C Select a language for the interface and then click OK The following languages are available...

Страница 224: ...SmartDeviceMonitor Standard TCP IP Port LPR Port SmartDeviceMonitor A Click SmartDeviceMonitor and then click Next B Select the printer you want to use TCP IP A Click TCP IP and then click Search Avai...

Страница 225: ...on Page NetBEUI ad dress appears as RNPxxxx xxx on the configuration page Enter the printer s network path name in the form of Computer name Share name Do not enter as head characters but You cannot p...

Страница 226: ...enter the printer name or IP address and then click Next D In the Add Standard TCP IP Printer Port Wizard window click Finish LPR Port A Click LPR Port and then click Next B In the Name or address of...

Страница 227: ...ck Next To change the printer name use the Share as box L L L L Select whether or not you want to print a test page and then click Next M M M M Click Finish Printer driver installation starts N N N N...

Страница 228: ...alog box appears Note If you cannot set items on the Recovery Parallel Printing tab follow the procedure below A Click Cancel to close the Port Configuration dialog box B Start SmartDeviceMonitor for...

Страница 229: ...sion Note The description uses the PCL 5c printer driver A A A A On the Start menu point to Settings and then click Printers The Printers window appears B B B B Click the icon of the printer you want...

Страница 230: ...ave installed from the Options group and then make any necessary set tings Note If you are using the RPCS printer driver select the options from Select printer options If you are using the PostScript...

Страница 231: ...printer status automat ically The PCL 5c printer driver supports bidirectional transmission you can update the printer status manually However it does not support bidirectional transmission over a par...

Страница 232: ...r must be set to bidirectional transmission SmartDeviceMonitor for Client included on the CD ROM must be installed and TCP IP must be used Under Windows 2000 Enable bidirectional support must be selec...

Страница 233: ...ion A A A A On the Start menu point to Settings and then click Printers The Printers window appears B B B B Click the icon of the printer you want to use On the File menu click Properties C C C C Sele...

Страница 234: ...Port LPR Port See p 35 Configuring the Protocols p 39 Installing the PCL 5c or RPCS Printer Driver and p 44 Installing the PostScript Printer Driver Note If you want to use LPR Port Print Services for...

Страница 235: ...g the IP address use the ping command to confirm that it has been set correctly A On the Start menu point to All Programs point to Accessories and then click Command Prompt B Enter the following Examp...

Страница 236: ...the File menu click Properties C C C C Check Internet Protocol TCP IP is selected in the This connection uses the following items box on the General tab Note If the check box for TCP IP is not selecte...

Страница 237: ...a language for the interface and then click OK The following languages are available Cestina Czech Dansk Danish Deutsch German Eng lish English Espanol Spanish Francais French Italiano Italian Magyar...

Страница 238: ...e to certain operating system settings If this is the case launch Setup exe located in the CD ROM root directory C C C C Select a language for the interface and then click OK The following languages a...

Страница 239: ...H H H H Double click the printer name to display its settings Note The details shown for Comment Driver and Port vary depending on the operating system be ing used model of printer selected and port b...

Страница 240: ...he printer s IP address enter http printer s ip address printer or ipp print er s ip address printer in the Printer URL field Example IP address is 192 168 15 16 http 192 168 15 16 printer ipp 192 168...

Страница 241: ...x enter the printer s IP address C In the Name of printer or print queue on that server box enter lp and then click OK K K K K Make sure the location for the selected printer is displayed after Port L...

Страница 242: ...dialog box may appear In this case click Continue Anyway to continue the installation Q Q Q Q When the Select Program dialog box appears click Finish R R R R When the Installation completion dialog b...

Страница 243: ...operating system settings If this is the case launch Setup exe located in the CD ROM root directory C C C C Select a language for the interface and then click OK The following languages are available...

Страница 244: ...want to use SmartDeviceMonitor Standard TCP IP Port LPR Port SmartDeviceMonitor A Click SmartDeviceMonitor and then click Next B Select the printer you want to use TCP IP A Click TCP IP and then clic...

Страница 245: ...from those of existing port names If you do not do this the address entered in Printer URL will be set as the IPP port name D If a proxy server and IPP user name are used click Detailed Settings and...

Страница 246: ...you want and then click Next Configure the default printer as necessary Select the Yes check box to set the printer as the default printer K K K K Select the Share name check box and then click Next...

Страница 247: ...ars Note If you cannot set items on the Recovery Parallel Printing tab follow the procedure below A Click Cancel to close the Port Configuration dialog box B Start SmartDeviceMonitor for Client and th...

Страница 248: ...te The description uses the PCL 5c printer driver A A A A Access the Printers and Faxes window from Start on the taskbar The Printers and Faxes window appears B B B B Click the icon of the printer you...

Страница 249: ...ave installed from the Options group and then make any necessary set tings Note If you are using the RPCS printer driver select the options from Select printer options If you are using the PostScript...

Страница 250: ...ansmission and updates the printer status automat ically The PCL 5c printer driver supports bidirectional transmission you can update the printer status manually The PostScript 3 printer driver does n...

Страница 251: ...set to bidirectional transmission SmartDeviceMonitor for Client included on the CD ROM must be installed and TCP IP must be used Under Windows XP or Windows Server 2003 Enable bidirectional support mu...

Страница 252: ...Access the Printers and Faxes window from Start on the taskbar The Printers and Faxes window appears B B B B Click the icon of the printer you want to use On the File menu click Properties C C C C Se...

Страница 253: ...ort See p 54 Configuring the Protocols p 60 Installing the PCL 5c or RPCS Printer Driver and p 65 Installing the PostScript Printer Driver Note If you want to use LPR Port Microsoft TCP IP Printing mu...

Страница 254: ...After setting the IP address use the ping command to confirm that it has been set correctly A On the Start menu point to Programs and then click Command Prompt B Enter the following Example IP address...

Страница 255: ...lled click Add on the Protocols tab and install it For more information about installing TCP IP see Windows NT 4 0 Help B B B B Check TCP IP with an appropriate IP address subnet mask and other settin...

Страница 256: ...and Windows NT 4 0 to use NetBEUI Preparation To use NetBEUI use the SmartDeviceMonitor for Client port Configuring the printer Configure the printer to use NetBEUI Check NetBEUI is set to active The...

Страница 257: ...l it For more information about installing NetBEUI see Windows NT 4 0 Help B B B B Change the Lana Number Click the Services tab click NetBEUI Interface in the Network Services box and then click Prop...

Страница 258: ...a language for the interface and then click OK The following languages are available Cestina Czech Dansk Danish Deutsch German Eng lish English Espanol Spanish Francais French Italiano Italian Magyar...

Страница 259: ...e to certain operating system settings If this is the case launch Setup exe located in the CD ROM root directory C C C C Select a language for the interface and then click OK The following languages a...

Страница 260: ...nter name to display its settings Note The details shown for Comment Driver and Port vary depending on the operating system be ing used model of printer selected and port being used I I I I Click Port...

Страница 261: ...lick Specify Address and then enter the NetBEUI address Check the NetBEUI network address is on the configuration page For more information about the printing of configuration page see p 134 Printing...

Страница 262: ...then click OK B In the Name or address of server providing lpd box enter the printer s IP address C In the Name of printer or print queue on that server box enter lp and then click OK K K K K Make su...

Страница 263: ...river installation Q Q Q Q When the Select Program dialog box appears click Finish R R R R When the Installation completion dialog box appears click Finish S S S S Set up the options Note You must set...

Страница 264: ...operating system settings If this is the case launch Setup exe located in the CD ROM root directory C C C C Select a language for the interface and then click OK The following languages are available...

Страница 265: ...lick New Port B Select the printer you want to use TCP IP A Click TCP IP and then click Search Available printers will be listed B Click the printer you want to use and then click OK Note Printers tha...

Страница 266: ...rs but You cannot print to printers beyond routers IPP A Click IPP The IPP setting dialog box appears B To specify the printer s IP address enter http printer s ip address printer or ipp print er s ip...

Страница 267: ...ou want to install and then click Next J J J J Change the name of the printer if you want and then click Next Configure the default printer as necessary Select the Yes check box to set the printer as...

Страница 268: ...alog box appears Note If you cannot set items on the Recovery Parallel Printing tab follow the procedure below A Click Cancel to close the Port Configuration dialog box B Start SmartDeviceMonitor for...

Страница 269: ...permission Note The description uses the PCL 5c printer driver A A A A On the Start menu point to Settings and then click Printers The Printers window appears B B B B Click the icon of the printer yo...

Страница 270: ...ave installed from the Options group and then make any necessary set tings Note If you are using the RPCS printer driver select the options from Select printer options If you are using the PostScript...

Страница 271: ...ts bidirectional transmission and updates the printer status automat ically The PCL 5c printer driver supports bidirectional transmission you can update the printer status manually The PostScript 3 pr...

Страница 272: ...must be set to bidirectional transmission SmartDeviceMonitor for Client included on the CD ROM must be installed and TCP IP must be used Under Windows NT 4 0 Enable bidirectional support must be sele...

Страница 273: ...indow appears B B B B Click the icon of the printer you want to use On the File menu click Properties C C C C Select the Shared check box on the Sharing tab Note If you use alternate drivers for Windo...

Страница 274: ...emote printer in a NetWare en vironment Configuring the NetWare Protocol using the Control Panel Note IPX SPX must be installed on your computer If it is not see Windows Help for instructions A A A A...

Страница 275: ...ay Network Setup E E E E Press the Enter key The following message appears on the display F F F F Select the NetWare Note All protocols are active by the default Do not select protocols not used on yo...

Страница 276: ...t setting appears on the display D Press the U U U U or T T T T key to display NetWare E Press the Enter key After about two seconds the display returns to Active Protocol F Press the Escape key The d...

Страница 277: ...rrect frame type if Auto is selected In this case select the ap propriate frame type A Press the U U U U or T T T T key to display Frame Type NW B Press the Enter key The current setting appears on th...

Страница 278: ...iceMonitor for Admin under the follow ing environments Novell NetWare Client is required NDS mode in Windows 95 98 Me NDS or Bindary mode in Windows 2000 XP Windows Server 2003 Windows NT 4 0 Use the...

Страница 279: ...the printer differ depending on whether the Network Interface Board is configured as a print server or as a remote printer This section describes how to configure it in the NetWare 3 x environment Not...

Страница 280: ...up menu point to Search Device and then click IPX SPX A list of printers appears Note If you cannot identify which printer to configure from the list of printers print Configuration Page from the prin...

Страница 281: ...I I Enter the print server name in the Print Server Name box the printer name in the Printer Name box and the print queue name in the Print Queue Name box then click Next In the Print Server Name box...

Страница 282: ...PX frame types between the computer and printer Use the Network dialog box of Windows to change the computer frame type For more information about changing equipment frame types see p 75 Configuring t...

Страница 283: ...Note If you use a currently defined print queue proceed to step J A On the Available Options menu click Print Queue Information and then press Enter B Press INSERT and then enter a print queue name C...

Страница 284: ...rallel LPT1 IRQ Buffer size Starting form and Queue service mode are automatically configured H Press the ESC key and then click Yes in the confirmation dialog box I Press the ESC key to return to Pri...

Страница 285: ...he print server by entering the following from the console of the NetWare Server If it is running restart it after exiting it To exit CAREE unload pserver To start CAREE load pserver print_server_name...

Страница 286: ...onfigured as a print server or remote printer This section describes how to configure it in a NetWare 4 x 5 5 1 6 6 5 environment To use NetWare 5 5 1 6 6 5 Use the printer as a print server Do not us...

Страница 287: ...le server as a Supervisor or the equivalent of a Supervisor B B B B Run SmartDeviceMonitor for Admin C C C C On the Group menu point to Search Device and then click IPX SPX or TCP IP A list of printer...

Страница 288: ...is to be created You can also select a file server from the list that appears by clicking Browse By clicking Browse you can select a NDS context from those listed in the Browse dialog box For context...

Страница 289: ...rs as an attached user Using Pure IP in the NetWare 5 5 1 6 6 5 Environment A A A A Log on to the file server as an Admin or the equivalent of an Admin B B B B Run SmartDeviceMonitor for Admin C C C C...

Страница 290: ...ontext object names are entered from a lower object and divided by a period For example if you want to create a print server into Net under DS enter NET DS D In the Print Server Operation Mode group c...

Страница 291: ...ears on the list match the IPX SPX frame types between the computer and printer Use the Network dialog box of Windows to change the computer frame type For more information about changing equipment fr...

Страница 292: ...lick As Remote Printer E In the Remote Printer No box enter the number of the printer Important Use the same number as that of the printer to be created in the print server F Click OK to close the pro...

Страница 293: ...Ware 5 5 1 6 click Printer Non NPDS C In the Printer name box enter the name of the printer D Select the Define additional properties check box and then click Create K K K K Assign print queues to th...

Страница 294: ...ver as follows A Click Assignments and then click Add in the Assignments group B In the Available objects box click the queue created in step K and then click OK C In the Printers group click the prin...

Страница 295: ...for each computer using the user codes Checks the results of print jobs executed from the computer Enables you to change the printer s network settings Device Settings function Limits settings done f...

Страница 296: ...d with Windows 2000 IPX SPX provided with Windows 2000 NetWare Client provided with Windows 2000 Novell Client for Windows NT 2000 Microsoft Windows XP TCP IP provided with Windows XP IPX SPX provided...

Страница 297: ...ailable Cestina Czech Dansk Danish Deutsch German Eng lish English Espanol Spanish Francais French Italiano Italian Magyar Hungarian Neder lands Dutch Norsk Norwegian Polski Polish Portugues Portugues...

Страница 298: ...ant to change configuration D D D D On the Tools menu click NIB Setup Tool NIB Setup Tool starts E E E E Click Wizard or Property Sheet and then click OK When configuring the network interface board f...

Страница 299: ...of the names in TCP IP form printer name and NetBEUI form is changed individually Com ments are however common to both protocols The factory default name consists of RNP and the last 3 bytes of the MA...

Страница 300: ...r comment using up to 31 characters NetBEUI A Click the General tab and then enter the comment in the Comment box In the Comment box enter a printer comment using up to 31 characters B Click the NetBE...

Страница 301: ...B B Click the Group menu point to Search Device and then click TCP IP or IPX SPX Printer status is indicated by an icon in the list Note For more information about status icons see SmartDeviceMonitor...

Страница 302: ...the Tools menu point to Device Settings and then click Lock Operation Panel Menu The Web browser starts and a screen prompting you to enter the user name and password appears E E E E Enter the user n...

Страница 303: ...the list select the printer whose paper type you want to change D D D D On the Tools menu point to Device Settings and then click Select Paper Type The Web browser starts and a screen prompting you t...

Страница 304: ...ick the Group menu point to Search Device and then click TCP IP or IPX SPX A list of printers appears Note Select the protocol of the printer for which you want to change configuration C C C C In the...

Страница 305: ...or which you want to change configuration C C C C Select the device you want to make a setting for You do not need to select anything if you want to make a setting for all devices in the group D D D D...

Страница 306: ...for which you want to change configuration D D D D On the Tools menu click NIB Setup Tool NIB Setup Tool starts Note To prevent the network interface board configuration from being changed accidental...

Страница 307: ...ts Microsoft Internet Explorer 4 01 or later Netscape Navigator 4 06 or later Operating systems the browser is guaranteed to run on are all supported Limitation If the Web browser in use is older than...

Страница 308: ...f a DNS server is used on the network you can type the host name as an URL For example ht tp webmonitor netprinter com In order to do this you must register the IP address and the host name of the Net...

Страница 309: ...WSMHLP Language 2 Menu Buttons Buttons to configure the Network Interface Board and confirm the status of the printer Note When you click Network Config a dialog box appears requesting the user name a...

Страница 310: ...name is displayed D D D D Enter your user name and password and then click OK To use the factory default account enter no user name and type password for the password E E E E Click the item you want...

Страница 311: ...BP 2 Limitation This page is displayed when the optional 1394 Interface Unit is installed IPP Authentication If using the IPP protocol configure the authentication settings for printing here Paper Typ...

Страница 312: ...onfig Reference The dialog box for entering the password and user name is displayed D D D D Click the item you want to check The following items can be checked General Shows general settings for the m...

Страница 313: ...py the Help files on the CD ROM to a desired location The Help files are located in folders la beled with abbreviated language names For example English Help files are in the EN folder Be sure to copy...

Страница 314: ...the factory default name is RNP627DD5 Comments are not configured A A A A Start the Web browser B B B B Enter the address http IP address of the printer you want to change the settings The status of t...

Страница 315: ...name of the printer within 47 characters The factory de fault name consists of RNP and the last 5 bytes of the EUI 64 on the IEEE 1394 IP over 1394 interface For example when the EUI 64 is 00 00 74 0...

Страница 316: ...Operating Instructions Administrator Reference 117 F F F F Click Apply The setting is transmitted to the printer G G G G Exit the Web browser...

Страница 317: ...ng a Web browser A A A A Start the Web browser B B B B Enter the address http IP address of the printer whose status you want to view The status of the selected printer is displayed on the Web browser...

Страница 318: ...d provides information about the parameters included in each menu Category Function menu Sample Print 1 Select Action Error File s Locked Print 1 Select Action Error File s Paper Input see p 126 Paper...

Страница 319: ...see p 140 Mainte nance Menu Color Regist Image Density Registration PlainPaper Type Envelope Type Maint Reset HDD Format 2 ROM Update 3 4C Graphic Mode WL LAN Signal 4 WL LAN Defaults Print Area Key...

Страница 320: ...tem Menu MisfeedRecovery Prt Err Report Auto Continue Memory Overflow Copies Printer Lang Sub Paper Size Page Size Duplex 6 Energy Saver 1 E Saver2 Timer Unit of Measure Resolution B W Page Detect Spo...

Страница 321: ...only when the optional Printer Hard Disk is installed 3 ROM Update is not currently used Host Interface see p 163 Host Inter face Menu I O Buffer I O Timeout Network Setup 7 IEEE 1394 Setup 8 IEEE 80...

Страница 322: ...access the Menu Protect Series Prnt Job Letterhead Mode E Saver2 OnOff USB Setting on the panel display 6 The Duplex menu appears only when the optional AD440 is installed 7 The Network Setup menu ap...

Страница 323: ...is menu shows the following 9 items which can be displayed one by one by pressing the U U U U or T T T T key Sample Print Locked Print Paper Input List Test Print Maintenance System Host Interface PCL...

Страница 324: ...ack to the previous page After making the printer settings be sure to return to the previous menu by pressing the Escape key After making the printer settings press the On Line key to return to the Re...

Страница 325: ...u Description Bypass Size The paper size for the bypass tray For more information about paper sizes that can be set in the bypass tray see Pa per and Other Media Supported by This Printer Maintenance...

Страница 326: ...ach tray see Mainte nance Guide Tray 1 Tray 2 Tray 3 Plain Paper Recycled Paper Special Paper Color Paper Letterhead Pre printed Prepunched Bond Paper Bypass Tray Plain Paper Recycled Paper Special Pa...

Страница 327: ...f you want to use a locked tray you must select it from the printer driver and control panel If a locked tray is selected from the printer driver the printer does not search for another Tray Priority...

Страница 328: ...or Reference 129 Changing the Paper Input Menu Tray Locking A A A A Press the Menu key Menu appears on the display B B B B Press the U U U U or T T T T key to display Paper Input and then press the En...

Страница 329: ...ey to display the tray to change the tray locking off and then press the Enter key Note The bypass tray cannot be locked E E E E Press the U U U U or T T T T key to display Off and then press the Ente...

Страница 330: ...he Menu key Menu appears on the display B B B B Press the U U U U or T T T T key to display Paper Input and then press the Enter key C C C C Press the U U U U or T T T T key to display Tray Priority a...

Страница 331: ...ce 132 D D D D Press the U U U U or T T T T key to select the tray type you want to use E E E E Press the Enter key Wait for two seconds Menu appears on the panel display F F F F Press the On Line key...

Страница 332: ...Parameters Menu Description Config Page You can print the current configuration of the printer See p 134 Printing a Con figuration Page Menu List You can print the Menu List which shows the function m...

Страница 333: ...onfiguration Page Reference For more information see p 137 Interpreting the Configuration Page A A A A Press the Menu key Menu appears on the panel display B B B B Press the T T T T or U U U U key to...

Страница 334: ...ter key The following message appears on the display After a short time the configuration page will start printing Important If you cannot print the configuration page check for an error message appea...

Страница 335: ...Operating Instructions Administrator Reference 136 E E E E Press the On Line key Ready appears on the panel display ZHBS050E Ready...

Страница 336: ...r firmware version number Engine Displays the printer engine firmware version number NCS Shows the version number of the Network Interface Board Pages Printed Shows the total number of pages printed b...

Страница 337: ...made under the Paper Input menu Reference For more information see p 126 Paper Input Menu Maintenance Displays the settings made under the Maintenance menu Reference For more information see p 140 Ma...

Страница 338: ...the settings made under the Host Interface menu When DHCP is active on the network the actual IP address subnet mask and gateway address appear in parentheses on the configuration page Reference For...

Страница 339: ...nu You can make the following settings from the Maintenance menu Color Regist Image Density Registration PlainPaper Type Envelope Type Maint Reset HDD Format ROM Update 4C Graphic Mode WL LAN Signal W...

Страница 340: ...t Sheet You can print the registration test sheet Black Cyan Magenta Yellow You can specify per color the image density in the range of 10 to 10 Reset Defaults This function returns settings to their...

Страница 341: ...elect the type of envelope you wish to use as a default Envelope Type 1 Envelope Type 2 Note Default Envelope Type 1 Some types or brands of envelope may not give uniform print qual ity With such enve...

Страница 342: ...characters or lines are blurred selecting Text Priority may make them clearer Select Photo Priority for normal use Note Default Photo Priority WL LAN Signal You can check the signal strength when usin...

Страница 343: ...changing menu settings a network administrator task Level 1 Level 2 Off Note Default Off While the printer is On Line press the Enter key and then press the Escape key finally press the Menu key You c...

Страница 344: ...ing the Maintenance Menu Protecting the menus A A A A Check if the On Line indicator is on If not press the On Line key to enter the Ready con dition B B B B Press the Enter key then the Escape key an...

Страница 345: ...ars on the display D D D D Press the U U U U or T T T T key to display Menu Protect E E E E Press the Enter key The following message appears on the display F F F F Press the U U U U or T T T T key to...

Страница 346: ...Operating Instructions Administrator Reference 147 G G G G Press the On Line key Ready appears on the display ZHBS050E Ready...

Страница 347: ...C C C Press the U U U U or T T T T key to display Maintenance menu and then press the Enter key The following message appears on the panel display D D D D Press the U U U U or T T T T key to display M...

Страница 348: ...the Main tenance menu A A A A Press the Menu key Menu appears on the display B B B B Press the T T T T or U U U U key to display the Maintenance menu C C C C Press the Enter key The following message...

Страница 349: ...hoc in Comm Mode of IEEE 802 11b in the Host Interface menu is selected you cannot check the signal Select Infrastructure and then check it again Every time you press the Enter key the signal is upda...

Страница 350: ...ngs If you need to reset the wireless LAN setting select WL LAN Defaults in the Maintenance menu Note The five items that can be reset in IEEE 802 11b of the Host Interface menu are Comm Mode Channel...

Страница 351: ...he T T T T or U U U U key to display WL LAN Defaults E E E E Press the Enter key F F F F Press the Enter key The following message appears on the panel display The wireless LAN setting value is reset...

Страница 352: ...the following settings from the System menu MisfeedRecovery Prt Err Report Auto Continue Memory Overflow Copies Printer Lang Sub Paper Size Page Size Duplex Energy Saver 1 E Saver2 Timer Unit of Measu...

Страница 353: ...n MisfeedRecovery You can select whether Misfeed Recovery is enabled When it is on printing re starts after the misfed paper has been cleared On Off Note Default On Prt Err Report You can have an erro...

Страница 354: ...ff When it is on and certain types of error occur the current job might be canceled and the machine automatically resumes the next job Memory Overflow You can have memory overflow error reports printe...

Страница 355: ...e if the paper cur rently specified is not loaded When you select Off the printer uses the paper in the current specified paper input tray regardless of its size Auto Off Note Default Off Page Size Yo...

Страница 356: ...n When the printer switches to Energy Saver mode the Power indi cator turns off while the On Line indicator stays on E Saver2 Timer You can set how many minutes the printer waits before switching to E...

Страница 357: ...Inch version Metric version mm Inch version inch Resolution You can set the print resolution in dots per inch PCL 300 x 300 dpi 600 x 600 dpi PS3 600 x 600 dpi 1200 x 1200 dpi 1200 x 600 dpi Note Def...

Страница 358: ...t jobs sent from a computer to be temporarily stored and printed after they have been sent On Off Note Default Off Spooling stores the print job sent by a computer temporarily in the printer transfers...

Страница 359: ...Reference 160 Changing the System Menu The following example describes how to change the settings for E Saver2 Timer A A A A Press Menu Menu appears on the display B B B B Press U U U U or T T T T to...

Страница 360: ...ministrator Reference 161 C C C C Press Enter The following message appears on the display D D D D Press U U U U or T T T T to display E Saver2 Timer and then press Enter ZHBS040E System MisfeedRecove...

Страница 361: ...select how many minutes the printer waits before switching to Energy Saver mode The following message appears on the display F F F F Press Enter Wait for two seconds Menu appears on the display G G G...

Страница 362: ...enu You can make the following settings from the Host Interface menu I O Buffer I O Timeout Network Setup IEEE 1394 Setup IEEE 802 11b USB Setting Reference For more information about Network Setup se...

Страница 363: ...not necessary to change this setting 128 KB 256 KB 512 KB Note Default 128 KB I O Timeout You can set how many seconds the printer should wait before ending a print job If data from another port ofte...

Страница 364: ...twork Quick Installation Guide IP Address You can set the IP address Limitation When DHCP is On its setting cannot be changed If you want to change the setting Make the setting for DHCP Off Consult th...

Страница 365: ...tting for the network Note Default All zero Reference See Configuring the printer for the Network Quick Installation Guide Gateway Address You can set the gateway address Limitation When DHCP is On it...

Страница 366: ...strator Reference 167 Network Setup Frame Type NW You can set the Frame type for NetWare Note Default Auto Active Protocol You can set the active protocol TCP IP NetWare NetBEUI AppleTalk Note Default...

Страница 367: ...lt Auto Reference See Configuring the printer for the Network Quick Installation Guide LAN Type You can select Ethernet or IEEE 802 11b for the LAN Type Note Default Ethernet Appears Only when the opt...

Страница 368: ...394 You can set the IP address for IEEE 1394 IP over 1394 Note Default All zero Subnet Mask1394 You can set the Subnet Mask for IEEE 1394 IP over 1394 Note Default All zero IP over 1394 You can activa...

Страница 369: ...y when the optional 802 11b Interface Unit is installed Comm Mode You can set the transmission mode for IEEE 802 11b Note Default 802 11 Ad hoc Channel The selectable channels are 1 11 Inch version an...

Страница 370: ...can be used are ASCII 0x20 0x7e 32 bytes A SSID value is set automatically to the nearest access point if the setting has not been made If the setting has not been made for 802 11 Ad hoc mode the sam...

Страница 371: ...the Host Interface Menu The following example describes how to change the setting for I O Timeout A A A A Press the Menu key Menu appears on the display B B B B Press the U U U U or T T T T key to di...

Страница 372: ...r key The following message appears on the display D D D D Press the U U U U or T T T T key to display I O Timeout E E E E Press the Enter key The following message appears on the display ZHBS040E Hos...

Страница 373: ...ss the U U U U or T T T T key to select how many minutes the printer waits before ending a print job G G G G Press the Enter key Wait for two seconds Host Interface appears on the display H H H H Pres...

Страница 374: ...ke the following settings from the PCL Menu Orientation Form Lines Font Source Font Number Point Size Font Pitch Symbol Set Ext A4 Width Append CR to LF PCL Parameters Menu Description Orientation You...

Страница 375: ...RAM HDD Note Default Resident When you select RAM you can select only fonts downloaded to the printer RAM Font Number You can set the ID of the default font you want to use 0 to 50 for Resident 0 to 4...

Страница 376: ...he available op tions are as follows Roman 8 ISO L1 ISO L2 ISO L5 PC 8 PC 8 D N PC 850 PC 852 PC8 TK Win L1 Win L2 Win L5 Desktop PS Text VN Intl VN US MS Publ Math 8 PS Math VN Math Pifont Legal ISO...

Страница 377: ...ting Instructions Administrator Reference 178 Changing the PCL Menu The following example describes how to change the setting for Orientation A A A A Press the Menu key Menu appears on the display ZHB...

Страница 378: ...d then press the Enter key The following message appears on the display C C C C Press the Enter key D D D D Press the U U U U or T T T T key to select the orientation desired and then press the Enter...

Страница 379: ...Operating Instructions Administrator Reference 180 E E E E Press the On Line key Ready appears on the display ZHBS050E Ready...

Страница 380: ...lable languages are English German French Italian Spanish Dutch Swedish Norwegian Danish Finnish Portuguese Czech Polish and Hungarian Note Default English Changing the Language Menu You can change th...

Страница 381: ...nguage C C C C Press the Enter key The following message appears on the display D D D D Press the U U U U or T T T T key until the language you want to select appears on the panel display E E E E Pres...

Страница 382: ...Operating Instructions Administrator Reference 183 F F F F Press the On Line key Ready appears on the display ZHBS050E Ready...

Страница 383: ...an get MIB information using these community names Reference You can configure SNMP from the command line using telnet See p 197 SNMP You can configure SNMP from SmartDeviceMonitor for Admin using the...

Страница 384: ...nting does not appear unless the optional Printer Hard Disk is installed Data that has been received in the protocol other than LPD or IPP cannot be spooled Up to 50 jobs approximately 1000 MB can be...

Страница 385: ...the spool jobs To delete check the box next to the name of the file you want to delete Enter the password 1 and then click Delete For more information see p 111 Configuring the Network Interface Boar...

Страница 386: ...intenance Using telnet The following is a sample procedure in using telnet Limitation Only one person at a time can be logged on to do remote maintenance A A A A Use the IP address or the host name of...

Страница 387: ...no and then press Enter If you want to make ad ditional changes type return at the command line and then press Enter Note If the Can not write NVRAM information message appears the changes are not sa...

Страница 388: ...name to display information about the syntax of that command msh help command_name TCP IP address Use the ifconfig command to configure TCP IP IP address subnet mask broadcast address default gateway...

Страница 389: ...rface when installing the optional 802 11b Interface Unit Changing the Interface You can specify either the LAN interface or IEEE 802 11b interface when using the optional 802 11b Interface Unit msh i...

Страница 390: ...TCP IP setting is the same as that for the LAN interface and IEEE 802 11b interface To type an address using hexadecimal prefix it by 0x Address Subnet Mask A number used to mathematically mask or hi...

Страница 391: ...ge 192 168 0 10 192 168 0 20 Note The access range restricts the workstations from which printing is possible by means of an ad dress If you do not need to restrict printing make the setting 0 0 0 0 T...

Страница 392: ...igure the boot method msh set parameter on off on off on means active and off means inactive Note The default is on When you use DHCP the server also needs to be configured DHCP takes precedence over...

Страница 393: ...d Note If you prohibit remote access using TCP IP and then log out you cannot use remote access If this was a mistake you can use the control panel to allow access by TCP IP When you prevent access vi...

Страница 394: ...is displayed when the ID number is added after the prnlog com mand Reference For more information about the meaning of the data returned with these commands see p 220 Un derstanding the Displayed Info...

Страница 395: ...the show command to have information displayed on screen at one time Reference For more information about the meaning of the data returned with this command see p 222 Con figuring the Network Interfac...

Страница 396: ...s Display Shows the SNMP information and available protocols msh snmp msh snmp p registered_number Note If the p option is added you can view the settings one by one Omitting the number displays all a...

Страница 397: ...ettings set to use that protocol are disabled msh snmp ip ipx on off ip ipx on off ip ipx on off on means active and off means inactive To change the protocol of access settings use the following comm...

Страница 398: ...sh snmp number ip ipx ip ipx address Note To specify the TCP IP protocol type ip followed by a space and then the IP address To specify the IPX SPX protocol type ipx followed by a space and then the I...

Страница 399: ...be made The auth setting indicates the user authorization mode IPP timeout configuration Specifies how many seconds to wait before canceling a print job if it has been interrupted for some reason The...

Страница 400: ...number 1 to 10 Type the number user name and password msh IPP user name user1 msh IPP password After configuring the settings the following message appears User configuration changed SPRINT To make s...

Страница 401: ...ample output port 9100 timeout 300 sec bidirect off The Port specifies the port number of the direct printing port The bidirect setting indicates whether the direct printing port is bidirectional Sett...

Страница 402: ...e for NetBEUI msh smb parameter Parameter Settings smb comp Your computer name consisting of up to 47 characters smb group Workgroup name consisting of up to 15 characters smb comment Comment consisti...

Страница 403: ...and a gateway address to gateway in the table Host becomes the default setting route delete host net destina tion route delete host net desti nation Deletes a host network route from the table Host b...

Страница 404: ...oes not support multi cast the settings are not available even if the TTL value is increased The acceptable TTL value is 1 255 msh slp ttl 1 255 Setting IEEE 802 11b To make setting for IEEE 802 11b u...

Страница 405: ...et automatically to the nearest access point if the setting has not been made If the setting has not been made for ad hoc mode the same value as for infrastructure mode or an ASSID value is set automa...

Страница 406: ...set the authorized mode when using WEP The specified value and the authorized mode are as follows open Open system authorized default shared Shared key authorized rate auto 11m 5 5m 2m 1m You can set...

Страница 407: ...owing command displays the WINS server IP address msh wins Example out put wins primary server 0 0 0 0 secondary server 0 0 0 0 Note If DHCP is used to start from the network the current WINS server a...

Страница 408: ...r_name 1 If you did not enter the interface name it will be automatically set to the Ethernet interface 2 If you install the optional 802 11b Interface Unit you can set the command 3 If you install th...

Страница 409: ...ddress Configuration You can specify the IP address of the NTP server msh sntp server IP_address Interval Configuration You can specify the interval at which the printer synchronizes with the operator...

Страница 410: ...Time zone Configuration You can specify the time difference between the printer clock and the NTP server clock msh sntp timezone hour_time Example To set the time zone difference to 8 hours msh sntp t...

Страница 411: ...rd Old password C C C C Type the new password New password Note The password must consist of 3 to 8 alphanumeric characters and symbols Upper and lower case characters are considered unique For exampl...

Страница 412: ...it is being supplied Color Regist Error The color registration error has occurred Energy Save Mode The printer is in Energy Saver Mode Hardware Problem Black PCU The photoconductor unit is not set cor...

Страница 413: ...d cannot print data Please Wait The printer is initializing the development unit The printer is initializing HDD Processing Print data is being processed Ready Printing is available Replace Black PCU...

Страница 414: ...Operating Instructions Administrator Reference 215 Warming Up The printer is warming up Waste Toner is Almost Full The waste toner is full Messages Description...

Страница 415: ...iption Input Tray No Name PaperSize Status ID number of the paper tray Name of the paper tray 1 Paper size loaded in the paper tray 2 Current status of the paper tray 3 Output Tray No Name Status ID n...

Страница 416: ...Tray Paper Size Description A4 210 297 mm A4 210 297 K B5JIS 182 257 mm B5 182 257 K A5 148 210 mm A5 148 210 K A6 105 148 mm A6 105 148 K 8 1 2 14 LG 8 1 2 14 K 8 1 2 11 LT 8 1 2 11 K 5 1 2 8 1 2 5 1...

Страница 417: ...K 8 13 8 13 K C6 Env 114 162 mm C6 Env 114 162 K 8K 267 390 mm 8K 267 390 K 16K 195 267 mm 16K 195 267 K NCS There is no tray The paper size is not selected Status Description Normal NoTray There is n...

Страница 418: ...Operating Instructions Administrator Reference 219 5 Output Tray Status Status Description Normal PaperExist There is paper in the output tray OverFlow Output tray is full of paper Error Other errors...

Страница 419: ...on The status of the print job can be viewed using the following commands telnet Use the status command See p 195 Printer status Item name Meaning Rank Print job status Active Printing or preparing fo...

Страница 420: ...nd See p 195 Printer status 1 Appears the UserID and JobName information when entering the info command with the ID Name Meaning ID Print request ID User Print request user name Page The number of pag...

Страница 421: ...low telnet Use the show command See p 196 Network Interface Board configuration settings infor mation Item name Meaning Common Mode Protocol Up Down AppleTalk TCP IP NetWare NetBEUI IP over 1394 1 4 S...

Страница 422: ...of printer Name of the zone that the printer belongs to TCP IP Mode ftp lpr rsh diprint web telnet snmp ipp EncapType dhcp Address Netmask Broadcast Gateway Access Range 2 Up means active Down means i...

Страница 423: ...ddress NTP server time difference Synchronizes interval URL of homepage URL name of homepage URL of help page Protocol used with SNMP NetWare EncapType RPRINTER number Print server name File server na...

Страница 424: ...orkgroup Name of the computer Comment Share name name of the printer type IEEE 802 11b 3 SSID SSID being used Channel range Channels available for use Channel Channel being used Communication mode IEE...

Страница 425: ...the item names when installing the optional the optional 802 11b Interface Unit 4 You can display the item names when installing the optional 1394 Interface Unit IP over 1394 1 4 Device name Address N...

Страница 426: ...on the file server If a password is specified for the print server de lete it add_sess community community name already de fined The same community name already exists Use another community name add_s...

Страница 427: ...um number that the file server can han dle Cannot find rprinter print server name printer number The printer having the number displayed on the print server does not exist Make sure that the number of...

Страница 428: ...e DHCP server Current IPX address IPX address The current IPX address DHCP lease time expired DHCP lease time has expired The printer tries to discov er the DHCP server again The IP address used up to...

Страница 429: ...by the user is displayed in ad hoc mode The channel used in the access point is displayed in infra structure mode Example Current channel is 11 IEEE 802 11b current channel 11 IEEE 802 11b MAC Addres...

Страница 430: ...t An inetd has started interface started with IP IP address IP address has been set for Interface and Inter face started Interface Subnet overlap Subnet from Netmask and the IP address you tried to se...

Страница 431: ...tart start NetBEUI The service for NetBEUI protocol stack setting has start ed NBT Registration Broadcast NetBIOS name Use a local broadcast to map NetBIOS name with the IP address nbtd start A nbtd N...

Страница 432: ...ct is not assigned to the print server print server name Using NWadmin assign the printer object and then restart the printer de vice Print session full Cannot accept the print session Printer printer...

Страница 433: ...ready Communication over IPX with SNMP is available snmpd start SNMP service has started started Direct print service has started The print server received error error number during at tempt to log in...

Страница 434: ...ress is correct and the WINS server is working properly WINS server address0 0 0 0 The WINS server address has not been specified Specify the WINS server address to match the printer name with WINS WI...

Страница 435: ...ase Because the packet transmission is a specification of NetWare you need to change the configuration of the router If the network you are using does not allow you to configure the router configure t...

Страница 436: ...ment Reference For more information about selecting a Frame type see p 75 Configuring the NetWare Protocol using the Control Panel Configuring the printer without NetWare A A A A While not printing th...

Страница 437: ...NetWare form feed is configured the printer might not print properly If you want to change the form feed setting always configure it on Windows With Windows 95 98 Me clear the Form Feed check box und...

Страница 438: ...he NetWare Settings tab in the Printer Properties dialog box With Windows NT 4 0 clear the Enable banner check box under the NetWare Settings tab in the Printer Properties dialog box Printing after re...

Страница 439: ...rd Settings Note Printers that register the printer NetBIOS name on a WINS server must be configured for the WINS server See p 208 WINS Supported DHCP server is Windows NT 4 0 Server Service Pack 4 or...

Страница 440: ...utomatically by the printer Limitation You must change the setting to on to use AutoNet See p 209 AutoNet Note The IP address assigned by the DHCP server is given priority to that selected by AutoNet...

Страница 441: ...rmation about the WINS Server settings see Windows Help If there is no reply from the WINS Server the NetBIOS name will be registered by broadcast The NetBIOS name consists of up to 13 alphanumeric ch...

Страница 442: ...lick Refresh H H H H Exit the Web browser Using telnet A A A A Connect to the remote printer using telnet B B B B Use the set command to make WINS active msh set wins on C C C C Specify the IP address...

Страница 443: ...int Quality Paper Size Non Duplex Printing Duplex Printing Can be printed Guaranteed Can be printed Guaranteed 600 600 dpi 1 A4 128 MB Standard 128 MB Standard B5 LT Legal 1200 600 dpi 2 A4 128 MB Sta...

Страница 444: ...t on Gradation Reference For more information about how to set the printer driver see printer driver s Help Print Quality Paper Size Non Duplex Printing Duplex Printing Can be printed Guaranteed Can b...

Страница 445: ...ution and Standard on Gradation Reference For more information about how to set the printer driver see printer driver s Help 3 To set resolution from each printer driver is as follows RPCS 1200 x 1200...

Страница 446: ...nning Electrophotographic printing Mono component toner development 4 drums tandem method Printing Speed Color A4K 16 17 pages per minute 81 2 11K 16 9 18 pages per minute Monochrome A4K 16 21 pages p...

Страница 447: ...equires a USB computer port and cable that support USB 2 0 Optional IEEE 1394 SCSI print IP over 1394 IEEE 802 11b Wireless LAN BluetoothTM Basic model Standard Parallel Bidirectional IEEE1284 USB USB...

Страница 448: ...ome only Printer Language PCL 5c RPCS Adobe PostScript Level 3 Fonts PCL 5c Agfa Font 35 Manager Intellifonts 10 TrueType fonts and 1 Bitmap font Agfa Font Manager available 31 fonts PostScript 3 136...

Страница 449: ...ues 2 Measured at the position of a bystander Dimensions Weight Approximately 30 5 kg 67 2 lb toner cartridge and power cord included Printing 1300 W or less Energy Saver 9 W or less Mainframe only Du...

Страница 450: ...same time Paper Output Capacity Standard 250 sheets 80 g m2 20 lb bond Memory Standard 64 128 MB up to 256 384 MB with the optional Memory Unit SDRAM capacity varies depending on model Network Protoco...

Страница 451: ...s W D H 508 639 286 mm 20 0 25 2 11 3 inches Paper size A4 B5 JIS 8 1 2 14 81 2 11 Paper weight 60 105 g m2 16 28 lb bond Weight Less than 7 5 kg 16 4 lb AD440 Dimensions W D H 400 303 138 mm 15 7 11...

Страница 452: ...pool print data to collate Spool Sample Locked Print data Store PostScript fonts Store log data Note You can install PostScript fonts with this optional Printer Hard Disk Type 3000 With Macintosh type...

Страница 453: ...pins User Account Enhance Unit Type B Capacity 64 KB Specifications Store User Code Up to 400 users Network Interface Board Type 3000 Topology Ethernet 10Base T 100Base TX Protocols TCP IP NetBEUI IPX...

Страница 454: ...ns 2 Required cable IEEE 1394 interface cable 6 pins x 4 pins 6 pins x 6 pins Important You cannot plug devices together to create loops Do not use a cable more than 4 5 meters long Connectable number...

Страница 455: ...tor are supported Data Transfer Speed Auto select from below speed 1Mbps 2Mbps 5 5Mbps 11Mbps Frequency Range Inch version 2412 2462 Mhz 1 11 channels Metric version 2412 2472 Mhz 1 13 channels Transm...

Страница 456: ...files the Software to deal in the Software without restriction including without limita tion the rights to use copy modify merge publish distribute sublicense and or sell copies of the Soft ware and t...

Страница 457: ...lted A full source code can be found at http www netbsd org Copyright 1999 2000 The NetBSD Foundation Inc All rights reserved Redistribution and use in source and binary forms with or without modifica...

Страница 458: ...OR BUSINESS INTERRUPTION HOWEVER CAUSED AND ON ANY THEORY OF LIABILI TY WHETHER IN CONTRACT STRICT LIABILITY OR TORT INCLUDING NEGLIGENCE OR OTHERWISE ARISING IN ANY WAY OUT OF THE USE OF THIS SOFTWAR...

Страница 459: ...loped by Christopher G Demetriou for the NetBSD Project This product includes software developed by Paul Kranenburg This product includes software developed by Adam Glass This product includes softwar...

Страница 460: ...Admin 100 Web Browser 115 Color Demo Page 133 Color Regist 140 Community Name 197 Config Page 133 134 Configuration NetWare 75 NetWare 3 x 80 NetWare 4 x 5 5 1 6 87 Windows 2000 14 Windows NT 4 0 54 W...

Страница 461: ...t Interface 124 163 164 Host Name 209 I IEEE 1394 Setup 163 IEEE 802 11b 163 205 Image Density 140 Information Network Interface Board configuration 196 222 print job 220 print log 221 system log 196...

Страница 462: ...Type C 64 128 256MB 253 Menu accessing 124 Menu changing 181 Menu Chart 119 Menu key 124 Menu List 133 Menu Protect 140 Message 227 MIB 184 MisfeedRecovery 153 N NetWare 75 NetWare 3 x 80 NetWare 4 x...

Страница 463: ...te Printer NetWare3 x 83 NetWare4 x NetWare5 1 92 Setting Up Options Windows 2000 30 Windows NT 4 0 70 Windows Server 2003 49 Windows XP 49 Share Setting Windows 2000 34 Windows NT 4 0 74 Windows Serv...

Страница 464: ...Account Enhance Unit Type B 254 Using a Web Browser 108 Using SmartDeviceMonitor for Admin 96 W Windows 2000 14 Share Setting 34 Windows NT 4 0 54 Share Setting 74 Windows Server 2003 35 Share Settin...

Страница 465: ...266 Operating Instructions Administrator Reference Copyright 2004...

Страница 466: ...267 Operating Instructions Administrator Reference EN USA G120 8713...

Страница 467: ...ows 2000 XP Windows Server 2003 or Windows NT 4 0 Print Server 22 Printing without a Print Server 28 Configuring Protocols 28 Installing Software 32 Printing via Parallel Connection 44 Installing the...

Страница 468: ...ows 2000 Installing the Printer Driver Using USB 82 Installing the Printer Driver Using IEEE 1394 83 Printing via SCSI print 83 Setting Up Options 87 3 Windows XP Windows Server 2003 Configuration Pri...

Страница 469: ...indows NT 4 0 Print Server 123 Printing without a Print Server 129 Configuring Protocols 129 Installing Software 133 Printing via Parallel Connection 145 Installing the PCL 5c or RPCS Printer Driver 1...

Страница 470: ...ilities Included on the CD ROM Software and Utilities Included on the CD ROM 180 Printer Drivers for This Printer 182 SmartDeviceMonitor for Admin 185 SmartDeviceMonitor for Client 188 8 Setting up th...

Страница 471: ...21 Windows 2000 Accessing the Printer Properties 224 Windows XP Windows Server 2003 Accessing Printer Properties 228 Windows NT 4 0 Accessing the Printer Properties 232 Macintosh Setting up for Printi...

Страница 472: ...rence 6 10 Troubleshooting Checking the Printer Status 256 SmartDeviceMonitor for Client 256 Web Browser 257 11 Appendix Color Guide 258 Color Printing Basics 258 Collate 261 Using Adobe PageMaker Ver...

Страница 473: ...is a registered trademark of International Business Machines Corporation PCL is a registered trademark of Hewlett Packard Company 3Com is a trade mark of 3Com corporation Bluetooth is a Trademark of...

Страница 474: ...ServerTM 2003 Standard Edition Microsoft Windows ServerTM 2003 Enterprise Edition Microsoft Windows ServerTM 2003 Web Edition The product names of Windows NT 4 0 are as follows Microsoft Windows NT Se...

Страница 475: ...minor or moderate injury or damage to property The statements above are notes for your safety Important If this instruction is not followed paper might be misfed or data might be lost Be sure to read...

Страница 476: ...nstructions Client Reference 10 Keys that appear on the machine s panel display Keys and buttons that appear on the computer s display Keys built into the machine s control panel Keys on the computer...

Страница 477: ...Client Reference 11 Confirming a Network Environment NetWare Server Windows 2000 XP Windows Server 2003 Windows NT 4 0 Server Macintosh NetWare Client UNIX Windows 95 98 Me 2000 XP Windows Server 2003...

Страница 478: ...ecting Printer and Computer Network connection Ethernet cable IEEE 1394 cable IP over 1394 IEEE 802 11b Wireless LAN Parallel connection parallel cable USB connection USB cable IEEE 1394 SCSI print co...

Страница 479: ...p 56 Printing Using a Print Server in Windows 2000 Configuration See p 90 Printing Using a Print Server in Windows XP Windows Server 2003 Configuration See p 123 Printing Using a Print Server in Windo...

Страница 480: ...Operating Instructions Client Reference 14 Network Connection Ethernet Windows Server 2003 Windows 95 98 Me 2000 XP Windows NT 4 0 Macintosh ACT005S...

Страница 481: ...Operating Instructions Client Reference 15 IEEE 1394 IP over 1394 Windows Me XP Windows Server 2003 ACT006S...

Страница 482: ...Operating Instructions Client Reference 16 IEEE 802 11b...

Страница 483: ...ode See p 28 Printing without a Print Server in Windows 95 98 Me Configuration See p 62 Printing without a Print Server in Windows 2000 Configuration See p 96 Printing without a Print Server in Window...

Страница 484: ...Me Configuration See p 77 Printing via Parallel Connection in Windows 2000 Configuration See p 110 Printing via Parallel Connection in WindowsXP WindowsServer 2003Configuration See p 145 Printing via...

Страница 485: ...nter Driver Using USB in Windows 95 98 Me Configuration See p 82 Installing the Printer Driver Using USB in Windows 2000 Configuration See p 115 Installing the Printer Driver Using USB in Windows XP W...

Страница 486: ...r Using IEEE 1394 in Windows 95 98 Me Configuration See p 83 Installing the Printer Driver Using IEEE 1394 in Windows 2000 Configuration See p 116 Installing the Printer Driver Using IEEE 1394 in Wind...

Страница 487: ...ing Instructions Client Reference 21 Macintosh Configuration See p 153 Macintosh Configuration UNIX Configuration For UNIX printing information please visit our Web site or consult your authorized ret...

Страница 488: ...indows NT 4 0 Print Server This section describes procedures for setting up a client on a network using Windows 2000 XP Win dows Server 2003 or Windows NT 4 0 as a print server To print from Windows 9...

Страница 489: ...et up and configured correctly Limitation When using a print server connected to the printer via SmartDeviceMonitor for Client you cannot use Recovery Printing and Parallel Printing When using Windows...

Страница 490: ...nt to agree with the license agreement and then click Next F F F F Select a printer drivers you want to use when the Printer Program dialog box appears You can select more than one printer driver G G...

Страница 491: ...dialog box To change the User Code you must uninstall the printer driver and then register the new User Code during the re install process PCL 5c You can specify the User Code with the Printer Driver...

Страница 492: ...l the new one Note Auto Run might not work automatically due to certain operating system settings If this is the case launch Setup exe located in the CD ROM root directory C C C C Select a language fo...

Страница 493: ...nfirming the location for the selected printer shown click Next K K K K Change the name of the printer if you want and then click Next Configure the default printer as necessary Click Yes to set the p...

Страница 494: ...tions to configure the printer and Windows 95 98 Me to use TCP IP and IPP Configuring the printer Configure the printer to use TCP IP Check TCP IP is set to active The default is active Assign an IP a...

Страница 495: ...ed out Configuring a Windows 95 98 Me computer Follow the procedure below to configure a Windows 95 98 Me computer to use TCP IP A Open Control Panel and double click the Network icon Check TCP IP is...

Страница 496: ...g a Windows 95 98 Me computer Install NetBEUI on a Windows 95 98 Me computer and set it as the default protocol A Open Control Panel and double click the Network icon Check NetBEUI is listed in the Th...

Страница 497: ...ns Client Reference 31 C Click the Advanced tab select the Set this protocol to be the default protocol check box and then click OK D Click OK to close the Network dialog box E When the restart messag...

Страница 498: ...4 IP over 1394 interface Installing SmartDeviceMonitor for Client A A A A Quit all applications that are running B B B B Insert the CD ROM into the CD ROM drive Auto Run will start the installer Impor...

Страница 499: ...Finnish Svenska Swedish D D D D Click SmartDeviceMonitor for Client Admin E E E E The software license agreement appears in the License Agreement dialog box After reading through the content click I...

Страница 500: ...certain operating system settings If this is the case launch Setup exe located in the CD ROM root directory C C C C Select a language for the interface and then click OK The following languages are a...

Страница 501: ...ter name to display its settings Note The details shown for Comment Driver and Port vary depending on the operating system be ing used model of printer selected and port being used I I I I Select Smar...

Страница 502: ...rinter not listed here click Specify Address and then enter the NetBEUI address Check the NetBEUI network address is on the configuration page For more information about printing the configuration pag...

Страница 503: ...on for the selected printer is displayed after Port K K K K Configure the user code and default printer as necessary User Code The procedure to specify the user code may differ depending on the printe...

Страница 504: ...inish N N N N When the Installation completion dialog box appears click Finish O O O O Set up the options Note You must set up the options when bidirectional transmission is disabled For more informat...

Страница 505: ...erating system settings If this is the case launch Setup exe located in the CD ROM root directory C C C C Select a language for the interface and then click OK The following languages are available Ce...

Страница 506: ...lt printer as necessary Click Yes to set the printer as the default printer J J J J Select whether or not you want to print a test page and then click Finish K K K K On the Start menu point to Setting...

Страница 507: ...I and then click Search A list of printers that can be used with NetBEUI appears B Click the printer you want to use and then click OK Note Printers that respond to a broadcast from the computer will...

Страница 508: ...ll be set as the IPP port name D If a proxy server and IPP user name are used click Detailed Settings and then configure the necessary settings Note For more information about these settings see Smart...

Страница 509: ...IP you can configure Timeout Settings Note If you cannot set items on the Recovery Parallel Printing tab follow the procedure below A Click Cancel to close the Port Configuration dialog box B Start Sm...

Страница 510: ...he same time When upgrading to a new version of the printer driver delete the old version and then install the new one Note Auto Run might not work automatically due to certain operating system settin...

Страница 511: ...printer name to display its settings Note The details shown for Comment Driver and Port vary depending on the operating system be ing used model of printer selected and port being used I I I I Confirm...

Страница 512: ...en the Select Program dialog box appears click Finish M M M M When the Installation completion dialog box appears click Finish N N N N Set up the options Note You must set up the options when bidirect...

Страница 513: ...erating system settings If this is the case launch Setup exe located in the CD ROM root directory C C C C Select a language for the interface and then click OK The following languages are available Ce...

Страница 514: ...then click Next H H H H In the Available ports box click LPT1 and then click Next I I I I Change the name of the printer if you want and then click Next Configure the default printer as necessary Cli...

Страница 515: ...The procedure below uses Windows 98 as an example The procedure for Windows Me may be slightly different When the USB cable is used for the first time the plug and play function starts and the New Har...

Страница 516: ...drive where the printer driver is located according to the operating system used and then click OK If the CD ROM drive is D the folder will be D Drivers USBPRINT WIN98ME F F F F Confirm the printer d...

Страница 517: ...iguring Protocols and p 32 Installing Software Important Make sure all other applications are closed and the computer is not currently printing prior to installation Printing via IP over 1394 You can...

Страница 518: ...erating system that does not support SCSI print or plug in or out the cable inactivate the device by following procedures A In the Add New Hardware Wizard dialog box confirm that Windows has found the...

Страница 519: ...nters window appears B B B B Click the icon of the printer you want to use C C C C On the File menu click Properties D D D D Click the Accessories tab Note If you are using the RPCS printer driver cli...

Страница 520: ...sso ries button under the Printer Configuration tab Note The RPCS printer driver supports bidirectional transmission and updates the printer status automat ically The PCL 5c printer driver supports bi...

Страница 521: ...st be used Under Windows 95 98 Me Enable bidirectional support for this printer must be selected in Spool Settings on the Details tab with RPCS printer driver When connecting with IEEE 1394 The printe...

Страница 522: ...NT 4 0 Print Server This section describes procedures for setting up a client in a network using Windows 2000 XP Win dows Server 2003 or Windows NT 4 0 as a print server To print from Windows 2000 yo...

Страница 523: ...nt is set up and configured correctly Limitation When using a print server connected to the printer via SmartDeviceMonitor for Client you cannot use Recovery Printing and Parallel Printing Note When u...

Страница 524: ...ers E E E E The software license agreement appears in the License Agreement dialog box After reading through the content click I accept the agreement to agree with the license agree ment and then clic...

Страница 525: ...e Printer Driver Properties after install ing the printer driver See the printer driver s Help Default Printer Select the Default Printer check box to set the printer as the default printer O O O O Cl...

Страница 526: ...erating system settings If this is the case launch Setup exe located in the CD ROM root directory C C C C Select a language for the interface and then click OK The following languages are available Ce...

Страница 527: ...use and then click Next Configure the default printer as necessary Click Yes to set the printer as the default printer J J J J Start printer driver installation K K K K Click Next L L L L Click Finish...

Страница 528: ...PostScript Printer Driver For Standard TCP IP Port LPR Port see p 62 Configuring Protocols p 66 Installing the PCL 5c or RPCS Printer Driver and p 71 Installing the PostScript Printer Driver Note If y...

Страница 529: ...following message appears Reply from 192 168 15 16 bytes 32 time 10ms TTL 32 If the address is configured incorrectly the following message appears Request timed out Configuring a Windows 2000 comput...

Страница 530: ...ng using NetBEUI The default is active Check NetBEUI is set to active The default is active Reference For more information about how to make the above settings see Configuring the printer for the Netw...

Страница 531: ...ot work automatically due to certain operating system settings If this is the case launch Setup exe located in the CD ROM root directory C C C C Select a language for the interface and then click OK T...

Страница 532: ...rtant Never have two versions of the same printer driver installed on your system at the same time When upgrading to a new version of the printer driver delete the old version and then install the new...

Страница 533: ...iver G G G G Select the Printer Name check box to select the printer model s you want to use To change the printer name use the Change settings for Printer Name box H H H H Double click the printer na...

Страница 534: ...Click NetBEUI and then click Search A list of printers that can be used with NetBEUI appears B Click the printer you want to use and then click OK Note Printers that respond to a broadcast from the co...

Страница 535: ...ose of existing port names If you do not do this the address entered in the Printer URL box will be set as the IPP port name D If a proxy server and IPP user name are used click Detailed Settings and...

Страница 536: ...efault Printer Select the Default Printer check box to set the printer as the default printer M M M M Click Continue to start printer driver installation N N N N When the Select Program dialog box app...

Страница 537: ...erating system settings If this is the case launch Setup exe located in the CD ROM root directory C C C C Select a language for the interface and then click OK The following languages are available Ce...

Страница 538: ...or A Select SmartDeviceMonitor and then click Next B Select the printer you want to use TCP IP A Click TCP IP and then click Search Available printers will be listed B Click the printer you want to us...

Страница 539: ...o not en ter as head characters but You cannot print to printers beyond routers IPP A Click IPP The IPP setting dialog box appears B To specify the printer s IP address enter http printer s ip address...

Страница 540: ...e Name or address of server providing lpd box enter the printer s IP address C In the Name of printer or print queue on that server box enter lp I I I I Confirm to select the name of the printer whose...

Страница 541: ...ference 75 Note You can specify the user code with the printer properties dialog box after installing the printer driver See the printer driver s Help Reference For more information about option setti...

Страница 542: ...P IP you can configure Timeout Settings Note If you cannot set items on the Recovery Parallel Printing tab follow the procedure below A Click Cancel to close the Port Configuration dialog box B Start...

Страница 543: ...m at the same time When upgrading to a new version of the printer driver delete the old version and then install the new one Note Auto Run might not work automatically due to certain operating system...

Страница 544: ...e the printer name use the Change settings for Printer Name box H H H H Double click the printer name to display its settings Note The details shown for Comment Driver and Port vary depending on the o...

Страница 545: ...ou must set up the options when bidirectional transmission is disabled For more information about bidirectional transmission status see p 88 Bidirectional transmis sion Reference For more information...

Страница 546: ...erating system settings If this is the case launch Setup exe located in the CD ROM root directory C C C C Select a language for the interface and then click OK The following languages are available Ce...

Страница 547: ...e printer port and then click Next H H H H Change the name of the printer if you want and then click Next I I I I Select whether or not you want to print a test page and then click Next Printer driver...

Страница 548: ...all a printer driver log on using an account that has Administrator permission When the USB cable is used for the first time the Found New Hardware Wizard dialog box appears and Windows 2000 s USB Pri...

Страница 549: ...Pack 1 SP1 or later If the Service Pack is not installed only one 1394 bus SCSI print device is connectable The client cannot install the printer driver without using an account that has Administrator...

Страница 550: ...sing the IEEE 1394 interface cable B B B B In the Found New Hardware Wizard dialog box click Next C C C C When the This wizard will complete the installation for this Device Unknown message appears cl...

Страница 551: ...lete the port and reinstall the printer driver For more information see Printer Does Not Print Maintenance Guide If you do not want to install the printer driver when Found New Hardware Wizard starts...

Страница 552: ...Found New Hardware Wizard dialog box click Next B When the This wizard will complete the installation for this Device message appears and IP over 1394 appears click Search for a suitable driver for my...

Страница 553: ...e C C C C On the File menu click Properties D D D D Click the Accessories tab Note If you are using the RPCS printer driver click the Change Accessories tab If you are using the PostScript printer dri...

Страница 554: ...he printer status automat ically The PCL 5c printer driver supports bidirectional transmission you can update the printer status manually However it does not support bidirectional transmission over a...

Страница 555: ...th RPCS printer driver When connecting with IEEE 1394 The printer must be connected to the IEEE 1394 connector of a computer using the IEEE 1394 interface cable On the printer s control panel Active i...

Страница 556: ...ver This section describes procedures for setting up a client in a network using Windows 2000 XP Win dows Server 2003 or Windows NT 4 0 as a print server To print from Windows XP or Windows Server 200...

Страница 557: ...nt is set up and configured correctly Limitation When using a print server connected to the printer via SmartDeviceMonitor for Client you cannot use Recovery Printing and Parallel Printing Note When u...

Страница 558: ...ers E E E E The software license agreement appears in the License Agreement dialog box After reading through the content click I accept the agreement to agree with the license agree ment and then clic...

Страница 559: ...r check box to set the printer as the default printer O O O O Click Continue to start printer driver installation Note During installation the Hardware Installation dialog box may appear If this happe...

Страница 560: ...erating system settings If this is the case launch Setup exe located in the CD ROM root directory C C C C Select a language for the interface and then click OK The following languages are available Ce...

Страница 561: ...printer you want to use and then click Next K K K K Start printer driver installation Note During installation the Hardware Installation dialog box may appear If this happens click Con tinue Anyway to...

Страница 562: ...cript Printer Driver For Standard TCP IP Port LPR Port see p 96 Configuring Protocols p 100 Installing the PCL 5c or RPCS Printer Driver and p 105 Installing the PostScript Printer Driver Note If you...

Страница 563: ...n click Command Prompt B Enter the following Example IP address is 192 168 15 16 C ping 192 168 15 16 If the address is configured correctly the following message appears Reply from 192 168 15 16 byte...

Страница 564: ...e If the check box for TCP IP is not selected select it If TCP IP is not installed click Install on the General tab and install it For more information about installing TCP IP see Windows XP or Window...

Страница 565: ...ot work automatically due to certain operating system settings If this is the case launch Setup exe located in the CD ROM root directory C C C C Select a language for the interface and then click OK T...

Страница 566: ...rtant Never have two versions of the same printer driver installed on your system at the same time When upgrading to a new version of the printer driver delete the old version and then install the new...

Страница 567: ...river G G G G Select the Printer Name check box to select the printer model s you want to use To change the printer name use the Change settings for Printer Name box H H H H Double click the printer n...

Страница 568: ...enter the printer s IP address or host name You can set a port using TCP IP and the IEEE 1394 IP over 1394 interface IPP A Click IPP The IPP setting dialog box appears B To specify the printer s IP ad...

Страница 569: ...In the Printer Name or IP Address box enter the printer name or IP address and then click Next D In the Add Standard TCP IP Printer Port Wizard window click Finish LPR Port A Select LPR Port and then...

Страница 570: ...nstallation N N N N When the Select Program dialog box appears click Finish O O O O When the Installation completion dialog box appears click Finish P P P P Set up the options Note You must set up the...

Страница 571: ...erating system settings If this is the case launch Setup exe located in the CD ROM root directory C C C C Select a language for the interface and then click OK The following languages are available Ce...

Страница 572: ...ort LPR Port SmartDeviceMonitor A Select SmartDeviceMonitor and then click Next B Select the printer you want to use TCP IP A Click TCP IP and then click Search Available printers will be listed B Cli...

Страница 573: ...m those of existing port names If you do not do this the address entered in the Printer URL box will be set as the IPP port name D If a proxy server and IPP user name are used click Detailed Settings...

Страница 574: ...ge the name of the printer if you want and then click Next Configure the default printer as necessary Click Yes to set the printer as the default printer K K K K Click Next L L L L Select whether or n...

Страница 575: ...onfigure Timeout Settings Note If you cannot set items on the Recovery Parallel Printing tab follow the procedure below A Click Cancel to close the Port Configuration dialog box B Start SmartDeviceMon...

Страница 576: ...em at the same time When upgrading to a new version of the printer driver delete the old version and then install the new one Note Auto Run might not work automatically due to certain operating system...

Страница 577: ...e the printer name use the Change settings for Printer Name box H H H H Double click the printer name to display its settings Note The details shown for Comment Driver and Port vary depending on the o...

Страница 578: ...u must set up the options when bidirectional transmission is disabled For more information about bidirectional transmission status see p 121 Bidirectional transmis sion Reference For more information...

Страница 579: ...erating system settings If this is the case launch Setup exe located in the CD ROM root directory C C C C Select a language for the interface and then click OK The following languages are available Ce...

Страница 580: ...driver you want to install and then click Next I I I I Change the name of the printer if you want and then click Next J J J J Select whether or not you want to print a test page and then click Finish...

Страница 581: ...d dialog box appears and Windows XP or Windows Server 2003 s USB Printing Support will automatically install If the printer driver is already installed the plug and play window appears and the printer...

Страница 582: ...394 interface board is possible under Win dows XP or Windows Server 2003 Important Do not connect new IEEE 1394 or USB devices to the computer or turn on another printer while in stalling the printer...

Страница 583: ...izard helps you install soft ware for Unknown is displayed and click Install from a list or specific location Advanced and then click Next C C C C When Please choose your search and installation optio...

Страница 584: ...the procedure If printing does not work properly after installation you need to delete the port and reinstall the printer driver For more information see Printer Does Not Print Maintenance Guide If y...

Страница 585: ...pecified For more information about how to make printer settings see IEEE 1394 Configuration Option Setup Guide Limitation When using the IEEE 1394 IP over 1394 interface in a network the Ethernet int...

Страница 586: ...C C C On the File menu click Properties D D D D Click the Accessories tab Note If you are using the RPCS printer driver click the Change Accessories tab If you are using the PostScript 3 printer drive...

Страница 587: ...s bidirectional transmission and updates the printer status automat ically The PCL 5c printer driver supports bidirectional transmission you can update the printer status manually The PostScript 3 pri...

Страница 588: ...ith RPCS printer driver When connecting with IEEE 1394 The printer must be connected to the IEEE 1394 connector of a computer using the IEEE 1394 interface cable On the printer s control panel Active...

Страница 589: ...Print Server This section describes procedures for setting up a client in a network using Windows 2000 XP Win dows Server 2003 or Windows NT 4 0 as a print server Printing from Windows NT 4 0 you mus...

Страница 590: ...the following proce dure until the client is set up and configured correctly Limitation When using a print server connected to the printer via SmartDeviceMonitor for Client you cannot use Recovery Pri...

Страница 591: ...hrough the content click I accept the agreement to agree with the license agree ment and then click Next F F F F In the Select Program dialog box select the printer drivers you want to use and then cl...

Страница 592: ...Select the Default Printer check box to set the printer as the default printer O O O O Click Continue to start printer driver installation P P P P When the Select Program dialog box appears click Fini...

Страница 593: ...erating system settings If this is the case launch Setup exe located in the CD ROM root directory C C C C Select a language for the interface and then click OK The following languages are available Ce...

Страница 594: ...Select the printer you want to use and then click OK I I I I Change the name of the printer if you want and then click Next Configure the default printer as necessary Click Yes to set the printer as t...

Страница 595: ...er For LPR Port see p 129 Configuring Protocols p 135 Installing the PCL 5c or RPCS Printer Driver and p 140 Installing the PostScript Printer Driver Note If you want to use LPR Port Microsoft TCP IP...

Страница 596: ...the following message appears Reply from 192 168 15 16 bytes 32 time 10ms TTL 32 If the address is configured incorrectly the following message appears Request timed out Configuring a Windows NT 4 0 c...

Страница 597: ...ient port Configuring the printer Configure the printer to use NetBEUI Check NetBEUI is set to active The default is active Reference For more information about how to make the above settings see Conf...

Страница 598: ...a Number corresponding to the Nbf protocol of the Network Route column and then click Edit D Enter 0 as the Lana Number Note If another protocol s Lana Number is configured as 0 change it to another n...

Страница 599: ...ever have two versions of the same printer driver installed on your system at the same time When upgrading to a new version of the printer driver delete the old version and then install the new one No...

Страница 600: ...r reading through the content click I accept the agreement to agree with the license agree ment and then click Next F F F F Select the SmartDeviceMonitor for Client check box and then click Next G G G...

Страница 601: ...o certain operating system settings If this is the case launch Setup exe located in the CD ROM root directory C C C C Select a language for the interface and then click OK The following languages are...

Страница 602: ...me to display its settings Note The details shown for Comment Driver and Port vary depending on the operating system be ing used model of printer selected and port being used I I I I Click Port and th...

Страница 603: ...dress and then enter the NetBEUI address Confirm the NetBEUI network address is on the configuration page For more information about printing the configuration page see Printing a Configuration Page A...

Страница 604: ...out these settings see SmartDeviceMonitor for Client online Help E Click OK LPR Port A Select LPR Port and then click OK B In the Name or address of server providing lpd box enter the printer s IP add...

Страница 605: ...ptions Note You must set up the options when bidirectional transmission is disabled For more information about bidirectional transmission status see p 151 Bidirectional transmission Reference For more...

Страница 606: ...erating system settings If this is the case launch Setup exe located in the CD ROM root directory C C C C Select a language for the interface and then click OK The following languages are available Ce...

Страница 607: ...inter you want to use TCP IP A Click TCP IP and then click Search Available printers will be listed B Click the printer you want to use and then click OK Note Printers that respond to an IP broadcast...

Страница 608: ...racters but You cannot print to printers beyond routers IPP A Click IPP The IPP setting dialog box appears B To specify the printer s IP address enter http printer s ip address printer or ipp print er...

Страница 609: ...I Change the name of the printer if you want and then click Next Configure the default printer as necessary Click Yes to set the printer as the default printer J J J J Select whether or not you want...

Страница 610: ...P IP you can configure Timeout Settings Note If you cannot set items on the Recovery Parallel Printing tab follow the procedure below A Click Cancel to close the Port Configuration dialog box B Start...

Страница 611: ...ever have two versions of the same printer driver installed on your system at the same time When upgrading to a new version of the printer driver delete the old version and then install the new one No...

Страница 612: ...printer you want to use To change the printer name use the Change settings for Printer Name box H H H H Double click the printer name to display its settings Note The details shown for Comment Driver...

Страница 613: ...ptions Note You must set up the options when bidirectional transmission is disabled For more information about bidirectional transmission status see p 151 Bidirectional transmission Reference For more...

Страница 614: ...erating system settings If this is the case launch Setup exe located in the CD ROM root directory C C C C Select a language for the interface and then click OK The following languages are available Ce...

Страница 615: ...nt to install and then click Next H H H H Change the name of the printer if you want and then click Next Configure the default printer as necessary Click Yes to set the printer as the default printer...

Страница 616: ...k Printers The Printers window appears B B B B Click the icon of the printer you want to use C C C C On the File menu click Properties D D D D Click the Accessories tab Note If you are using the RPCS...

Страница 617: ...onal transmission and updates the printer status automat ically The PCL 5c printer driver supports bidirectional transmission you can update the printer status manually The PostScript 3 printer driver...

Страница 618: ...artDeviceMonitor for Client included on the CD ROM must be installed and TCP IP must be used Under Windows NT 4 0 Enable bidirectional support must be selected and Enable printer pool ing must not be...

Страница 619: ...ore information Limitation For use with Mac OS 8 6 or later Mac OS X Classic environment is supported For use with a Macintosh Power PC is required Note The PostScript 3 printer driver is stored in th...

Страница 620: ...he language you use F F F F Open DISK1 and then double click the installer icon G G G G Follow the instructions on the screen PPD File A A A A Double click the CD ROM icon B B B B Double click the Mac...

Страница 621: ...r B B B B Click the Adobe PS icon C C C C In the Select a PostScript Printer list click the name of the printer you want to use D D D D Click Create E E E E Click the printer you want to use and then...

Страница 622: ...er Utility in the AdobePS Components folder B B B B Select AdobePS in With and Printer USB in Create Desktop and then click OK C C C C Click Change in USB Printer Selection D D D D Select the model yo...

Страница 623: ...en click Setup D D D D Click Configure A list of options appears E E E E Select the option you want to set up and then select the appropriate setting for it Note If the option you want to set up is no...

Страница 624: ...be controlled by ColorSync See the doc umentation that comes with your display for details The following procedure shows how to install the ColorSync profile A A A A Start the Macintosh B B B B Doubl...

Страница 625: ...er you restart the computer A A A A Start the Macintosh B B B B Insert the CD ROM into the CD ROM drive C C C C Double click the CD ROM icon D D D D Double click the Mac OS 8 and 9 folder E E E E Doub...

Страница 626: ...C C Double click the CD ROM icon The contents of the CD ROM appear D D D D Double click the Mac OS 8 and 9 folder E E E E Double click the Fonts folder F F F F Double click the Screen font folder G G...

Страница 627: ...rd USB port only A A A A Open the AdobePS Component folder on the hard disk B B B B Double click Desktop Printer Utility C C C C Click AdobePS in With and Printer USB in Create Desktop and then click...

Страница 628: ...ing Instructions Client Reference 162 J J J J Specify the location where the file is to be saved and the name and then click Save The printer icon appears on the desktop K K K K Quit Desktop Printer U...

Страница 629: ...Mac OS X 10 1 or later For use with a Macintosh Power PC is required Note The PPD file is stored in the following folder on the CD ROM Mac OS X PPD Installer Installing the PPD File It is necessary t...

Страница 630: ...elect the zone in the second pop up menu C C C C Select the PPD file of the model you are using from the Printer Model pop up menu and then click Add Setting Up Options Limitation You can make all the...

Страница 631: ...and then select its manufacturer on the Printer Model pop up menu A list of printer types appears Note For Mac OS X 10 1 x a list of model names appears on the Printer Model pop up menu Select the pr...

Страница 632: ...lk see the Macintosh man uals Mac OS A A A A Open Control Panel and then double click the AppleTalk icon B B B B From the Connect via pop up menu select Ethernet C C C C If you change zones select a n...

Страница 633: ...ing the Printer for the Network with the Control Panel Quick Installation Guide Changing the Printer Name If the network has several same model printers the names will be the same Printers that have t...

Страница 634: ...er installing the printer driver change the print port to NetWare queue Preparation Log on to the NetWare file server before starting the following procedure A A A A Install the printer driver you wan...

Страница 635: ...Click OK to close the Printer Properties and open it again J J J J Click the Printer Settings tab K K K K Click to clear the Form Feed and Enable Banner check boxes Note You should not check these box...

Страница 636: ...r that was used in installing the driver that is displayed in the message and reinstall with Add Printer A Click Start point to Settings and then click Printers B Double click the Add Printer icon C F...

Страница 637: ...all applications that are running D D D D Insert the CD ROM into the CD ROM drive Auto Run will start the installer Note Auto Run might not automatically work with certain OS settings In this case lau...

Страница 638: ...n one printer driver D Check Printer Name to select the model s of printer you want to use To change the printer name change it in the Change settings for Printer Name box E Double click the printer n...

Страница 639: ...r that was used in installing the driver that is displayed in the message and reinstall with Add Printer A Click Start point to Settings and then click Printers B Double click the Add Printer icon C F...

Страница 640: ...C C C C Close all applications that are running D D D D Insert the CD ROM into the CD ROM drive Auto Run will start the installer Note Auto Run might not automatically work with certain OS settings I...

Страница 641: ...n one printer driver D Check Printer Name to select the model s of printer you want to use To change the printer name change it in the Change settings for Printer Name box E Double click the printer n...

Страница 642: ...river that was used in installing the driver that is displayed in the message and reinstall with Add Printer A Click Start and then click Printers and Faxes B Double click the Add Printer icon C Follo...

Страница 643: ...e all applications that are running D D D D Insert the CD ROM into the CD ROM drive Auto Run will start the installer Note Auto Run might not automatically work with certain OS settings In this case l...

Страница 644: ...er driver D Check Printer Name to select the model s of printer you want to use To change the printer name change it in the Change settings for Printer Name box E Double click the printer name to disp...

Страница 645: ...e driver that was used in installing the driver that is displayed in the message and reinstall with Add Printer A Click Start point to Settings and then click Printers B Double click the Add Printer i...

Страница 646: ...mation about Font Manager see the manual on the CD ROM labeled Printer Drivers and Utilities SmartDeviceMonitor for Admin An utility for the system administrator to manage printers on the network Refe...

Страница 647: ...e the USB connection under Windows 98 SE Me Viewing the Contents of the CD ROM Follow the steps to view the contents of the CD ROM A A A A Insert the CD ROM into the CD ROM drive Auto Run will start t...

Страница 648: ...ystem 2 Microsoft Windows 98 operating system 3 Microsoft Windows Me operating system 4 Microsoft Windows 2000 professional Microsoft Windows 2000 Server Microsoft Windows 2000 Advanced Server 5 Micro...

Страница 649: ...cluded on the CD ROM labeled Printer Drivers and Utilities PCL 5c printer driver This printer driver allows the computer to communicate with the printer via a printer language See p 191 Windows 95 98...

Страница 650: ...ws the computer to communicate with the printer via a printer language The PPD files allow the printer driver to enable printer specific functions See p 221 Windows 95 98 Me Accessing the Printer Prop...

Страница 651: ...ocol stack Microsoft Windows 95 98 Me TCP IP provided with Windows 95 98 Me IPX SPX provided with Windows 95 98 Me NetWare network client provided with Windows 95 98 Novell Client for Windows 95 98 Mi...

Страница 652: ...ontrol panel and disables changes made to some items Enables the selection of paper types loaded in the printer Energy Saver function Switches to Energy Saver mode and wakes up from Energy Saver mode...

Страница 653: ...ent Reference 187 Reference For system administrator operations see Using SmartDeviceMonitor for Admin Administrator Reference For more information about using SmartDeviceMonitor for Admin see SmartDe...

Страница 654: ...status of network devices File Path SmartDeviceMonitor for Client is stored in the following folders on the CD ROM NETWORK DEVMON CLIENT DISK1 Operating system Protocol stack Microsoft Windows 95 98 M...

Страница 655: ...necessary for printing such as the paper feed unit are not installed on the substitute printer that function is disabled Microsoft Windows XP TCP IP provided with Windows XP IPX SPX provided with Win...

Страница 656: ...ng load paper of the same size into that tray If the type and devices of the printer for Recovery Parallel Printing and the printer for giving com mands are different the print results might not turn...

Страница 657: ...To make the default printer settings first open the Printer Properties dialog box from the Printers window Note With some applications the printer driver s settings are not used and the application s...

Страница 658: ...stall with the Auto Run program Use the driver that was used in installing the driver that is displayed in the message and reinstall with Add Printer A Click Start point to Settings and then click Pri...

Страница 659: ...epend ing on the application For more information see the documentation that comes with the application you are using With some applications the printer driver s settings are not used and the applicat...

Страница 660: ...default When you set up options log on using an account that has Manage Printers permission A A A A Click Start on the taskbar point to Settings and then click Printers The Printers window appears B...

Страница 661: ...stall with the Auto Run program Use the driver that was used in installing the driver that is displayed in the message and reinstall with Add Printer A Click Start point to Settings and then click Pri...

Страница 662: ...u set up options log on using an account that has Manage Printers permission A A A A Click Start on the taskbar point to Settings and then click Printers The Printers window appears B B B B Click to s...

Страница 663: ...The actual procedures you should follow to open the Printing Preferences Properties may differ de pending on the application For more information see the documentation that comes with the appli cation...

Страница 664: ...on by default When you set up options log on using an account that has Manage Printers permission A A A A Access the Printers and Faxes window from Start on the taskbar The Printers and Faxes window a...

Страница 665: ...with the Auto Run program Use the driver that was used in installing the driver that is displayed in the message and reinstall with Add Printer A Access the Printers and Faxes window from Start on th...

Страница 666: ...set up options log on using an account that has Manage Printers permission A A A A Access the Printers and Faxes window from Start on the taskbar The Printers and Faxes window appears B B B B Click to...

Страница 667: ...he actual procedures you should follow to open the Printing Preferences Properties may differ de pending on the application For more information see the documentation that comes with the appli cation...

Страница 668: ...ission by default When you set up options log on using an account that has Full Control permission A A A A Click Start on the taskbar point to Settings and then click Printers The Printers window appe...

Страница 669: ...install with the Auto Run program Use the driver that was used in installing the driver that is displayed in the message and reinstall with Add Printer A Click Start point to Settings and then click P...

Страница 670: ...on by default When you set up options log on using an account that has Full Control permission A A A A Click Start on the taskbar point to Settings and then click Printers The Printers window appears...

Страница 671: ...epend ing on the application For more information see the documentation that comes with the application you are using With some applications the printer driver settings are not used and the applicatio...

Страница 672: ...ettings in order to make various kinds of prints Custom Setting This is the window type for users who rarely change print settings when making prints The Custom Setting display may vary depending on t...

Страница 673: ...ter driver When there is a driver in the computer that is newer than the one currently being installed a message dialog box appears In such a case you cannot install with the Auto Run program Use the...

Страница 674: ...depend ing on the application For more information see the documentation that comes with the application you are using With some applications the printer driver settings are not used and the applicati...

Страница 675: ...the taskbar point to Settings and then click Printers The Printers window appears B B B B Click to select the icon of the printer you want to use C C C C On the File menu click Properties The Printer...

Страница 676: ...nstall with the Auto Run program Use the driver that was used in installing the driver that is displayed in the message and reinstall with Add Printer A Click Start point to Settings and then click Pr...

Страница 677: ...u set up options log on using an account that has Manage Printers permission A A A A Click Start on the taskbar point to Settings and then click Printers The Printers window appears B B B B Click to s...

Страница 678: ...The actual procedures you should follow to open the Printing Preferences Properties may differ de pending on the application For more information see the documentation that comes with the appli cation...

Страница 679: ...Printers and Faxes window from Start on the taskbar The Printers and Faxes window appears B B B B Click to select the icon of the printer you want to use C C C C On the File menu click Properties The...

Страница 680: ...ll with the Auto Run program Use the driver that was used in installing the driver that is displayed in the message and reinstall with Add Printer A Access the Printers and Faxes window from Start on...

Страница 681: ...set up options log on using an account that has Manage Printers permission A A A A Access the Printers and Faxes window from Start on the taskbar The Printers and Faxes window appears B B B B Click to...

Страница 682: ...he actual procedures you should follow to open the Printing Preferences Properties may differ de pending on the application For more information see the documentation that comes with the appli cation...

Страница 683: ...k Start on the taskbar point to Settings and then click Printers The Printers window appears B B B B Click to select the icon of the printer you want to use C C C C On the File menu click Properties T...

Страница 684: ...t install with the Auto Run program Use the driver that was used in installing the driver that is displayed in the message and reinstall with Add Printer A Click Start point to Settings and then click...

Страница 685: ...on by default When you set up options log on using an account that has Full Control permission A A A A Click Start on the taskbar point to Settings and then click Printers The Printers window appears...

Страница 686: ...end ing on the application For more information see the documentation that comes with the application you are using With some applications the printer driver settings are not used and the application...

Страница 687: ...r Properties dialog box from the Printers window Note With some applications the printer driver settings are not used and the application s own default settings are applied A A A A Click Start on the...

Страница 688: ...all with the Auto Run program Use the driver that was used in installing the driver that is displayed in the message and reinstall with Add Printer A Click Start point to Settings and then click Print...

Страница 689: ...depend ing on the application For more information see the documentation that comes with the application you are using With some applications the printer driver settings are not used and the applicati...

Страница 690: ...ult When you set up options log on using an account that has Manage Printers permission A A A A Click Start on the taskbar point to Settings and then click Printers The Printers window appears B B B B...

Страница 691: ...all with the Auto Run program Use the driver that was used in installing the driver that is displayed in the message and reinstall with Add Printer A Click Start point to Settings and then click Print...

Страница 692: ...u set up options log on using an account that has Manage Printers permission A A A A Click Start on the taskbar point to Settings and then click Printers The Printers window appears B B B B Click to s...

Страница 693: ...The actual procedures you should follow to open the Printing Preferences Properties may differ de pending on the application For more information see the documentation that comes with the appli cation...

Страница 694: ...default When you set up options log on using an account that has Manage Printers permission A A A A Access the Printers and Faxes window from Start on the taskbar The Printers and Faxes window appear...

Страница 695: ...with the Auto Run program Use the driver that was used in installing the driver that is displayed in the message and reinstall with Add Printer A Access the Printers and Faxes window from Start on the...

Страница 696: ...set up options log on using an account that has Manage Printers permission A A A A Access the Printers and Faxes window from Start on the taskbar The Printers and Faxes window appears B B B B Click to...

Страница 697: ...he actual procedures you should follow to open the Printing Preferences Properties may differ de pending on the application For more information see the documentation that comes with the appli cation...

Страница 698: ...ission by default When you set up options log on using an account that has Full Control permission A A A A Click Start on the taskbar point to Settings and then click Printers The Printers window appe...

Страница 699: ...nstall with the Auto Run program Use the driver that was used in installing the driver that is displayed in the message and reinstall with Add Printer A Click Start point to Settings and then click Pr...

Страница 700: ...on by default When you set up options log on using an account that has Full Control permission A A A A Click Start on the taskbar point to Settings and then click Printers The Printers window appears...

Страница 701: ...epend ing on the application For more information see the documentation that comes with the application you are using With some applications the printer driver settings are not used and the applicatio...

Страница 702: ...n in Format for and then use Paper 1 to select the paper size you want to use Under Mac OS X this is called Paper Size Note If the printer is now shown in the Format for box use the pop up menu to dis...

Страница 703: ...r printing from an application A A A A Open the file you want to print B B B B On the File menu click Print C C C C Confirm that the printer is selected in the Printer box and then make the printer se...

Страница 704: ...te You can also open the print job queue window by double clicking the printer icon in the Printer window D D D D Press Job Reset on the control panel The message appears on the panel display indicati...

Страница 705: ...D Press Job Reset on the control panel The message appears on the panel display indicating that the print job is being canceled Important When the printer is being shared by multiple computers be care...

Страница 706: ...y the User ID and the time when the job was stored The actual number of pages the printer can save depends on the contents of the print images For example the printer can save up to 30 jobs or 1 000 p...

Страница 707: ...User ID of up to eight alphanumeric characters Note This is used to identify the user associated with a job The User ID can consist of up to eight alphanumeric a z A Z 0 9 characters E E E E Click OK...

Страница 708: ...the panel display B B B B Press U U U U or T T T T to display Sample Print and then press Enter The User ID and the time when the job was stored are displayed C C C C Press U U U U or T T T T to disp...

Страница 709: ...s are displayed Note To cancel printing press Escape E E E E Press Enter To change the number of sets you want to print press U U U U or T T T T and select the number of sets and then press Enter The...

Страница 710: ...n the panel display B B B B Press U U U U or T T T T to display the Sample Print menu and then press Enter C C C C Press U U U U or T T T T to display the file you want to delete and then press Enter...

Страница 711: ...then press Enter Note If you want to cancel the deletion of a Sample Print file press Escape E E E E Press Enter to delete the file The following message appears on the panel display F F F F Press On...

Страница 712: ...using the control panel Limitation The error log displays up to 20 of the newest jobs If you turn off the power switch the errors will be deleted A A A A Press Menu Menu appears on the panel display B...

Страница 713: ...turns to the Sample Print job selection menu Note To print a document with an error either print or delete the job saved on the Hard Disk Drive and then printing command the host computer to print aga...

Страница 714: ...You can identify the file you want to print by the User ID and the time when the job was stored The actual number of pages the printer can save depends on the contents of the print images For example...

Страница 715: ...st be four digits 0 9 F F F F Command to print The job is saved on the Hard Disk Drive G G G G Enter the password using the control panel and then specify whether to print or delete Reference See p 25...

Страница 716: ...he panel display B B B B Press U U U U or T T T T to display Locked Print and then press Enter The User ID and the time when the job was stored are displayed C C C C Press U U U U or T T T T to displa...

Страница 717: ...t digit appears C Enter the remaining digit of the password and then press Enter E E E E Confirm that Print File is displayed and then press Enter Note If you want to cancel printing press Escape F F...

Страница 718: ...File A A A A Press Menu Menu appears on the panel display B B B B Press U U U U or T T T T to display the Locked Print menu and then press Enter C C C C Press U U U U or T T T T to display a file you...

Страница 719: ...digit appears C Repeat steps A A A A and B B B B to enter the remaining password digits and then press Enter E E E E Press U U U U or T T T T to display Delete File and then press Enter Note If you wa...

Страница 720: ...using the control panel Limitation The error log displays up to 20 of the newest jobs If you turn off the printer power the errors will be deleted A A A A Press Menu Menu appears on the panel display...

Страница 721: ...turns to the Locked Print job selection menu Note To print a document with an error either print or delete the job saved on the Hard Disk Drive and then printing command the host computer to print aga...

Страница 722: ...for Client Options window is displayed C C C C Select the printer you want to use check To be Monitored and then click OK D D D D Right click the SmartDeviceMonitor for Client icon on the task bar an...

Страница 723: ...IP address of the printer you want the status to be displayed for the ad dress The status of the selected printer is displayed on the Web browser C C C C Click Status to find the amount of paper in t...

Страница 724: ...ected Color Models All lights are a mixture of red green and blue which are normally called the RGB color model When red green and blue are of equal intensities the RGB color model produces white Note...

Страница 725: ...uses CMY toner plus K black toner CMYK color model to provide full color printing The colors of the RGB color model can be mixed to produce the cyan magenta and yellow of the CMY color model and vice...

Страница 726: ...y or dark brown Black toner is added to the color model in order to make it possible to produce pure black For example if the image is created with cyan only there is no problem in printing all of it...

Страница 727: ...ver s Help file Collate Outputs can be assembled as sets in sequential order Limitation To use these functions the optional Memory Unit of at least 128 MB or the optional Hard Disk Drive must be insta...

Страница 728: ...r Windows 95 98 Me Use the folder at this level that is appropriate for the operating system you are currently using The third folder Language may be substituted by an appropriate language name Copy t...

Страница 729: ...ion Macintosh 153 NetWare 168 Windows 2000 56 Windows 95 98 Me 22 Windows NT 4 0 123 Windows Server 2003 90 Configuring NetBEUI for Printing Windows 2000 64 Windows 95 98 Me 30 Windows NT 4 0 131 Conf...

Страница 730: ...r 2003 174 Windows XP 174 P PageMaker 262 PCL 5c 183 PostScript 184 Printer Driver 182 Printer Name 167 Printing a Locked Print File 248 Printing the Remaining Sets 242 Printing Using a Print Server W...

Страница 731: ...oubleshooting 256 U USB Printing Support 181 Using USB Interface Mac OS 161 W Windows 2000 56 printer properties PostScript 3 224 printer properties RPCS 194 209 Windows 95 98 Me 22 printer properties...

Страница 732: ...266 Operating Instructions Client Reference Copyright 2004...

Страница 733: ...267 Operating Instructions Client Reference EN USA G120 8711...

Отзывы: