


31
Intera 5.3
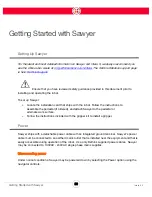
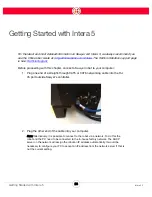
Getting Started with Intera 5
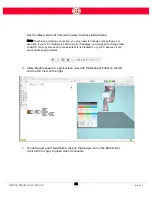
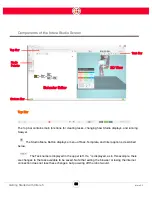
Intera Studio refers to the Intera software accessed through a Google Chrome browser, which
features a Behavior Editor of the task and a simulated Sawyer robot. Optionally Intera Studio may
be connected to, and communicate with, an actual Sawyer robot.
Most of the programming of the logic of Sawyer's tasks will take place on Intera Studio.
A node is the basic building block of the behavior editor. Each node performs a specific function
depending on the type of node it is, and the value of the node’s properties. Examples of node
functions: moving the robot; interacting with signals; using vision; waiting for instructions from an
external machine.
The behavior editor is a collection of nodes, organized in a tree-like structure (although displayed on
its side in the software) that collectively accomplish a task. The nodes that constitute the tree and
the way in which the tree is structured determine what is to be done when. The behavior editor
grows and branches out from the left side of the screen and is made up of parent and child nodes.
A Task is the complete description of what the robot uses to accomplish the job. A task is the
behavior editor combined with all the resources that the nodes in the behavior editor rely on to
accomplish the desired job. Examples of resources: the kind of end effectors attached, frames,
landmarks, location of points in space, configured devices.
When a branch of the Behavior Tree is active, it is said to be running. It will return a status that
indicates whether the branch ended in success, failure, or error. (Other statuses can be imposed on
a branch, for example: paused, stopped, terminated, disabled.)
Содержание Sawyer
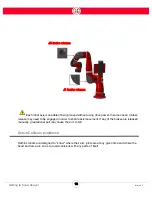
Страница 15: ...8 Intera 5 3 Getting to Know Sawyer Hardware Overview of Your Robot ...
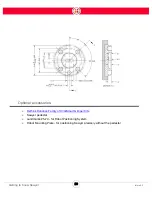
Страница 16: ...9 Intera 5 3 Getting to Know Sawyer Dimensions ...
Страница 17: ...10 Intera 5 3 Getting to Know Sawyer Sawyer Reach ...
Страница 21: ...14 Intera 5 3 Getting to Know Sawyer Bottom View Inputs Power Air Input Outputs 4x Air Power and Data Video ...
Страница 93: ...86 Intera 5 3 Train Pick and Place Patterns on the Head 11 Press OK to go to the next step ...
Страница 98: ...91 Intera 5 3 Train Pick and Place Patterns on the Head 16 Press OK to allow modifications to the direction ...
Страница 104: ...97 Intera 5 3 Train Pick and Place Patterns on the Head You may now run the task ...
Страница 134: ...127 Intera 5 3 TCP IP The Set To node in the Behavior Editor is used to output information ...
Страница 138: ...131 Intera 5 3 Fieldbus Devices 3 Using a keyboard navigate to CONFIGURATION and press ENTER ...
Страница 155: ...148 Intera 5 3 ...
Страница 156: ...149 Intera 5 3 ...
Страница 175: ...168 Intera 5 3 Figure D 8 Flow chart for determining when to use 1 Figure D 4 or 2 Figures D 6 and D 7 ...
Страница 180: ...173 Intera 5 3 ...
Страница 190: ...183 Intera 5 3 Fixed Data 112 From Robot ...
Страница 191: ...184 Intera 5 3 Standard Booleans 113 To Robot 114 From Robot Standard Integers 115 To Robot 116 From Robot ...
Страница 192: ...185 Intera 5 3 Standard Floats 117 To Robot 118 From Robot Small Booleans 119 To Robot 120 From Robot ...
Страница 193: ...186 Intera 5 3 Small Integers 121 To Robot 122 From Robot Small Floats 123 To Robot 124 From Robot ...
Страница 195: ...188 Intera 5 3 Large Floats 131 To Robot 132 From Robot Large Strings 133 To Robot 134 From Robot ...
Страница 206: ...199 Intera 5 3 Small Assembly 114 From Robot 115 To Robot ...
Страница 207: ...200 Intera 5 3 Large Assembly 116 From Robot 117 To Robot ...
Страница 208: ...201 Intera 5 3 Floats 118 From Robot 119 To Robot ...
Страница 209: ...202 Intera 5 3 Strings 120 From Robot 121 To Robot ...
Страница 218: ...Z Zero G button 16 17 Zero G mode 24 Zero Gravity mode 17 zoom reset 42 ...
Страница 219: ......
Страница 220: ...Last updated June 18 2018 Intera 5 3 User Guide Getting Started Rev A ...