


Redpine Signals, Inc.
Page 62
R
R
S
S
-
-
W
W
C
C
-
-
3
3
0
0
1
1
E
E
v
v
a
a
l
l
u
u
a
a
t
t
i
i
o
o
n
n
B
B
o
o
a
a
r
r
d
d
U
U
s
s
e
e
r
r
G
G
u
u
i
i
d
d
e
e
V
V
e
e
r
r
s
s
i
i
o
o
n
n
2
2
.
.
5
5
1
1
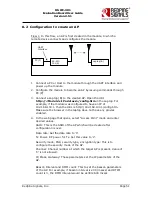
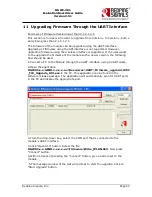
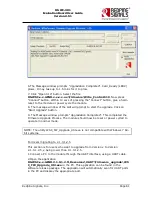
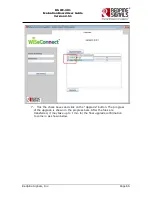
2.From the drop-down box, select the COM port that is connected to the
module‟s UART interface.
3.Click “Open S19” button. Select the file
RS.WSC.x.x.GENR.2.1.0.1.2.5\Firmware\WFU\WFU_Control.S19
. Now
press “Connect” button.
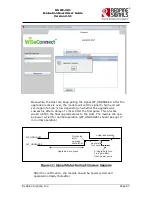
4. Within 10 secs of pressing the “Connect” button, give a hard-reset to the
module.
5.The message window of the GUI will prompt to start the upgrade. Click on
“Start Upgrade” button.
6.The Message window prompts “Upgradation Completed”.
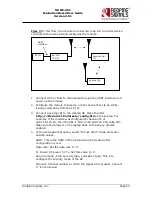
7. Click “Open S19” button. Select the file
RS.WSC.x.x.GENR.2.1.0.1.2.5\Firmware\WFU\WLAN_Config.S19
. Now
press “Connect” button. Within 10 secs of pressing the “Connect” button, give a
hard-reset to the module or power cycle the module.
8. The message window of the GUI will prompt to start the upgrade. Click on
“Start Upgrade” button.
9. The Message window prompts “Upgradation Completed”. Card_Ready (LED2)
goes “Low”. It may take up to 1 min for the pin to go low.
10.From the drop-down box, select the COM port that is connected to the
module‟s UART interface. Click “Open S19” button. Select the file
RS.WSC.x.x.GENR.2.1.0.1.2.5\Firmware\WiSe_WLAN.S19
. Now press
“Connect” button.
11.Within 10 secs of pressing the “Connect” button, give a hard-reset to the
module.
12.The message window of the GUI will prompt to start the upgrade. Click on
“Start Upgrade” button.
13.The Message window prompts “Upgradation Completed”. Card_Ready (LED2)
goes “Low”. It may take up to 1 min for the pin to go low.
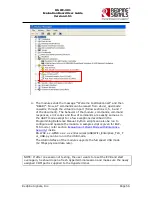
14. Click “Open S19” button. Select the file
RS.WSC.x.x.GENR.2.1.0.1.2.5\Firmware\WiSe_Control.S19
. Now press
“Connect” button. Within 10 secs of pressing the “Connect” button, give a hard-
reset to the module or power cycle the module.
15. The message window of the GUI will prompt to start the upgrade. Click on
“Start Upgrade” button.
16. The Message window prompts “Upgradation Completed”. This completed the
Firmware Upgrade Process. Close the application in the PC and power cycle the
module
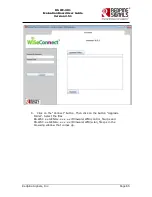
For Users migrating to versions higher than 2.1.0.1.2.5
This section is for users migrating from version x to version y, both x and y
being equal to or greater than 2.1.0.1.2.5. There are two options available:
1.
Wireless firmware upgrade. For this option follow the section
Wireless
Firmware Upgrade
.


