iDRAC Express and Enterprise 101
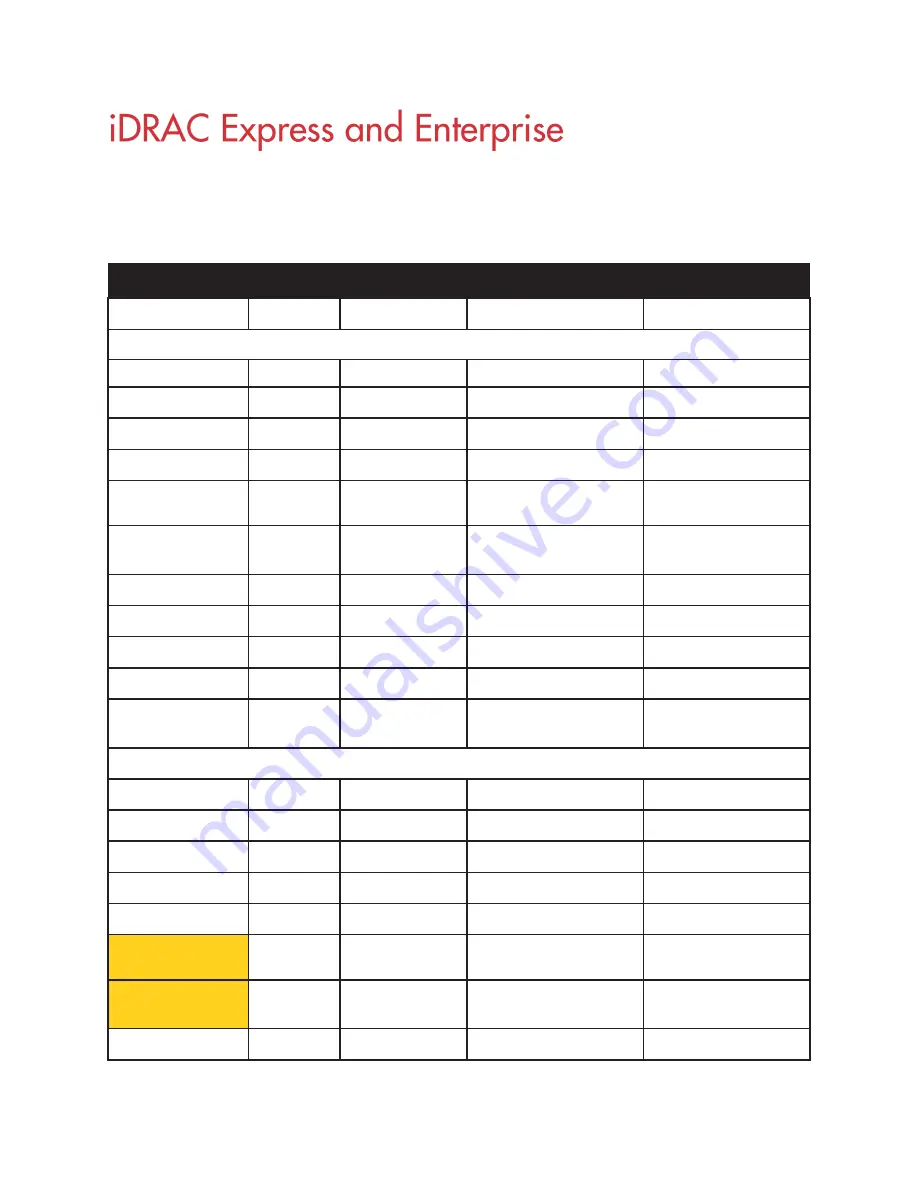
iDRAC9 License Level and Features
New Features in Yellow
iDRAC 9 License Levels and Features
License Type
Basic
Express
Express for Blades
Enterprise
Interfaces / Standards
Redfish
✓
✓
✓
✓
IPMI 2.0
✓
✓
✓
✓
DCMI 1.5
✓
✓
✓
✓
Web-based GUI
✓
✓
✓
✓
Racadm command
line (local/remote)
✓
✓
✓
✓
SMASH-CLP (SSH-
only)
✓
✓
✓
✓
Telnet
✓
✓
✓
✓
SSH
✓
✓
✓
✓
Serial Redirection
✓
✓
✓
✓
WSMAN
✓
✓
✓
✓
Network Time
Protocol
✓
✓
✓
Connectivity
Shared NIC
✓
✓
N/A
✓
1
Dedicated NIC
✓
✓
✓
✓
2
VLAN tagging
✓
✓
✓
✓
IPv4
✓
✓
✓
✓
IPv6
✓
✓
✓
✓
DHCP (new default;
not static IP)
✓
✓
✓
✓
DHCP with Zero
Touch
✓
Dynamic DNS
✓
✓
✓
✓
Содержание V8
Страница 1: ...rcgs20200916 2020 2020 2020 2020 2020 2020 2020 2020 2020...
Страница 27: ...V12 Overview 26 Figure 21 Service Information with System Touch Points...
Страница 37: ...V14 Overview 36 3 OpenManage Mobile OMM label 4 iDRAC MAC address and iDRAC secure password label 5 Service Tag...
Страница 45: ...A8 Overview 44 Figure 39 System touchpoint electrical overview jumper settings and memory information...
Страница 73: ...RAID Storage 72 Click or Choose Integrated RAID Controller 1 Figure 61 BIOS Device Settings Menu...
Страница 75: ...RAID Storage 74 Select Virtual Disk Management Figure 63 PERC Adapter Server Profile View...
Страница 77: ...RAID Storage 76 Under Operation choose Delete Virtual Disk Figure 65 Virtual Disk Management Select Go...
Страница 78: ...RAID Storage 77 And Confirm that you want to Delete Figure 66 Virtual Disk Management Confirmation...
Страница 79: ...RAID Storage 78 Once the operation has been completed click OK Figure 67 Virtual Disk Management Job Complete...
Страница 80: ...RAID Storage 79 Go Back to the Main Menu and Select Configuration Management Figure 68 Configuration Management...
Страница 81: ...RAID Storage 80 Select Create Virtual Disk Figure 69 Create Virtual Disk...
Страница 82: ...RAID Storage 81 Select RAID level Figure 70 Select RAID Type...
Страница 83: ...RAID Storage 82 Select Physical Disks Figure 71 Select Physical Disks...
Страница 85: ...RAID Storage 84 Scroll up and Click Apply Changes Figure 73 Apply Changes...
Страница 86: ...RAID Storage 85 Select OK Figure 74 Confirm Completion...
Страница 88: ...RAID Storage 87 Once you have completed your settings click Create Virtual Disk Figure 76 Create Virtual Disk...
Страница 89: ...RAID Storage 88 Confirm and Click Yes Figure 77 Confirm Operation...
Страница 96: ...RAID Storage 95 Verify all settings and if correct click Finish Figure 84 Complete the Wizard...


