V8 Overview 9
Rear View of Server
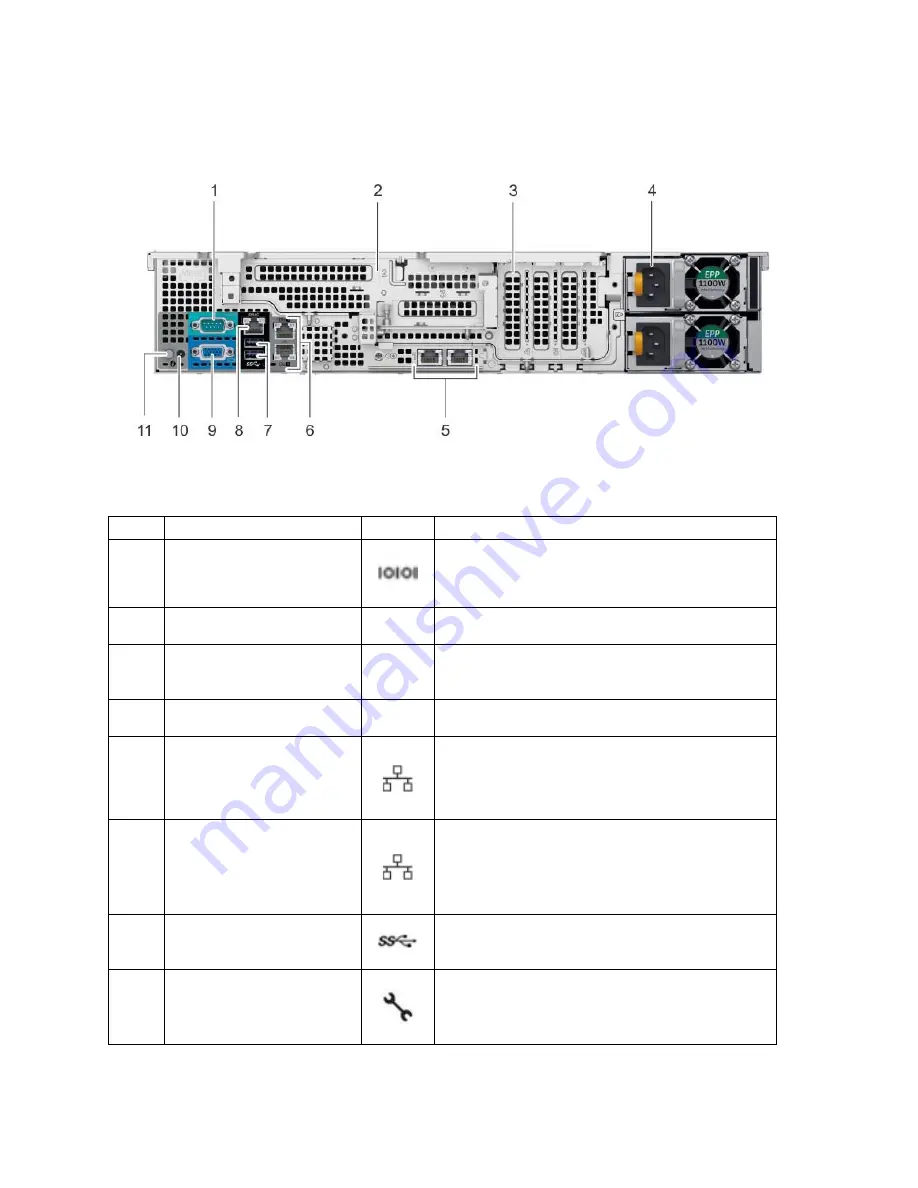
Figure 2. Rear View of V8
Table 2. Rear View of V8
Item
Features
Icon
Description
1
Serial port
Use the serial port to connect a serial device to the
system. For more information about the supported
serial port, see the
technical specifications
section.
2
Butterfly riser slot
N/A
Use the card slots to connect full-height PCIe
expansion cards on the butterfly riser.
3
PCIe slot (3)
N/A
Use the card slots to connect up to three half-
height PCIe expansion cards on the system board.
4
Power supply unit (PSU)
N/A
For information about supported PSUs, see the
technical specifications
section.
5
LOM riser ports
Use the Ethernet or SFP+ ports to connect Local Area
Networks (LANs) to the system. For more
information about the supported Ethernet or SFP+
ports, see the Technical specifications section.
6
Ethernet ports (2)
Use the Ethernet ports to connect Local Area
Networks (LANs) to the system. For more
information about the supported Ethernet ports,
see the Technical specifications section.
7
USB 3.0 port
Use the USB 3.0 port to connect USB devices to the
system. These ports are 4-pin, USB 3.0-compliant.
8
iDRAC9 dedicated network
port
Use the iDRAC9 dedicated network port to securely
access the embedded iDRAC on a separate
management network.
Содержание V8
Страница 1: ...rcgs20200916 2020 2020 2020 2020 2020 2020 2020 2020 2020...
Страница 27: ...V12 Overview 26 Figure 21 Service Information with System Touch Points...
Страница 37: ...V14 Overview 36 3 OpenManage Mobile OMM label 4 iDRAC MAC address and iDRAC secure password label 5 Service Tag...
Страница 45: ...A8 Overview 44 Figure 39 System touchpoint electrical overview jumper settings and memory information...
Страница 73: ...RAID Storage 72 Click or Choose Integrated RAID Controller 1 Figure 61 BIOS Device Settings Menu...
Страница 75: ...RAID Storage 74 Select Virtual Disk Management Figure 63 PERC Adapter Server Profile View...
Страница 77: ...RAID Storage 76 Under Operation choose Delete Virtual Disk Figure 65 Virtual Disk Management Select Go...
Страница 78: ...RAID Storage 77 And Confirm that you want to Delete Figure 66 Virtual Disk Management Confirmation...
Страница 79: ...RAID Storage 78 Once the operation has been completed click OK Figure 67 Virtual Disk Management Job Complete...
Страница 80: ...RAID Storage 79 Go Back to the Main Menu and Select Configuration Management Figure 68 Configuration Management...
Страница 81: ...RAID Storage 80 Select Create Virtual Disk Figure 69 Create Virtual Disk...
Страница 82: ...RAID Storage 81 Select RAID level Figure 70 Select RAID Type...
Страница 83: ...RAID Storage 82 Select Physical Disks Figure 71 Select Physical Disks...
Страница 85: ...RAID Storage 84 Scroll up and Click Apply Changes Figure 73 Apply Changes...
Страница 86: ...RAID Storage 85 Select OK Figure 74 Confirm Completion...
Страница 88: ...RAID Storage 87 Once you have completed your settings click Create Virtual Disk Figure 76 Create Virtual Disk...
Страница 89: ...RAID Storage 88 Confirm and Click Yes Figure 77 Confirm Operation...
Страница 96: ...RAID Storage 95 Verify all settings and if correct click Finish Figure 84 Complete the Wizard...


