


Razberi Monitor™
97
Figure 86. Monitor Dashboard
Razberi Monitor is a software-based platform that provides a top-down view of your
physical security network. It is purpose-built for security professionals to securely monitor
and provide remote visibility to system availability, performance, and cyber posture of
servers, storage, cameras, and other networked security devices.
Razberi Monitor:
•
Detects problems with servers, cameras, and other IoT devices
•
Identifies and alerts on hard drive and storage issues
•
Monitors device's cybersecurity and reports on cyber posture of the security system
•
Provides on-demand reporting
•
User-driven interactive dashboard and progressive disclosure
•
Integrate with 3
rd
party on-premise VMS and Network Event and Information
Management Systems
•
Multi-tenant architecture
–
support all customers with a single sign-on
•
Compliance focused audit logging
•
Asset and inventory management
How to obtain Razberi Monitor Account
There are a few different ways to request a Razberi Monitor Cloud Account.
1.
Razberi Website
–
go to
and navigate to Products, select Monitor. On
the left-hand menu, select Request an Account.
Figure 87. Request Account
Содержание V8
Страница 1: ...rcgs20200916 2020 2020 2020 2020 2020 2020 2020 2020 2020...
Страница 27: ...V12 Overview 26 Figure 21 Service Information with System Touch Points...
Страница 37: ...V14 Overview 36 3 OpenManage Mobile OMM label 4 iDRAC MAC address and iDRAC secure password label 5 Service Tag...
Страница 45: ...A8 Overview 44 Figure 39 System touchpoint electrical overview jumper settings and memory information...
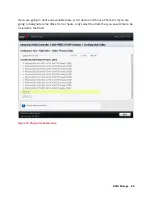
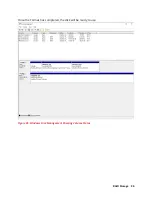
Страница 73: ...RAID Storage 72 Click or Choose Integrated RAID Controller 1 Figure 61 BIOS Device Settings Menu...
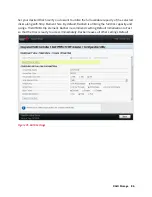
Страница 75: ...RAID Storage 74 Select Virtual Disk Management Figure 63 PERC Adapter Server Profile View...
Страница 77: ...RAID Storage 76 Under Operation choose Delete Virtual Disk Figure 65 Virtual Disk Management Select Go...
Страница 78: ...RAID Storage 77 And Confirm that you want to Delete Figure 66 Virtual Disk Management Confirmation...
Страница 79: ...RAID Storage 78 Once the operation has been completed click OK Figure 67 Virtual Disk Management Job Complete...
Страница 80: ...RAID Storage 79 Go Back to the Main Menu and Select Configuration Management Figure 68 Configuration Management...
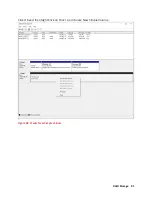
Страница 81: ...RAID Storage 80 Select Create Virtual Disk Figure 69 Create Virtual Disk...
Страница 82: ...RAID Storage 81 Select RAID level Figure 70 Select RAID Type...
Страница 83: ...RAID Storage 82 Select Physical Disks Figure 71 Select Physical Disks...
Страница 85: ...RAID Storage 84 Scroll up and Click Apply Changes Figure 73 Apply Changes...
Страница 86: ...RAID Storage 85 Select OK Figure 74 Confirm Completion...
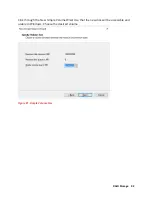
Страница 88: ...RAID Storage 87 Once you have completed your settings click Create Virtual Disk Figure 76 Create Virtual Disk...
Страница 89: ...RAID Storage 88 Confirm and Click Yes Figure 77 Confirm Operation...
Страница 96: ...RAID Storage 95 Verify all settings and if correct click Finish Figure 84 Complete the Wizard...