


iDRAC Express and Enterprise 109
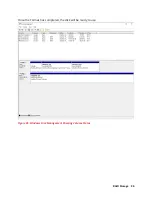
6.
Set the IPV4 or IPV6 network settings, depending on the local configuration (Static or
DHCP)
Figure 92.iDRAC IP Settings
7.
Click Back, Click Finish, and then click Yes. The network information is saved, and the
system reboots.
iDRAC configuration is now completed. The iDRAC Web User Interface can now be reached
with any supported browser (Chrome, IE, Firefox, Safari).
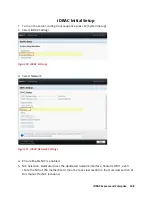
Logging into iDRAC
1.
Open a browser and type the IP address that you configured for iDRAC. If using
DHCP, you can identify the DHCP address within the Server Administrator
application. On the desktop, click the Server Administrator icon and log in. The
Server Administrator uses windows authentication.
a.
Once logged in, click on Main System Chassis in the left-hand menu
b.
Click on Remote Access
c.
Within this screen, you will see the IP address in the lower section. This is the
IP to use to browse to the iDRAC Web Interface Application
2.
Login Screen
Содержание V8
Страница 1: ...rcgs20200916 2020 2020 2020 2020 2020 2020 2020 2020 2020...
Страница 27: ...V12 Overview 26 Figure 21 Service Information with System Touch Points...
Страница 37: ...V14 Overview 36 3 OpenManage Mobile OMM label 4 iDRAC MAC address and iDRAC secure password label 5 Service Tag...
Страница 45: ...A8 Overview 44 Figure 39 System touchpoint electrical overview jumper settings and memory information...
Страница 73: ...RAID Storage 72 Click or Choose Integrated RAID Controller 1 Figure 61 BIOS Device Settings Menu...
Страница 75: ...RAID Storage 74 Select Virtual Disk Management Figure 63 PERC Adapter Server Profile View...
Страница 77: ...RAID Storage 76 Under Operation choose Delete Virtual Disk Figure 65 Virtual Disk Management Select Go...
Страница 78: ...RAID Storage 77 And Confirm that you want to Delete Figure 66 Virtual Disk Management Confirmation...
Страница 79: ...RAID Storage 78 Once the operation has been completed click OK Figure 67 Virtual Disk Management Job Complete...
Страница 80: ...RAID Storage 79 Go Back to the Main Menu and Select Configuration Management Figure 68 Configuration Management...
Страница 81: ...RAID Storage 80 Select Create Virtual Disk Figure 69 Create Virtual Disk...
Страница 82: ...RAID Storage 81 Select RAID level Figure 70 Select RAID Type...
Страница 83: ...RAID Storage 82 Select Physical Disks Figure 71 Select Physical Disks...
Страница 85: ...RAID Storage 84 Scroll up and Click Apply Changes Figure 73 Apply Changes...
Страница 86: ...RAID Storage 85 Select OK Figure 74 Confirm Completion...
Страница 88: ...RAID Storage 87 Once you have completed your settings click Create Virtual Disk Figure 76 Create Virtual Disk...
Страница 89: ...RAID Storage 88 Confirm and Click Yes Figure 77 Confirm Operation...
Страница 96: ...RAID Storage 95 Verify all settings and if correct click Finish Figure 84 Complete the Wizard...