en - Operating and Installation Instructions Q node 5
Operating and Installation Instructions Q node 5 - en
V1.0 / 10.03.2015 FOM5-00AM-DES-RNN5 15
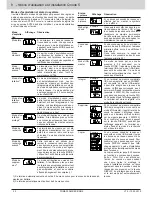
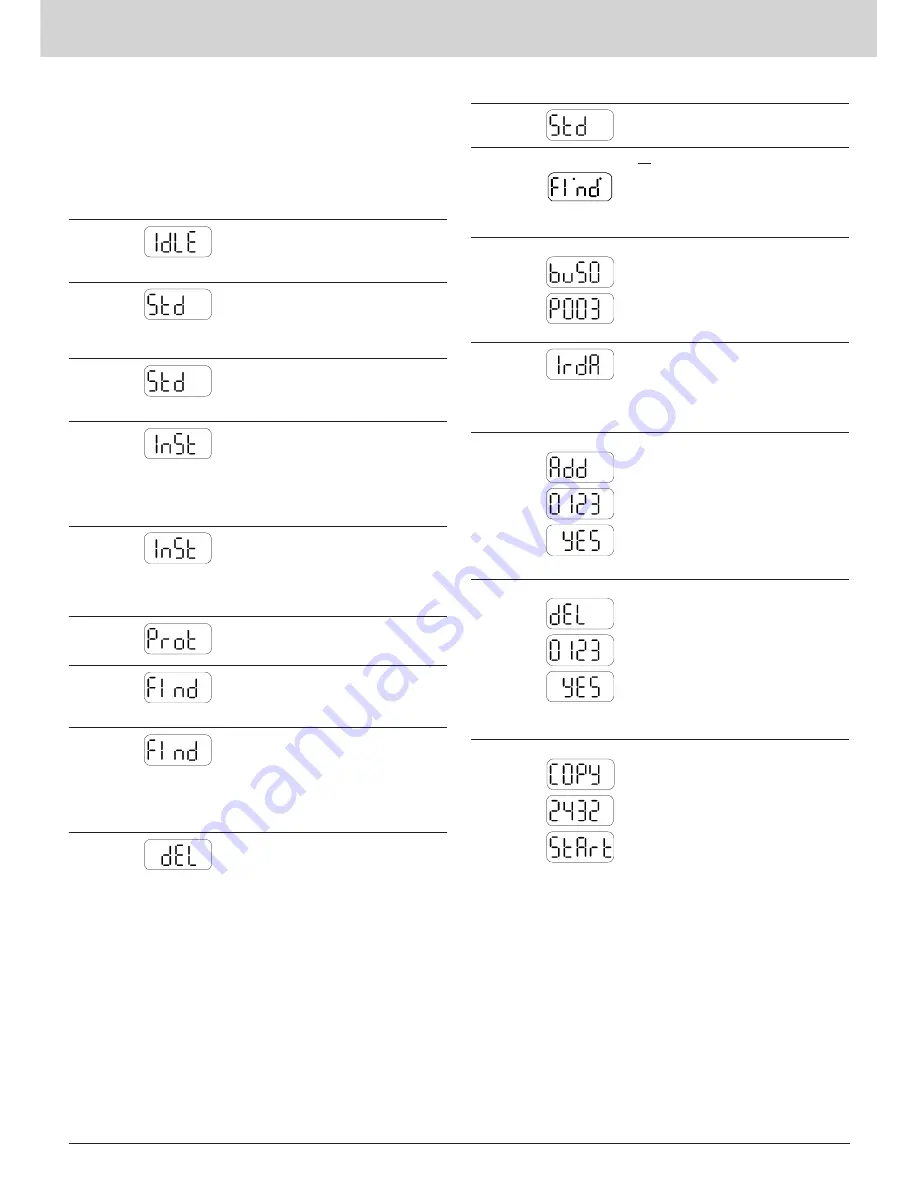
Operating modes and system states
There are various different operating modes, some of which are set
by pressing a key on the network node, some of which are automatic
or are set by means of a connected PC and the commissioning soft
-
ware ACT26. The current version of the commissioning software
ACT26 must be available for this. The respective operating mode
is shown on the display:
Operating
mode
Display
Note
Idle mode
This is the mode of the network node
on delivery. It changes to installation
mode after the MODE key has been
pressed somewhat longer (> 2 sec.).
Standard
mode
This is the normal operating mode of
the data collector: Telegrams from
the registered metering devices are
received, saved and repeated in the
network.
Extended
standard
mode
1)
M
The receiver is continually active and
thus makes fast communication pos
-
sible. This mode is started manually
using the ACT26 service tool.
Installation
mode
2)
The wireless network is built up auto
-
matically in installation mode. Metering
devices which transmit installation tel
-
egrams during this operating mode are
registered in the network. This mode
is started by pressing the MODE key
somewhat longer (> 2 sec.).
Extended
installation
mode
2)
M
The extended installation mode regis
-
ters all metering devices which trans
-
mit either installation or data telegrams.
This mode helps if the network has
been retrofitted. A network is not built
up.
Protected
installation
mode
2)
Like installation mode, but a connec
-
tion is only built up to devices which are
using the same network coding.
Search
mode
Metering devices which have been
entered manually or lost their wireless
connection are synchronised again.
This mode is activated automatically.
Extended
search
mode
2)
M
This search run is used to re-establish
wireless connection to lost or manually
entered metering devices. This mode
can also be started manually with
jumper 1 set (in the connector outlet)
and by pressing the MODE key some
-
what longer.
Delete
mode
2)
Like installation mode, but all regis
-
tered devices which transmit instal
-
lation telegrams are not deleted, not
registered (meter replacement).
System
state
Display
Note
Remote
access
C
If a network node is accessed by a
master, the symbol “ɔ” is displayed.
High-speed
mode
example
M
If
all
network nodes have their receives
switched on constantly, so that all new
data can be exchanged immediately
within the network, this is indicated
by two dots in the upper section of the
LCD.
Bus
connection
example
If a connection to the bus is set up, the
bus number is displayed briefly (0=M-
Bus) as well as the primary address set
for this bus.
In the example the network node with
primary address 03 was connected to
the M-Bus.
IrDA-Mas-
ter mode
This mode is started by pressing the
MODE key briefly (< 0.5 sec.). It signal
-
ises that other IrDA devices can now be
connected (in IrDA-Slave mode). This
mode is automatically ended after 10
seconds of inactivity.
Add
example
If a non-registered IrDA-capable meter
-
ing device e.g. WHE467 is connected
in IrDA-Master mode, this can be
added in the network node. The display
corresponds to the last 4 digits of the
metering device (example: 20000123).
The DISPLAY key must be pressed for
confirmation when this appears on the
display. The device is then registered
and search mode is started.
Delete
example
If a IrDA-capable metering device that
has already been registered is con
-
nected in IrDA-Master mode, this can
be removed from the network node.
The display corresponds to the last 4
digits of the metering device (example:
20000123). The DISPLAY key must be
pressed for confirmation when this ap
-
pears on the display. The device is then
deleted and the search mode ended if
appropriate.
Copy
example
If a new network node is connected in
IrDA-Master mode (in idle mode!) all
network data can be copied into the
new node. The DISPLAY key must be
pressed for confirmation when this ap
-
pears on the display. The protected in
-
stallation mode is automatically started
in the network.
Depending on the data contents, copy
-
ing takes up to 20 minutes. Finally,
“StArt Prot” is shown on the display of
the new node for 1 hour. After instal
-
lation, the protected installation mode
is started on the new network node
as well by pressing the DISPLAY key.
It is integrated in the network and the
search run started automatically.
1) is ended automatically after approx. 8 hours in the case of battery-operated network nodes.
2) is ended automatically after approx. 8 hours.
Содержание RNN5
Страница 38: ...38 FOM5 00AM DES RNN5 V1 0 10 03 2015 Dimensions in mm...
Страница 39: ...V1 0 10 03 2015 FOM5 00AM DES RNN5 39 Test certificates in accordance with Tests and Criteria Manual...
Страница 40: ...40 FOM5 00AM DES RNN5 V1 0 10 03 2015 Test certificates in accordance with Tests and Criteria Manual...
Страница 41: ...V1 0 10 03 2015 FOM5 00AM DES RNN5 41...

