


XTR-PX2-C0006-IN004
3-17
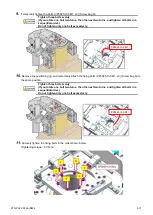
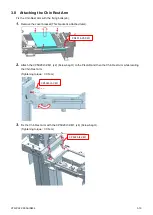
9.
Temporarily tighten the bolts (CP5X25-I3-CM1, x3) (Screw bag Q).
Tighten three bolts evenly.
(If you rotate one bolt two turns, then the next two turns, and tighten all bolts in a
sequential order.)
Do not tighten only one bolt excessively.
10.
Remove the positioning jig, and temporarily attach the fixing bolts (CP5X25-I3-CM1, x3) (Screw bag Q) to
the same position.
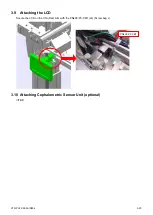
Tighten three bolts evenly.
(If you rotate one bolt two turns, then the next two turns, and tighten all bolts in a
sequential order.)
Do not tighten only one bolt excessively.
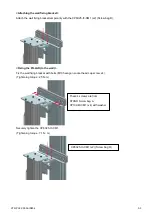
11.
Securely tighten the fixing bolts in the order shown below.
(Tightening torque : 3.0 N
・
m)
CP5X25-I3-CM1
CP5X25-I3-CM1


