9.45, 9.45i Treadmill
Page 26
Procedure 5.3 - Troubleshooting the Lift System, 9.45 (1L
Units)
Lift System Description:
The lift system on these units consists of an AC line voltage driven lift motor (120 Vac or 240
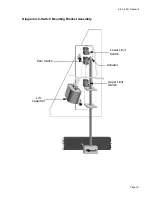
Vac), a hall effect rotation sensor and three position location switches. The lift system orients
itself by locating the zero sense switch when the treadmill is powered up. When the zero sense
switch is activated the system recognizes that physical position as 0% incline. If the zero sense
switch is activated when the treadmill is powered up, the system proceeds directly into the
normal program mode. If the zero sense switch is not activated when the treadmill is powered up,
the system performs a self calibration procedure. The purpose of the self calibration procedure is
to locate the zero sense switch (0% incline). The user will be prompted to press any key to
commence the lift calibration. The treadmill will go up 4%, because the lowest the treadmill could
have been at power up is -3%. If the treadmill does not locate the zero sense switch by going up
4%, it will stop and then go down until it activates the zero sense switch. The system will then
proceed to the normal program mode.
Once the 0% lift position has been located, the system tracks any subsequent lift operations by
counting motor revolutions. A hall effect sensor is mounted on a bracket that is next to a hub that
is attached to the lift motor shaft. As the lift motors operates, a magnet mounted in the hub,
passes the hall effect sensor once per motor revolution. The hall effect sensor send one pulse to
the lift control system per revolution. The system knows how far the lift travels per revolution and
by counting revolutions (hall effect sensor pulses), knows the current lift position.
The other two position switches (upper and lower limit) do not come into play during normal
operation. If either switch is activated it means that the lift has moved beyond it’s normal range of
motion. When either limit switch is activated, power is removed from the lift motor. Removing
power from the lift motor, protects the lift system from physical damage.
Caution
All resistance measurements must be performed with power removed from the treadmill.
Performing resistance measurements with voltage applied may damage your ohmmeter.
Procedure
1.
If the lift motor operates but creates a lift error (error 40, 41 or 43) go to step 8. If the lift
motor will not move continue with step 2.
2.
Put the treadmill in a condition in which the lift motor is ready to be operated (for example,
quick start into the manual program). Using an AC voltmeter, monitor the voltage across the
lift capacitor and press one of the incline keys. Approximately 1.4 times the AC input voltage
should appear on the lift capacitor when an incline key is pressed. Approximately 170 Vac
on a 120 Vac unit or approximately 340 Vac on a 240 Vac unit. The actual lift capacitor
voltage will vary with the AC input voltage. If AC line voltage or 1.4 times line voltage is on
the lift capacitor go to step 6. If no AC voltage is on the lift capacitor, continue with step 3.
Содержание 9.45
Страница 55: ...9 45 9 45i Treadmill Page 55 Wiring Diagram 7 1 9 45 1L Unit...
Страница 56: ...9 45 9 45i Treadmill Page 56 Block Diagram 7 2 9 45 1L Units...
Страница 57: ...9 45 9 45i Treadmill Page 57 Wiring Diagram 7 3 9 45 2P 3Y Units...
Страница 58: ...9 45 9 45i Treadmill Page 58 Block Diagram 7 4 9 45 2P 3Y Units...

