


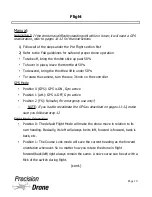

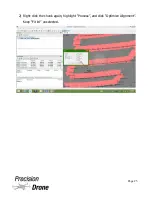

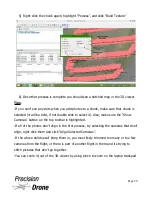
11. Take drone up to roughly 20 feet. Take it through typical movements (forward,
backward, left, right). If it "toilet bowls", or moves in a constant circular pattern
land the drone and repeat steps 6-10. If it locks onto a position and does not
wander, land the drone and continue. The GPS calibration was a success.
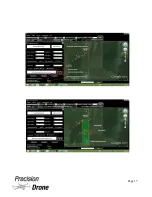
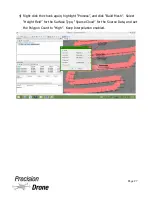
12. With the drone on the ground, go back to "Servo Setup" on the controller. Put the
Flight Mode switch back into position 2, and set the left-hand % under "Gear" back
to 105%. Double check what flight mode position 2 is set to by switching to it and
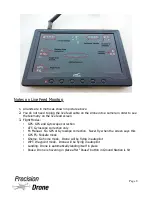
looking on the bottom left-hand corner of the live feed monitor. If it says “GPS FS”,
you set your fail-safe correctly and can continue with flying. If it still says “M”,
repeat step 12.
THIS IS EXTREMELY IMPORTANT
:
FAILURE TO RESET THE
LEFT GEAR VALUE TO 105% MEANS THERE WILL BE NO FAIL-SAFE IF THE DRONE
LOSES COMMUNICATION WITH THE CONTROLLER!
13. DO NOT FORGET STEP 12
GPS Declination
When first set, the drones are programmed for true north in relation to Indiana. If the
drone does not fly straight where you are, you will need to adjust the declination.
NOTE: It is advised by the manufacturer that you have your authorized dealer
perform this calibration. Once declination is set, it will not have to be set again if the
drone stays in the same geographic location.
1) Figure out which way it is rotated in relation to forward. Example: Is it pointing
forward more with arm 1 or arm 2?
2) Land the drone, remove the dome and batteries.
3) Rotate the GPS puck away from the arm it is “favoring”.
Example: If it is flying and points forward more with arm 1, rotate the puck more
towards arm 2. The foam under the puck can be rotated roughly 20 degrees
without needing to be removed
4) Test the drone and repeat this process until proper flight orientation is achieved
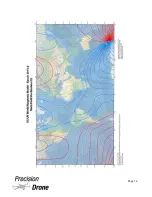
5) The map on the following page will give you a rough idea on how far you will
need to rotate it. Each line is 2 degrees, with negative being counter-clockwise
(left towards arm 2), and positive being clockwise (right towards arm 1).
1
14
Page 13
Содержание Pacesetter 2015
Страница 1: ...User s Manual Pacesetter Model 2015 Serial Number Version 1 12...
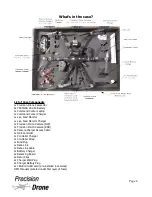
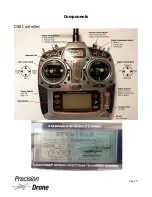
Страница 6: ...Components DX8 Controller 1 6 Page 5...
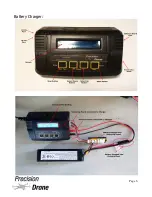
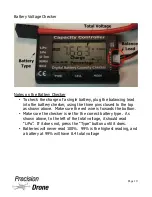
Страница 7: ...Battery Charger 1 7 Page 6...
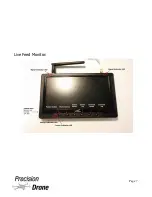
Страница 8: ...Live Feed Monitor 1 8 Page 7...
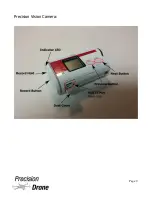
Страница 10: ...Precision Vision Camera 1 10 Page 9...
Страница 15: ...1 15 Page 14...
Страница 18: ...1 18 Page 17...
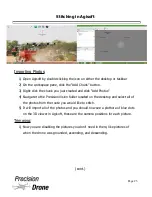
Страница 36: ...10 A Select Layers box will open select the RGB IR layers and click OK 1 36 Page 35...
Страница 38: ...16 Click the Band 1 tab at the top and make sure the RGB layer is checked and the IR layer is not 1 38 Page 37...
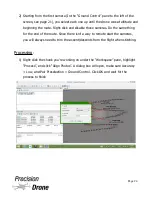
Страница 42: ...3 A Select Export Format window will pop up make sure GeoTIFF is selected 1 42 Page 41...
Страница 48: ...Blade Motor Rotation 1 48 Page 47...
Страница 49: ...1 49 Page 48...
Страница 51: ...Flight and Service Log Serial Number...