


Getting Everything Charged
DX8 Controller:
Turn the controller off. Plug one end of the charging cable into the
charging port (see p. 5), and the other end into a power outlet. The controller
indicator LED will glow blue indicating it is charging and turn off when fully charged.
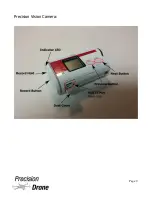
Precision Vision Camera:
Turn the camera off. Plug the micro USB cable into the
MULTI port on the camera (see p. 9), and the other end into a generic USB port on a
laptop or similar device connected to power. The Indicator LED will glow red when
charging, and turn off when fully charged.
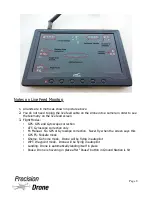
Live Feed Monitor:
The monitor can remain powered on while charging. Plug one
end of the charging cable into the bottom DC IN port on the monitor (see p. 7), and
the other end into a power outlet. The charging indicator LED will glow red. It will turn
green when finished.
IMPORTANT:
DO NOT leave it in prolonged exposure to sunlight while charging! DO
NOT plug the adapter into the DC OUT port. This will ruin the battery.
Command Center Laptop:
The laptop can remain powered on while charging.
Simply plug one end into the charging port on the laptop, and the other end into a
power outlet. The charging indicator LED will glow red. It will turn green when
finished. Laptop battery percentage can also be checked in Windows, in the lower
right hand corner of the desktop.
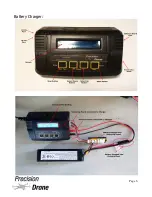
Batteries:
(see p. 6) Plug the battery charger into a power outlet using the power
cable. Attach the red and black leads to their respective positions on the charger.
Attach the balancing board to the balancing port on the charger. Now take the
red/black leads and connect it to the battery. Connect the white balancing cable to the
balancing board. Make sure everything is secure and snug. The charger should now be
switched to “CHARGE” mode (it is already on by default). Now hold down the enter
button for a few moments, then tap it again to confirm, it will now charge the battery.
The charger will beep and flash “FULL” when finished. Hit “STOP”.
IMPORTANT:
DO NOT disconnect the red/black terminals from the charger at all.
Simply unplug the battery from its end. Failure to do so will create an arc in between
the leads, this will damage the battery! The Pacesetter comes equipped with 7600
mAh 2s LiPo batteries. It is important that the batteries are charged with these
settings. Failure to do so could result in machine under performance or damage to
the battery.
Note: Refer to the battery charging video for visual instruction.
1
12
Page 11
Содержание Pacesetter 2015
Страница 1: ...User s Manual Pacesetter Model 2015 Serial Number Version 1 12...
Страница 6: ...Components DX8 Controller 1 6 Page 5...
Страница 7: ...Battery Charger 1 7 Page 6...
Страница 8: ...Live Feed Monitor 1 8 Page 7...
Страница 10: ...Precision Vision Camera 1 10 Page 9...
Страница 15: ...1 15 Page 14...
Страница 18: ...1 18 Page 17...
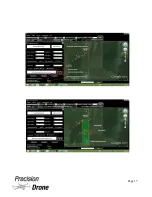
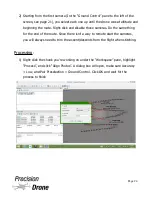
Страница 36: ...10 A Select Layers box will open select the RGB IR layers and click OK 1 36 Page 35...
Страница 38: ...16 Click the Band 1 tab at the top and make sure the RGB layer is checked and the IR layer is not 1 38 Page 37...
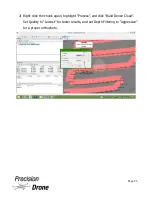
Страница 42: ...3 A Select Export Format window will pop up make sure GeoTIFF is selected 1 42 Page 41...
Страница 48: ...Blade Motor Rotation 1 48 Page 47...
Страница 49: ...1 49 Page 48...
Страница 51: ...Flight and Service Log Serial Number...