background image

0507347110/160114/B SHIELD fire safety solutions (5k1)

| INSTALLATION | EN - 7

5.4

Electrical connection

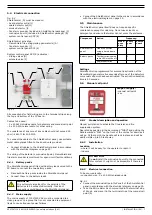
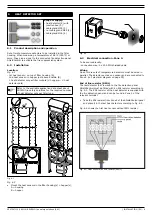
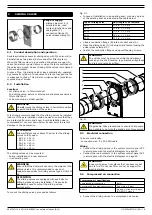
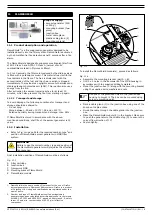
Fig. 5.3
ShieldControl (D) must be wired to:
- heat detector set(s) (J)
- spark detector set (H)
- smoke detector (I)
- fire alarm sounder (included in ShieldControl package) (C)
- manual call point (included in ShieldControl package) (B)
- system control panel SCP (E)

ShieldControl activates:
- FlameShield fire extinguishing generator(s) (A)
- fire alarm sounder (C)
- system control panel SCP (E)

System control panel SCP (E) activates:
- sliding valves (G)
- solenoid valve (F)

Fig. 5.3

All connections for field wiring are to the terminal strips along 
the top and bottom of the PC board. 

Cables to be used:
- 5 x 20 AWG shielded cable for detectors and manual call point
- 5 x 20 AWG normal cable for other wiring

The resistance of any core of any cable should not exceed 25 
ohm(>1640 ft for 20 AWG).

To connect the cables to the ShieldControl panel, use suitable 
metal cable glands fitted to the knock-outs provided. 

Connect all cables to the ShieldControl panel in accordance 
with the electrical diagram on page 29.

The wiring of the detectors, manual call point, FlameShield and 
fire alarm sounder is monitored for open circuit fault conditions.

5.4.1

Battery packs

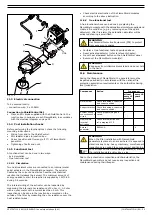
The ShieldControl panel is fitted with battery leads wired to the 
PC board to connect the two battery packs. 

Place both battery packs inside the ShieldControl panel.

Connect them to the battery leads. 

5.4.2

Mains supply

The mains supply of 115V/230V AC must be connected to a 
clean group or to a group that is not connected to equipment 
likely to cause frequent power failures. 

Connect the ShieldControl panel to the mains in accordance 
with the electrical diagram on page 29.

5.5

Maintenance

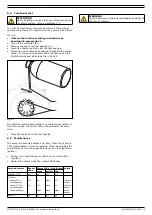
The ShieldControl panel itself does not require specific 
maintenance except for cleaning. Do not use solvents or 
detergents and ensure that water cannot enter the enclosure.
 

Settings

ShieldControl is programmed for automatic activation of the 
FlameShield generators five seconds after one of the detectors 
or manual call point has been activated. The activation duration 
time is 60 seconds.

5.6

Manual call point    

5.6.1

Product description and operation

Manual pull station to activate the fire alarm and fire 
suppression system. 
Operated by pushing in the bar marked “PUSH” and pulling the 
handle marked “PULL” on the front of the unit as far down as it 
will go. At that point, the handle will lock in place and will be 
easily visible up to 50 feet away.

5.6.2

Installation

Location

- where it will be easy for the operator to reach it
- indoors
 

5.6.3

Electrical connection

To be sourced locally:
- connection wire: 5 x 20 AWG shielded cable

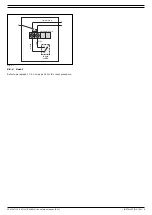
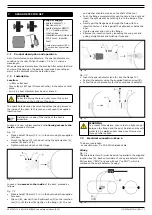
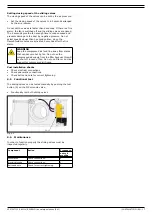
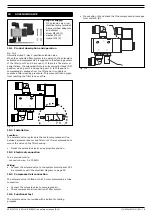
Fig. 5.1

Connect the manual call point to Zone 4 of the ShieldControl 
panel in accordance with the electrical diagram on page 29. 

Take the EOL resistor 5k ohm mounted in the terminal strip 
of Zone 4  and place it in the terminal strip of the manual call 
point (A).

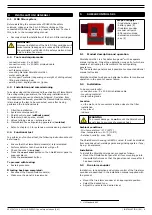
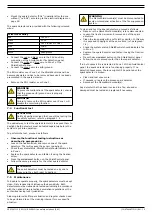
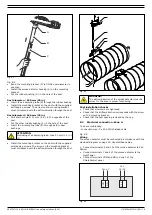
WARNING

It is extremely important for the polarity of the 
batteries to be connected correctly. Incorrect 
connections could damage the ShieldControl panel.

E

F

A

B

C

D

F

J

I

H

Component

Action

Frequency:

when-

ever 

dirty

every 

year

every 4 

years

ShieldControl 

panel

Clean the outside 

using a barely damp 

cloth. 

X

Battery packs

Test batteries; 

POWER 

FAULT

 LED must be off.

X

Replace batteries.

X

Scope of supply:

- manual call point
- key

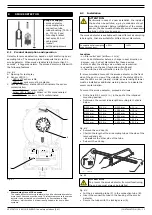
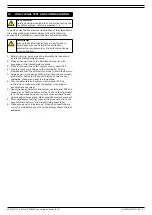
ATTENTION

Do 

not

 install the manual call point to the connected 

filter system. It might not be accessible if there is a 
fire. 

Содержание Shield 5k1

Страница 1: ...www plymovent com EN Fire safety solutions EN Installation and user manual shield 5k1...

Страница 2: ...general convenience of our clients It has been based on general data pertaining to construction material properties and working methods known to us at the time of issue of the document and is therefo...

Страница 3: ...B ranging from MDB 4 to MDB 48 other sizes on request central fan type SIF system control panel SCP round ductwork of the appropriate diameter 1 3 Functional description of SHIELD fire safety solution...

Страница 4: ...after activation thus preventing re ignition The amount of aerosol is proportional to the filter volume and can be easily adapted by adding generators The system control panel SCP M controls the filte...

Страница 5: ...cifications given in this installation manual must not be altered Modifications Modification of parts of the product is not allowed Product combinations Since the products are used in combination with...

Страница 6: ...es off fan motor is switched off release of compressed air through solenoid valve After a delay of 5 seconds sliding valves close release of aerosol by FlameShield generators during 60 seconds After a...

Страница 7: ...nect the FlameShield module s Make sure the panel is in RUN mode 5 1 Product description and operation ShieldControl 5k1 is a fire detection panel1 with a separate manual call point It has three detec...

Страница 8: ...the mains in accordance with the electrical diagram on page 29 5 5 Maintenance The ShieldControl panel itself does not require specific maintenance except for cleaning Do not use solvents or detergent...

Страница 9: ...10 160114 B SHIELD fire safety solutions 5k1 INSTALLATION EN 8 Fig 5 1 5 6 4 Reset Refer to paragraph 17 2 1 on page 24 for the reset procedure NC NO field wiring toggle switch white red terminal stri...

Страница 10: ...sets of temperature detectors must be wired in parallel The detectors act as one sensor and are connected to Zone 2 ref electrical diagram on page 29 End of line resistor REOL The last detector that...

Страница 11: ...status ShieldControl should indicate a fire in Zone 2 To perform the test proceed as follows Observe the functional testing instructions as described in paragraph 4 4 Functionally test all heat detect...

Страница 12: ...t of the tool Push the flange completely through the hole in the duct and insert the split washer by rotating it into the inside of the duct Gently pull the flange back through the hole with the inser...

Страница 13: ...having local jurisdiction Cleaning intervals differ per situation and regular checks need to be performed to set the cleaning interval for your specific situation To clean and test the spark detectors...

Страница 14: ...mount the smoke detector proceed as follows Drill a hole 51 mm 2 in in the duct at the intended mounting position Determine the correct tube length according to the table below Fig 8 2 Remove the end...

Страница 15: ...the supplied self tapping screws The arrow on the mounting bracket must correspond with the airflow direction through the duct Fig 8 4 Post installation checks Check that all screws are tightened Che...

Страница 16: ...LEDs extinguishes at the same time Place the cap back on the test opening 8 5 Maintenance The sensor wil become polluted over time When the sensor is 75 contaminated it must be replaced This is indic...

Страница 17: ...ed locally connection wire 5 x 20 AWG cable Wiring Connect the sliding valves to the system control panel SCP in accordance with the electrical diagram on page 29 Connect the reed contacts to the syst...

Страница 18: ...er the fire alarm Post installation checks Check electrical connections Check pneumatic connections Check bolts and nuts for correct tightening 9 5 Functional test The sliding valves can be tested man...

Страница 19: ...main compressed air line between pressure reducer and filter unit It is recommended to mount the valve on the filter housing Mount the solenoid valve at an appropriate position 10 3 Electrical connect...

Страница 20: ...lation position of FlameShield must be as follows Fig 11 1 A Filter cartridge B Junction box C Framework MDB D Mounting bracket FlameShield E FlameShield module Fig 11 1 To install the FlameShield mod...

Страница 21: ...A true functional check can be done by replacing the FlameShield module with the detonation simulator supplied and create a fire condition e g by removing one of the spark detectors After fire alarm t...

Страница 22: ...in RUN mode 6 Test the detectors and system control panel SCP as instructed to make sure that the system is reacting as expected and required 7 Reset the panel detectors and system control panel SCP...

Страница 23: ...functionally tested through exposure to daylight and the signal being monitored by ShieldControl Check OK 1 Is the smoke detector placed in the filter outlet duct 2 Is the mounting bracket correctly i...

Страница 24: ...sed 3 Is the solenoid functionally tested after a fire test alarm in the complete system set up Check OK 1 Are FlameShield modules undamaged 2 Is the correct number of FlameShield modules being instal...

Страница 25: ...s Reset alarm condition Determine cause e g fire and only push SYSTEM RESET after cause has been settled Panel will go to normal and display will show SYSTEM OK Program switch in RUN This action will...

Страница 26: ...maintenance procedure on spark detectors ref paragraph 7 5 Follow maintenance procedure on smoke detector ref paragraph 8 5 Disconnect the ShieldControl panel Replace the FlameShield module s Perform...

Страница 27: ...d After the life of the product dispose it of in accordance with federal state or local regulations activated FlameShield generators can be disposed of as non hazardous waste non activated FlameShield...

Страница 28: ...in a particular environment and to perform a specific task The entire installation must comply with the relevant directives and standards The assembly instructions given by the manufacturer as well as...

Страница 29: ...MDB 8 V MDB 8 H MDB 10 1x FS 200 1x FS 200 1x FS 500 1x FS 500 1x FS 500 MDB 4 MDB 12 MDB 12 V MDB 12 H MDB 16 MDB 16 H MDB 16 V 1x FS 500 1x FS 500 1x FS 500 1x FS 500 1x FS 500 1x FS 500 MDB 20 MDB...

Страница 30: ...SHIELD fire safety solutions 5k1 ELECTRICAL DIAGRAM 29 Electrical diagram 900010G0026 0 22 05 2014...

Страница 31: ......

Страница 32: ...www plymovent com 0507347110 160114 B SHIELD 5k1 EN...

Отзывы: