background image

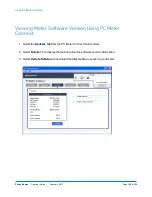
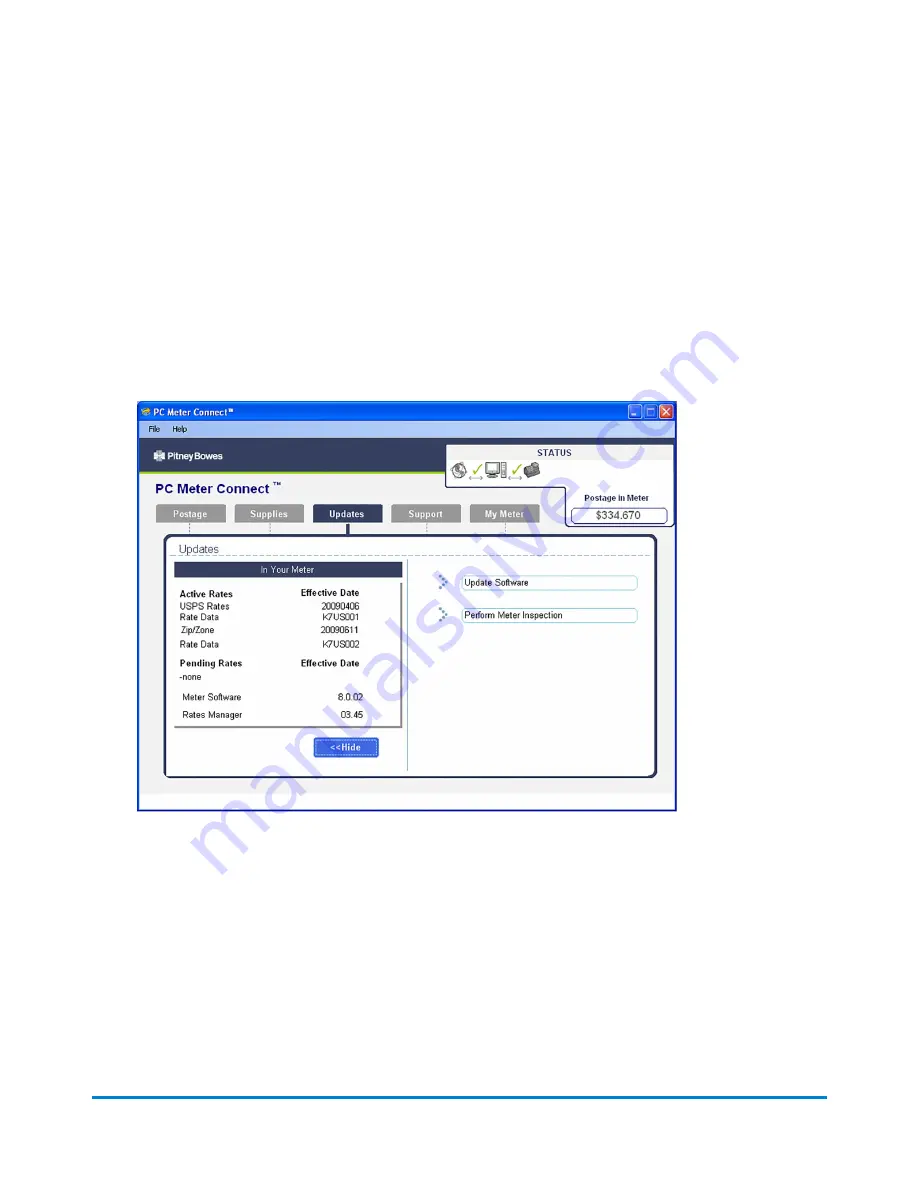
Viewing Meter Software Version Using PC Meter 
Connect

 1.  Select the 

Updates tab

 from the PC Meter Connect main window. 

 2.  Select 

Details >>

 to display the mainling machine software version information.

 3.  Select 

Update Software

 to download the latest software version to your meter.

Using PC Meter Connect

Pitney Bowes

Operator Guide

February, 2017

Page 189 of 226

Содержание DM125

Страница 1: ...Postage Meters DM125 Digital Postage Meter Operator Guide Canada English Edition SV62667 Revision F February 2017 ...

Страница 2: ...itute an infringement of intellectual property rights of Pitney Bowes and Pitney Bowes assumes no responsibility for any such use of the information We have made every reasonable effort to ensure the accuracy and usefulness of this manual However we cannot assume responsibility for errors or omissions or liability for the misuse or misapplication of our products Except as provided in writing duly ...

Страница 3: ... refer to the warranty information if problems occur The responsible party is Pitney Bowes Canada All service and supply inquiries can be done by calling 1 800 672 6937 and following the telephone prompts Customer Service Representatives are available Monday through Friday 8 00 AM 8 00 PM ET If you need to contact customer support refer to What Information You Need to Provide Customer Support befo...

Страница 4: ......

Страница 5: ...and Removing Inscriptions 33 Seal the Envelope Only Bypass All Printing 34 4 Running Mail Power up the Machine 36 Checking the Amount of Postage Available 37 Determine the Amount of Postage Needed 38 Applying Postage Entering Postage In Manually 39 Applying Postage Entering Weight In Manually 41 Applying Postage Using The Weighing Platform 43 5 Using Batch Count Feature Viewing the Batch Mail Coun...

Страница 6: ...s 96 Setting System Time 97 Setting the Contrast of the LCD Display 98 Turning Features On and Off 99 Setting the Date Time and Timeouts 100 Setting Normal Preset Time 101 Sleep Mode Activation Time 102 Setting Autodate Advance 103 Correct Drift 104 Setting Daylight Savings Time 105 Setting Up or Disabling the Lock Code 106 Setting Up or Disabling the Supervisor Password 107 Turning Scale On or Of...

Страница 7: ...9 Installation Requirements 150 Network Specifications and Requirements for PC Meter Connect 151 PC Meter Connect Installation 156 Launching the Application 157 Displaying PC Meter Connect on the System Tray 158 Accessing Features from the System Tray 159 Starting PC Meter Connect 160 PC Meter Connect Application Main Window 162 Checking the Postage Amount Using PC Meter Connect 164 Adding Postage...

Страница 8: ...17 Supplies and Options Supplies and Options 192 18 Specifications Specifications Equipment and Materials 196 19 Troubleshooting Getting Help 200 What Information You Need to Provide Customer Support 201 Display Problems 202 Feeding Problems 203 Printing Problems 204 Accidentally Printing the Wrong Postage 205 Moistening Problems envelopes don t seal 207 Viewing System Configuration Levels 209 Tro...

Страница 9: ...1 Safety Introduction 10 Industry Canada 11 Ear Protection Noise Exposure Guidelines 12 System Power 13 Operation 14 Maintenance 15 ...

Страница 10: ...miliarize yourself with proper procedures and methods before you install operate or repair the system to avoid personal injury or damage to the equipment Safety Pitney Bowes Operator Guide February 2017 Page 10 of 226 ...

Страница 11: ... 0 The termination on an interface may consist of any combination of devices subject only to the requirement that the sum of the RENs of all devices does not exceed five The abbreviation IC before the registration number signifies that registration was performed based on a Declaration of Conformity indicating that Industry Canada technical specifications were met It does not imply that Industry Ca...

Страница 12: ...s Analyze your specific work area environment to ensure safe practices OSHA Standards 85dBA time weighted average over an 8 hour shift requires hearing protection be made available to employees and use is recommended European Union standard is 80dBA 90dBA time weighted average over an 8 hour shift mandates hearing protection is used European Union standard is 85dBA NOTE Local jurisdictions may hav...

Страница 13: ...hine will be connected to a dedicated AC power line l DO NOT route the power cord over sharp edges or trap it between furniture l Ensure there is no strain on the power cord where it becomes jammed between the equipment walls or furniture l Be certain the area in front of the wall receptacle into which the machine is plugged is free from obstruction l Ensure there is no strain on the power cord wh...

Страница 14: ...g hair and neckties away from all moving parts Make sure that clothing and hair fit closely to your body and that all jewelry is removed l Before starting the machine check that All persons are clear of the machine No maintenance work is being performed on the machine All guards are in place The machine is free of scraps jams and foreign objects l When opening guards wait for all parts to stop mov...

Страница 15: ...n the inserter l Use only Pitney Bowes approved printer ink and cleaners l To prevent overheating do not cover the vent openings l Do not store flammable fluids inside this machine l Do not place any container with liquid on this machine i e coffee cups soda etc l Do not use flammable cleaners in this machine l Do not use aerosol air canisters It is recommended that a vacuum cleaner be used to rem...

Страница 16: ...This page intentionally left blank ...

Страница 17: ...2 Getting Started Parts of the Machine 18 The Control Panel 19 Connections on the Back of the Machine 22 ...

Страница 18: ...ence Guide tape strips etc for easy access 6 Stacker Tray Allows the neat stacking of finished mail pieces 7 Transport Release Lever two position Home transport rollers engaged for processing mail normal Released transport rollers disengaged so you can clear a stalled mail piece NOTE The machine won t process mail when the lever is left in the released position 8 Feed Deck Supports your envelope p...

Страница 19: ...The Control Panel Control Panel Getting Started Pitney Bowes Operator Guide February 2017 Page 19 of 226 ...

Страница 20: ...the lock code feature has been enabled you can either power down the machine or put the machine into lock down mode In lock down mode access to the machine requires entering a four digit lock code 5 Yes Enter and No Keys Allows you to confirm an operation or answer Yes or No to a prompt the Yes key also functions as the Enter key for data entry 6 Alpha Numeric Keypad Allows you to type in numbers ...

Страница 21: ...s Allows you to generate reports for postage accounting and other types of data see Reports for more information Weight Rate Allows you to weigh and calculate postage based on service selected Options Allows you to access system setup information such as date time postage accounts passwords etc see Configuring Your Mailing Machine for more information Print Menu Allows you access to all the inform...

Страница 22: ...Connections on the Back of the Machine Getting Started Pitney Bowes Operator Guide February 2017 Page 22 of 226 ...

Страница 23: ...oduct which allows you to transfer Standard Accounting data from your machine to your PC 3 USB Port type A host port Used to connect to the Pitney Bowes Data Centre via LAN Internet using a USB to LAN network adapter an external printer to print report data an external weighing platform scale a USB flash drive to store accounting data for high end accounting systems e g InView 4 Power Input Connec...

Страница 24: ...This page intentionally left blank ...
Страница 25: ...mp Imprint 28 Printing a Meter Stamp with an Advanced Date 29 Printing only the Date and Time no meter stamp 30 Adding and Removing Advertisements at the Machine 31 Printing Advertisement Date and Time Only no meter stamp 32 Adding and Removing Inscriptions 33 Seal the Envelope Only Bypass All Printing 34 ...

Страница 26: ...ostage l An optional advertisement l An optional postal inscription l Printing only the Date and Time no meter stamp l Printing Advertisement Date And Time Only no meter stamp l Bypass all printing and Seal the Envelope only For information on printing a normal meter stamp refer to Determining the Amount of Postage Needed For information on the locations of the meter stamp and optional components ...

Страница 27: ...n 1 Encrypted Canpost indicia 2 Meter serial number 3 Postage amount 4 Date 5 Postal code of postage meter 6 Envelope Ad 7 Optional printing area 8 Required printing Meter Stamp Optional Advertisement and Postal Inscription Components What You Can Print on Mail Pieces Pitney Bowes Operator Guide February 2017 Page 27 of 226 ...

Страница 28: ...by printing a meter stamp with 0 00 postage To print with 0 00 postage press Zero at the Home screen and press Enter yes and slide an envelope or a tape sheet through the machine What You Can Print on Mail Pieces Pitney Bowes Operator Guide February 2017 Page 28 of 226 ...

Страница 29: ...ted date to a date earlier than the machine s internally held date in an effort to backdate the mail l Accounting data is posted on the actual date the mail piece is run per the internal clock calendar in the mailing system not by the date printed on the meter stamp How to Advance the Date Manually 1 Press Options 2 Select Advance the date 3 The Machine displays the current date in MM DD YY format...

Страница 30: ...stration wall of the system and slide it to the right until the system grasps it The system prints the time and date and ejects the envelope tape sheet NOTE Make sure you orient the mail piece so the date and time prints on a blank section of the mail piece 4 Select Exit Date and Time when finished to return to the Home screen What You Can Print on Mail Pieces Pitney Bowes Operator Guide February ...

Страница 31: ...ed directly into your machine You can also work with Pitney Bowes to create custom ads NOTE Your ad must be purchased and the machine must be connected to Pitney Bowes Data Centre for this download procedure 1 From Home screen press Page Down to second screen and select AD 2 Select Install an Ad 3 Select Connect now The system connects to the Pitney Bowes Data Centre this may take a few moments Va...

Страница 32: ... chosen select Ad then select Select an Ad Choose an ad from the list provided You return to the Print Ad Date Time screen 4 Place the envelope tape sheet up against the registration wall of the system and slide it to the right until the system grasps it The system prints the ad time and date and ejects the envelope tape sheet Make sure you orient the mail piece so the date and time prints on a bl...

Страница 33: ...1 From Home screen press Page Down to second screen and select Insc 2 Select Select an Inscript 3 You may either A Key in the inscription number and press Yes Enter B Scroll through inscriptions and then select the inscription 4 You return to the Home screen with the name of the inscription listed on the second screen If you have PC Meter Connect refer to Adding or Removing Postal Inscriptions Usi...

Страница 34: ... moistener and move towards the right 4 Slide the envelope to the right until the system takes hold of it The system seals and ejects the piece 5 Select Exit Seal Only when finished to return to the Home screen What You Can Print on Mail Pieces Pitney Bowes Operator Guide February 2017 Page 34 of 226 ...

Страница 35: ...e 36 Checking the Amount of Postage Available 37 Determine the Amount of Postage Needed 38 Applying Postage Entering Postage In Manually 39 Applying Postage Entering Weight In Manually 41 Applying Postage Using The Weighing Platform 43 ...

Страница 36: ...perating display If your system has been set up to require a Lock Code or password you are prompted to enter it A typical Home screen is show below with optional scale connected and optional internal rating feature Running Mail Pitney Bowes Operator Guide February 2017 Page 36 of 226 ...

Страница 37: ... amount of funds postage left in your meter Used the total of all postage ever used in the meter Total Pieces the total number of mail pieces run through the meter that had postage applied 3 Press Clear back arrow key or Home to return to Home screen Running Mail Pitney Bowes Operator Guide February 2017 Page 37 of 226 ...

Страница 38: ...tage Use the machine can calculate the postage for the mail pieces based on the weight you provide Refer to Applying Postage Using Internal Rating Use the Scale with Internal Rating to Calculate Postage If you have purchased the scale the machine can calculate the postage required for the mail piece Refer to Applying Postage Using Scale and Internal Rating Use the Differential Weighing Mode For Al...

Страница 39: ...ys to see additional classes 6 If there is no value next to the class name more information is needed Follow the prompts for the options and or services available for this class of service The last screen is usually Servicesand lists special services such as COD and Insurance If you are unsure if a particular class is valid for your mail piece call your local post office or visit www canadapost ca...

Страница 40: ...st the registration wall of the system and slide it to the right until the system grasps it The system prints the meter stamp and ejects the envelope tape sheet Running Mail Pitney Bowes Operator Guide February 2017 Page 40 of 226 ...

Страница 41: ... to see additional classes 6 If there is no value next to the class name more information is needed Follow the prompts for the options and or services available for this class of service The last screen is usually Services and lists special services such as COD and Insurance If you are unsure if a particular class is valid for your mail piece call your local post office or visit www canadapost ca ...

Страница 42: ...9 Place the envelope tape sheet up against the registration wall of the system and slide it to the right until the system grasps it Running Mail Pitney Bowes Operator Guide February 2017 Page 42 of 226 ...

Страница 43: ... use the scroll keys to see additional classes If you are unsure if a particular class is valid for your mail piece call your local post office or www canadapost ca 4 If there is no value next to the class name more information is needed Follow the prompts for the options and or services available for this class of service The last screen shows Services and lists special services such as COD and I...

Страница 44: ...st the registration wall of the system and slide it to the right until the system grasps it The system prints the meter stamp and ejects the envelope tape sheet Running Mail Pitney Bowes Operator Guide February 2017 Page 44 of 226 ...

Страница 45: ...5 Using Batch Count Feature Viewing the Batch Mail Count 46 Printing the Batch Count 47 Clearing the Batch Count 48 ...

Страница 46: ...ess Funds 2 Press Page Down 3 The display shows the batch information Funds Report Description Batch Count The number of mail pieces that had postage applied since the last time the batch count was cleared Batch Value The amount of postage applied since the last time the batch value was cleared 4 To clear the batch count refer to Clearing the Batch Count or press Home to return to the Home screen ...

Страница 47: ...he amount of postage remaining in the meter Total Pieces The total number of mail pieces run through the machine that had postage applied Control Sum The total of all postage refills for the meter and equals the amount Used plus Available This is a postal requirement that verifies an accurate accounting of the postage in your meter Batch Count The number of mail pieces that had postage applied sin...

Страница 48: ...ore the data 1 Press Funds 2 Press Page Down and select Clear batch values 3 At the Confirm Clear prompt press Yes Enter to confirm The batch value and batch piece registers return to zero 4 Press Home to return to the Home screen Using Batch Count Feature Pitney Bowes Operator Guide February 2017 Page 48 of 226 ...

Страница 49: ...cement Messages 50 Printing a Test Pattern 51 Purging the Print Heads 52 Replacing the Print Head 53 Replacing the Ink Cartridge 57 Filling The Moistener Tank 60 Cleaning the Moistener Brush 61 Cleaning the Moistener Wick and Holder 63 ...

Страница 50: ...atus appear on the machine display Low Ink Replace the ink cartridge soon You can print about another 300 impressions or leave the system running for six days without printing If you don t have a replacement cartridge on hand you should order one now Refer to the Contact List for information on ordering supplies Ink Out Replace the ink cartridge immediately The ink supply is gone you will not be a...

Страница 51: ...enance mode 5 Select Printer maintenance 6 Select Test Print 7 l The test pattern should look like the sample below Good Test Print no missing lines If it does then press Enter yes l If the test pattern looks like the sample below Poor Test Print missing lines press NoThe machine will execute a print head cleaning When complete you will be returned to the PM maintenance menu Maintenance Pitney Bow...

Страница 52: ...nter maintenance 6 Select Purge 7 You have a choice of 4 purges to use Normally selecting Purge A is sufficient to purge the system unless directed by a Pitney Bowes agent to do otherwise 8 The system executes a purge This may take a few moments When finished you return to the Purge screen 9 Press Clear back arrow key 5 times to return to the Home screen Maintenance Pitney Bowes Operator Guide Feb...

Страница 53: ...eriencing poor print quality after purging the print head you can replace the print head 1 Remove the weighing platform if you are using one by lifting it straight up 2 Open the top cover 3 Select Replace Ink Tank on the display This moves the printhead and ink tank cartridge into position 4 Unlatch the ink tank cartridge guard by sliding the green lever to the right and flipping the guard open Ma...

Страница 54: ... head so that they slide toward each other 7 While squeezing lift and tilt the print head to the right toward the space for the ink tank cartridge The print head should come up out of the machine 8 Remove the new print head from packaging Maintenance Pitney Bowes Operator Guide February 2017 Page 54 of 226 ...

Страница 55: ... the two gray tabs on either side of the new print head and slightly angle the print head while pushing the print head flush against the wall 11 Replace the ink cartridge see Replacing the Ink Tank Cartridge if you need assistence Maintenance Pitney Bowes Operator Guide February 2017 Page 55 of 226 ...

Страница 56: ...12 Close the top cover and reposition the weighing platform if you are using one The machine resets and you return to the Home screen Maintenance Pitney Bowes Operator Guide February 2017 Page 56 of 226 ...

Страница 57: ...ponse to a possible error condition 1 Remove the weighing platform if you are using one by lifting it straight up 2 Open the top cover 3 Select Replace Ink Tank on the display This moves the printhead and ink tank cartridge into position 4 Unlatch the ink tank cartridge guard by sliding the green lever to the right and flipping the guard open Maintenance Pitney Bowes Operator Guide February 2017 P...

Страница 58: ...Lower the ink cartridge into the cavity the label on the top of the cartridge should face the front of your system The ridges on either side of the cartridge will slide into the grooves 8 Close the ink cartridge guard and click to secure Maintenance Pitney Bowes Operator Guide February 2017 Page 58 of 226 ...

Страница 59: ...system automatically starts an ink initialization process and in a few moments returns you to the Home screen Replace the weighing platform if you use one Maintenance Pitney Bowes Operator Guide February 2017 Page 59 of 226 ...

Страница 60: ...evel up to the bottom of the fill hole We recommend E Z Seal because it helps keep your moistener clean and improves sealing efficiency Refer to the Pitney Bowes Contact List to order E Z Seal 3 If the tank was empty allow 30 minutes for the moistener brush and wick to get completely wet NOTE Do not overfill the moistener tank Maintenance Pitney Bowes Operator Guide February 2017 Page 60 of 226 ...

Страница 61: ...ush 1 Push down on the blue release lever on the moistener 2 Pull the moistener straight out to the left away from the machine 3 Open the hinged brush holder Maintenance Pitney Bowes Operator Guide February 2017 Page 61 of 226 ...

Страница 62: ...l to remove excess water 6 Position the brush as shown at right so its bottom edge is under the mounting tabs and slide the brush back toward the rear of the moistener 7 Reinstall the moistener Push down on the blue release lever on the moistener and guide the moistener back onto the machine You should hear a click as it engages Maintenance Pitney Bowes Operator Guide February 2017 Page 62 of 226 ...

Страница 63: ...oistener Wick and Holder 1 Push down on the blue release lever on the moistener 2 Pull the moistener straight out to the left away from the machine Maintenance Pitney Bowes Operator Guide February 2017 Page 63 of 226 ...

Страница 64: ...ss water and place the wick back into the holder 5 Reinstall the wick and holder assembly into moistener Be sure the holder is seated against the top of the wick 6 Reinstall the moistener Push down on the blue release lever on the moistener and guide the moistener back onto the machine You should hear a click as it engages Maintenance Pitney Bowes Operator Guide February 2017 Page 64 of 226 ...

Страница 65: ...7 How to Enter Text About Entering Text 66 ...

Страница 66: ...xample pressing the 2 numeric key cycles through 2 A B C Extended character sets are provided for foreign markets on a country by country basis In those cases a numeric key may be pressed more than four times to cycle through the complete character set associated with a key If you wish to enter two consecutive alpha characters that are located on the same numeric key such as DE you must wait for t...

Страница 67: ...k Ampersand Forward slash Percent Back slash _ Underscore Open parenthesis Quotation mark Close parenthesis The zero 0 key on the keypad functions as the space key The word Space is printed on the machine to indicate this The decimal point key functions as the Shift key The word Shift is printed on the machine to indicate this This key toggles between all uppercase letters and all lowercase letter...

Страница 68: ...This page intentionally left blank ...
Страница 69: ...unt Name and Password 74 Selecting an Account 75 Viewing Account Totals 76 Printing a Single Account Report 77 Printing a Multi Account Summary Report 78 Clearing All or Some of the Accounts 79 Deleting an Account 80 Turning On Account Passwords Globally 81 Turning Off Account Passwords Globally 82 ...

Страница 70: ... to an account since it was last cleared l An account password if set up can run enhanced accounting features Enhanced Accounting InView Accounting Your DM125 mailing machine can run enhanced accounting software from Pitney Bowes called InView Accounting This software allows you to further customize your categories into subaccounts and even subsubaccounts allowing for more details accounting of yo...

Страница 71: ... Pitney Bowes Contact List 5 The next screen shown depends on your machine settings If accounts have been established already Select Select an account If no accounts have been established you are prompted to create an account Refer to Creating an Account 6 The Select an Account screen displays Press Page Down if lit to see more choices To select an account A Key in the first digit of the account n...

Страница 72: ...Turning accounting OFF If the supervisor password has been enabled you are prompted to enter it Key in the 4 digit password and select Continue 4 You return to the Home screen with no account displayed Accounting Pitney Bowes Operator Guide February 2017 Page 72 of 226 ...

Страница 73: ...rs tap the appropriate number key until the desired character displays When finished select Continue 4 If passwords have been enabled for accounts you will be prompted to enter one A Key in the 4 digit password and select Continue B At the confirmation password prompt re enter the new password and select Set 5 At the prompt to create another account either A Press Yes Enter and go back to Step 3 t...

Страница 74: ...ter it Key in the 4 digit password and select Continue 4 The Edit an Account screen displays a sample is shown below Press Page Down if lit to see more choices To select an account A Key in the first digit of the account number if you know it and press Yes Enter OR B Use the appropriate selection key next to the display 5 If a password has been assigned to this account you will be prompted to ente...

Страница 75: ...ess Page Down if lit to see more choices To select an account A Key in the first digit of the account number if you know it and press Yes Enter OR B Use the appropriate selection key next to the display 4 If a password has been assigned to this account you will be prompted to enter one Key in the 4 digit password if necessary 5 You return to the Home screen with the name of the account listed Acco...

Страница 76: ...postage used displays Select Continue 5 You have a choice to either view another account clear the account or exit A Select View another acct and go back to Step 3 to enter another account to view B Select Clear this account if you want to clear account totals If your system has been set up to require a supervisor or account password you are prompted to enter it The Clear an Account screen display...

Страница 77: ...eport 3 Select Single Accounts Rpt 4 Key in an account 5 When prompted insert tape sheet or envelope into machine The report is printed and you return back to the Printable reports menu 6 Press Clear back arrow key to return to Report type menu or press Home to return to the Home screen To perform this with PC Meter Connect refer to Printing an Account Report Using PC Meter Connect Accounting Pitn...

Страница 78: ...elect Printable report 3 Select Multi Acct Summary 4 When prompted insert tape sheet or envelope into machine The report is printed and you return back to the Printable reports menu 5 Press Clear back arrow key to return to Reports menu or press Home to return to the Home screen To perform this with PC Meter Connect refer to Printing an Account Report Using PC Meter Connect Accounting Pitney Bowes...

Страница 79: ...Accounts menu 2 Press Page Down and select Clear an account If a Supervisor password has been enabled you are prompted to enter one Key in the 4 digit password if necessary 3 The Clear an Account screen displays Press Page Down if lit to see more choices To select an account A Key in the first digit of the account number if you know it and press Yes Enter OR B Use the appropriate selection key nex...

Страница 80: ...he Accounts menu 2 Select Delete an account If a Supervisor password has been enabled you are prompted to enter one Key in the 4 digit password if necessary 3 The Delete an Account screen displays Press Page Down if lit to see more choices To select an account A Key in the first digit of the account number if you know it and press Yes Enter OR B Use the appropriate selection key next to the displa...

Страница 81: ...s Page Down twice and select Acct Passwords 3 Select Turn Passwords ON You return back to the Accounts menu 4 Select Select an account 5 The Select an Account screen displays a sample is shown below Press Page Down to see more choices if lit To select an account you may either A Key in the first digit of the account number if you know it and press Yes Enter OR B Use the appropriate selection key n...

Страница 82: ...lection key next to ACCT line to display the Accounts menu 2 Press Page Down twice and select Acct Passwords 3 Select Turn Passwords OFF 4 You are prompted to enter the Supervisor password Key in the 4 digit password You return back to the Accounts menu 5 Press Clear back arrow key or Home to return to the Home screen Accounting Pitney Bowes Operator Guide February 2017 Page 82 of 226 ...

Страница 83: ...ort 86 Add Postage Report 87 Rates Summary Report 88 Printing a Single Account Report 89 Printing a Multi Account Summary Report 90 Configuration Report 91 System Setup Report 92 Account List Report Standard Accounting 93 Error Report 94 ...

Страница 84: ...lable reports may Include l Add Postage Report l Single Account Report l Multi account Summary Report l Account List Report laser printer only l Special Services l Register Funds Report l Configuration Report l Systems Setup Report laser printer only l Error Report l Rates Summary Report Printing a Report on an Envelope or Tape Strip 1 Press Menu 2 Select Reports 3 Select the report you wish to pr...

Страница 85: ...n choose Yes to print another report or No to return to the Home screen Printing a Report Using a Laser Printer 1 Press Menu 2 Select Reports 3 Select the report you wish to print from the list You may need to press the down arrow key to view additional reports 4 When prompted select Attached Printer 5 A message appears indicating that the report will be printed to the attached printer Select Retu...

Страница 86: ...er used in the meter Available the amount of postage left in the meter Total Pieces the total number of mail pieces run through the meter that had postage applied Control Sum the total of all postage refills for the meter and equals the amount Used plus Available Batch Count the number of mail pieces that had postage applied since the last time the batch count was cleared Batch Value the amount of...

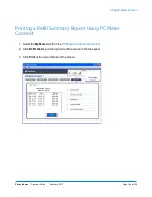
Страница 87: ... Home to return to the Home screen Description Date of Refill the date of the refill Time the time of refill Refill Amount the amount of the refill Account No your Postage By Phone system account number Meter No serial number of this meter normally meter number Printed the date the report was printed If you have PC Meter Connect refer to Printing a Refill Summary Report Using PC Meter Connect Repo...

Страница 88: ...you will be prompted to insert another envelope tape sheet 6 Press Clear back arrow key to return to the Reports menu or press Home to return to the Home screen Description Description the specific type of rate Version the alpha numeric identifier used for this rate Effective Date the date the rate takes effect Active indicates if the rate is active Yes or No Meter Number the serial number of this...

Страница 89: ...report 3 Select Single Accounts Rpt 4 Key in an account 5 When prompted insert tape sheet or envelope into machine The report is printed and you return back to the Printable reports menu 6 Press Clear back arrow key to return to Report type menu or press Home to return to the Home screen To perform this with PC Meter Connect refer to Printing an Account Report Using PC Meter Connect Reports Pitney...

Страница 90: ... Select Printable report 3 Select Multi Acct Summary 4 When prompted insert tape sheet or envelope into machine The report is printed and you return back to the Printable reports menu 5 Press Clear back arrow key to return to Reports menu or press Home to return to the Home screen To perform this with PC Meter Connect refer to Printing an Account Report Using PC Meter Connect Reports Pitney Bowes ...

Страница 91: ... Bowes Customer Service Representative requests it 1 Press Reports 2 Select Printable reports 3 Select Configuration report 4 When prompted insert tape sheet or envelope into the machine The report is printed 5 Press Clear back arrow key to return to the Reports menu or press Home to return to the Home screen Reports Pitney Bowes Operator Guide February 2017 Page 91 of 226 ...

Страница 92: ... Warning Values l Time Settings l Advertisements l Inscriptions l Accounting Setup l Modem Setup l Scale Settings l Presets 1 Press Reports 2 Select Printable Reports 3 Select System Setup Report 4 When prompted ensure that a laser printer is connected to your system then select Continue 5 The report is printed 6 Press Clear back arrow key to return to the Reports menu or press Home to return to t...

Страница 93: ...nted therefore you will need to have a laser printer attched to your machine 1 Press Reports 2 Select Printable reports 3 Select Account List Report 4 When prompted ensure that a laser printer is connected to your system then select Continue 5 The report is printed 6 Press Clear back arrow key to return to the Reports menu or press Home to return to the Home screen Reports Pitney Bowes Operator Gu...

Страница 94: ... Representative requests it 1 Press Reports 2 Select Printable reports 3 Select Error report 4 When prompted insert tape sheet or envelope into the machine The report is printed 5 Press Clear back arrow key to return to the Reports menu or press Home to return to the Home screen Reports Pitney Bowes Operator Guide February 2017 Page 94 of 226 ...

Страница 95: ...dvance 103 Correct Drift 104 Setting Daylight Savings Time 105 Setting Up or Disabling the Lock Code 106 Setting Up or Disabling the Supervisor Password 107 Turning Scale On or Off 108 Setting Scale Options if using scale option 109 Zeroing the Scale 110 Setting Weight Change Options 111 Setting Class Change Options 112 Setting the High Funds Warning 113 Setting the Low Funds Warning 114 Enabling ...

Страница 96: ... or Off if installed on machine l Setting Date Time and Timeouts l Setting Postage Values Funds Warnings l Setting Lock Code and Passwords l Scale Options accessed from the Home screen l Checking and Clearing the Batch Count also refer to Checking Clearing Batch Mail Count l Connecting to Data Centre settings also refer to Advanced Settings l Maintenance Mode l Change Language l Meter Withdrawal f...

Страница 97: ... up to 24 hours which means you are in the next day 1 Press Options 2 Select Set to today s date You will be returned to the Home screen with today s date set If you have PC Meter Connect refer to Setting System Time Using PC Meter Connect Configuring Your Mailing Machine Pitney Bowes Operator Guide February 2017 Page 97 of 226 ...

Страница 98: ...y contrast 1 Press Options 2 Select Adjust the Contrast 3 Select Increase Contrast or Decrease Contrast 4 Press Clear back arrow key or Yes Enter to return to the Options menu Configuring Your Mailing Machine Pitney Bowes Operator Guide February 2017 Page 98 of 226 ...

Страница 99: ...swords when choosing a departmental account if accounting passwords are set up Also refer to Accounting Auto Rating this turns on or off the auto rating feature which calculates the postage amount for a mail piece based on the weight the class and services selected Preset Class Lookup this turns on or off the prompt for a class when you are saving a preset that has no class listed also known as ke...

Страница 100: ... inactive before reverting to the normal preset values Listed are the basic setting options l Normal Preset refer to Setting the Normal Preset Time l Sleep Mode refer to Sleep Mode Activation Time l Autodate Advance refer to Setting Autodate Advance l Correct drift refer to Correcting Drift l Daylight Savings refer to Setting Daylight Savings Time Configuring Your Mailing Machine Pitney Bowes Oper...

Страница 101: ...es before it reverts to the normal preset 1 Press Options 2 Press Page Down 3 Select Time and Timeouts 4 Select Normal Preset 5 Key in the amount of minutes from 1 240 before the system returns to the normal preset 6 Select OK The display returns to Time and Timeouts menu 7 Press Clear back arrow key to return to Options Menu Configuring Your Mailing Machine Pitney Bowes Operator Guide February 20...

Страница 102: ...erely pressing any button on the control panel 1 Press Options 2 Press Page Down 3 Select Time and Timeouts 4 Select Sleep Mode 5 Key in the amount of minutes from 1 240 before the system goes into sleep mode 6 Select OK The display returns to Time and Timeouts menu 7 Press Clear back arrow key to return to Options menu Configuring Your Mailing Machine Pitney Bowes Operator Guide February 2017 Pag...

Страница 103: ...g 1 Press Options 2 Press Page Down 3 Select Time and Timeouts 4 Select Autodate advance 5 The following selections appear Switch AM PM Use the soft key next to this selection to toggle between AM or PM Select Continue Disable Use the soft key next to this selection to disable the feature and return to using 12 00 AM as the time when the machine advances the date of the meter stamp 6 The display r...

Страница 104: ...cting minutes from the current time displayed To Add Minutes Select Add 1 120 min to add minutes Key in the number of minutes you need to add and select Continue To Subtract Minutes Select Add 1 120 min to subtract minutes Key in the number of minutes you need to add and select Continue 7 The display returns to Time and Timeouts menu 8 Press Clear back arrow key to return to Options menu Configuri...

Страница 105: ...s the current setting 6 Select Enable to use Daylight Saving Time or select Disable if you don t use Daylight Saving Time Your selected setting is saved and the display returns to the Time and Timeouts menu 7 Press Clear back arrow key to return to Options menu Configuring Your Mailing Machine Pitney Bowes Operator Guide February 2017 Page 105 of 226 ...

Страница 106: ... prompt type in a new lock code 4 digits and select Continue Re enter the new lock code again to confirm and select Continue At the Meter Lock Code has been enabled message select Continue 6 Press Clear back arrow key to return to Options menu NOTE If you have set up a password for an account when using the optional accounting feature you can enter the account password instead of the lock code pas...

Страница 107: ...ords 4 Select Supervisor Password If there is an existing lock code you are prompted to key in the 4 digit code 5 You then have a choice to either disable the password if present or change establish the password To Disable the Password Select Disable Password At the Supervisor Password has been disabled message select Continue To Change or Establish the Password Select Change password At the promp...

Страница 108: ...ion as necessary 1 At the Home screen press the selection key next to SCALE line 2 Select Turn Scale OFF or ON 3 You return to the Home screen with either the scale on or off Configuring Your Mailing Machine Pitney Bowes Operator Guide February 2017 Page 108 of 226 ...

Страница 109: ...as l Zero the Scale l Turn the scale on off l View Imperial Wgt l Change Retain Class l Change Retain Code Most of the scale options are accessed by pressing the selection key next to SCALE line at the Home screen Configuring Your Mailing Machine Pitney Bowes Operator Guide February 2017 Page 109 of 226 ...

Страница 110: ...u can display a weight in metric values grams or kilograms as needed This is helpful when you are using the internal rating feature and need the weight of an item when sending to a country whose rates are based on metric values 1 At the Home screen press the selection key next to SCALE line 2 Select View metric weight 3 The current weight displays in grams 4 Select Continue to return to the Home s...

Страница 111: ...tings Select Change Retain class Select either change class or retain class when weight changes The current condition is listed at the bottom of the screen To Change Postal Code Settings Select Change Retain Code Select either change Postal Code or retain Postal Code when weight changes The current condition is listed at the bottom of the screen 4 Press Clear back arrow key to return to the Home s...

Страница 112: ...key next to SCALE line 2 Press Page Down twice 3 Select Change Retain Class 4 Select either change class or retain class when Postal Code changes The current condition is listed at the bottom of the screen 5 Press Clear back arrow key to return to the Home screen Configuring Your Mailing Machine Pitney Bowes Operator Guide February 2017 Page 112 of 226 ...

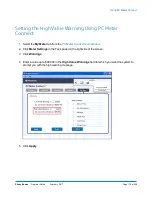
Страница 113: ...unts determined by the internal rating feature 1 Press Options 2 Press Page Down 3 Select Postage Values 4 Select High postage amount 5 Key in the value you want including the digits to the right of the decimal point if you want a fractional value like 75 or 1 50 Select OK 6 Press Clear back arrow key to return to Options menu If you have PC Meter Connect refer to Setting the High Value Warning Us...

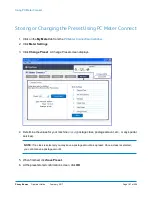
Страница 114: ...dding postage refer to Adding Postage to Your Machine 1 Press Options 2 Press Page Down 3 Select Postage Values 4 Select Low funds amount 5 Key in the amount you want in whole dollars only Select OK 6 Press Clear back arrow key to return to Options menu If you have PC Meter Connect refer to Setting the Low Funds Warning Using PC Meter Connect Configuring Your Mailing Machine Pitney Bowes Operator ...

Страница 115: ...tions You can minimize these disturbances by enabling the scale stabilizing feature Enabling this feature could cause a slight delay in scale response 1 Press Options 2 Press Page Down 3 Select Turn items ON OFF 4 Press Page Down 5 Select Scale Stabilizer 6 The current setting YES or NO is listed on the screen Follow the prompt to change the setting 7 Press Clear back arrow key to return to the Ho...

Страница 116: ...ally powered up To change language 1 Press Options 2 Press Page Down twice 3 Select Advanced Features 4 Press Page Down once 5 Select Change Language 6 Select the desired language English or French Press Home to return to the Main screen The language you selected will remain in effect until it is changed again Configuring Your Mailing Machine Pitney Bowes Operator Guide February 2017 Page 116 of 2...

Страница 117: ...er to Pitney Bowes Contact List for more information NOTE Do not run this option unless directed to do so by your Pitney Bowes representative To run the install mode 1 Press Options 2 Press Page Down twice 3 Select Advanced Features 4 Press Page Down once 5 Select Run Install Mode Follow the screen prompts until you reach the Installation Successful screen Select OK and you will be returned to the...

Страница 118: ...This page intentionally left blank ...
Страница 119: ...eature About Presets 120 Defining New Values for the Normal Preset 122 Viewing A Custom Preset 123 Selecting a Custom Preset 124 Defining a New Custom Preset 125 Editing a Custom Preset Name 126 Deleting a Custom Preset 127 ...

Страница 120: ... up to 10 additional presets called Custom Presets Custom Presets can not be edited once established however they can be deleted and a new Custom Preset can then be established IMPORTANT Always Include the Canada Post Class in the Preset When setting up the preset be sure to include the Canada Post class This ensures that whenever there is a Canada Post rate change and you download the new rates t...

Страница 121: ... to all presets to make sure that they comply with the new rates Viewing the Normal Preset 1 Press Custom Preset 2 Press Page Down 3 Select View Preset The display lists all presets 4 Select Normal Preset The first screen of defined values for Normal Preset is listed Press Page Down to see the remainder of the defined values 5 When you press Page Down to the last screen you have the option to A Us...

Страница 122: ...s Yes Enter the new values are saved and you return to the Custom Presets menu B If you press No the system will display the current values Press Page Down to see the remainder of the current values 5 Select Continue at the last screen to return to the first screen in step 4 and save the current values as the Normal preset or press Home to return to the Home screen to establish the proper settings...

Страница 123: ... Page Down to see the remainder of the defined values 5 Press Page Down to the last screen you have the option to A Choose this Custom Preset as is select Select this preset You return to the Home screen with this Custom Preset chosen using the values just shown B Select Continue to return to the View a Preset screen to select another preset Using the Preset Feature Pitney Bowes Operator Guide Feb...

Страница 124: ...stem 3 Press Page Down to see additional choices if available 4 Select the preset you want to use You return to the Home screen with the preset values chosen If you have PC Meter Connect refer to Viewing the Preset Using PC Meter Connect Using the Preset Feature Pitney Bowes Operator Guide February 2017 Page 124 of 226 ...

Страница 125: ...access alpha characters repeatedly press the appropriate number key until the desired character displays When finished select OK The new values are saved and you return to the Custom Preset menu B If you press No the system will display the current values Press Page Down to see the remainder of the defined values 5 Select Continue at the last screen to return to the correct values prompt in Step 4...

Страница 126: ... new name of this preset Key in the new name for this preset It can be up to twelve alpha numeric characters long To access alpha characters repeatedly press the appropriate number key until the desired character displays 5 When finished select OK You return to the Custom Preset menu 6 Press Home to return to the Home screen Using the Preset Feature Pitney Bowes Operator Guide February 2017 Page 1...

Страница 127: ...wn and select Delete Preset The display lists all presets 3 Select the preset you want to delete 4 At the prompt to clear the Preset press Yes Enter The preset is deleted 5 The system confirms that the preset has been deleted Select Continue You return to the Custom Preset menu 6 Press Home to return to the Home screen Using the Preset Feature Pitney Bowes Operator Guide February 2017 Page 127 of ...

Страница 128: ...This page intentionally left blank ...
Страница 129: ...12 Passwords About Passwords and Meter Functions 130 ...

Страница 130: ... settinp up a password for the machine referred to as a Lock Code refer to Setting or Disabling the Lock Code l For information on settinp up a supervisor password refer to Setting or Disabling the Supervisor Password l For information on setting up a password for an account refer to Creating an Account Passwords Pitney Bowes Operator Guide February 2017 Page 130 of 226 ...

Страница 131: ...Centre How You Connect to the PB Data Centre 132 Connect to the PB Data Centre Directly to a LAN Port with DM Series USB Ethernet Adapter 133 Connect to the PB Data Centre Using PC Meter Connect Application on Your Computer 134 ...

Страница 132: ...o connect your machine to the PB Data Centre through a LAN network with internet access using the DM Series USB Ethernet adapter and an Ethernet cable supplied For more information see Connect to the PB Data Centredirectly to a LAN Port with DM Series USB Ethernet Adapter Connect Directly Through Your Computer Using PC Meter Connect This method connects the machine directly to a PC that has PC Met...

Страница 133: ...able supplied l Connect one end of the Ethernet cable into the LAN network wall outlet that has internet access and the other end to the adapter l Plug the other end of the adapter into an available USB A port on the back of the machine For more information on setting up this type of connection refer to How to setup a LAN connection on the DM125 available on our website Connecting to the Data Cent...

Страница 134: ...u to perform the following operations l Add postage and perform Postal inspections and rate updates l See status messages such as low funds from the machine l See or print your postage refill history l Set machine settings such as date and time printing options presets etc l Run accounting reports l Access the Pitney Bowes online store which provides an easy and convenient way to order ink cartrid...

Страница 135: ...14 Adding Postage Checking Postage Funds in the Meter 136 Checking Postage By Phone Account Balance 137 Adding Postage to Your Machine 138 Withdrawing Postage Funds from the Meter 140 ...

Страница 136: ...establish a Postage By Phone account contact Pitney Bowes See Pitney Bowes Contact List You can check the funds postage in your machine 1 Press Funds 2 The funds available used and pieces processed will display 3 Press Clear back arrow key or Home to return to Home screen Description Available the amount of funds postage left in your meter Used the total of all postage ever used in the meter Total...

Страница 137: ...chine The following method describes how to check the balance of funds available on the PB Data Centre 1 Make sure that your machine can make the connection to the Data Centre 2 Press Add Postage 3 Select Check PBP balance 4 The machine connects to the Pitney Bowes Data Centre Various status screens display 5 The Prepaid and Other balances display Adding Postage Pitney Bowes Operator Guide Februar...

Страница 138: ...When meter is in sleep mode press any key to waken it c Enter the password for the lock code not a password for an ac count and press Enter Yes See supervisor if you need help d Press Funds and continue at the beginning of this step 3 Key in the refill amount whole numbers only NOTE The minimum amount of postage you can add is 1 4 At the refill amount confirmation prompt press Enter yes 5 The mach...

Страница 139: ... account of those funds you paid for in advance by sending in a check direct withdrawal etc Credit Line Available Amount you have left in your Postage By Phone system account of those funds you established as credit with Pitney Bowes such as Purchase Power etc Refill Amount Amount of your refill Account No Your Postage By Phone system account number Meter No Your meter serial number on record with...

Страница 140: ... 3 Select Advanced Features 4 Press Page Down to the second screen 5 Select Meter Withdrawal 6 Select Transfer all funds from meter to PBP account 7 The system connects into the Pitney Bowes Data Centre this may take a few moments Various screens displays letting you know the status of the process 8 The Transfer Successful screen displays Select Continue 9 At the prompt Print Funds Report press Ye...

Страница 141: ...15 Meter Updates and Inspections About Meter Updates and Inspections 142 About Postal Rate Changes 144 Performing Meter Inspections 145 ...

Страница 142: ...e prompt Restart now displays Select this to restart the system l If it is not necessary to reboot simply select Continue to return to the Home screen IMPORTANT Do not remove power or the Internet connection to the Pitney Bowes Data Centre during a system upgrade or rates download Wait until the meter has finished processing before disconnecting the meter You will know this has occurred when the m...

Страница 143: ...stal Code of your system the code will be downloaded into your system When a system is moved to a new Postal Code the Data Centre enters the new code into the record The system is updated when a connection is made to the Data Centre To initiate a download for Postal Codes follow the Procedure for Downloading New Postal Rates Updates Inscriptions and Ads Postal Rate Update Refer to Downloading New ...

Страница 144: ...il is changing and is effective immediately a screen displays showing the present preset postage and prompts you to reset the normal preset postage Press Yes Enter A screen displays for you to enter the new rate l When a Rate Change update takes place it may also affect the preset values in your mailing machine Check all of the preset settings to insure that it conforms to the new rates Refer to U...

Страница 145: ...our machine can make connection to the Data Centre 2 Press Add Postage 3 Select Check PBP balance 4 The system connects to the Pitney Bowes Data Centre this may take a few moments Various screens displays letting you know the status of the process 5 The Prepaid and Other balances displays Press No 6 If there are no updates for your system you will return to the Home screen If there are updates ava...

Страница 146: ...This page intentionally left blank ...
Страница 147: ... Using PC Meter Connect 165 Downloading New Postal Rates Using PC Meter Connect 167 Performing Meter Inspections Using PC Meter Connect 168 Printing a Meter Stamp with an Advanced Date Using PC Meter Connect 169 Adding or Removing Ads Using PC Meter Connect 171 Adding or Removing Postal Inscriptions Using PC Meter Connect 173 Setting the System Time Using PC Meter Connect 175 Resetting the Scale t...

Страница 148: ...anging the Preset Using PC Meter Connect 187 Viewing the Preset Using PC Meter Connect 188 Viewing Meter Software Version Using PC Meter Connect 189 Viewing PC Meter Connect Software Version 190 Using PC Meter Connect Pitney Bowes Operator Guide February 2017 Page 148 of 226 ...

Страница 149: ...ugh a Windows PC with an internet connection You simply download the PC Meter Connect software from the Pitney Bowes support website see PC Meter Connect Installation Install it onto a PC with an internet connection broadband DSL network etc and connect a USB cable between your machine and the PC Using PC Meter Connect Pitney Bowes Operator Guide February 2017 Page 149 of 226 ...

Страница 150: ...dows XP 32 bit or 64 bit Windows Vista 32 bit or 64 bit or Windows 7 32 bit or 64 bit operating systems with the latest service packs Mac OS is not supported l 1 2 GHz processor and 512 MB of RAM l administrative rights to install software l an Internet connection Using PC Meter Connect Pitney Bowes Operator Guide February 2017 Page 150 of 226 ...

Страница 151: ...and 64 Bits and Windows 7 32 Bits and 64 Bits l 1 2 GHz processor 512 Mb RAM l USB port l Administrative privilege to install software l Microsoft NET framework 2 0 required for PC Meter Connect will be automatically installed if it is not ready on the PC This is a one time installation l Internet Connection l Non Windows Operating Systems e g Mac and Linux are not supported Network Requirements f...

Страница 152: ...ers to your exception list Refer to Exception List Frequently Asked Questions What type of FTP is used by the System Active or Passive FTP may be used if the preferred method HTTPS is not desired The PC Meter Connect desktop application will default to FTP Passive mode but you can change the protocol to Active if necessary using the Internet Settings menu from the PC Meter Connect desktop applicat...

Страница 153: ...ts 1023 must be opened for successful FTP connection and transfer of files 2 Firewall on Passive FTP what ports should be opened on server and client side On server port 21 for commands and ports 1023 must be opened On the client ports 1023 must be opened for successful FTP connection and transfer of files Using PC Meter Connect Pitney Bowes Operator Guide February 2017 Page 153 of 226 ...

Страница 154: ...oes the System use static and dynamic addressing PC Meter Connect uses the PC s internet connection and functions with static or dynamic IP addressing Is the HTTP communication Chunked or Non Chunked The PC Meter Connect desktop application supports both chunked and non chunked HTTP transfer encoding communication By default the PC Meter Connect uses non chunked However Postage by Phone connectivi...

Страница 155: ...3 From the Internet Settings Menu screen in the Proxy Address Assignment section a Select the Use Internet Explorer proxy settings option button to choose the same setting as Internet Explorer or b Select the Manual proxy settings option button Then enter the Name and Password in the Proxy Authentication section Using PC Meter Connect Pitney Bowes Operator Guide February 2017 Page 155 of 226 ...

Страница 156: ... you downloaded to your PC 5 The install program automatically starts Follow the prompts on screen 6 When installation is complete a PC Meter Connect icon will be installed on your desktop and an icon will reside on your PC s system tray usually in the lower right corner of the screen Item Description 1 PC Meter Connect desktop shortcut icon 2 PC Meter Connect system tray icon 7 To make sure that ...

Страница 157: ...ck on the Start button All Programs Pitney Bowes PC Meter Connect A PC Meter Connect icon will then appear in system tray If you connect or disconnect your machine from the PC messages display from the PC Meter Connect icon in the system tray l Meter Not Connected displays when you disconnect your machine from the PC The red x stays on the icon thereafter l Meter detected displays when you connect...

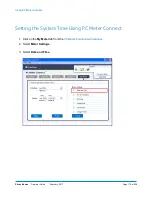
Страница 158: ...follow these steps to have it displaythere 1 On your desktop taskbar usually located on the bottom of your screen right click on a blank area 2 Click on Properties from the list of choices that displays 3 At the Taskbar and Start Menu Properties window on the Taskbar tab verify that the Hide inactive icons field is unchecked blank If necessary click to uncheck it Click OK to finish Using PC Meter ...

Страница 159: ...re Internet Settings Allows you to change your Internet settings for best operation with PC Meter Connect see Troubleshooting section later in this chapter for more details About PC Meter Connect Lists the PC Meter Connect software version About Your Meter Displays whether or not the machine is connected to your PC Contact Us Provides email and phone number information to contact Pitney Bowes Exit...

Страница 160: ...esktop Icon Icon in System Tray PC Meter Connect connects to the PB Data Centre and displays the postage amount in your system your Postage By Phone account balance your Purchase Power balance and any updates required PC Meter Connect Main Window Using PC Meter Connect Pitney Bowes Operator Guide February 2017 Page 160 of 226 ...

Страница 161: ... X stays in the tray Meter Not Connected Message When you reconnect your machine to the PC after disconnecting it the following message displays in the system tray The red X disappears from the tray Meter Detected Message Using PC Meter Connect Pitney Bowes Operator Guide February 2017 Page 161 of 226 ...

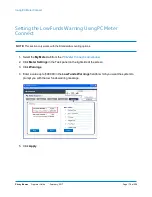
Страница 162: ...nternet and to your mailing machine A green check indicates a good connection while a red X means the devices can not communicate Good Communication PC Not Communicating with Machine PC Not communicating with Internet PC Not Communicating with Internet or Machine Using PC Meter Connect Pitney Bowes Operator Guide February 2017 Page 162 of 226 ...

Страница 163: ...port This tab provides links to the following support functions n My Account on the Pitney Bowes website n Online help on this machine on the Pitney Bowes website n Demonstrations about your machine n PDF of this operator guide n Frequently Asked Questions FAQs on this machine on the Pitney Bowes website e My Meter This tab allows you to edit machine settings such as the date and time printing opt...

Страница 164: ...an check the funds postage in your machine from the Postage tab on the PC Meter Connect main window The Postage tab is the default tab that displays when you launch the program Using PC Meter Connect Pitney Bowes Operator Guide February 2017 Page 164 of 226 ...

Страница 165: ...stage to your machine from the Postage tab on the PC Meter Connect main window The Postage tab is the default tab that displays when you launch the program 1 At the Postage tab click on Add Postage to Meter 2 Enter in the amount or choose one of the preset amounts Click Confirm to continue Using PC Meter Connect Pitney Bowes Operator Guide February 2017 Page 165 of 226 ...

Страница 166: ...our Postage By Phone system account of those funds you paid for in advance by sending in a check direct withdrawal etc Credit Line Available Amount you have left in your Postage By Phone system account of those funds you established as credit with Pitney Bowes such as Purchase Power etc Refill Amount Amount of your refill Account No Your Postage By Phone system account number Meter No Your meter s...

Страница 167: ...urrent active rates and any pending rate updates are displayed in the Support Information panel on the left of the screen 3 When completed the system will prompt you to click Continue then Done 4 If updates are required click on the Update Software link in the Task panel on the right side of the screen Using PC Meter Connect Pitney Bowes Operator Guide February 2017 Page 167 of 226 ...

Страница 168: ...e current active rates and any pending rate updates are displayed in the Support Information panel on the left of the screen 3 Click on the Perform Meter Inspection link in the Task panel on the right side of the screen 4 After several minutes a Meter Inspection Completed screen displays 5 Click Ok Using PC Meter Connect Pitney Bowes Operator Guide February 2017 Page 168 of 226 ...

Страница 169: ... Advanced Date Using PC Meter Connect 1 Click on the My Meter tab from the PC Meter Connect main window 2 Select Meter Settings 3 Select Date and Time Using PC Meter Connect Pitney Bowes Operator Guide February 2017 Page 169 of 226 ...

Страница 170: ...then click the day you want to print on the meter stamp 5 Click Apply A confirmation screen displays the new date Click OK 6 To reset the date on your mail back to the current date repeat steps 1 5 and select today s date Using PC Meter Connect Pitney Bowes Operator Guide February 2017 Page 170 of 226 ...

Страница 171: ...ds Using PC Meter Connect 1 Click on the My Meter tab from the PC Meter Connect main window 2 Select Meter Settings 3 Select Ads Inscriptions Using PC Meter Connect Pitney Bowes Operator Guide February 2017 Page 171 of 226 ...

Страница 172: ...4 Select the ad you want by clicking in the Envelope Ads field and selecting it from the dropdown list 5 Click Apply Using PC Meter Connect Pitney Bowes Operator Guide February 2017 Page 172 of 226 ...

Страница 173: ...scriptions Using PC Meter Connect 1 Click on the My Meter tab from the PC Meter Connect main window 2 Select Meter Settings 3 Select Ads Inscriptions Using PC Meter Connect Pitney Bowes Operator Guide February 2017 Page 173 of 226 ...

Страница 174: ...tions field and selecting it from the dropdown list You can also remove an inscription by selecting the blank option The inscription you select displays on the screen 5 Click Apply Using PC Meter Connect Pitney Bowes Operator Guide February 2017 Page 174 of 226 ...

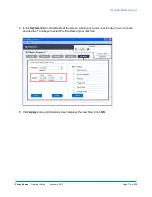
Страница 175: ...Time Using PC Meter Connect 1 Click on the My Meter tab from the PC Meter Connect main window 2 Select Meter Settings 3 Select Date and Time Using PC Meter Connect Pitney Bowes Operator Guide February 2017 Page 175 of 226 ...

Страница 176: ...ace your cursor over the day hour or minute and use the or v keys to select the time date of your machine 5 Click Apply and a confirmation screen displays the new time Click OK Using PC Meter Connect Pitney Bowes Operator Guide February 2017 Page 176 of 226 ...

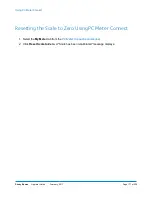
Страница 177: ...PC Meter Connect 1 Select the My Meter tab from the PC Meter Connect main window 2 Click Reset Scale to Zero A Scale has been recalibrated message displays Using PC Meter Connect Pitney Bowes Operator Guide February 2017 Page 177 of 226 ...

Страница 178: ...2 Click Meter Settings in the Task panel on the right side of the screen 3 Click Warnings 4 Enter a value up to 99 000 in the High Value Warnings field for which you want the system to prompt you with the high warning message 5 Click Apply Using PC Meter Connect Pitney Bowes Operator Guide February 2017 Page 178 of 226 ...

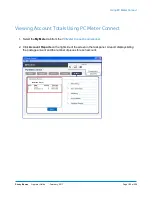
Страница 179: ... PC Meter Connect main window 2 Click Meter Settings in the Task panel on the right side of the screen 3 Click Warnings 4 Enter a value up to 99 000 in the Low Funds Warnings field for which you want the system to prompt you with the low funds warning message 5 Click Apply Using PC Meter Connect Pitney Bowes Operator Guide February 2017 Page 179 of 226 ...

Страница 180: ...m the PC Meter Connect main window 2 Click Account Reports on the right side of the screen in the task panel A report displays listing the postage amount and the number of pieces for each account Using PC Meter Connect Pitney Bowes Operator Guide February 2017 Page 180 of 226 ...

Страница 181: ...the My Meter tab from the PC Meter Connect main window 2 Click Account Reports on the right side of the screen in the task panel 3 Click Print at the lower left side of the screen Using PC Meter Connect Pitney Bowes Operator Guide February 2017 Page 181 of 226 ...

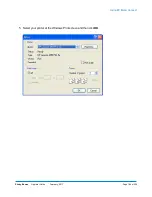
Страница 182: ...4 Click Print at the lower left side of the screen again Using PC Meter Connect Pitney Bowes Operator Guide February 2017 Page 182 of 226 ...

Страница 183: ...5 Select your printer at the Windows Print screen and then click OK Using PC Meter Connect Pitney Bowes Operator Guide February 2017 Page 183 of 226 ...

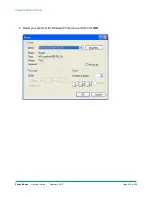
Страница 184: ...ect the My Meter tab from the PC Meter Connect main window 2 Click Refill History on the right side of the screen in the task panel 3 Click Print at the lower left side of the screen Using PC Meter Connect Pitney Bowes Operator Guide February 2017 Page 184 of 226 ...

Страница 185: ...4 Click Print at the lower left side of the screen again Using PC Meter Connect Pitney Bowes Operator Guide February 2017 Page 185 of 226 ...

Страница 186: ...5 Select your printer at the Windows Print screen and then click OK Using PC Meter Connect Pitney Bowes Operator Guide February 2017 Page 186 of 226 ...

Страница 187: ...4 Determine the values for your machine preset postage class postage amount etc or any special services NOTE If no class is selected you may save a postage amount as a preset Once a class is selected you cannot save a postage amount 5 When finished click Save Preset 6 At the preset stored confirmation screen click OK Using PC Meter Connect Pitney Bowes Operator Guide February 2017 Page 187 of 226 ...

Страница 188: ...et Using PC Meter Connect 1 Click on the My Meter tab from the PC Meter Connect main window 2 Click Meter Settings 3 Click on View Preset Using PC Meter Connect Pitney Bowes Operator Guide February 2017 Page 188 of 226 ...

Страница 189: ...ab from the PC Meter Connect main window 2 Select Details to display the mainling machine software version information 3 Select Update Software to download the latest software version to your meter Using PC Meter Connect Pitney Bowes Operator Guide February 2017 Page 189 of 226 ...

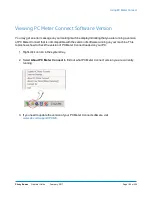
Страница 190: ...ning on your machine This topic shows how to check the version of PC Meter Connect loaded on your PC 1 Right click on icon in the system tray 2 Select About PC Meter Connect to find out what PC Meter Connect version you are currently running 3 If you need to update the version of your PC Meter Connect software visit www pb com support PCMC Using PC Meter Connect Pitney Bowes Operator Guide Februar...

Страница 191: ...17 Supplies and Options Supplies and Options 192 ...

Страница 192: ...our Pitney Bowes Sales Representative for more information see Pitney Bowes Contact List for web addresses and phone numbers Integrated Weighing Platform Scale The weighing platform allows you to accurately weigh mail and packages You can select from either a 2 3 kg or a 4 5 kg capacity scale Moistener The moistener applies sealing fluid to the envelope flap You can seal envelopes or leave them un...

Страница 193: ... About Accounts for more information on this feature For more information on InView Accounting and InView Meter Reporting visit the Pitney Bowes website and enter InView in the search field on our Home page Postal Inscriptions Advertisements Your system comes pre loaded with several envelope ads and postal inscriptions These give your mail a professional appearance and can turn your mailings into ...

Страница 194: ...This page intentionally left blank ...
Страница 195: ...18 Specifications Specifications Equipment and Materials 196 ...

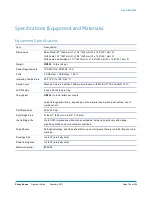
Страница 196: ...NSI 12 10 LCD Display 4 lines 20 characters long Throughput DM125 Up to 45 letters per minute Actual throughput will vary depending on the material used machine condition use of moistener etc Print Resolution 600 x 400 dpi Print Image Area At least 1 25 4 mm x 6 5 8 170 mm Ink Cartridge Life Up to 3 000 impressions without an envelope ad Actual ink yields vary with usage graphics printed and envir...

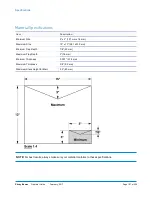
Страница 197: ...nimum Flap Depth 7 8 22 mm Maximum Flap Depth 3 76 mm Minimum Thickness 0 007 0 18 mm Maximum Thickness 3 8 9 5 mm Maximum Stack Height for Mail 2 5 60 mm NOTE For best results always make sure your material conforms to these specifications Specifications Pitney Bowes Operator Guide February 2017 Page 197 of 226 ...

Страница 198: ...This page intentionally left blank ...

Страница 199: ...s 204 Accidentally Printing the Wrong Postage 205 Moistening Problems envelopes don t seal 207 Viewing System Configuration Levels 209 Troubleshooting Communications Problems 210 Problems Connecting to the Data Centre Via PC Meter Connect 211 Troubleshooting Your Internet Connection 217 Text Error Messages 218 Numeric Error Codes 219 Exception List 222 ...

Страница 200: ... you are unable to finds answers to your questions using these resources contact PB Customer Support at General Questions 800 672 6937 Customer service representatives are available Monday through Friday 8 00 AM 8 00 PM EST To help us help you refer to What Information I Need to Provide Customer Support This will reduce the time it takes to troubleshoot and solve your problem Troubleshooting Pitne...

Страница 201: ...gital Postage Meter PCN See the label under the lid at the top of the meter Serial Number See the label under the lid at the top of the meter Problem Description What is happening and when Any error messages displayed Attempts to Fix What steps have you already tried to fix the problem and what happened Troubleshooting Pitney Bowes Operator Guide February 2017 Page 201 of 226 ...

Страница 202: ...cted to a switched wall outlet power strip or surge protector Power lamp is yellow on the machine Possible Cause Machine in sleep mode Solution Press any key to awaken it Display hard to read Possible Cause The display contrast needs adjustment Solution 1 Press Options 2 Select Adjust the Contrast 3 Select Increase Contrast or Decrease Contrast to change the contrast level as necessary 4 Press Hom...

Страница 203: ...nsport release lever 1 4 turn to the left counter clockwise back to the home position horizontal NOTE To avoid jammed envelopes Make sure your envelopes meet our published specifications See Material Specifications Feed envelopes correctly See Running Mail Don t try to feed oversize envelopes through the machine Use tape strips instead Troubleshooting Pitney Bowes Operator Guide February 2017 Page...

Страница 204: ...is incomplete or streaked poor print quality Possible Cause Ink cartridge needs replacing Solution Replace ink cartridge see Replacing the Ink Cartridge for step by step instructions Possible Cause Print nozzles clogged Solution Perform a print purge needed see Purging the Print Heads for step by step instructions Troubleshooting Pitney Bowes Operator Guide February 2017 Page 204 of 226 ...

Страница 205: ...key in the postage value but does not function if the internal rating feature is used Canada Post Refund Guidelines For complete and up to date guidlines you can go to www canadapost ca and refer to How do I get a refund for spoiled meter impressions To qualify for a refund postage meter impressions must l be completely legible l be separated by denomination and by the postage meter number custome...

Страница 206: ...lease provide a detailed list of your spoiled meter impressions and return them to the nearest corporate Canada Post office If the amount is more than 200 00 the post office will fill out a receipt for the spoiled meter impressions and give you a copy for your records The post office will send a copy to Canada Post s head office The amount less the applicable fee will be credited to your meter man...

Страница 207: ...k If the sealant level is low add E Z Seal solution until it reaches the bottom of the fill hole see Filling the MoistenerTank Possible Cause Dry moistener brush Solution Try wetting the moistener brush If the brush drys out quickly replace the moistener wick see Cleaning the Moistener Wich and Holder Possible Cause Dirty moistener brush Solution Remove the moistener brush Clean it in plain water ...

Страница 208: ...Possible Cause Worn moistener brush Solution Replace the moistener brush see Cleaning the Moistener Brush Refer to Getting Help Troubleshooting Pitney Bowes Operator Guide February 2017 Page 208 of 226 ...

Страница 209: ...to do this 1 Press Options 2 Press Page Down twice 3 Select Advanced Features 4 Select Maintenance mode 5 Select View system info 6 There are various screens of information available about your machine Press Page Down to scroll through all the screens if needed 7 Press Clear back arrow key four times to return to the Home screen Troubleshooting Pitney Bowes Operator Guide February 2017 Page 209 of...

Страница 210: ...ct to the PB Data Centre l If you are connecting to the PB Data Centre through your PC with PC Meter Connect you need to verify that you are able to connect to the internet o To make sure you do not have problems with your internet connection refer to Internet Connection Troubleshooting o For possible issues with PC Meter Connect refer to Troubleshooting PC Meter Connect Troubleshooting Pitney Bow...

Страница 211: ...on of PC Meter Connect installed on the PC and that is connected to the meter 2 Review adjust the Internet Settings from within the PC Meter Connect application a Right click the PC Meter Connect icon in the system tray bottom right corner of the screen and select Internet Settings from the menu b Select Non Chunked as the HTTP Transfer Encoding Method c Select HTTPS as the Protocol If the option ...

Страница 212: ...eter but you can access www canadapost ca from your PC using Internet Explorer Solution 1 Review adjust the Internet Settings from within the PC Meter Connect application a Right click the PC Meter Connect icon in the system tray bottom right corner of the screen and select Internet Settings from the menu b Select Non Chunked as the HTTP Transfer Encoding Method c Select HTTPS as the Protocol d Cl...

Страница 213: ...t time make sure to download and install PC Meter Connect software Go to Downloading PC Meter Connect Desktop Application Internet Not Detected Make sure your PC has an active network connection Refer to Troubleshooting Your Internet Connection For more information refer to Network Specifications and Requirements for PC Meter Connect 10054 Full desktop application version of PC Meter Connect Socke...

Страница 214: ...he proxy settings Consult your IT manager and or refer to the Frequently Asked Questions section in Network Specifications and Requirements for PC Meter Connect USB Device Driver Not Found PC Meter Connect is not installed or PC Meter Connect is installed but the driver must be installed manually 1803 This indicates you may need to update your version of PC Meter Connect Troubleshooting Pitney Bow...

Страница 215: ...Go to the following test site http cometservp1 pb com t3cometserver asp o If a series of zeros are displayed such as 00000000 0000 0000 0000 000000000000 0 then web filtering is most likely not the issue o If you have a web filtering or firewall issue a specific message will display instead of a line of zeros If this is the case consider adding the Pitney Bowes servers to your Exception List If yo...

Страница 216: ...hin the PC Meter Connect application a Right click the PC Meter Connect icon in the system tray bottom right corner of the screen and select Internet Settings from the menu b Select Non Chunked as the HTTP Transfer Encoding Method c Select HTTPS as the Protocol If the option is greyed out select FTP Mode Passive as the Protocol Troubleshooting Pitney Bowes Operator Guide February 2017 Page 216 of ...

Страница 217: ...If it displays the internet connection is working 2 Run this test to determine if the problem is caused by security filters or firewall settings a Go to the following test site http cometservp1 pb com t3cometserver asp b If a series of zeros are displayed such as 00000000 0000 0000 0000 000000000000 0 then web filtering is most likely not the issue c If you have a web filtering or firewall issue a...

Страница 218: ...you that something needs attention an error message usually tells you about a system condition you can fix If you can not fix the issue with the website resources you may have to call for service or assistance Refer to Getting Help Troubleshooting Pitney Bowes Operator Guide February 2017 Page 218 of 226 ...

Страница 219: ...ist Error Code Description Action 1103 Your rate data modules may be out of sync Your downloaded rates are not effective until a future date or you may not have ordered the weight capacity and or the rating features for your meter 1 Unplug your power cord and wait one to three minutes 2 Plug your power cord back in ensuring that it is plugged directly into a wall outlet 3 Follow the Procedures for...

Страница 220: ...work communication problem Check your modem router and other network connections Refer to Troubleshooting Communications Problems Contact customer service if you are still having problems Refer to Getting Help 0815 You have a problem with your postage rates software Connect to the PB Data Centre and perform a Balance Inquiry Then follow the prompts Refer to Checking the Amount of Postage Available...

Страница 221: ...t head refer to Clean or replace the print head P20XX P21XX E25XX E22XX P2BXX These are system error codes and my require help from a Pitney Bowes engineer to diagnose and correct 1 Press Clear Back C If nothing happens in 5 seconds turn off the machine wait 15 seconds and turn the machine back on 2 If the error does not clear or the problem persists refer to Getting Help and contact customer serv...

Страница 222: ...App http pbdlsp1 pb com https pbdlsp1 pb com DLA File Downloads https dlsdlp1T pb com https dlsdlp1z pb com https dlsdlp1 pb com https dlsdlp1b pb com Hosted Web Server https pbwebconnect pb com Amazon App https s3 amazonaws com If you are using PC Meter Connect Distributor http distservp1 pb com https distservp1 pb com Comet Server http cometservp1 pb com US https cometservp1 pb com US http comet...

Страница 223: ...20 Glossary ...

Страница 224: ...technology that allows you to download machine features postal rates and system updates via a digital link Lock Code A four digit code that can be set up which acts as a password to gain access to the machine after it powers up or after it is awakened from a sleep mode Meter Stamp The imprint produced by the machine machine stamp or indicia Depending on your settings it may include The indicia inc...

Страница 225: ...e display after a certain period of idle time Pressing any key wakes up the display Standby Mode DM125 DM225 only The lowest power consumption mode that may persist for an indefinite time when the product is connected to an outlet and switched off at the back of the machine Standby is the product s minimum power mode Supervisor Password A four digit code that can be set up to protect unauthorized ...

Страница 226: ...This page intentionally left blank ...
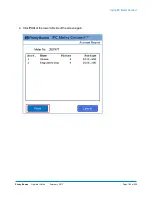
Отзывы: