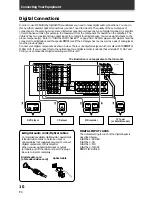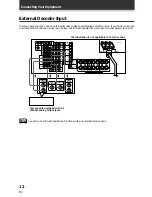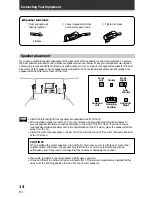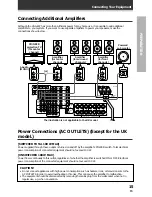
24
En
Initial Set Up
Setting Up the Remote Control
Since this remote is based on LCD screens, you should try and get used to the touch-sensitive nature of the
buttons as well as the way in which different screens control different operations. You can move between the
different screens with the function buttons on the left and right and/or certain buttons within each screen. The
EXIT button will always return the remote control to the previous screen. In the explanations below you must
complete the TOUCH PANEL ADJUSTMENT setup to use the remote control properly. After that you can adjust
various basic settings to suit your personal preferences.
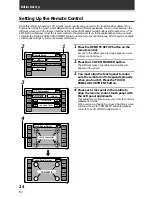
1
Press the REMOTE SETUP button on the
remote control.
Access to the different setup modes appear on your
remote control screen.
2
Press the LCD COMMANDER button.
The different types of possible adjustments will
appear on the screen.
3
You must align the touch panel to make
sure the remote control responds properly
when you touch it. Press the TOUCH
PANEL ADJUSTMENT button.
4
Press each cross point in the middle to
align the remote control touch panel with
the LCD panel underneath.
This adjustment will make sure your remote control is
calibrated correctly.
When you've touched all four cross points the screen
will show the word "COMPLETE" and automatically
return to the LCD COMMANDER screen.
AMP
DVD/LD
TV/SAT
VCR1
VCR2
REMOTE
SETUP
MD/TAPE1
CD
LINE/
TUNER
TV
CONTROL
Remote Setup
LCD
COMMANDER
MULTI OPERATION
DIRECT FUNCTION
PRESET RECALL
LEARNING
EXIT
2
1
AMP
DVD/LD
TV/SAT
VCR1
VCR2
REMOTE
SETUP
MD/TAPE1
CD
LINE/
TUNER
TV
CONTROL
LCD Commander
TOUCH PANEL
ADJUSTMENT
BEEP ON
LCD CONTRAST
EXIT
LCD TIMER :
10
SEC
3
AMP
DVD/LD
TV/SAT
VCR1
VCR2
REMOTE
SETUP
MD/TAPE1
CD
LINE/
TUNER
TV
CONTROL
Touch Panel Adjust
EXIT
TOUCH CROSS POINT
4
AMP
DVD/LD
TV/SAT
VCR1
VCR2
REMOTE
SETUP
MD/TAPE1
CD
LINE/
TUNER
TV
CONTROL
Touch Panel Adjust
COMPLETE
EXIT

