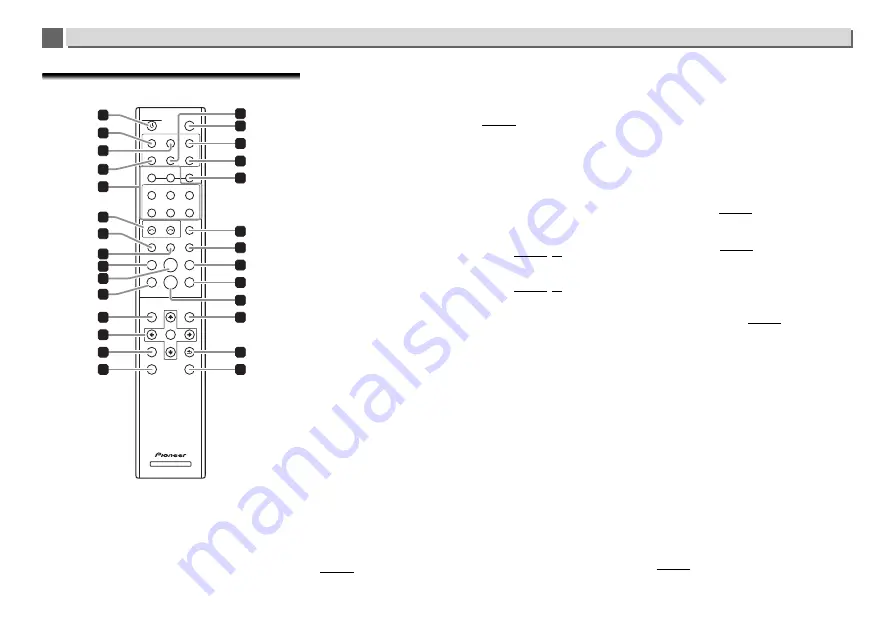
8
Controls and displays
1
1
Remote control
1
STANDBY/ON
This button operates when the unit’s main
/I
STANDBY/ON
button is set to
ON
. Each time this button is pressed, the
unit’s status alternates between
ON
and
STANDBY
modes.
2
DIRECT
Directly output the input signal.
3
Hi-Bit 32
Press this button to turn on the
SOUND
mode’s
Hi-Bit 32
function. Expands the dynamic range for digital audio signals.
Re-quantization of 16 bit to 24 bit audio as 32 bit produces
smoother and more detailed playback (page 30).
4
A.S.R
Used when turning the
Auto Sound Retriever
function on/
off.
5
Function buttons
Use to change the input source.
6
SOURCE SELECT
/
Switch the unit’s input source. Each press of the button will
cycle through input sources.
7
REPEAT
Perform repeat play of files on the selected iPod/iPhone, USB
storage device/External HDD or Music Server (page 15, 28).
8
SHUFFLE
Perform shuffle play of files on the selected iPod/iPhone, USB
storage device/External HDD or Music Server (page 15, 28).
9
Press to return to the beginning of the currently playing file.
•
Depending on the input function selected, it may not be
possible to return to the beginning of the currently playing
file.
10
Press to start playback. During playback, pause/unpause
playback.
11
Hold down to fast-rewind the file. Depending on the input or
file, you may not be able to fast-rewind.
12
TOP MENU
Display the top menu screen for each input.
13
///
Use these to select items, change settings and move the
cursor.
ENTER
Use this to implement the selected item or enter a setting
that you have changed.
14
SETUP
Use this to change the settings. This button is also used to
reinitialize unit settings as described in the section
Reset
(page 36).
15
CLEAR
Press to clear the selected item. Use this for example if you
input the wrong number.
16
A.L.C
Use when turning the
Auto Level Control
function on/off.
17
DISPLAY
Press to turn the display off when you do not need it. When an
action is performed on the unit, the display will automatically
light, then turn off again after ten seconds. Press the button
once again to cancel the Display OFF mode.
18
Up Sampling
Switch
Up Sampling
setting (page 30).
19
SOUND
Turns
Auto Sound Retriever
,
Auto Level Control
,
Hi-Bit 32
and
Up Sampling
on and off (page 30).
20
iPod CONTROL
Each press of the button will toggle display of music
information between the iPod/iPhone screen and the front
panel of the unit.
21
DIMMER
Adjust the brightness of the display (page 14).
22
SORT
Sort the order of tracks, when using Music Server input and
the DLNA server supports the sort function.
23
Press during playback to skip ahead to the beginning of the
next file.
24
Hold down to fast-forward the file. Depending on the input or
file, you may not be able to fast-forward.
25
Press to stop playback.
26
NOW PLAYING
When pressed while the track select screen is displayed and
during playback, will switch to the playback screen.
27
RETURN
Press to return to the previous screen.
28
+Favorite
When using Internet Radio or Music Server input, register a
favorite internet radio station or track on the media server to
your Favorites (page 26).
NETWORK AUDIO PLAYER
STANDBY/ON
DISPLAY
TOP
MENU
ENTER
SETUP
CLEAR
NOW
PLAYNG
RETURN
+
Favorite
DIRECT
A.S.R
iPod/USB
FRONT
MUSIC
SERVER
DIG IN 1
SOURCE SELECT
REPEAT
A.L.C
iPod/USB
REAR
NET
SERVICE
DIG IN 2
SHUFFLE
Up Sampling
Hi-Bit32
SOUND
iPod
CONTROL
FAVORITES
USB DAC IN
DIMMER
SORT
12
24
15
25
19
20
11
10
2
4
5
6
7
8
9
1
18
22
23
13
14
26
27
28
17
21
16
3


