31
Using other functions
8
8
Adjust the DAC lock range (N-70A only)
Use this function to make fine adjustments in the pursuit of
higher audio quality. Even using clock input with the same
jitter, incidental noise can be reduced and overall sound
quality increased by narrowing the lock range. However, if you
set the lock range too narrow, then an input signal with severe
jitter may release the lock and interrupt the audio or generate
noise. If that happens, expand the lock range again while
listening to the audio until you can hear it correctly. In regard
to the audio interruption or generation of noise when the lock
range setting is too narrow (aside from normal setting), this is
not covered by the unit’s guarantee of operation. Increase the
lock range setting so that the audio does not cut out. The unit
will remember lock range settings for each input.
•
The factory default setting is
Range 7
.
1
Press SETUP.
The
Initial Setup
screen is shown on the display.
2
Select Option Setting
Lock Range Adjust.
3
Use
/
to select the value you wish to set, then press
ENTER.
You can choose from one of 7 ranges.
Note
•
Please note that Range 1 – Range 3 are settings intended
for expert users, allowing for more detailed adjustment of
sound quality but also greatly increasing the frequency
with which audio may cut out. In particular, if you are
playing a series of tracks with different sampling
frequencies or bitrates, the audio may cut out depending
on the track.
•
Even if Up Sampling has been set and the sampling
frequency raised, sound will still be prone to dropouts.
•
If signal dropout occurs, try readjusting the lock range to a
wider value so that the sound appears normal. Narrowing
the width of the lock range setting (other than in normal
conditions) is considered outside the range of warranted
operation as regards signal dropout. In such cases, widen
the lock range setting until dropouts do not occur.
•
If you have selected anything other than Range 7, the L.R.A.
Icon will be shown on the display.
Switch digital filter (N-70A only)
You can perform separate settings for input signals
PCM
and
DSD
.
1
Press SETUP.
The
Initial Setup
screen is shown on the display.
2
Select Option Setting
Digital Filter.
3
Select either DSD or PCM.
4
Use
/
to select a setting, then press ENTER.
After selecting DSD
High frequency attenuation outside of the audible range
will be reduced, in order of settings
Mode 1
Mode 2
Mode 3
.
•
The factory default setting is
Mode 1
.
After selecting PCM
SHARP
: A harder sound, with a skeletal feeling
SLOW
: A soft and gentle sound
SHORT
: A sound that rises quickly and pushes forward
•
The factory default setting is
SLOW
.
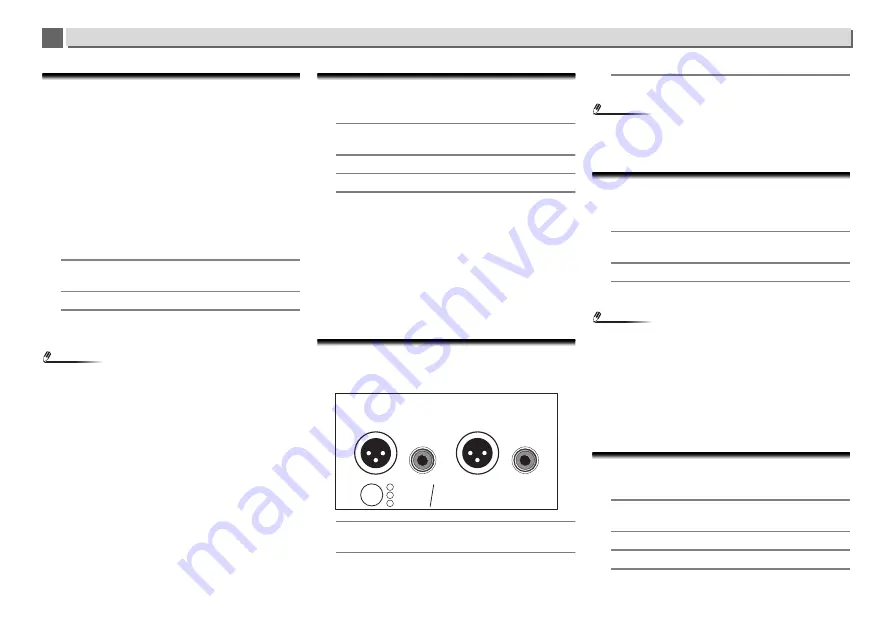
Set the phase (N-70A only)
Switch the phase for the balance output terminal.
•
The factory default setting is
2-HOT/3-COLD
.
1
Press SETUP.
The
Initial Setup
screen is shown on the display.
2
Select Option Setting
BALANCE OUT.
3
Use
/
to select either 2-HOT/3-COLD or 2-COLD/3-
HOT, then press ENTER.
Note
•
When
2-COLD/3-HOT
is selected when switching the
phase, the RCA output phase will reverse by 180°. When
connecting with an RCA connection, choose
2-HOT/3-
COLD
.
Toggle between output/settings output for
digital audio
Toggle between output and settings for digital audio.
•
The factory default setting is
On
.
1
Press SETUP.
The
Initial Setup
screen is shown on the display.
2
Select Option Setting
DIGITAL OUT.
3
Use
/
to select either On or Off, then press ENTER.
Note
•
Digital output, allowing for output of high quality digital
audio, can only be used when
DIRECT
mode is turned On.
•
When
DIRECT
mode is turned Off, turning this setting On
will also automatically turn
DIRECT
mode On.
•
During analog audio output, switching off the digital output
will suppress the effect that the digital noise has to the
analog circuit in terms of audio quality, resulting in a higher
quality audio playback.
•
When the
DIGITAL OUT
setting is turned
On
, the
DIGITAL
OUT
icon is shown on the display.
Language setting
Select the language used on the display.
•
The factory default setting is
English
.
1
Press SETUP.
The
Initial Setup
screen is displayed on the display.
2
Select ‘Option Setting’ from Initial Setup menu.
3
Select ‘Language’.
4
Use
/
to select the language to be displayed, then
press ENTER.
1 GND
2 HOT (
+
)
3 COLD (
−
)
GND
COLD (
−
)
HOT (
+
)
R
ANALOG OUT
L
1 2
3
DEFAULT SELECTED


