background image

11

Enjoying through External Equipment

71

En

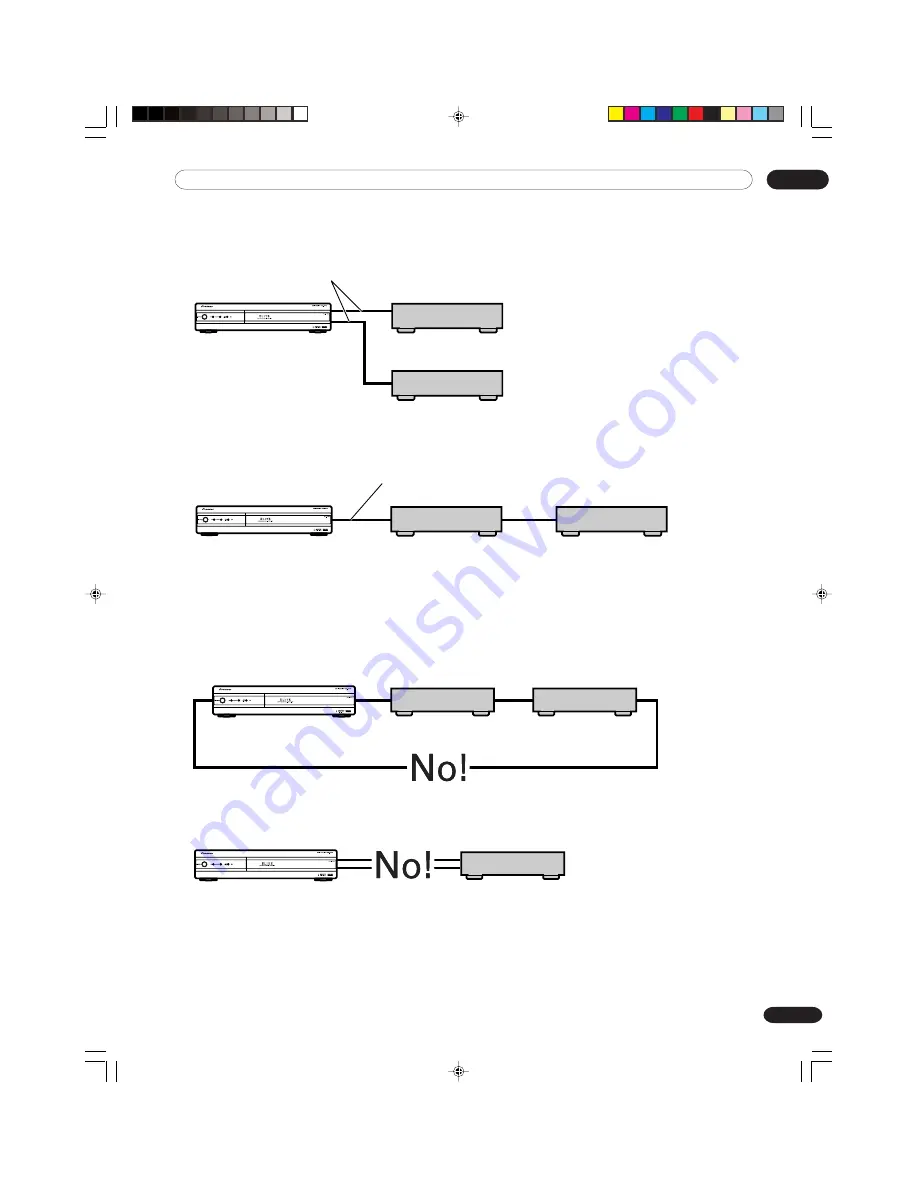
When connecting two D-VHS recorders

You can connect two D-VHS recorders directly to the
i.LINK terminals on the rear of the Media Receiver.

Using i.LINK cables you can also connect up to two
D-VHS recorders in a daisy chain.

Precautions about i.LINK connections

• Use S400 i.LINK cables that have 4-pin plugs and are

shorter than 3.5 m (11.48 feet).

• Some i.LINK devices cannot relay data when their

power is off.

• Do not make the following loop connections:

Media Receiver

D-VHS recorder

D-VHS recorder

Media Receiver

D-VHS recorder

Media Receiver

D-VHS recorder

D-VHS recorder

i.LINK cable

Media Receiver

D-VHS recorder

i.LINK cables

D-VHS recorder

 PDP-ELITE-Eng (65-80)

9/9/03, 11:46

71

Содержание Elite PureVision PRO 1110HD

Страница 1: ...PLASMA DISPLAY SYSTEM PRO 1110HD PRO 910HD Operating Instructions Register Your Product on www pioneerelectronics com PDP ELITE Eng Cover 9 9 03 11 42 1 ...

Страница 2: ...art apparatus combination to avoid injury from tip over Unplug this apparatus during lightning storms or when unused for long periods of time Refer all servicing to qualified service personnel Servicing is required when the apparatus has been damaged in any way such as power supply cord or plug is damaged liquid has been spilled or objects have fallen into the apparatus the apparatus has been expo...

Страница 3: ...ar installation If this equipment does cause harm ful interference to radio or television reception which can be determined by turning the equipment off and on the user is encouraged to try to correct the inter ference by one or more of the following measures Reorient or relocate the receiving antenna Increase the separation between the equipment and receiver Connect the equipment into an outlet o...

Страница 4: ...een 36 Freezing images 37 09 Basic Adjustment Settings Using the menu 38 AV mode menus 38 PC mode menus 39 Menu operation keys 40 Setting up conventional TV channels 41 Using Auto Channel Preset 41 Setting for skipping unwanted channels 42 Setting your favorite channels 43 Setting up digital TV channels 44 Using Auto Channel Preset 44 Setting for skipping unwanted channels 45 Checking signal stren...

Страница 5: ... mode only 81 Adjusting image positions and clock manually PC mode only 82 Selecting a screen size 83 Changing the brightness at both sides of the screen Side Mask 84 Sleep Timer 85 Closed caption for conventional TV channels 86 Activating the closed caption 86 Selecting the type of closed captions 86 Closed caption for digital TV channels 87 Activating the closed caption 87 Selecting the type of ...

Страница 6: ...ing image After using the Plasma Display System always switch the display to STANDBY mode Installation guidelines The Pioneer PureVision PRO 1110HD PRO 910HD Plasma Display System incorporates a very thin design To ensure safety please take the proper measures to mount or install the Plasma Display in order to prevent the unit from tipping over in the event of vibration or accidental movement This...

Страница 7: ... the still images and the time they had been displayed 2 After image lag image due to burning Avoid displaying the same image on the Plasma Display continuously over a long period of time If the same image is displayed continuously for several hours or for shorter periods of time over several days a permanent after image may remain on the screen due to burning of the fluorescent materials Such ima...

Страница 8: ...ck the cords at the plugs and product 13 The plasma Display used in this product is made of glass Therefore it can break when the product is dropped or applied with impact Be careful not to be injured by broken glass pieces in case the plasma Display breaks 14 Overloading Do not overload AC outlets or extension cords Overloading can cause fire or electric shock 15 Entering of objects and liquids N...

Страница 9: ...d to use the optional PIONEER mounting products PIONEER shall not be liable for any personal injury or product damage that results from the use of mounting items other than the optional PIONEER products Installation Precautions Observe the following precautions when installing with any items such as the optional stand When using the optional stand brackets or equivalent items Ask your dealer to pe...

Страница 10: ...nctions of the product may be adversely af fected Switch on and run the product occasionally Condensation Condensation may take place on the surface or inside of the product when the product is rapidly moved from a cold place to a warm place or just after a heater is switched on in winter morning for example When condensation takes place do not switch on the product and wait until condensation dis...

Страница 11: ...HD 1024 x 768 H x V pixels PureCinema TruBass FOCUS and SRS sound systems Dual TV Tuner Multi screen display 2 screen picture in picture Still image function 4 Language On Screen Display 4 Video Input and PC XGA Input 3 Component Video Input 2 i LINK interface Parental Control System V CHIP Power Saving Design PDP ELITE Eng 06 12 9 9 03 11 43 11 ...

Страница 12: ...oth Speed clamp x 3 Bead band x 3 Warranty card Speaker cushion x 3 Use when installing the optional speakers at the bottom of the Plasma Display Power cord 2 m 6 6 feet Remote control unit System cable 3 m 9 8 feet AA size battery x 2 Alkaline battery Stand Screw x 4 for stand Screw hole cap x 4 VCR controller x 1 1 8 m 5 9 feet Coaxial cable 0 15 m 0 49 feet x 1 Already set at the rear of the Me...

Страница 13: ...l sensor 1 2 4 3 5 6 7 8 right view 5 STANDBY ON button 6 INPUT button 7 VOLUME buttons 8 CHANNEL buttons 0 9 Rear view Front view 9 SYSTEM CABLE terminal BLACK 0 SYSTEM CABLE terminal WHITE SPEAKER right left terminals AC INLET terminal The terminals have faced downward PDP ELITE Eng 13 16 9 9 03 11 43 13 ...

Страница 14: ...or 4 REC TIMER indicator 5 INPUT 4 COMPONENT VIDEO terminals Y CB PB CR PR 6 INPUT 4 terminal S VIDEO 7 INPUT 4 terminal VIDEO 8 INPUT 4 terminals AUDIO 9 PC INPUT terminal AUDIO 0 PC INPUT terminal ANALOG RGB 1 2 3 4 6 7 8 9 0 5 Pull this section to open the door PDP ELITE Eng 13 16 9 9 03 11 43 14 ...

Страница 15: ... terminal Antenna B output terminal INPUT 2 terminal S VIDEO MONITOR OUT terminal S VIDEO MONITOR OUT terminal VIDEO MONITOR OUT terminals AUDIO INPUT 1 terminal S VIDEO INPUT 3 terminals AUDIO _ INPUT 3 COMPONENT VIDEO terminals Y CB PB CR PR SYSTEM CABLE terminal WHITE SYSTEM CABLE terminal BLACK I N SERVICE ONLY MONITOR OUT DIGITAL OUT OPTICAL INPUT 1 COMPONENT VIDEO S400 DTV ANTENNA IN INPUT 3...

Страница 16: ...e lighting will turn off if no operations are performed within about 5 seconds This button is used for performing operations in dark places ANT Selects the antenna A B See pages 24 to 26 for details 0 9 Sets the channel CH ENTER Executes a channel number VOL Sets the volume e MUTING Mutes the sound HOME MENU Displays the menu screen ENTER Executes a command DTV GUIDE Displays the DTV Electronic Pr...

Страница 17: ...trol unit Operate the remote control unit while pointing it toward the remote control sensor t located at the bottom right of the front panel of the Plasma Display The distance from the remote control sensor must be within 7 m 276 inches and the angle relative to the sensor must be within 30 degrees in the right left upward or downward direction When the remote control unit does not func tion prop...

Страница 18: ...ther device on top of the Media Receiver When installing allow enough space on the sides and above the Media Receiver Do not block the side cooling vents or the rear ventilation fan opening of the Media Receiver Over 10 cm 3 15 16 inches Over 5 cm 2 inches Over 5 cm 2 inches Over 5 cm 2 inches Over 5 cm 2 inches Over 5 cm 2 inches Over 10 cm 3 15 16 inches PDP ELITE Eng 17 27 9 9 03 11 44 18 ...

Страница 19: ...crews Shock absorbing pad You can remove the shock absorbing pads Keep the shock absorbing pads and screws They are required when you place the Media Receiver in the horizontal position Plug the screw holes using the caps provided When you have installed the Media Receiver vertically always use the accompanying stand If you place the unit directly on the floor the cooling vents will be blocked whi...

Страница 20: ...the system Connecting the system cable to the Plasma Display THESE SPEAKER TERMINALS CAN BE UNDER HAZARDOUS VOLTAGE WHEN YOU CONNECT OR DISCONNECT THE SPEAKER CABLES TO PREVENT THE RISK OF ELECTRIC SHOCK DO NOT TOUCH UNINSULATED PARTS BEFORE DISCONNECTING THE POWER CORD Connecting the system cable to the Media Receiver For details on optional PIONEER speaker installation refer to the speaker instr...

Страница 21: ...n the rear of the Plasma Display and snap 2 into the back of 1 to lock the clamp Speed clamps are designed to be difficult to undo once in place Please attach them carefully Use pliers to twist the clamp 90 pulling outward The clamp may deteriorate over time and become damaged if removed 1 2 Speaker cable Speed clamps Speaker cable Speaker cable Cable binders supplied with the stand Cable binders ...

Страница 22: ...use deformation of the unit The remote control unit may not work properly if the remote sensor window of the Plasma Display is under direct sunlight or strong lighting In such case change the angle of the lighting or Plasma Display set or operate the remote control unit closer to the remote sensor window Inserting batteries If the remote control unit fails to operate Plasma Display System function...

Страница 23: ...old and new batteries can shorten the life of new batteries or cause chemical leakage in old batteries Remove batteries as soon as they have worn out Chemicals that leak from batteries can cause a rash If you find any chemical leakage wipe thoroughly with a cloth The batteries supplied with this product may have a shorter life expectancy due to storage conditions If you will not use the remote con...

Страница 24: ...axial cable with an F type connector plug it into the antenna terminal at the rear of the Media Receiver Connecting a VHF UHF antenna I N A ANTENNA CABLE B OUT I N OUT Cable TV VHF antenna Cable Converter UHF antenna U V mixer The coaxial cable is already connected at the time of purchase Media Receiver rear Media Receiver rear Connecting a Cable Converter When making the above connections first r...

Страница 25: ...s via the two antennas you can select it by pressing ANT on the remote control unit While watching a broadcast press ANT to view the image received from the other antenna Pressing ANT while viewing in Dual Screen mode TV image and video image with TV selected will display the TV image of the other antenna Pressing ANT while viewing Dual Screen with two TV images displayed will not have any effect ...

Страница 26: ...ng for cable TV Be sure to connect coaxial cables as shown above Signal reception may fail if not properly connected I N A ANTENNA CABLE B OUT I N OUT DTV ANTENNA IN I N A ANTENNA CABLE B OUT I N OUT DTV ANTENNA IN U V mixer VHF antenna UHF antenna Splitter Digital tuner Analog tuner Media Receiver rear Media Receiver rear Splitter Cable TV Digital tuner Analog tuner The coaxial cable is already c...

Страница 27: ...he power cords Disconnect the power cord from the power outlet when the Plasma Display System is not going to be used for a long period of time I N SERVICE ONLY MONITOR OUT DIGITAL OUT OPTICAL INPUT 1 COMPONENT VIDEO S400 DTV ANTENNA IN INPUT 3 VCR CONTROL A ANTENNA CABLE B OUT I N I N OUT CONTROL OUT S VIDEO S VIDEO S VIDEO R AUDIO L R AUDIO L Y AC INLET BLACK WHITE SYSTEM CABLE R AUDIO L R AUDIO...

Страница 28: ... light up red and then press TV a on the remote control unit or STANDBY ON on the Plasma Display to turn the system on The POWER ON indicators on the Plasma Display and Media Receiver light up green In this manual system means the Plasma Display Panel and Media Receiver You can also reverse steps 1 and 2 POWER ON indicator POWER button STANDBY indicator Media Receiver POWER ON indicator POWER butt...

Страница 29: ...s recommended to place the system into the standby mode by pressing TV a on the remote control unit This allows the system to automatically receive Electronic Program Guide information signals in the standby mode Plasma Display Media Receiver status indicators Indicator Status System Status Plasma Display Media Receiver POWER ON STANDBY POWER ON STANDBY Power to the Plasma Display and Media Receiv...

Страница 30: ...ding on the connections to the antenna input terminals on the Media Receiver pages 24 to 26 Changing channels Using CH on the remote control unit Press CH to increase the channel number Press CH to decrease the channel number CHANNEL on the Plasma Display operates the same as CH Using CH RETURN on the remote control unit Press CH RETURN to switch the currently tuned channel to the previously tuned...

Страница 31: ...crease the volume press VOL To decrease the volume press VOL VOLUME on the Plasma Display operates the same as VOL Using e MUTING on the remote control unit e mutes the current sound output 1 Press e MUTING M appears on the screen 2 Press e MUTING again to cancel the mute mode Pressing VOL can also cancel the mute mode PDP ELITE Eng 28 37 9 9 03 11 44 31 ...

Страница 32: ...er MAIN or SAP sound MAIN sound The normal program soundtrack either in mono or stereo SAP sound Listen to second language supplemen tary commentary and other information SAP is mono sound If stereo sound is difficult to hear Obtain a clearer sound by manually switching to the MONO mode Once the MONO mode is selected the Plasma Display System sound remains mono even if the system receives a stereo...

Страница 33: ...nd signals In STEREO mode In SAP mode In MONO mode A 125 MAIN SAP A 125 SAP MAIN A 125 MONO SAP When receiving STEREO SAP sound signals In STEREO mode In SAP mode In MONO mode A 125 STEREO SAP A 125 SAP STEREO A 125 MONO SAP When receiving MONO sound signals In STEREO mode In SAP mode In MONO mode A 125 MONO A 125 MONO A 125 MONO PDP ELITE Eng 28 37 9 9 03 11 44 33 ...

Страница 34: ...he channel number CHANNEL on the Plasma Display operates the same as CH Using CH RETURN on the remote control unit Press CH RETURN to switch the currently tuned channel to the previously tuned channel Press CH RETURN again to switch back to the currently tuned channel Using 0 9 and dot on the remote control unit Select channels directly by pressing buttons 0 to 9 To select subchannels also use the...

Страница 35: ...ppears on the screen 2 Press e MUTING again to cancel the mute mode Pressing VOL can also cancel the mute mode Changing the language If you have selected a digital TV program that provides multi language services you can switch among the languages by pressing MTS on the remote control unit Each time you press MTS the language switches Switchable languages differ depending on the current broadcast ...

Страница 36: ...auses the following banner to appear WHD TV STEREO CC TV PG 35 01 6 00 6 45 PM JAN 1 Sat 5 10 AM 1 2 3 5 6 4 7 8 0 9 1 Station name 2 Channel number 3 Program time schedule 4 Program title 5 Date 6 Time 7 Appears if closed captions CC are available 8 Shows the parental control ratings 9 Shows available audio services 0 Information about the program The above information is not displayed if not inc...

Страница 37: ...en function cannot display images from the same input source at the same time If you make such an attempt a warning message appears When you press HOME MENU DTV GUIDE or DTV INFO the single screen mode is restored and the corresponding menu is displayed Freezing images Use the following procedure to capture and freeze one frame from a moving image that you are watching 1 Press FREEZE A still image...

Страница 38: ...n is performed for three hours 56 Sleep Timer Automatically places the system into the standby mode when the selected time elapses 85 Option Position Adjusts the vertical and horizontal positions of displayed images 81 Side Mask With the 4 3 screen size selected sets the brightness of the gray side masks that appear at both sides of the screen 84 Setup Channel Setup Sets up for conventional TV cha...

Страница 39: ...put between left and right speakers 53 Reset All audio adjustment settings return to the factory defaults 53 FOCUS Shifts the sound coming direction sound images upward and produces clear sound contours 54 Front Surround Provides three dimensional sound effects and or deep rich bass 54 Power Control Energy Save Saves power by decreasing picture brightness 55 Power Management Automatically places t...

Страница 40: ...ctions HOME MENU Press to open or close the Home menu Press to select a menu item For some menu items you can select parameters using these keys Press to select a parameter or adjustment level for menu items ENTER Press to proceed to lower menu levels For some menu items you need to press this key to complete selections RETURN Press to return to upper menu levels PDP ELITE Eng 40 56 9 9 03 11 45 4...

Страница 41: ...s to select Channel Setup and then press ENTER 4 Press to select Auto Channel Preset and then press ENTER 5 Press to select Antenna and then press to select A or B Auto Channel Preset Air Cable Preset Antenna Start Air A 6 Press to select Air Cable and then press to select Air or Cable Auto Channel Preset Air Cable Preset Antenna Start A Air 7 Press to select Preset Start and then press ENTER Auto...

Страница 42: ... to select Antenna and then press to select A or B Channel ADD DEL Channel Add Delete Antenna 2 Add A 6 Press to select Channel and then press to select a channel to be skipped Channel ADD DEL Channel Add Delete Antenna Add A 2 7 Press to select Add Delete and then press to select Delete Channel ADD DEL Channel Add Delete Antenna A 2 Delete 8 Press HOME MENU to exit the menu To restore skipped cha...

Страница 43: ...0 A 0 B 86 A 69 B 125 5 Press and to select a location where the TV channel is to be registered and then press ENTER Favorite Channel Current Channel B 86 A 1 69 B 2 86 B 3 125 A 4 69 B 86 A 0 A 0 B 86 A 69 B 125 6 Press ENTER to execute the registration Before pressing ENTER you can also change a TV channel to be registered Press to select ANT A or ANT B and then press to select a TV channel To c...

Страница 44: ...up and then press ENTER 3 Press to select DTV Channel Setup and then press ENTER 4 Press to select Auto Channel Preset and then press ENTER 5 Press to select Air or Cable Auto Channel Preset Air Cable Air Start 6 Press to select Start and then press ENTER Auto channel preset searching Please wait To cancel auto channel preset press RETURN PLASMA DISPLAY Channel search automatically starts 7 Press ...

Страница 45: ... 8 Press to select Delete Channel Add Del Add Delete Channel 120 001 Delete 9 Press HOME MENU to exit the menu To restore skipped channels use the above procedure except that you select Add in step 8 Checking signal strength When watching a digital TV program you can check its current signal strength 1 Press HOME MENU 2 Press to select DTV Setup and then press ENTER 3 Press to select DTV Channel S...

Страница 46: ... manually set the correct time again 1 Press HOME MENU 2 Press to select Setup and then press ENTER 3 Press to select Clock and then press ENTER 4 Press to select Clock Setting and then press to select Auto or Manual Clock Clock Setting Clock Set Channel Time Zone D S T Time Date 0 at ANT B ATLANTIC Adjust Off Auto 01 01 2003 SAT 12 30AM If you select Auto the date and time will be automatically c...

Страница 47: ... use auto channel select and preset TV programs for recording AV Selection AV Selection gives you five viewing options to choose from to best match the Plasma Display System environ ment which can vary due to factors like room bright ness type of program watched or the type of image input from external equipment 1 Press AV SELECTION Present AV Selection mode appears 2 Press AV SELECTION again befo...

Страница 48: ...u can set the mode for each input source For PC source Item Description STANDARD For a highly defined image in a normally bright room USER Allows the user to customize settings as desired You can set the mode for each input source 5 Press HOME MENU to exit the menu Picture adjustments Adjust the picture to your preference for the chosen AV Selection option except DYNAMIC 1 Press HOME MENU 2 Press ...

Страница 49: ...all the items press to select Reset in step 3 and then press ENTER A confirmation screen appears Press to select Yes and then press ENTER PureCinema Automatically detects a film based source originally encoded at 24 frames second analyzes it then recre ates each still film frame for high definition picture quality 1 Press HOME MENU 2 Press to select Picture and then press ENTER 3 Press to select P...

Страница 50: ...an manually adjust the color temperature using the following procedure 1 Select Manual in step 5 above and then press and hold ENTER for more than three seconds to display the manual adjustment screen 2 Press to select an item to be adjusted and then press ENTER 3 Press to select the desired level and then press ENTER Item button button R High For weaker red For stronger red G High For weaker gree...

Страница 51: ...d Standard DNR Low Moderate DNR 6 Press HOME MENU to exit the menu MPEG NR This eliminates mosquito noise from video images when a DTV channel is watched or a DVD is played resulting in noise free images 1 Press HOME MENU 2 Press to select Picture and then press ENTER 3 Press to select Pro Adjust and then press ENTER 4 Press to select MPEG NR and then press ENTER 5 Press to select the desired para...

Страница 52: ...tes the CTI 6 Press HOME MENU to exit the menu DRE Use the DRE Dynamic Range Expander to adjust dark and bright portions on images so that the contrast between brightness and darkness becomes clearer 1 Press HOME MENU 2 Press to select Picture and then press ENTER 3 Press to select Pro Adjust and then press ENTER 4 Press to select DRE and then press ENTER 5 Press to select the desired parameter an...

Страница 53: ... press RETURN and then repeat steps 5 and 6 You may press to immediately change an item to be adjusted 7 Press HOME MENU to exit the menu Sound adjustments Adjust the sound to your preference for the chosen AV Selection option See page 47 1 Press HOME MENU 2 Press to select Sound and then press ENTER 3 Press to select an item to be adjusted and then press to select the desired level Bass Balance T...

Страница 54: ...rich bass 1 Press HOME MENU 2 Press to select Sound and then press ENTER 3 Press to select Front Surround and then press to select the desired parameter Bass Balance Treble Reset FOCUS Front Surround 0 0 On 2 Sound STANDARD TruBass SRS Item Description Off Deactivates both the SRS and TruBass SRS Reproduces highly effective three dimensional sound TruBass Provides deep rich bass using a new factor...

Страница 55: ... when the input source is a PC No Signal off The system will be automatically placed into the standby mode if no signal is received for 15 minutes 1 Press HOME MENU 2 Press to select Power Control and then press ENTER 3 Press to select No Signal off and then press ENTER 4 Press to select Enable and then press ENTER No Signal off Disable Enable Item Description Disable Does not place the system int...

Страница 56: ...al is received from the personal computer 1 Press HOME MENU 2 Press to select Power Control and then press ENTER 3 Press to select Power Management and then press ENTER 4 Press to select Mode1 or Mode2 and then press ENTER Power Management Off Mode1 Mode2 Item Description Off No power management factory default Mode1 Places the system into the standby mode when no signal is received from the perso...

Страница 57: ...y set there may be TV programs whose EPG information is not displayed 7 00 PM 8 30 PM 1 01 1 02 3 01 4 01 4 02 ABC ABC CBS NBC NBC Program A Program F Program K 11 30pm 11 00pm 10 30pm 10 00pm 9 30pm Program N Program G Program H Program I Program J Program O Program P Program L Program M Schedule window Picture window Information window Schedule window OCT 25 MON 7 15pm A ABC CBS NBS NNNNNNN 1 01...

Страница 58: ...le of such a program and related information highlight a folded section and then press For programs whose title and or time information have not been acquired No Title appears Using the EPG Use the following procedure to check the schedule of digital TV programs view information about desired programs and or select programs to watch 1 Press DTV GUIDE The EPG screen appears Downloading EPG data now...

Страница 59: ... preset digital TV pro grams for watching later auto channel select record ing with a D VHS recorder or recording via a VCR controller Using auto channel select With the power to the system left on this function automatically selects the preset TV program when its on air time comes Then you will not miss watching an important TV program when you are enjoying another TV program 1 Press DTV GUIDE Th...

Страница 60: ... For priorities about overlapped presettings see Priority rules for overlapped presettings on page 63 Recording TV programs using a D VHS recorder Use the following procedure to preset TV programs for recording with a connected D VHS recorder 1 Press DTV GUIDE The EPG screen appears 2 Press and to select a program to be preset and then press ENTER Select a program not yet started A setup menu appe...

Страница 61: ... recorder specified for recording with a timer is not in connection Finish presetting operations two minutes before the start of the program otherwise presettings may fail For priorities about overlapped presettings see Priority rules for overlapped presettings on page 63 If you switch off the system using the POWER button the program presetting will become ineffective Be careful not to switch off...

Страница 62: ... Reservation Setting Program View Program Rec Recording Type ANALOG i LINK A dialog box for confirmation appears 5 Press to select OK and then press ENTER The program is preset and the schedule table is restored A red square icon appears for the preset program A black icon appears for overlapped presetttings 6 Press DTV GUIDE to exit the Program Guide Switch on the recording equipment at least 30 ...

Страница 63: ...before the start of the program Presettings made using the EPG are automatically shown in the schedule table For presetting made using the EPG E appears beside the channel number in the schedule table If you alter the presetting content E disappears For priorities about overlapped presettings see Priority rules for overlapped presettings on page 63 If you switch off the system using the POWER butt...

Страница 64: ...ing in progress started by program presetting for example to change the channel cancel the program presetting using the menu In this case you cannot cancel the program presetting using the EPG Using the menu Use the following procedure to change or cancel program presetings using the menu 1 Press HOME MENU 2 Press to select Rec View Timer and then press ENTER The schedule table appears Rec View Ti...

Страница 65: ...corder To view images coming from external equipment select the input source using the INPUT buttons on the remote control page 16 or the INPUT button on the Plasma Display Media Receiver rear view AV cable commercially available Component Video cable commercially available S Video cable commercially available To protect all equipment always turn off the system before connecting to a DVD player VC...

Страница 66: ...n the order where 1 S Video 2 Video Connect external equipment to only terminals that are to be actually used VCR I N SERVICE ONLY MONITOR OUT DIGITAL OUT OPTICAL INPUT 1 COMPONENT VIDEO S400 DTV ANTENNA IN INPUT 3 VCR CONTROL A ANTENNA CABLE B OUT I N I N OUT CONTROL OUT S VIDEO S VIDEO S VIDEO R AUDIO L R AUDIO L Y AC INLET BLACK WHITE SYSTEM CABLE R AUDIO L R AUDIO L Y CB PB CB PB CR PR CR PR V...

Страница 67: ...erminals that are to be actually used Component Video cable commercially available Displaying an image of the game console or camcorder To watch an image coming from the game console or camcorder press INPUT 4 on the remote control unit or press INPUT on the Plasma Display to select INPUT4 Enjoying a game console or watching camcorder images Connecting a game console or camcorder Use the INPUT 4 t...

Страница 68: ...ou can also record digital TV programs more easily by using the supplied VCR controller Connect the VCR controller to the VCR control terminal on the rear of the Media Receiver and then position the controller so that its light emitting section faces the remote control sensor on the recording equipment For more informa tion see page 78 Connecting a recorder About the MONITOR OUT terminals The MONI...

Страница 69: ...cal audio signal type Set up for the DIGITAL AUDIO output terminal OPTI CAL depending on your AV receiver 1 Press HOME MENU 2 Press to select DTV Setup and then press ENTER 3 Press to select Digital Audio Out and then press ENTER If your AV receiver does not have a digital audio input terminal optical connect the MONITOR OUT termi nals AUDIO on the rear of the Media Receiver to the audio input ter...

Страница 70: ...ions Media Receiver rear view i LINK cable commercially available D VHS recorder The function and performance are the same for both terminals I N SERVICE ONLY MONITOR OUT DIGITAL OUT OPTICAL INPUT 1 COMPONENT VIDEO S400 DTV ANTENNA IN INPUT 3 VCR CONTROL A ANTENNA CABLE B OUT I N I N OUT CONTROL OUT S VIDEO S VIDEO S VIDEO R AUDIO L R AUDIO L Y AC INLET BLACK WHITE SYSTEM CABLE R AUDIO L R AUDIO L...

Страница 71: ...sy chain Precautions about i LINK connections Use S400 i LINK cables that have 4 pin plugs and are shorter than 3 5 m 11 48 feet Some i LINK devices cannot relay data when their power is off Do not make the following loop connections Media Receiver D VHS recorder D VHS recorder Media Receiver D VHS recorder Media Receiver D VHS recorder D VHS recorder i LINK cable Media Receiver D VHS recorder i L...

Страница 72: ...s system to play back images and sound recorded on VHS tape S VHS tape or if with analog signals D VHS tape If this is the case connect the analog output terminals on the D VHS recorder to INPUT 1 2 3 or 4 terminals on this system See pages 65 to 67 This system supports the Digital Transmission Con tent Protection DTCP technology The DTCP is a copy protection technology that presents data coding a...

Страница 73: ...ist Delete All Name Maker Number Status 1 1 D VHS1 Connected 5 Press to select the D VHS recorder model to be operated and then press ENTER i LINK Setting Connect Rename Replace Delete D VHS1 Connected 6 Press to select Connect and then press ENTER 7 Press HOME MENU to exit the menu The following information appears at the right end of the i LINK list to indicate the connection status of the D VHS...

Страница 74: ... tape has been inserted Appears when the inserted tape has been write protected The inserted tape cannot be used for recording when this indicator appears Appears when the D VHS recorder has been preset for recording and is in the standby mode If no i LINK device has been connected No i LINK devices are connected appears If this is the case connect i LINK devices If none of the connected equipment...

Страница 75: ...le device 1 Press to select the desired device from the list and then press ENTER 2 Press to select Delete and then press ENTER i LINK Setting Connect Rename Replace Delete D VHS1 Connected A confirmation message appears A warning message appears if the selected device has been preset for recording with the timer or if its power is on If this is the case you cannot delete the device that you have ...

Страница 76: ...e following procedure to enable data transfer between multiple i LINK devices even when the system is in the standby mode 1 Press HOME MENU 2 Press to select DTV Setup and then press ENTER 3 Press to select i LINK Setup and then press ENTER 4 Press to select i LINK Standby and then press ENTER 5 Press to select Enable and then press ENTER i LINK Standby Disable Enable 6 Press HOME MENU to exit the...

Страница 77: ...compatible Refer to page 107 for a list of personal computer signals compatible with the Plasma Display System Media Receiver front view ø 3 5 mm stereo mini plug cable commercially available RGB cable commercially available Personal computer Displaying an image from a personal com puter When connecting to a personal computer the input signal type is automatically identified If the personal comput...

Страница 78: ...the VCR controller secure with the tape provided Remote control sensor Media Receiver rear view VCR or DVD recorder Use the following procedure to set the manufacture of the recording equipment 1 Press HOME MENU 2 Press to select DTV Setup and then press ENTER 3 Press to select VCR Control and then press ENTER 4 Press to select the manufacture of the recording equipment and then press ENTER 1 5 VC...

Страница 79: ...AR 1 HITACHI 1 2 MAGNAVOX 1 MITSUBISHI 1 7 RCA 1 6 SANYO 1 3 SONY 1 3 JVC 1 4 ZENITH 1 GRANDIENTE 1 AKAI 1 MATSUI 1 AIWA 1 ALBA 1 2 BUSH 1 THOMSON 1 BAIRD 1 TELEFUNKEN 1 Grunding 1 3 MARANTZ 1 2 GE 1 3 YAMAHA 1 4 CURTIS MATHIS 1 3 FUNAI 1 ADMIRAL 1 KENWOOD 1 3 NEC 1 2 WARDS 1 4 MEMOREX 1 2 JC PENNY 1 6 Some modes of the listed manufactures may not allow control through the VCR controller PDP ELITE...

Страница 80: ...als have been connected the remote control sensors on the connected equip ment do not accept commands from the remote control units Face the remote control units to the remote control sensor on the Plasma Display when operating the connected equipment Make sure that the power is turned off when making connections Complete all component connections before making control cord connections About SR Th...

Страница 81: ...and then press ENTER Adjustments are stored separately according to input source Adjusting image positions and clock automatically PC mode only Use Auto Setup to automatically adjust positions and clock of images coming from a personal computer 1 Press HOME MENU 2 Press to select Option and then press ENTER 3 Press to select Auto Setup and then press ENTER Option Auto Setup Manual Setup Auto Setup...

Страница 82: ...ss to select Manual Setup and then press ENTER 4 Press to select the item to be adjusted and then press ENTER Manual Setup H V Position Adjust Clock Phase Reset 0 0 5 Press and to perform adjustment Use only when you adjust the vertical position after selecting H V Position Adjust 6 Press HOME MENU to exit the menu To restore the factory defaults for all the items press to select Reset in step 4 a...

Страница 83: ...s WIDE In this mode pictures are progressively stretched toward each side of the screen PC mode except for XGA signals Item Description 4 3 Fills the screen without altering the input signal aspect ratio FULL Full 16 9 screen display Dot by Dot Matches input signal with same number of screen pixels PC mode for XGA signals Ex 1024 768 input at PRO 1110HD Item Description 4 3 Matches input signal wi...

Страница 84: ...ress HOME MENU 2 Press to select Option and then press ENTER 3 Press to select Side Mask and then press ENTER 4 Press to select the desired parameter and then press ENTER Side Mask Fixed Auto Item Description Fixed Always sets the same brightness for the factory default gray side masks Auto Adjusts the brightness of the gray side masks according to the brightness of images 5 Press HOME MENU to exi...

Страница 85: ...0 90 120 Off minutes The factory default is Off To cancel the Sleep Timer select Off by pressing SLEEP Five minutes before the selected time elapses the remaining time appears every minute You can also use the menu to set the Sleep Timer 1 Press HOME MENU 2 Press to select Sleep Timer and then press ENTER 3 Press to select the desired time and then press ENTER Sleep Timer Remain 90min Off 30min 60...

Страница 86: ...n If Mute and then press ENTER Setting Off On If Mute On Item Description Off Does not show closed captions factory default On Always shows closed captions On If Mute Shows closed captions only while sound is being muted 6 Press HOME MENU to exit the menu Selecting the type of closed captions CC 1 or CC 2 displays subtitles of TV dramas and news programs while allowing a full view of the picture T...

Страница 87: ... ENTER Setting Off On If Mute On Item Description Off Does not show closed captions factory default On Always shows closed captions On If Mute Shows closed captions only while sound is being muted 6 Press HOME MENU to exit the menu For MONITOR OUT only conventional closed caption signals are output digital closed caption signals are not output Selecting the type of conventional closed captions for...

Страница 88: ...rvice 2 if these services are available Selecting digital closed caption param eters Use the following procedure to change such param eters of digital closed captions as font size font type foreground and background colors 1 Press HOME MENU 2 Press to select DTV Setup and then press ENTER 3 Press to select DTV Closed Caption and then press ENTER 4 Press to select Digital Caption Setup and then pre...

Страница 89: ...e Yellow Magenta Cyan Background Opacity Auto Opaque Translucent Transparent Flashing 1 Font 1 default font Font 2 monospaced with serifs Font 3 proportionally spaced with serifs Font 4 monospaced without serifs Font 5 proportionally spaced without serifs Font 6 casual font Font 7 cursive font Font 8 small capitals font With Auto selected parameters specified by the provider are used if not specif...

Страница 90: ...over broadcasts accessed by their children It allows parents to select programs judged suitable for child viewing while blocking ones judged not suitable It does so automatically once you activate the V CHIP feature in your Plasma Display This tool functions for both conventional and digital TV channels The U S has two rating systems for viewing content TV Parental Guidelines and movie ratings The...

Страница 91: ...NU to exit the menu Example 1 Changing R from Block to View causes View to be automatically selected also for G PG and PG 13 Example 2 Changing R from View to Block causes Block to be automatically selected also for NC 17 and X Blocking Not Rated NR TV programs Use the following procedure to block movies not rated by the MPAA 1 Press HOME MENU 2 Press to select Setup and then press ENTER 3 Press t...

Страница 92: ...dian system you can chose either the Canadian English ratings or the Canadian French ratings Canadian English ratings Rating Description E Exempt Includes news sports documen taries and other information programming talk shows music videos and variety programming C Children Intended for younger children under the age of 8 years Pays careful attention to themes that could threaten their sense of se...

Страница 93: ...Press to select Parental Control and then press ENTER If you have set a password page 95 the password entry screen appears Enter your 4 digit password using buttons 0 9 4 Press to select Canadian English Ratings and then press ENTER 5 Press to select the desired rating and then press to select View or Block Canadian English Ratings C8 G C PG 14 18 View View View View View Block The factory default...

Страница 94: ...instead of entering the password the password entry screen disappears The password entry screen stays only for one minute Pressing ENTER causes the password entry screen to appear again Reactivating the V CHIP Block Executing one of the following procedures reactivates the V CHIP Block Method 1 Make a selection On or Off for Status under Parental Control in the menu See page 90 Method 2 Make a sel...

Страница 95: ... If you have set a password the password entry screen appears Enter your 4 digit password using buttons 0 9 The factory default is 1234 4 Press to select Change Password and then press ENTER 5 Enter a 4 digit password to be newly set using buttons 0 9 Change Password Please Input New Password Reconfirm New Password 6 Enter the same password that you have entered in step 4 using buttons 0 9 Change ...

Страница 96: ...t and hold it down for 3 seconds or longer The password reverts to 1234 Resetting the password 1 Press HOME MENU 2 Press to select Setup and then press ENTER 3 Press to select Password and then press ENTER The password entry screen appears Enter your 4 digit password using buttons 0 9 4 Press to select Reset and then press ENTER No Resets password PLASMA DISPLAY Yes 5 Press to select Yes and then ...

Страница 97: ...ame time The LED flashes 3 Press a button to be learned The LED lights up For the functions that can be learned see pages 100 to 105 When learning is finished the LED starts flashing again 4 Press EDIT LEARN again to exit the Learn mode To exit the Learn mode halfway press EDIT LEARN again If the Mode switch selection is changed when in the Learn mode the Learn mode is cancelled If no operation is...

Страница 98: ...ts up To exit the Edit mode halfway press EDIT LEARN again If the Mode switch selection is changed when in the Edit mode the Edit mode is cancelled If no operation is performed for more than one minute the Edit mode is cancelled When you enter a code not listed the LED flashes quickly If the table on page 99 does not include your desired manufacturer or the remote control does not work you can mak...

Страница 99: ... SAT SANYO KENWOOD LD 022 RCA2 SAT SANYO2 PANASONIC1 LD 023 SONY SAT SANYO3 PANASONIC2 LD 024 SHARP PHILIPS LD 025 SHARP2 RCA LD 026 SHARP3 SONY MDP 027 SONY BETA SONY LD 028 SONY VHS 029 SONY 8mm 030 TOSHIBA 031 JVC 032 JVC2 033 JVC3 034 JVC4 035 JVC5 036 ZENITH 037 MITSUBISHI J 3 038 SHARP J 2 039 PANASONIC J 3 040 TOSHIBA J 3 041 GRANDIENTE 042 AKAI 043 PIONEER2 044 SANYO4 045 MATSUI 046 AIWA 0...

Страница 100: ...ting See page 97 1 RECEIVER a STANDBY ON Turns the receiver power on and off 2 RECEIVER INPUT Selects the input source connected to the receiver 3 RECEIVER VOL Adjusts the receiver volume level Press VOL to increase the volume and VOL to decrease it RECEIVER eMUTING Allows the remote control unit to learn receiver s mute signal Use this button when the mode switch is set to a position other than T...

Страница 101: ...ess CH or CH to tune in a higher or lower channel 3 SOURCE a Turns the cable converter power on and off 4 CH ENTER Fix the selected channel with the direct channel selection buttons 5 CH RETURN Press to switch between the current channel and the channel you were watching immediately before Some manufacturers do not preset CH ENTER and CH RETURN Use these buttons to learn if neces sary CABLE and SA...

Страница 102: ... the button to select items on the SAT GUIDE screen or SAT MENU screen 4 SAT INFO When this button is pressed information on satellite broadcasting will appear Use this button to learn if necessary 5 SOURCE a Turns the Satellite broadcast tuner power on and off 6 CH ENTER Fix the selected channel with the direct channel selection buttons Use this button to learn if necessary 7 SAT MENU When this b...

Страница 103: ...reset can also be operated using the remote control unit if 1 to 8 have learned the functions See page 97 1 CH Press to select the channel of the TV tuner on the VCR 2 I PLAY Selects playback 3 S REW Rewinds the tape and allows picture search 4 SOURCE a Turns the power of the VCR on and off 5 F PAUSE STILL Sets pauses and still pictures 6 V FF Rapidly advances the tape and allows picture search 7 ...

Страница 104: ...of the tuner built in the DVD recorder 2 RETURN When the DVD menu is in display press to restore the immediately previous screen 3 I PLAY Selects playback 4 T CHAPTER SEARCH Pressing quickly once takes you to the start of the chapter currently playing Each time you press it you move back to the start of the previous chapter 5 S SCAN Continue pressing to go backward 6 SOURCE a Turns the power of th...

Страница 105: ...stops when pressing once With some DVD players or DVD recorders pressing the button twice may open the disc tray H REC STOP Press and hold E and then press this button to stop recording This operation is true of only Pioneer DVD recorders The DVD player or DVD recorder cannot be selected at the same time The color highlighted buttons on the remote control can learn the control signal from another ...

Страница 106: ...t in after 1 or 2 minutes Is the Mode switch set correctly Slide it to the TV setting position See page 16 Are batteries inserted with polarity aligned See page 22 Are batteries worn out Replace with new batteries See page 22 Operate the remote control unit while pointing it toward the remote control sensor on the Plasma Display See page 17 Are you using it under strong or fluorescent lighting Is ...

Страница 107: ...ution Frequency Remarks 720 400 70 Hz 640 480 60 Hz 65 Hz Macintosh 13 67 Hz 72 Hz 75 Hz 800 600 56 Hz 60 Hz 72 Hz 75 Hz 832 624 74 5 Hz Macintosh 16 1024 768 60 Hz 70 Hz 75 Hz Macintosh 19 1280 768 56 Hz 60 Hz 70 Hz PDP ELITE Eng 106 111 9 9 03 11 43 107 ...

Страница 108: ... system Circuit type Video signal detection PLL full synchronous detection PLL digital synthesizer system Tuner VHF UHF VHF 2 13ch UHF 14 69ch CATV 1 125ch Audio multiplex BTSC system Terminals Rear DTV Antenna 75 Ω UNBAL F Type for DTV in Antenna A 75 Ω UNBAL F Type for VHF UHF CATV in Loop out Antenna B 75 Ω UNBAL F Type for VHF UHF CATV in Loop out i LINK TS S400 2 INPUT 1 COMPONENT VIDEO in S ...

Страница 109: ...stered trademark of NEC Corporation The i LINK logo and i LINK are registered trademarks of Sony Corporation D VHS is a registered trademark of Victor Company of Japan Limited Apple and Macintosh are registered trademarks of Apple Computer Inc Microsoft is a registered trademark of Microsoft Corporation DDC is a registered trademark of Video Electronics Standards Association Power Management is a ...

Страница 110: ...PDP ELITE Eng 106 111 9 9 03 11 43 110 ...

Страница 111: ...PDP ELITE Eng 106 111 9 9 03 11 43 111 ...

Страница 112: ... PIONEER ELECTRONICS OF CANADA INC 300 Allstate Parkway Markham Ontario L3R OP2 Canada PIONEER EUROPE NV Haven 1087 Keetberglaan 1 B 9120 Melsele Belgium TEL 03 570 05 11 PIONEER ELECTRONICS AUSTRALIA PTY LTD 178 184 Boundary Road Braeside Victoria 3195 Australia TEL 03 9586 6300 PIONEER ELECTRONICS DE MEXICO S A DE C V Blvd Manuel Avila Camacho 138 10 piso Col Lomas de Chapultepec Mexico D F 1100...

Страница 113: ...About HDMI Quelques mots sur HDMI Acerca de HDMI PDP5040HD UC HDMI 8 22 03 10 48 1 ...

Страница 114: ...t of correspondence Using HDMI Input The INPUT 1 and INPUT 3 terminals include HDMI terminals to which digital video and audio signals can be input To use the HDMI terminal activate the termi nal and specify the types of video and audio signals to be received from the connected equipment For the types of these signals see the operation manual that came with the connected equipment Before starting ...

Страница 115: ...o signal types to be specified check the operation manual that came with the connected equipment To specify the type of audio signals 1 Press HOME MENU 2 Press to select Option and then press ENTER 3 Press to select HDMI Input and then press ENTER 4 Press to select Audio and then press ENTER 5 Press to select the type of audio signals and then press ENTER Setting Auto Digital Analog If you select ...

Страница 116: ...entrée HDMI Les prises INPUT 1 et INPUT 3 assurent les liaisons HDMI et peuvent recevoir des signaux d entrée audio et vidéo Pour utiliser la prise HDMI mettez cette prise en service et précisez le type des signaux audio et vidéo en provenance de l appareil relié Pour de plus amples détails concernant les signaux reportez vous au mode d emploi qui accompagne l appareil relié Avant d ouvrir le menu...

Страница 117: ...e signal vidéonumérique reportez vous au mode d emploi qui accompagne l appareil relié Pour préciser le type des signaux audionumériques 1 Appuyez sur HOME MENU 2 Utilisez pour sélectionner Options puis appuyez sur ENTER 3 Utilisez pour sélectionner Entrée HDMI puis appuyez sur ENTER 4 Utilisez pour sélectionner Audio puis appuyez sur ENTER 5 Utilisez pour sélectionner le type des signaux audio pu...

Страница 118: ...ción de la entrada HDMI Los terminales INPUT 1 e INPUT 3 incluyen terminales HDMI a los cuales pueden introducirse señales digitales de audio y vídeo Para utilizar el terminal HDMI active el terminal y especifique los tipos de señales de audio y vídeo que se van recibir desde el equipo conectado Para el tipos de señales consulte el manual de instrucciones que acompaña el equipo conectado Antes de ...

Страница 119: ...ificar consulte el manual de instrucciones que acompaña el equipo conectado Para especificar el tipo de señales de audio 1 Pulse HOME MENU 2 Pulse para seleccionar Opción y a continuación pulse ENTER 3 Pulse para seleccionar Entrada HDMI y a continuación pulse ENTER 4 Pulse para seleccionar Audio y a continuación pulse ENTER 5 Pulse para seleccionar el tipo de señales de audio y a continuación pul...

Страница 120: ...9120 Melsele Belgium TEL 03 570 05 11 PIONEER ELECTRONICS AUSTRALIA PTY LTD 178 184 Boundary Road Braeside Victoria 3195 Australia TEL 03 9586 6300 PIONEER ELECTRONICS DE MEXICO S A DE C V Blvd Manuel Avila Camacho 138 10 piso Col Lomas de Chapultepec Mexico D F 11000 TEL 52 55 9178 4270 FAX 52 55 5202 3714 Published by Pioneer Corporation Copyright 2003 Pioneer Corporation All rights reserved 03H...

Отзывы: