19
2.2.1
Replacing the Battery
Do not attempt to replace the internal rechargeable battery in the
penveu
system
. Battery
replacements must be performed by the manufacturer. For information about battery
replacement services go to
2.3
SET UP the penveu system
The
penveu system
can work with both Windows and Macintosh computers. Follow the steps
outlined in this section to install the
penveu system
to work with your computer and display.
2.3.1
SET UP the
veu
on a PC
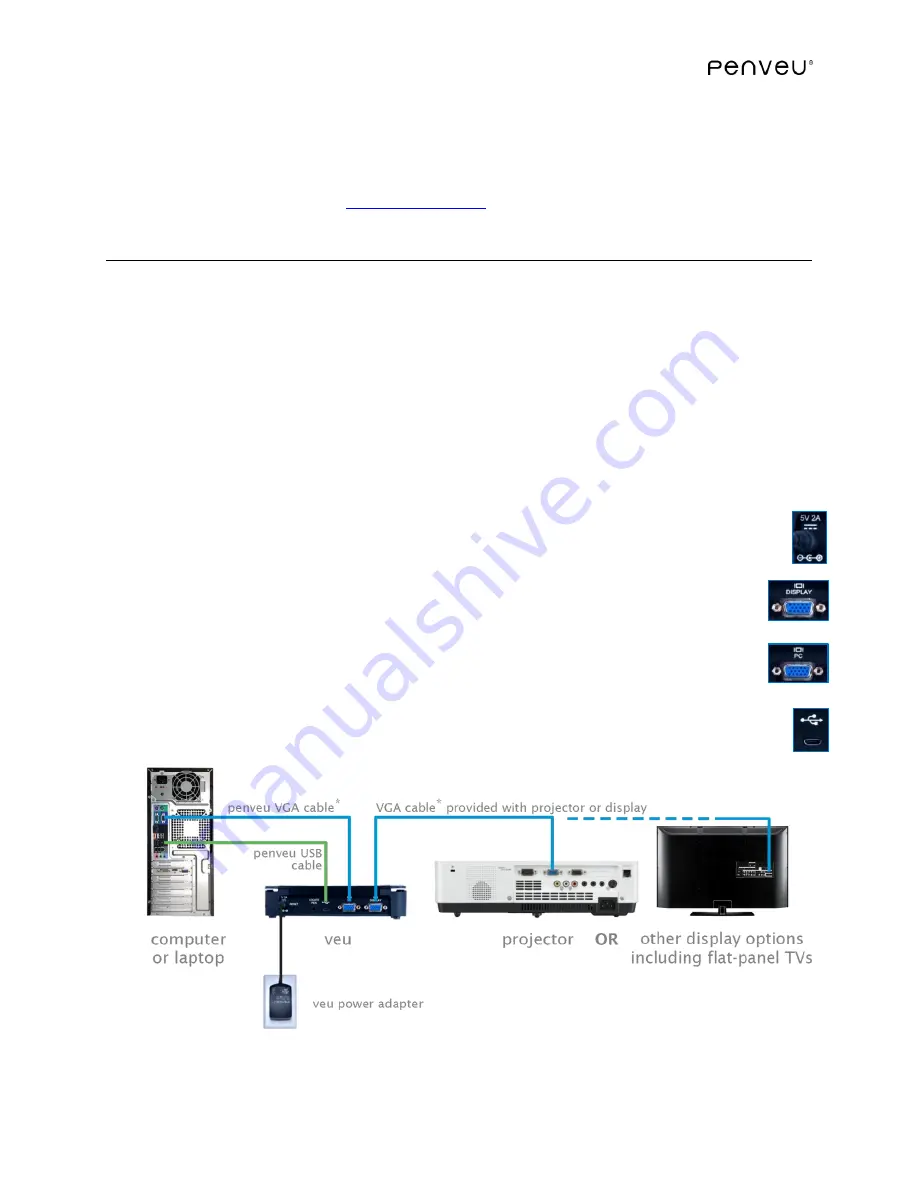
Use the diagram below as a quick reference guide to set up the
veu
with the computer source
and display. The blue lines illustrate where to connect the VGA cables. The green line illustrates
the USB cable connection.
Two VGA cables are required to set up the
penveu system
as shown below. One VGA cable is
included with your
penveu system
; the other VGA cable was provided with your projector or
display.
❶
FIRST
,
plug in the power adapter to the back of the
veu
and an electrical outlet. The
veu
must be plugged into a power supply when in use.
❷
Attach the VGA cable connected to your projector or display to the port on the back
of the
veu
labeled DISPLAY.
❸
Attach the VGA cable provided with the
penveu system
to the port on the back of
the
veu
labeled PC and the other end to the VGA port on the computer.
Insert the USB cable provided with the
penveu system
to the USB port on the back of
the
veu
and the other end to a USB port on the computer.
* Diagram is not drawn to scale.
❶
❷
❸
Содержание penveu32
Страница 1: ...November 11 2014 ...
Страница 4: ...4 ...
Страница 16: ...16 ...
Страница 29: ...29 Click on Arrangement Check Mirror Displays Disconnect and reconnect the Mini DisplayPort from the computer ...
Страница 39: ...39 ...
Страница 68: ...68 ...
Страница 75: ...75 ...


