8
1.5. Control Panel
1.5.1. Overview of control panel
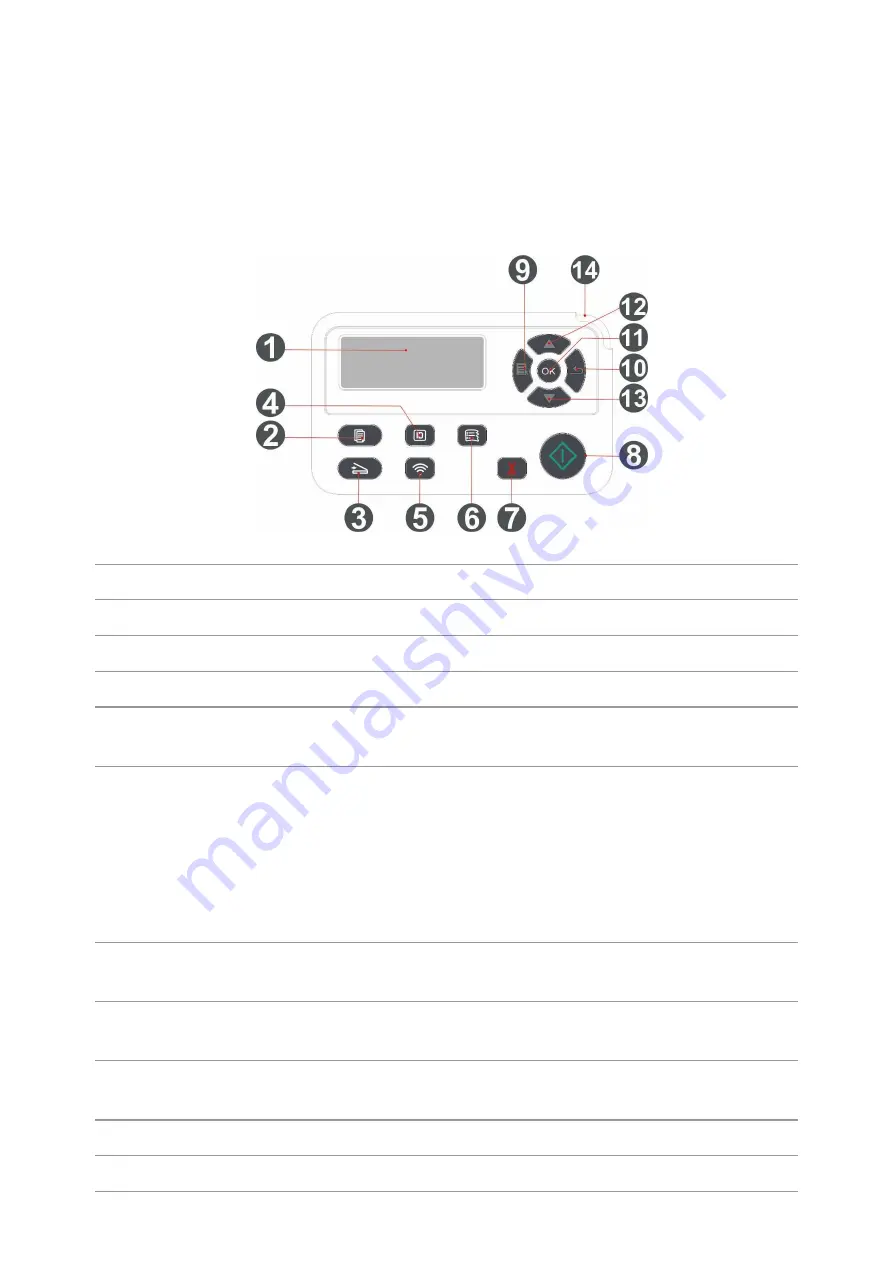
The layout of the printer control panel is shown below:
No. Name
Functions
1
LCD Display
Display operation interface and product information.
2
Copy Button
Press this button to enter into copy mode.
3
Scan Button
Press this button to enter into scan mode.
4
ID Card Copy
Button
Press this button to enter into ID Card Copy mode.
5
Wi-Fi button
Short press Wi-Fi button to turn on direct Wi-Fi connection of the printer and
automatically print out "Mobile Device Wi-Fi Connection Wizard" page (for
models with Wi-Fi function only).
Long press Wi-Fi button for over 2s to start WPS when Wi-Fi is not connected
or to disconnect Wi-Fi when it has already been connected (for models with
Wi-Fi function only).
Open save toner function(applicable to non-Wi-Fi model only).
6
Bill Copy
Button
Press this button to enter into Bill Copy mode.
7
Cancel
Execute cancel operation
Idle state interface under copy mode, to reset the "Number of Copies" to 01.
8
Start Button
This is used to start relevant operations after finishing operation settings.
In case of a feed failure, please press this key for pick-up and printing again.
9
Menu
Open the main menu of control panel
10
Back
Return to the previous menu.
Содержание BM5100 Series
Страница 125: ...110 3 After the window pops up click on Scan 4 Click on Open Scanner and the scan window will pop up...
Страница 150: ...135 6 Open the auto feed tray and wipe the pickup roller gently with dry lint cloth...
Страница 163: ...148 2 Gently pull the jammed paper out 3 Install paper tray...
Страница 166: ...151 1 Open the front cover and then remove the laser toner cartridge along the guide rail 2 Open the rear cover...
Страница 167: ...152 3 Open the fuser door using the handles on both sides 4 Gently pull the jammed paper out...
Страница 173: ...158 13 1 5 Paper jam of auto feed tray 1 Pull out the automatic tray 2 Gently pull the jammed paper out...
Страница 192: ......


