BA_PH_3V_EN_07-22.docx
50
17.6
Retighten the V-belt(s)
Switch off the machine during maintenance and repair work and secure it against being
switched on again unexpectedly! Lock the main switch with a padlock!
•
Turn off main switch (
1
) and lock it with a padlock.
•
Unlock the door safety switch for the lower door
according to section
11.2 and open the door.
•
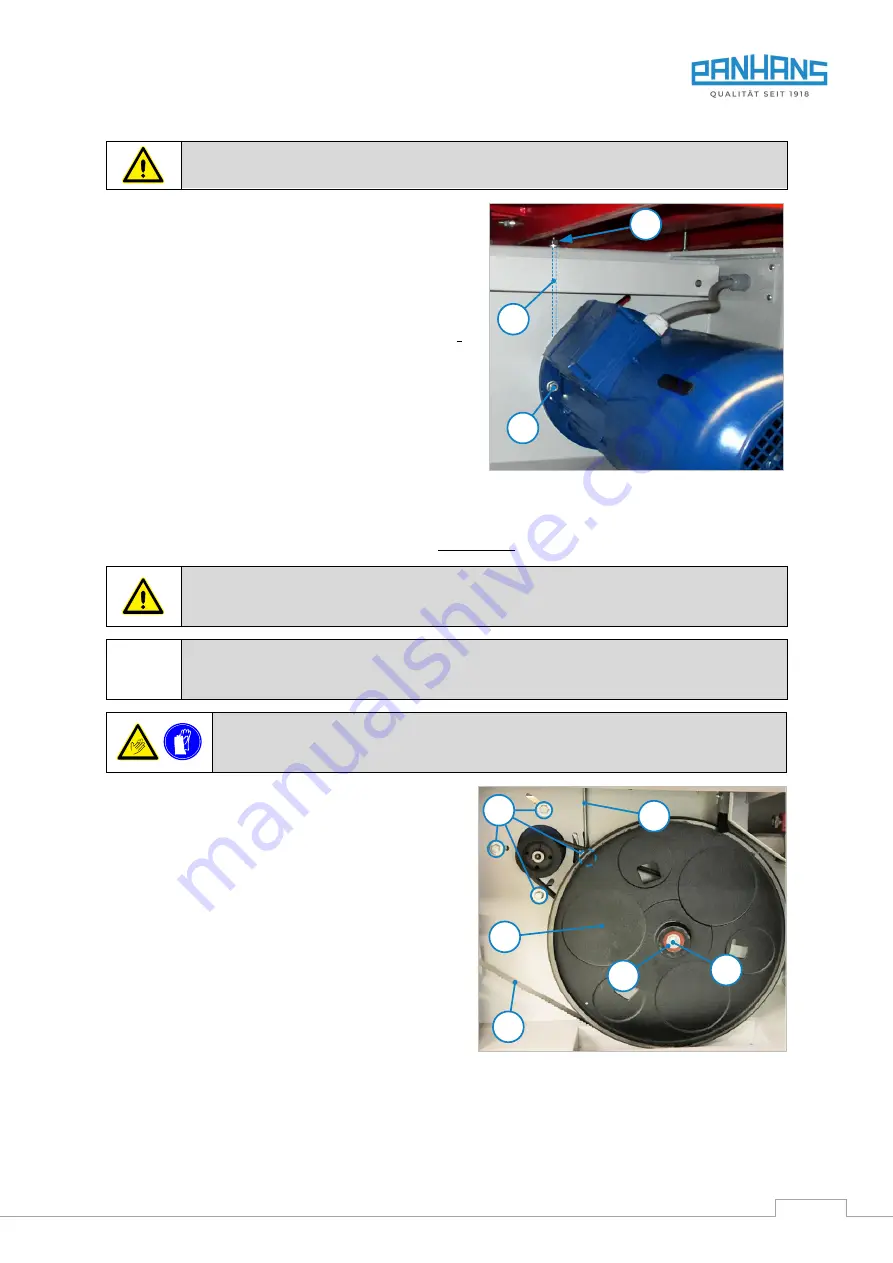
Slightly loosen the 4 screws (
M
) on the motor.
•
Tighten the tensioning nut (
S
) on the threaded rod
(
G
) with an open-ended spanner SW17 until the cor-
rect V-belt tension is achieved (see also
Checking the V-belt Tension:
It must be possible to push the belt(s) through by hand
between the two axles by approx. 10 mm.
•
Tighten the screws (
M
) on the motor again.
•
Close the lower bandsaw door again and lock it with
the safety switch (see
Figure 37: Retighten the V-belts
17.7
Replacing the V-belt(s)
The belt type for the two V-belts of the 3V bandsaw is
SPZ 1337 Lw
(Art. No.: 0345.6085).
Switch off the machine during maintenance and repair work and secure it against being
switched on again unexpectedly! Lock the main switch with a padlock!
Only V-belts with the same cross-section and length may be used. In the case of a V-belt change,
both belts must always be replaced together.
Cutting hazard! Wear protective gloves when handling the bandsaw blade!
•
Turn off main switch (
1
) and lock it with a padlock.
•
Unlock the three safety switches according to sec-
tion
11.2 open all three bandsaw doors.
•
Release the tension on the saw blade (
B
) and re-
move it (see procedure in section
•
Slightly loosen the 4 screws (
M
) on the motor.
•
Loosen the tensioning nut (
S
) on the threaded rod
(
G
) until the V-belt is loose.
•
Remove the hexagon head screw (
N
) and washer
(
U
) from the roller hub.
•
Gently pull out the lower bandsaw wheel (
R1
)
(please be careful, the wheel is very heavy!).
•
Remove belt(s) and insert new belt(s) in the pul-
ley(s) of the bandsaw wheel.
•
Tighten the belt(s) according to section
Figure 38: Replacing the V-belt(s)
•
Refit the lower wheel (
R1
) and reinsert the bandsaw blade.
•
Close doors and lock them with the safety switches (see
M
S
G
(4 pieces)
R1
U
N
M
B
G
Содержание 3V
Страница 2: ...BA_PH_3V_EN_07 22 docx 2 Space for notes...
Страница 4: ...BA_PH_3V_EN_07 22 docx 4 Space for notes...


