55
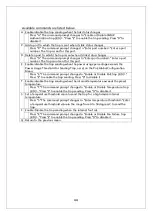
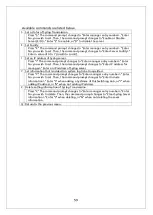
Available commands are listed below.
E Set Enable/Disable of access limitation via Telnet.
E Set access limitation from Telnet to Enable.
D Set access limitation from Telnet to Disable.
A Set an IP address to be permitted. Five ranges can be set up.
Press "A." The command prompt changes to "Enter IP address entry number>."
Enter an IP address entry number between 1 and 5. The command prompt
changes to "Enter IP address>." Enter an IP address to be permitted. If IP address
is correct, the command prompt changes to "Enter subnetwork mask>." Enter a
range of IP address you wish to permit accessing with subnet mask format.
(Setting example)
No.
---
IP Address
-------------
Subnet Mask
----------------
Access permitted IP Address
-----------------------------
1
192.168.1.10
255.255.255.255
192.168.1.10
(Only one unit can be accessed)
2
192.168.1.20
255.255.255.254
192.168.1.20, 192.168.1.21
(Two units can be accessed)
3
192.168.2.1
255.255.255.128
192.168.2.1 – 192.168.2.127
(127 units can be accessed)
4
192.168.3.1
255.255.255.0
192.168.3.1 – 192.168.3.254
(254 units can be accessed)
D Delete a range of IP address that has been set up.
Press "D." The command prompt changes to "Enter IP address entry number>."
Enter an IP address entry number you wish to delete.
M Change a range of IP address that has been set up.
Press "M." The command prompt changes to "Enter IP address entry number>."
Enter an IP address entry number between 1 and 5. The command prompt
changes to "Enter IP address>." Enter an IP address that has been set up. The
command prompt changes to "Enter subnetwork mask>." Enter a range of IP
address you wish to permit accessing with mask.
Q Return to the previous menu.
Содержание Switch-M12PWR
Страница 6: ...6 malfunction When stacking Switching Hubs leave a minimum of 20 mm space between them is required ...
Страница 17: ...17 Fig 2 2 Mounting to Wall ...
Страница 20: ...20 function does not work Therefore use a cross cable to connect them ...
Страница 28: ...28 command If you enter a command or setting not available an error message is shown in the explanation field ...
Страница 30: ...30 ...
Страница 36: ...36 ...
Страница 49: ...49 ...
Страница 69: ...69 ...
Страница 78: ...78 Quit to previous menu Quits the Advanced Switch Configuration Menu and returns to the Main menu ...
Страница 81: ...81 setting and the management VLAN status of VLAN ID 1 is UP ...
Страница 96: ...96 Press S Q Return to the previous menu ...
Страница 98: ...98 ...
Страница 122: ...122 Q Return to the previous menu ...
Страница 125: ...125 ...
Страница 130: ...130 ICMP Type Displays the ICMP type ...
Страница 136: ...136 802 1p Priority Displays priority of IEEE802 1p TCP SYN Flag Displays the TCP SYN flag ICMP Type Displays ICMP type ...
Страница 156: ...156 Threshold Displays the threshold of the number of packets per second ...
Страница 173: ...173 Fig 4 7 49 Display of values accumulated after resetting the counters ...
Страница 185: ...185 Q Return to the previous menu ...
Страница 211: ...211 Q Return to the previous menu ...
Страница 232: ...232 IEEE8021 PAE MIB IEEE802 1X IEEE8023 LAG MIB IEEE 802 3ad ...
Страница 237: ...237 IEEE 802 3af standard ...
Страница 240: ...240 P0813 1084 ...


