199
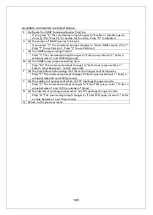
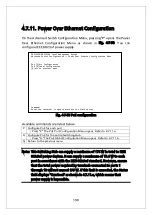
Available commands are listed below.
N Set the domain name.
Press "N." The command prompt changes to "Enter RRP Domain Name>." Enter a
name of the domain to be configured in 25 characters or less.
T Set the node role.
Press "N." The command prompt changes to "Enter RRP Node Type (M/T) >." Press
"M" to set the domain for a master node. Press "T" to set the domain for a transit
node.
P Set the primary port.
Press "P." The command prompt changes to "Enter RRP Primary Port >." Enter the
port number (1-10) you wish to set as a primary port.
S Set the secondary port.
Press "S." The command prompt changes to "Enter RRP Secondary Port >." Enter the
port number (1-10) you wish to set as a secondary port.
O Set the polling interval.
Press "O." The command prompt changes to "Enter RRP Polling Interval>." Enter a
value between 1 and 2 (seconds) as the polling interval.
F Set the timeout for polling.
Press "F." The command prompt changes to "Enter RRP Fail Period>." Enter a value
between 2 and 5 (seconds) as the timeout for polling.
S Set the control VLAN ID.
Press "S." The command prompt changes to "Enter Control VLAN ID >." Enter the
VLAN ID (2-4094) you wish to set as a control VLAN. When entering two or more
port numbers, separate them with a comma without a space, or use a hyphen for
consecutive numbers.
D Set the data VLAN ID.
Press "D." The command prompt changes to "Enter Data VLAN ID >." Enter the VLAN
ID (1-4094) you wish to set as a data VLAN. When entering two or more VLAN IDs,
separate them with a comma without a space, or use a hyphen for consecutive
numbers.
A Set a domain.
Press "A" to apply your settings.
Q Return to the previous menu.
Note: If you press "Q" (Quit) after setting a domain, your settings will not be
applied.
Be sure to press "A" (Apply) to apply your domain settings.
Содержание Switch-M12PWR
Страница 6: ...6 malfunction When stacking Switching Hubs leave a minimum of 20 mm space between them is required ...
Страница 17: ...17 Fig 2 2 Mounting to Wall ...
Страница 20: ...20 function does not work Therefore use a cross cable to connect them ...
Страница 28: ...28 command If you enter a command or setting not available an error message is shown in the explanation field ...
Страница 30: ...30 ...
Страница 36: ...36 ...
Страница 49: ...49 ...
Страница 69: ...69 ...
Страница 78: ...78 Quit to previous menu Quits the Advanced Switch Configuration Menu and returns to the Main menu ...
Страница 81: ...81 setting and the management VLAN status of VLAN ID 1 is UP ...
Страница 96: ...96 Press S Q Return to the previous menu ...
Страница 98: ...98 ...
Страница 122: ...122 Q Return to the previous menu ...
Страница 125: ...125 ...
Страница 130: ...130 ICMP Type Displays the ICMP type ...
Страница 136: ...136 802 1p Priority Displays priority of IEEE802 1p TCP SYN Flag Displays the TCP SYN flag ICMP Type Displays ICMP type ...
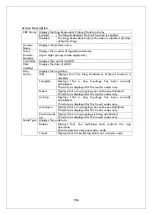
Страница 156: ...156 Threshold Displays the threshold of the number of packets per second ...
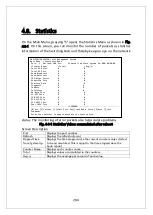
Страница 173: ...173 Fig 4 7 49 Display of values accumulated after resetting the counters ...
Страница 185: ...185 Q Return to the previous menu ...
Страница 211: ...211 Q Return to the previous menu ...
Страница 232: ...232 IEEE8021 PAE MIB IEEE802 1X IEEE8023 LAG MIB IEEE 802 3ad ...
Страница 237: ...237 IEEE 802 3af standard ...
Страница 240: ...240 P0813 1084 ...


